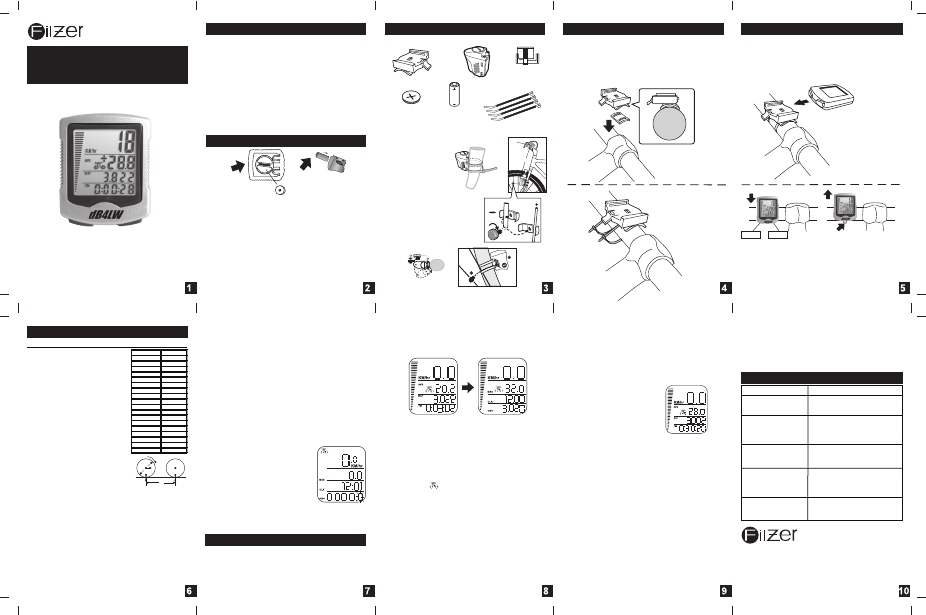
dB4LW Wireless Cycle
Computer Owner's Manual
Functions
Speedometer (0-99.9 Km/hr or M/hr)
Tripmeter (DST) (Up to 999.99 Km or M)
Odometer (ODO) (Up to 9999.99 Km or M)
Auto trip timer (TM) (9:59:59)
Maximum Speed (MXS) (up to 99.9 Km/Hr or M/hr)
Digital Clock, 12/24 hour Selectable
Average Speed (AVS) (0-99.9 Km/hr or M/hr)
Speed Comparator (+ or -)
Speed Tendency
Odometer Program Function
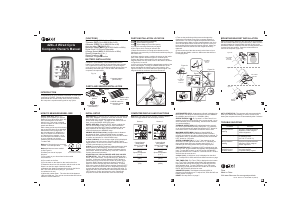
Figure 1
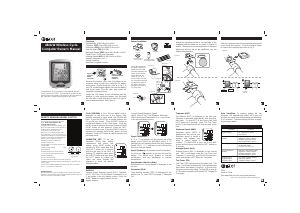
Computer
Battery
3V/CR2032
Figure 2
Transmitter Battery
12V/VR22
L1028/A 23
Remove the battery cover from the bottom of the
computer using a small coin. Install the 3V battery
with positive (+) pole facing the cover as in Fig. 1. If
the LCD shows irregular figures, take out the battery
and install again. This will clear and restart the
computer's microprocessor.
Install the 12V battery in the transmitter with the
positive (+) pole facing the battery cap. Re-install
the cap with a small coin and be sure it is tight to
ensure waterproofness. See Figure 2.
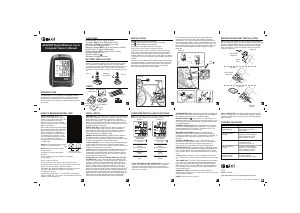
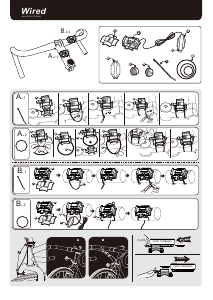
Sensor Installation
mounting
bracket
transmitter
magnet
computer battery
(3V/CR2032)
transmitter battery
(12V/VR22/L1028)
cable tie
Figure 3a
Figure 3b
Figure 3c
Figure 4a
Figure 4b
flat
spoke
normal
spoke
Clamp the magnet on
the spoke of the front
wheel with the screw
provided and attach the
sensor to the left fork
using cable ties as
shown in Fig. 3a, 3b
and 3c. Make sure the
arc of magnet intersects
the alignment mark on
the sensor with 2mm
clearance as shown in
Fig. 4a and 4b.
2mm max
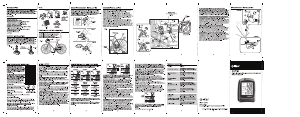
Attach the mounting bracket to the right side of the
handlebar with the cable ties as shown in Figure 5a
and 5b. Make sure the mounting bracket is clamped
tightly and will not slip on the handlebar, use the
rubber shim provided.
Figure 5a
Figure 5b
Figure 6
Slide the computer on to the mounting bracket until it
snaps firmly into position. Press the release button
to remove the computer as shown in Fig. 6.
computer
max 60 cm
Press and hold the LEFT and RIGHT buttons
for 4 seconds to access wheel size input
mode. Note all information in the
computer will be erased.
The digits on the bottom row will flash. The
value you need to enter in to the computer is
the Wheel factor. Wheel factor is the
circumference of the wheel in mm.
Note, there are no standard wheel sizes in
the cycling world - i.e. the circumference of a
700x23 tire will differ from one brand of tire to
another so for accurate speed and distance
values on your computer you need to
measure your wheel circumference.
To obtain wheel factor:
1) Fast (and not so accurate) method - use
chart provided.
2) Most accurate method:
a) See Figure 8.
b) Inflate you tires to its proper pressure.
c) Put a mark on your front wheel on the
outside circumference.
d) Put a mark on the floor.
e) Put the mark on the wheel on the mark on the floor.
f) Rotate the wheel one full revolution until the mark on the wheel is on
the floor again.
g) Measure the distance between the marks in mm. This is the wheel
factor (i.e. your wheel circumference).
Fig.8
C=distance in mm
per one turn
C
2
x
x
1
d
Km/Mile Selection
After the wheel factor input, the Km/Miles units for distance and speed
will flash. Press the RIGHT button to toggle between kilometer (KM) and
miles (M), press the LEFT button to confirm.
W hee l D iame ter d W hee l Fa ctor c
26 x 1 .0 191 3
26 x 1 .25 195 3
26 x 1 .4 200 5
26 x 1 .5 201 0
26 x 1 .75 202 3
26 x 1 .95 205 0
26 x 2 .0 205 5
26 x 2 .1 206 8
26 x 2 .3 217 0
700 x 18 207 0
700 x 20 208 6
700 x 23 209 6
700 x 25 210 5
700 x 28 213 6
700 x 30 217 0
27 x 1 " 214 5
27 x 1 1/8 " 215 5
27 x 1 1/4 " 216 1
HOW TO MEASURE WHEEL FACTOR
Clock (12H/24H): A 12 or 24 hour digital clock is
displayed on the third row of the screen. After
Km/mile selection in setup mode, the 12h/24h will
flash. Press the RIGHT key to toggle between the
12 and 24 hour format. Press the LEFT button to
confirm and advance to the clock mode. Press the
RIGHT button to advance the hours by one unit (hold
RIGHT button for fast advance). Press the LEFT
button to confirm hours. Press the RIGHT button to
advance the minutes (hold RIGHT button for fast
advance). Press LEFT button to confirm minutes and
exit setup mode.
ODOMETER SET: To set the
odometer (ODO) after battery
replacement and wheel size
setting, press RIGHT button to
advance to ODO mode and then
hold LEFT button for 5 seconds
until the last digit of the ODO is
flashing. TO adjust the value, press
the RIGHT button and then press
the LEFT button to confirm and
select the value. Repeat this
sequence to reach the desired
odometer value.
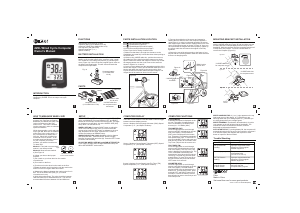
DISPLAY:
Current speed, Average Speed (AVS), Tripmeter
(DST), Trip Timer TM and Speed Comparator (+ or
-) are shown in the first display screen. Press the
RIGHT button to toggle between the two
display screens.
Current Speed, Maximum Speed
(MXS), Clock (CLK), Total Distance, Odometer
(ODO) and Speed Comparator (+ or -) are shown
in the second display screen.
Speed Comparator:
A "+" or "-" sign appears on the second row of the
display to the right of the AVG/MAX speed. A "+"
indicates you are traveling faster than your Average
Speed (AVS). A "-" indicates you are riding slowr
than your Average Speed.
Speed Tendency: (Acceleration and Deceleration)
A cyclist icon appears on the second row of the
display. The wheel turns forward to indicate
acceleration, and turn backwards to indicate
deceleration.
Speedometer: (Km/Hr or M/Hr)
Speedometer or Current Speed is displayed in the
top row.
Odometer: (ODO)
Total distance traveled (ODO) is displayed on the
bottom row. To reset ODO see page 7 Odometer
Set.
Tripmeter: (DST)
Trip distance (DST) is displayed on the third row.
Tripmeter is activated automatically with speedom-
eter input. To reset DST to zero press and hold
LEFT button for 2 seconds. Note, TM (Trip Time)
and AVS (Average Speed) will also be reset at this
time.
Maximum Speed: (MXS)
Maximum speed (MXS) is
displayed on the second row.
Maximum speed is stored in
memory and updates only
when a higher speed is
reached. To reset MXS to zero, go to the MXS
screen and then press and hold the LEFT button for
2 seconds.
Average Speed: (AVS)
Average Speed (AVS is displayed on the second
row. AVS is calculated using the Trip Timer and
Tripmeter. To reset AVS, go to the AVS screen then
press and hold the LEFT button for 2 seconds.
Trip Timer: (TM)
Trip Timer (TM) is displayed on the bottom row. Trip
Timer is activated automatically with speedometer
input (when front wheel is turning). It records only
the time spent actually riding. To reset TM to zero go
to TM screen and press and hold the LEFT button for
2 seconds.
Auto Start/Stop: To prolong battery life, the
computer will automatically switch off if the unit
receives no signal from the transmitter for more than
5 or 6 minutes. Computer display will turn on again
by pressing a button.
Congratulations on your purchase of the dB4LW wireless
cycle computer by FILZER. Packed with all the features that
a professional rider needs to keep track of during a workout,
this computer is a perfect training tool for any cyclist.
Filzer
Made in China
Visit www.filzer.com for more great products.
Art No.: BS-13-MOS-KSS-P3-GB-Filzer(db4LW)-R4
Problem
Inaccurate maximum
speed reading
No Speedometer
reading
Slow display response
No Trip Distance
reading
Display shows
irregular figures
or blank screen
Solution
Unknown atmospheric or
RF interference. Reset
Max Speed.
Temperature outside out
of operating limits
(32-125 ºF or 0-55 ºC)
Re-install computer battery
and verify that the
computer battery is good.
Improper magnet/transmitter
alignment. Check magnet/
tramitter alignment. Verify
transmitter batter is good.
Improper magnet/transmitter
alignment. Check magnet/
tramitter alignment. Verify
transmitter batter is good.
left
right
Press to
release
rubber
shim

Praat mee over dit product
Laat hier weten wat jij vindt van de Filzer dB4LW Fietscomputer. Als je een vraag hebt, lees dan eerst zorgvuldig de handleiding door. Een handleiding aanvragen kan via ons contactformulier.
beantwoord | Ik vind dit nuttig (0) (Vertaald door Google)