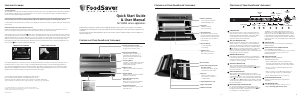
Care and Cleaning
To Clean Appliance:
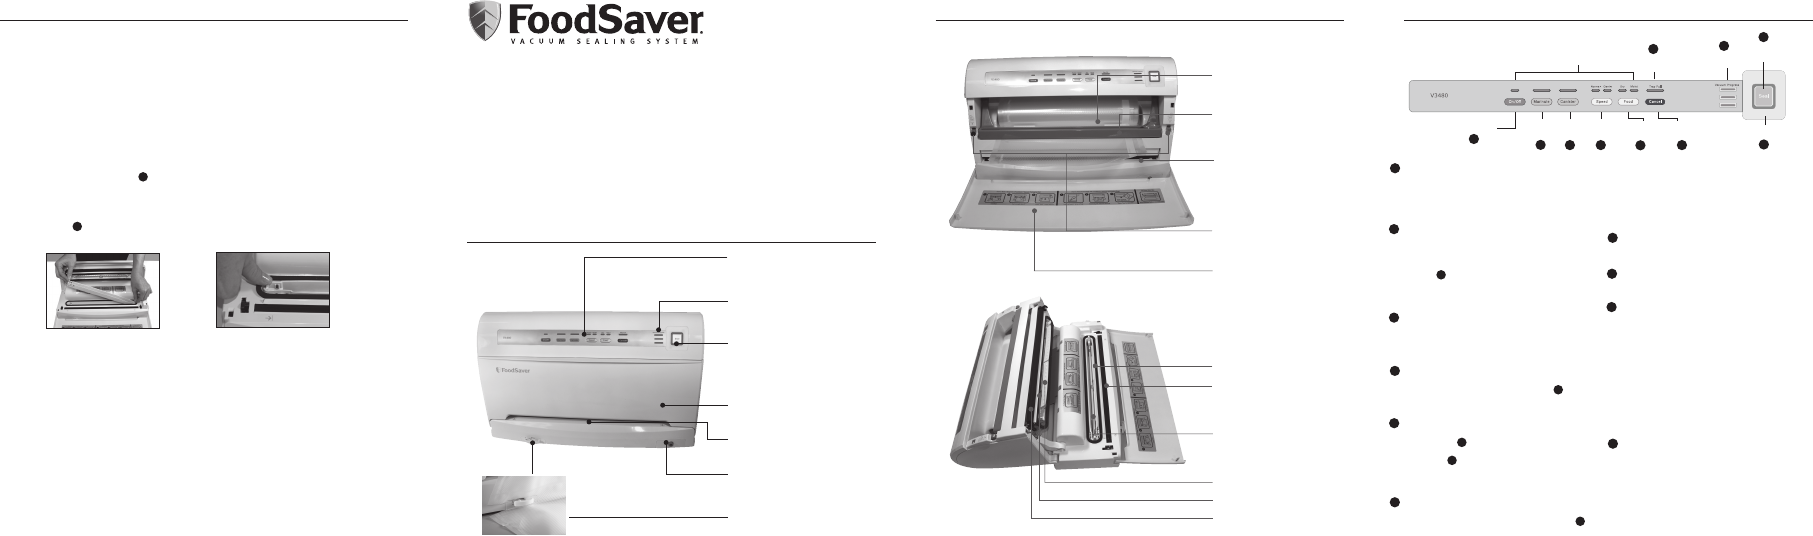
Unplug before cleaning. Open appliance door (D), while holding the appliance with two hands, press two Release
Buttons (K) with your thumbs, rotate appliance away from you, and allow appliance to rest on the counter.
Check Foam Gasket (M) around Drip Tray (O) and Upper Gasket (Q) which surrounds the Upper Bag Detection Tray (P)
to make sure they are free from food materials and the lower Foam Gasket is properly inserted into gasket channel.
For important product maintenance information and helpful tips, please refer to the FoodSaver
®
Reference Guide
included in your kit.
Antibacterial Drip Tray & Upper Bag Detection Tray
Empty Drip Tray after each use (See Fig. 7). Wash in warm soapy water or place in top rack of dishwasher. The Food
Sensors in the Drip Tray (O) will not function correctly if liquid is allowed to remain in Drip Tray.
This appliance has a Tray Full indicator 2 . When excess liquid fills the Drip Tray, the unit will turn off and the Tray
Full Indicator light will activate. To resume normal operation, open Appliance Door (D), press two release buttons
(K), rotate appliance away from you, and allow appliance to rest on the counter. Remove the Drip Tray, empty
liquid, clean Drip Tray and replace in housing. When replacing drip tray, set the right end of the drip tray into place,
then firmly snap the left side down (See Fig. 8). Appliance can be used without Drip Tray, however the Adjustable
Food Sensor setting 6 will not function without the Drip Tray.
Clean Upper Bag Detection Tray after each use. The Upper Bag Detection Tray (P) is removable for cleaning, remove
by lifting the tabs on each end. Do not pull on the Upper Bag Detection Flags to remove the Upper Bag Detection
Tray. Clean Upper Bag Detection Tray by washing in warm soapy water or placing in top rack of dishwasher. Upper
Bag Detection Tray MUST be inserted to use the appliance. Without the Upper Bag Detection Tray, your FoodSaver
®
Appliance will not detect bag when inserted in the Vacuum Channel (E). After cleaning, hold appliance with two
hands and rotate upright until the latches lock.
©2008 Sunbeam Products, Inc. doing business as Jarden Consumer Solutions.
All rights reserved. Distributed by Sunbeam Products, Inc. doing business as Jarden
Consumer Solutions, Boca Raton, Florida 33431. SPR-042108
Printed in China.
P.N.128166
T180-00460
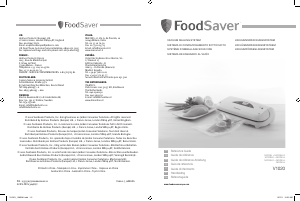
Features of Your FoodSaver
®
Appliance
(Note some features may vary slightly by model)
Quick Start Guide
& User Manual
for V3400 series appliances
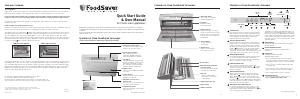
A. Controls and Indicator Lights
To indicate current setting, vacuum
progress and for added control.
B. Vacuum Progress Lights*
Lights signal progression of
vacuuming. All lights extinguish
when the full process is finished.
C. Seal Button
Red light illuminates to signal SEAL
function is selected. Press Seal any
time durring vacuuming to begin
the CrushFree
™
Instant Seal feature.
Prevents crushing delicate items.
D. Appliance Door
Opens to access Built-in Roll Holder
and Cutter.
E. Vacuum Channel
Simply insert bag and the FoodSaver
®
appliance does the rest.
F. Retractable Accessory Hose* /
Accessory Port
Accessory hose can be used with all
FoodSaver
®
Brand Accessories.
G. Integrated Bag Opener
Quick and convenient, opens sealed
bags with ease.
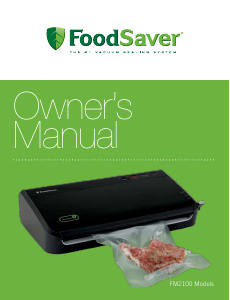
M. Foam Gasket
N. Extra-wide Sealing Strip with
Non-stick Coating
Provides extra secure, airtight
seal that’s two times wider.
O. Drip Tray
Catches overflow liquids
and contains Food Sensors
to detect liquid.
P. Upper Bag Detection Tray
Q. Upper Gasket
R. Rubber Seal Profile
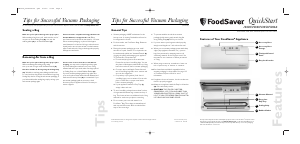
For important safety information and helpful tips, please refer to
the FoodSaver
®
Reference Guide included in your kit.
Questions? Visit us at www.foodsaver.com to get tips on vacuum sealing and
order FoodSaver
®
brand accessories, bags and rolls, or call 1-877-777-8042 (U.S.).
H. Built-in Roll Holder
For storage of FoodSaver
®
Vacuum Sealing Rolls.
I. Roll Cutter
Simplifies making
custom-sized bags.
J. Auto Bag Sensing
Simply insert open end of bag
into the vacuum channel and the
machine will sense and grasp the
bag, vacuum, seal and shut-off
automatically.
K. Release Buttons
To open appliance
for cleaning.
L. Appliance Door
Opens to access Built-in
Roll Holder and Cutter.
Power Button
Tray Full
Indicator
Marinate
Mode
Canister
Mode
Speed
Settings
Adjustable
Food Settings
Cancel
Button
Seal Indicator
Seal
Button
Vacuum
Progress Lights
Indicator
LEDs
Features of Your FoodSaver
®
Appliance
Features of Your FoodSaver
®
Appliance
4
8
10
Registering your appliance is quick and easy at www.prodregister.com/foodsaver. If you register on our website,
you will have the opportunity to receive special bag and accessory introductory offers. Refer to the registration card
in the box.
For more usage tips and safety information, please refer to the FoodSaver
®
Reference Guide or visit our website at
www.foodsaver.com.
1
2
3
5
6
9
7
1
2
3
4
5
6
7
8
9
10
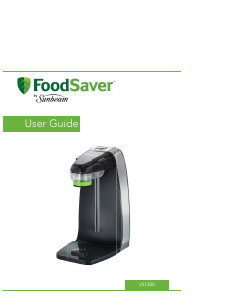
POWER BUTTON
Press the power button to begin. The Power Indicator,
Speed Indicator and Food Indicator lights will become
illuminated. After Vacuum Sealing, press Power Button
to turn appliance Off. Note: After 12 minutes, the
appliance will turn Off automatically.
TRAY FULL INDICATOR LIGHT
During the vacuum sealing process, small amounts of
liquids, crumbs or food particles can be inadvertently
pulled into the Drip Tray (O). When excess liquid fills
the Drip Tray, the unit will turn off and the Tray Full
Indicator 2 will activate. To resume normal operation,
remove the Drip Tray, empty liquid, wash in warm
soapy water or place in top rack of dishwasher. Dry and
replace Drip Tray in trough. (See Care and Cleaning)
MARINATE MODE BUTTON
A ten minute predetermined sequence of vacuum pulse
to rest ratio allowing foods to get optimum flavor
infusion in the least amount of time. See “Marinating
with your FoodSaver
®
” section on page 5.
CANISTER MODE BUTTON
Press to achieve best vacuum for canisters and
accessories. Push Canister Vacuum Button 4 to begin
vacuum process. Motor will run until Vacuum Sealing
Process is complete.
SPEED SETTINGS BUTTON*
When vacuum sealing delicate items, press Speed
Setting Button 5 so that the gentle speed indicator
light is illuminated. For more control you may press
Seal Button 9 at any time to stop vacuum and begin
automatic sealing process. Note: Appliance will default
to Normal speed upon pressing the Power On Button or
when power has been interrupted.
ADJUSTABLE FOOD SETTINGS BUTTON
For optimal vacuuming and sealing of moist or juicy
foods, press the Adjustable Food Setting Button 6
until the Moist Indicator Light is illuminated. Choose the
dry food setting for foods without liquid.
The Moist Food Indicator light will flash when Food
Sealing Sensors automatically detect any moisture or
liquid in the drip tray (O). Note: Appliance will default
to Dry setting upon pressing the Power Button or when
power has been interrupted, unless liquid is detected
in the Drip Tray. (See Care and Cleaning section of this
Quick Start Guide).
CANCEL BUTTON
Immediately halts the current function opening the
Vacuum Channel.
VACUUM PROGRESS DISPLAY
Displays vacuum levels as the bag/canister is
evacuated.
SEAL BUTTON
CrushFree
™
Instant Seal feature-
This button has four uses:
1. Press to immediately stop the vacuum process
and begin sealing the bag. This prevents crushing
delicate items such as bread, cookies and pastries.
2. Press to create a seal when making bags from a
FoodSaver
®
Roll.
3. Press to create a seal on Mylar bags (such as a
potato chip bag) to keep food sealed airtight.
4. Press during PulseVac
™
mode to seal bag.
SEAL INDICATOR LIGHT
Constant Red light indicates sealing process is
engaged. (Flashing light indicates error)
Fig. 7
Remove For Cleaning
Firmly Snap in Place
Fig. 8
* not available on all models
* not available on all models
2
3


Praat mee over dit product
Laat hier weten wat jij vindt van de FoodSaver V3400 Vacumeermachine. Als je een vraag hebt, lees dan eerst zorgvuldig de handleiding door. Een handleiding aanvragen kan via ons contactformulier.
beantwoord | Ik vind dit nuttig (0) Lees meer (Vertaald door Google)
Ik vind dit nuttig (1) (Vertaald door Google)
beantwoord | Ik vind dit nuttig (0) Lees meer (Vertaald door Google)
Ik vind dit nuttig (1) (Vertaald door Google)