
➋ ➌ ➍ ➎ ➏➊
12V Jump Starter
User Manual
MA21000
Thank you for choosing the Matson MA21000 12V Lithium Jump Starter.
Always follow basic safety precautions when using electrical appliances and
battery products.
Read all instructions carefully, and please keep this instruction manual for
easy reference.
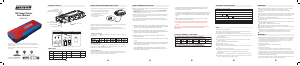
PRODUCT LAYOUT JUMP STARTER CHARGING INSTRUCTIONS
Please make sure to charge the jump starter after purchasing, and before your rst use.
The LED charge level indicator lights will ash one by one as the unit is charging. When
charging is complete, all indicator lights will turn o.
The MA21000 will retain a useful charge for up to 12 months, but it is highly
recommended to charge the unit every 3 months in order to maintain the battery in
optimum condition.
1) Plug the USB charging cable into the Home
AC Charger or any functioning USB output
port. The device will charge faster from a
Quick Charge output
2) Connect the micro-USB plug
into the MA21000
Charge Level Indicators:
Press the power button and the LED lights corresponding to the level of charge will
be illuminated
LED Lighting Modes:
Press and hold the LED button for 2 seconds until the light on the front of the Jump
Starter turns on. The LED button can be pressed briey again to cycle through the other
lighting modes – Steady, Strobe Flash, SOS and O.
Charging USB Devices:
Connect a USB powered device to either of the USB output ports, then press the power
button to start charging. The connected device should indicate it is charging. Once
charging is complete, the MA21000 will automatically turn o.
# Part Qty # Part Qty
1 Jump Starter 1 4 240V AC Adaptor 1
2
USB Cable 1 5 User Manual 1
3 Smart Jump Leads 1
PARTS LIST
!
Check your vehicle owner’s manual! Some vehicles have special requirements before
jump starting the vehicle.
!
If the vehicle battery is abnormally hot, smoking or swollen DO NOT ATTEMPT TO
JUMP START! Stop using the vehicle, do not attempt to charge, and remove the
battery from the vehicle if it is safe to do so.
!
Make sure the jump starter has at least 75% battery capacity remaining. Attempting
to start a vehicle when the jump starter has less than 75% capacity can potentially
damage the jump starter battery.
Prepare: Make sure there is no oxidation or dirt on the vehicle battery terminals. A dirty
connection will prevent maximum power being transferred to the vehicle and may result in
not being able to start the vehicle
1. Slide open the protective cover on the jump start housing and insert the
blue connector on the jump start leads. Make sure this connection is rm
and secure, and that the Starting Status Indicator LED is o.
2. Attach the jump start lead clamps to the vehicle battery, being very
careful to connect the red clamp to the positive (+) battery terminal and
the black clamp to the negative (-) battery terminal.
3. Immediately check the Starting Status Indicator LED for one of the
following conditions:
Green LED solid: The connection is correct and starter is ready – Start the
vehicle.
Red LED with alarm: The jump start lead clamps are connected in reverse
polarity, or there is a short circuit. Correct the connection and wait for a
Green LED, then start the vehicle.
Green LED ashing: Vehicle battery has very low voltage, press the
Boost button and wait for the Starting Status Indicator to show a solid
Green LED, then start the vehicle.
JUMP STARTING INSTRUCTIONS TECHNICAL SPECIFICATIONS
WARRANTY
Products developed and sold by Tridon Australia Pty Ltd come with a guarantee for the
reasonable life of the product, for the purpose it is commonly used. This is in addition
to the rights of the consumer under the Australian Consumer Law. To be considered
for warranty please take the product with proof of purchase to the store where you
purchased the product or contact Tridon Australia
The warranty is given by:
Tridon Australia, 21-25 Derby St, Silverwater, NSW 2128.
Tel: 1300 362 263.
Our goods come with guarantees that cannot be excluded under the Australian
Consumer Law. You are entitled to a replacement or refund for a major failure and
for compensation for any other reasonably foreseeable loss or damage incurred if the
product fails when used for the purpose for which it was intended. You are also entitled
to have the goods repaired or replaced if the goods fail to be of acceptable quality and
the failure does not amount to a major failure.
Tridon Australia will bear costs associated with claiming legitimate warranties. Proof of
expenses incurred must be submitted to Tridon Australia Pty Ltd.
WARNINGS
!
Always check that the battery clamps are connected in the correct polarity – RED
clamp to Positive (+) terminal, BLACK clamp to the Negative (-) terminal.
!
Always check that the battery clamps are well connected without any dirt or
corrosion.
!
DO NOT connect the jump start clamps to the vehicle battery in reverse polarity when
the Override function is engaged, this can damage the vehicle and the jump start unit.
!
DO NOT touch the two jump start clamps together when the Override function is
engaged, this can damage the jump start unit.
!
Remove the jump start clamps from the vehicle battery within 30 seconds after jump
starting the vehicle.
!
DO NOT attempt to jump start a vehicle more than 3 times. If this does not work, there
are other problems with the vehicle.
!
DO NOT modify or disassemble the jump start unit.
!
DO NOT immerse the jump start unit in water or allow it to become wet.
!
DO NOT operate the jump starter in explosive atmospheres, including in the presence
of ammable gases, liquids or dust.
!
If the jump start unit is damaged and the contents of the battery come into contact
with skin or eyes, rinse immediately with water and seek medical attention.
!
Please dispose of this jump start unit responsibly at the end of its service life.
FAQ
Q: How do I turn o the MA21000?
A: The Jump Starter will turn itself o automatically after a short period of inactivity.
Q: How many times can the MA21000 jump start a vehicle?
A: This depends on voltage, engine capacity and conditions, but as a guide it will start
12V passenger vehicles around 10 times. The bigger the vehicle and engine, the fewer
starts you will get.
Q: What will the MA21000 start?
A: This depends on the capacity and condition of the engine, but up to 3 litre diesel
engines is expected.
Q: How long does it take to fully charge the MA21000?
A: Approximately 5.5 hours.
Q: How long is the life-span of the MA21000?
A: About 3 to 5 years, depending on how frequently it is used and how well it is looked
after.
Q: How long does the battery hold charge?
A: The MA21000 can hold 70% of its rated capacity for up to 1 year. For optimum
performance and life-span we recommend you fully charge the jump starter
each 3 months.
Q: What happens if I use the MA21000 outside its recommended temperature ranges?
A: The MA21000 has thermal sensors and protections that will prevent its use when the
device exceeds its operating temperature ranges.
TOXIC AND HARMFUL SUBSTANCES
L E D f la s h l ig h t
Press the switch 3 seconds to start the LED flash light.
There are 4 modes of LED light appear in order (normal. strobe.
SOS. off) if you press slightly.
93*130mm 单黑,157铜,正反折页
1 2
E po w e r C h a r g in g I n s tr uc ti o n:
1. Plug the home adaptor into the universal socket.
2. Connect the Type-c connector to the EPOWER host.
B . O P E R AT IO N G U ID A N C E
In d i c ato r
Press the switch to check the storage level of Epower.
Indicator Unlit 1 solid 2 solid 3 solid 4 solid
torage level
S 0% 25% 50% 75% 100%
U S E R M A N U A L
Thank you for choosing the EPower! Always follow basic safety
precautions when using electri cal appliances. Read all
instructions carefully, Please keep this instruction manual for
easy reference.
A . P R O DU C T L AY O U T:
The indicator will flash one by one during the period of charging.
Different number of solid indicators show different storage level
of EPower. All indicators light off when the charging is paused or
completed.
1 3 4
Jump start socket
Indicator
Switch
LED Flash Light
2
IN 5V/9V 5V 1A 5V 2.1A
E . 常:
1、:如何关移源?
答:品有智能功能,一旦没有,或者子品充束,移
源会自休眠,保存量,以免流失。
2、:E P O W E R 主机充需要多?
答:通快充入需要5 .5个小左右就可以完全充。
3、:E P O W ER 能手机充几次?
答:取决你的手机池的容量大小,以I p h o n e 6例,可以充9次左右。
4、:E P O W ER 能启2 . 0 L汽油多少次?
答:可以启汽5 0次左右。
5、:E P O W ER 的寿命是多?
答:正常使用情况下可以用3 - 5年。
6、:E P O W ER 充不用,存放多久能启汽?
答:E P O W E R 路很科学,不使用存放6 - 12个月都没,但了
延使用寿命,建每3个月充一次。
象 原 因 操 作
触开关按,
EP O W E R 没有任何反
由于E P O W E R低,低保
功能启,切断路
将充插插入快充入
口激活
G . 品中有毒有害物或元素的名称及含量
多功能汽/ 机 急启源 O O O O O O
O :表示有害物在部件所有均材料中的含量均在2 00 2/ 9 5 / EC (R oH s )准定的限量要求以下。
有毒有害物或元素
品名称 (P b) 汞 (H g) (C d)
(C r( V i) ( PB B) ( P BD E)
六 价鉻 多 溴苯 多 溴二苯
F . 故 障排除
如果以下“ 操作” 无法排除您的故障,停止使用E P O W E R 并系
品的商店.
品型号 出 厂号
日期 修日期
客姓名 系
客地址
售位
品异常象描述
本品客提供自之日起 个 月内的保修服
保修卡
保障条件: 需 要保修服,出示本保修卡,并尽填写相关内
容。本公司向品用提供从品之日起 个 月的保期。
保修范:
1、在正常使用的状下出品量。
2、如因操作失造成品的害,不在保修范。
3、自行拆机后,不予保修。
4、撕的机器,不予保修。
不在保修范内的品,我司可提供修服,修用需由客承
担。
4 5 6 7
G . T O X I C A ND H A R MF UL S UB S TA NC E S :
O:Indicate all homogeneous materials' hazardous substances content are
below the MCV limit specified in the Standard 2002/95/EC(RoHs).
Composition and amount of toxic and harmful substances in EPower.
Pb Hg Cd Cr( Vi) PBB PBDE
O O O O O O
E . FA Q :
Q. How to turn off this appliance?
A. This appliance will power off automatically when no load or charging is
complete
Q. How long time to full charge the EPOWER?
A. Approx. 5.5 hours through the Quick Charge input port.
Q. How many times can this appliance charge for my cell phone?
A. Depend on the battery capacity of your cell phone. Take iPhone6 as an
example, can full charging 9 times.
Q. What's the lifetime of EPOWER?
A. Usually 3-5 years in normal condition.
Q. How long the storage of battery will remain?
A. 6-12 months, however, we suggest to recharge it every 3 months.
Q. How
many times can this appliance jump start the 2.0L vehicle if it is in full battery?
A. Approx. 50 times.
F. T R O U B L E S H O O T IN G :
Finding Cause Remedies
No response when
pressing the switch
button.
Low voltage protection of
EPower is started.
Plug the adaptor into the
Quick Charge input port to
activate.
I. WA R R A NT Y I N F O R MA T IO N :
1.We offer a limited warranty for this product against any defects
in material and workmanship for a period of 6 months from the
date of purchase by the end user/consumer. The conditions of
the warranty are as follows:
2.The warranty is only valid upon presentation of the original
receipt (from dealer/retailer) by the original purchaser with the
product to be repaired or replaced.
3.The warranty is void if the serial n
umber, date of purchase and
label has been removed.
4.The warr
anty does not cover damage or product failure
resulting from normal wear and tear, physical abuse, improper
installation, misuse, modification or repairs by unauthorized
third parties.
5.We do not assume responsibility for any loss or damage
incurred during shipment or as a result of a force majeure.
6.We are not liable for any incidental or consequential damages
arising from the use or misuse of this product.
7.All warranty claims are li
mited to repair or replacement of the
defective product and a
t the sole discretion of us.
8.If we repair or replace the product, the product will be covered
for the remaining time of the original warranty period. Repair or
replacement may involve the use of reconditioned units which
are equivalent in function. Replaced part or product becomes
the property of us.
9.Consumable components such as batteries are not covered by
the warranty.
Fu se P r ote ct io n
O ve rc h arg e a n d
O ve rd is ch arg e P r ote ct io n
A ga i ns t- re v er s e P l u g
A p p li e d S t an d a rd :G B / T 1 8 2 8 7 - 20 0 0
5 6 7
C . P A R T S L IS T:
# Parts Name Quantity
1 Host 1
2 Home adaptor 1
3 Switch cable 1
# Parts Name Quantity
4 Intelligent jumper cable 1
5
User Manual 1
5 V 1A O u tp u t p o r t
St a r ti n g S t a te
In d ic a to r
BOOST
Quick Charge
Input port
5 O u t p u t p o r tV 2.1 A
Home charger
Quick Charge Input port
USB Output port
IN 5V/9V 5V 1A 5V 2.1A
Jumper Cable
G R E E N L IG H T o n : Telling the connection is correct and the circuit is
working, you can turn on the engine to jump-start directly.
R E D L IG H T o n w ith A la r m b u z z e r : Telling the connection is wrong,
or short-circuit happens.Check and correct the clamps till the
GREEN LIGHT on, then turn on the engine.
R E D L IG H T o n w ith A la r m b l e ep: Telling the load is short-circuit.
Check and correct the connection till the GREEN LIGHT on, then turn
on the engine.
G R E E N L IG H T b l ink in g : Saying the vehicle battery is low voltage,
press the “BOOST” button, wait GREEN LIGHT becomes solid
, then
turn on the engine within 30s.
N O L IG H T o n : Saying the vehicle’s battery maybe damaged, after
confirming the clamps connection is correct, press the “BOOST” button,
wait GREEN LIGHT is on, and then turn on the engine within 30s.
R E D L IG H T a n d G R E E N l i g h t b l in k i ng: Saying the host goes to
Protection Situation after 4times continuously start, wait for 120s
then turn on the engine.
If it still can not start the car, please consult Professional persons,
NOT make jump-start again.
1
5
3
2
4
1
5
225 x 91 x 34mm
-20°C
~ 60°C
3
2
4
Jump star t 12V vehicle instruction:
1.Connect the blue plug fully seat ed into the host, and mak e sur e the
Star ting Stat e Indicat or is o.
2.Connect batt er y clamps to car batt er y terminals corr ectly .
Red Clamp to the positiv e(+) batt er y terminal, Black Clamp to the
negativ e(-) batt er y terminal.
3.Try the ignition to “S tar t” position
4.S tar t engine successfully , remov e the blue plug from the host
5.R emov e the batt er y clamps from the car batt er y terminals.
H .警 告:
1 .在使用本品前,仔明。
2 .禁止替代汽瓶使用。
3 .勿当玩具使用。
4 .降低受,在儿童附近使用本品,必行密切督。
5 .品用于1 2 V 启,如果用于其他启可能会有危。
6 .使用随机配送的瓶夹,当瓶夹或者材坏,停止使
用,以免出火灾、等人身害。
7 .勿夹瓶夹正极。
8 .在启前,确保接口无、无异物附着,将主机与瓶夹密
接,避免因接口接影响品的启性能。
9 .成功启汽后,在3 0 s内将品从汽瓶上取下,否可能
引起坏。
1 0 .勿启3次以
上。否会引起品而坏品。多次启
,每次启隔两分。
1 1 .勿用夹子其他行供。
1 2 .不要把品放置于温度超6 0 的境中。
1 3 .在0 到 4 5 室温境下充
1 4 .勿将品淋雨或置于水中。
1 5 .勿将品置于极条件下或火中。
1 6 .勿在爆炸性境中操作品,如有易燃液体、气体或灰的
情况下。
1 7 .确保在使用品,有人在能听到你的声音范内,或者足够
赶来帮助你的距离内。
1 8 .使用品前,摘掉佩戴的金属品,如戒指,手,。
1 9 .降低源插和源坏的,在瓶夹插断开
主机与夹子接。
2 0 .勿使用坏或者改装的池,芯坏或改装可能出
不可的后果,致火灾,爆炸及受等。
2 1 .使用随机配送或与主机入端同格的充器行充。
2 2 .使用本品启汽后不允立即本品行充。
2 3 .勿在主机充启汽。
2 4 .在极
端情况下,池可能会漏液。不可用手或者皮肤直接接触
漏液,在有接触的情况下,立即用肥皂和水冲洗。若不慎入
眼睛,用冷水冲洗眼睛至少1 0分,并立即就医。
2 5 .基于池的品在品寿命束根据当地法行置。
H . WA R N IN G :
1.Read the instruction manual carefully before using this unit.
2.DO NOT use in place of a vehicle battery.
3.Do NOT use as a toy.
4.To reduce the risk of injury, close supervision is necessary
when the product is used near children.
5.Jump for 12V vehicles , it would be hazard if for other jumping.
6.Use of an attachment not recommended or sold by power pack
manufacturer may result in a risk of fire, electric shock, or
inj
ury to persons.
7.Do NOT connect the two clamps together.
8.Before starting, ensure that there is no corrosion at the
interface and no foreign matter adheres. Connect the main
unit to the battery holder tightly to avoid the impact of the
interface connection.
9.After successfully starting the car, please remove the product
from the car battery within 30s, otherwise it may cause
damage.
10.Do NOT Jump Start more than 3 times in a row,It could
damage the unit by overheating. When starting up multiple
times, each start-up interval is two minutes.
11.Don’t use the jumper cable t
o charge other equipments.
12.Do NOT store in locations where the temperature may
exceed 60 .
13.Charge only at ambient temperature between 0
and 45 .
14.D o n o t e x p o s e t h e p ro d u c t t o r a in o r w a t e r
15.Do NOT expose product to extreme heat or fire.
16.Do NOT operate the product in explosive atmospheres, such
as in the presence of flammable liquids, gases or dust.
17.Make sure someone should be within range of your voice or
close enough to come to your aid when working with batteries.
18.Remove personal metal items like rings, bracelets,
necklaces, etc. When using the pr
oducts.
19.To reduce risk of damage to the electric plug and cord, pull
the plug rather than the cord when disconnecting the power
pack.
20.Do not use a battery pack or appliance that is damaged or
modified. Damaged or modified batteries may exhibit
unpredictable behavior resulting in fire, explosion or risk of
injury.
21.Charge only using the charger provided with this unit or the
same standard with the host input port.
22.After jump start the car,don’t charge this unit immediately.
23.Do NOT use the unit to jump start a vehicle while charging the
internal battery.
24.U
nder extreme conditions, the battery may leak. If a liquid is
noticed coming from product do not handle with bare hands. In
case of skin contact wash with soap and water immediately. If
liquid comes in contact with eyes rinse eyes with cold running
water for at least 10 minutes and get medical attention
immediately.
25.Product contains lithium based battery, at end of product life
dispose of product according to local regulation.
C ha r g i n g C e l l P ho n e o r T a ble t I n s tr u c tio n :
1. Plug the switch cable to Quick Charge output port.
2. Select appropriate connector and connect it to y
our mobile phones
or tablet.
3. Touch the switch button, it can recognise eletronic products's
suitable parameters, start to charge for mobile phone/tabletc etc.
Dimension:
Weight 750g:
Battery Capacity: 21000mAh(77.7Wh)
Output: 5V 1A; 5V 2.1A;
12V j
ump start
Start current 550A:
Peak current 1300A:
Operating temperature :
Input: Quick Charge(5V 2A; 9V 2A)
D . 技 格:
技格:
尺寸: 2 2 5 X9 1 X 3 4m m
重量: 7 5 0 g
容量: 2 1 0 00 m A h(7 7 .7 W h)
出: 5 V 1 A;5 V 2 .1 A ;
1 2 V 机启
入: (5 V 2 A 9 V 2 A
启流: 5 5 0 A
峰流: 1 3 0 0 A
使用温度范 : - 2 0 - 6 0
快充 ; )
Lorem ipsum
L E D f la s h l igh t
Press the switch 3 seconds to start the LED flash light.
There are 4 modes of LED light appear in order (normal. strobe.
SOS. off) if you press slightly.
93*130mm 单黑,157铜,正反折页
1 2
E po we r C h a r g in g I n s tr u c tio n:
1. Plug the home adaptor into the universal socket.
2. Connect the Type-c connector to the EPOWER host.
B . O P E R AT IO N G U I D A N C E
In dic a to r
Press the switch to check the storage level of Epower.
Indicator Unlit 1 solid 2 solid 3 solid 4 solid
torage level
S 0% 25% 50% 75% 100%
U S E R M A N U A L
Thank you for choosing the EPower! Always follow basic safety
precautions when using electrical appliances. Read all
instructions carefully, Please keep this instruction manual for
easy reference.
A . P R O D U C T L AY O U T:
The indicator will flash one by one during the period of charging.
Different number of solid indicators show different storage level
of EPower. All indicators light off when the charging is paused or
completed.
1 3 4
Jump start socket
Indicator
Switch
LED Flash Light
2
IN 5V/9V 5V 1A 5V 2.1A
E . 常:
1、:如何关移源?
答:品有智能功能,一旦没有,或者子品充束,移
源会自休眠,保存量,以免流失。
2、:E P O W ER 主机充需要多?
答:通快充入需要5 . 5个小左右就可以完全充。
3、:E P O W E R 能手机充几次?
答:取决你的手机池的容量大小,以Ip h o n e 6例,可以充9次左右。
4、:E P O W E R 能启2 . 0 L汽油多少次?
答:可以启汽5 0次左右。
5、:E P O W E R 的寿命是多?
答:正常使用情况下可以用3 - 5年。
6、:E P O W E R 充不用,存放多久能启汽?
答:E P O W E R 路很科学,不使用存放6 - 1 2个月都没,但了
延使用寿命,建每3个月充一次。
象 原 因 操 作
触开关按,
EP O W E R没有任何反
由于E P O W E R 低,低保
功能启,切断路
将充插插入快充入
口激活
G . 品中有毒有害物或元素的名称及含量
多功能汽/ 机急启源 O O O O O O
O :表示有害物在部件所有均材料中的含量均在2 00 2/ 95 / EC ( R o H s)准定的限量要求以下。
有毒有害物或元素
品名称 (P b) 汞 (H g) (C d )
(C r(V i) ( P BB ) ( P BD E)
六 价鉻 多 溴苯 多 溴二苯
F . 故 障排除
如果以下“ 操作” 无法排除您的故障,停止使用E P O W E R 并系
品的商店.
品型号 出 厂号
日期 修日期
客姓名 系
客地址
售位
品异常象描述
本品客提供自之日起 个 月内的保修服
保修卡
保障条件: 需 要保修服,出示本保修卡,并尽填写相关内
容。本公司向品用提供从品之日起 个 月的保期。
保修范:
1、在正常使用的状下出品量。
2、如因操作失造成品的害,不在保修范。
3、自行拆机后,不予保修。
4、撕的机器,不予保修。
不在保修范内的品,我司可提供修服,修用需由客承
担。
4 5 6 7
G . T O X IC A N D H A R MF UL S U B S T A N C E S :
O:Indicate all homogeneous materials' hazardous substances content are
below the MCV limit specified in the Standard 2002/95/EC(RoHs).
Composition and amount of toxic and harmful substances in EPower.
Pb Hg Cd Cr( Vi) PBB PBDE
O O O O O O
E . FA Q :
Q. How to turn off this appliance?
A. This appliance will power off automatically when no load or charging is
complete
Q. How long time to full charge the EPOWER?
A. Approx. 5.5 hours through the Quick Charge input port.
Q. How many times can this appliance charge for my cell phone?
A. De
pend on the battery capacity of your cell phone. Take iPhone6 as an
example, can full charging 9 times.
Q. What's the lifetime of EPOWER?
A. Usually 3-5 years in normal condition.
Q. How long the storage of battery will remain?
A. 6-12 months, however, we suggest to recharge it every 3 months.
Q. How
many times can this appliance jump start the 2.0L vehicle if it is in full battery?
A. Approx. 50 times.
F. T R O U B L E S H O O T IN G :
Finding Cause Remedies
No response when
pressing the switch
button.
Low voltage protection of
EPower is star
ted.
Plug the adaptor into the
Quick Charge input port to
activate.
I. WA R R A N T Y I N F O R MAT IO N :
1.We offer a limited warranty for this product against any defects
in material and workmanship for a period of 6 months from the
date of purchase by the end user/consumer. The conditions of
the warranty are as follows:
2.The warranty is only valid upon presentation of the original
receipt (from dealer/retailer) by the original purchaser with the
product to be repaired or replaced.
3.The warranty is void if the serial n
umber, date of purchase and
label has been removed.
4.The warr
anty does not cover damage or product failure
resulting from normal wear and tear, physical abuse, improper
installation, misuse, modification or repairs by unauthorized
third parties.
5.We do not assume responsibility for any loss or damage
incurred during shipment or as a result of a force majeure.
6.We are not liable for any incidental or consequential damages
arising from the use or misuse of this product.
7.All warranty claims are li
mited to repair or replacement of the
defective product and a
t the sole discretion of us.
8.If we repair or replace the product, the product will be covered
for the remaining time of the original warranty period. Repair or
replacement may involve the use of reconditioned units which
are equivalent in function. Replaced part or product becomes
the property of us.
9.Consumable components such as batteries are not covered by
the warranty.
Fu se P ro te cti o n
O ve r ch ar g e a n d
O ve r dis ch ar g e P r ote ct io n
A ga i ns t- re ve rs e P l ug
A p p li e d S t a nd a r d:G B / T 1 8 2 8 7 - 2 0 00
5 6 7
C . P A R T S L IS T:
# Parts Name Quantity
1 Host 1
2 Home adaptor 1
3 Switch cable 1
# Parts Name Quantity
4 Intelligent jumper cable 1
5
User Manual 1
5 V 1A O u tp u t p o rt
St a r t in g S t a te
In d i ca to r
BOOST
Quick Charge
Input port
5 O utp ut p o rtV 2.1 A
Home charger
Quick Charge Input port
USB Output port
IN 5V/9V 5V 1A 5V 2.1A
Jumper Cable
G R E E N L IG H T o n : Telling the connection is correct and the circuit is
working, you can turn on the engine to jump-start directly.
R E D L I G H T o n w i th A la r m b u z z e r : Telling the connection is wrong,
or short-circuit happens.Check and correct the clamps till the
GREEN LIGHT on, then turn on the engine.
R E D L I G H T o n w i th A la r m b le ep: Telling the load is short-circuit.
Check and correct the connection till the GREEN LIGHT on, then turn
on the engine.
G R E E N L IG H T b li n k i n g : Saying the vehicle battery is low voltage,
press the “BOOST” button, wait GREEN LIGHT becomes solid
, then
turn on the engine within 30s.
N O L IG HT o n : Saying the vehicle’s battery maybe damaged, after
confirming the clamps connection is correct, press the “BOOST” button,
wait GREEN LIGHT is on, and then turn on the engine within 30s.
R E D L I G H T a n d G R E E N l ig h t b link in g : Saying the host goes to
Protection Situation after 4times continuously start, wait for 120s
then turn on the engine.
If it still can not start the car, please consult Professional persons,
NOT make jump-start again.
1
5
3
2
4
1
5
225 x 91 x 34mm
-20°C
~ 60°C
3
2
4
Jump star t 12V vehicle instruction:
1.Connect the blue plug fully seat ed int o the host, and mak e sur e the
Star ting Stat e Indicat or is o.
2.Connect batt er y clamps to car batt er y terminals corr ectly .
Red Clamp to the positiv e(+) batt er y terminal, Black Clamp to the
negativ e(-) batt er y terminal.
3.Try the ignition to “S tar t” position
4.S tar t engine successfully , remov e the blue plug from the host
5.R emov e the batt er y clamps from the car batt er y terminals.
H .警 告:
1 .在使用本品前,仔明。
2 .禁止替代汽瓶使用。
3 .勿当玩具使用。
4 .降低受,在儿童附近使用本品,必行密切督。
5 .品用于1 2 V 启,如果用于其他启可能会有危。
6 .使用随机配送的瓶夹,当瓶夹或者材坏,停止使
用,以免出火灾、等人身害。
7 .勿夹瓶夹正极。
8 .在启前,确保接口无、无异物附着,将主机与瓶夹密
接,避免因接口接影响品的启性能。
9 .成功启汽后,在3 0 s内将品从汽瓶上取下,否可能
引起坏。
1 0 .勿启3次以
上。否会引起品而坏品。多次启
,每次启隔两分。
1 1 .勿用夹子其他行供。
1 2 .不要把品放置于温度超6 0 的境中。
1 3 .在0 到 4 5 室温境下充
1 4 .勿将品淋雨或置于水中。
1 5 .勿将品置于极条件下或火中。
1 6 .勿在爆炸性境中操作品,如有易燃液体、气体或灰的
情况下。
1 7 .确保在使用品,有人在能听到你的声音范内,或者足够
赶来帮助你的距离内。
1 8 .使用品前,摘掉佩戴的金属品,如戒指,手,。
1 9 .降低源插和源坏的,在瓶夹插断开
主机与夹子接。
2 0 .勿使用坏或者改装的池,芯坏或改装可能出
不可的后果,致火灾,爆炸及受等。
2 1 .使用随机配送或与主机入端同格的充器行充。
2 2 .使用本品启汽后不允立即本品行充。
2 3 .勿在主机充启汽。
2 4 .在极
端情况下,池可能会漏液。不可用手或者皮肤直接接触
漏液,在有接触的情况下,立即用肥皂和水冲洗。若不慎入
眼睛,用冷水冲洗眼睛至少1 0分,并立即就医。
2 5 .基于池的品在品寿命束根据当地法行置。
H . WA R N IN G :
1.Read the instruction manual carefully before using this unit.
2.DO NOT use in place of a vehicle battery.
3.Do NOT use as a toy.
4.To reduce the risk of injury, close supervision is necessary
when the product is used near children.
5.Jump for 12V vehicles , it would be hazard if for other jumping.
6.Use of an attachment not recommended or sold by power pack
manufacturer may result in a risk of fire, electric shock, or
inj
ury to persons.
7.Do NOT connect the two clamps together.
8.Before starting, ensure that there is no corrosion at the
interface and no foreign matter adheres. Connect the main
unit to the battery holder tightly to avoid the impact of the
interface connection.
9.After successfully starting the car, please remove the product
from the car battery within 30s, otherwise it may cause
damage.
10.Do NOT Jump Start more than 3 times in a row,It could
damage the unit by overheating. When starting up multiple
times, each start-up interval is two minutes.
11.Don’t use the jumper cable t
o charge other equipments.
12.Do NOT store in locations where the temperature may
exceed 60 .
13.Charge only at ambient temperature between 0
and 45 .
14.D o n o t e xp o s e t h e p ro d u ct t o r a i n o r w a te r
15.Do NOT expose product to extreme heat or fire.
16.Do NOT operate the product in explosive atmospheres, such
as in the presence of flammable liquids, gases or dust.
17.Make sure someone should be within range of your voice or
close enough to come to your aid when working with batteries.
18.Remove personal metal items like rings, bracelets,
necklaces, etc. When using the pr
oducts.
19.To reduce risk of damage to the electric plug and cord, pull
the plug rather than the cord when disconnecting the power
pack.
20.Do not use a battery pack or appliance that is damaged or
modified. Damaged or modified batteries may exhibit
unpredictable behavior resulting in fire, explosion or risk of
injury.
21.Charge only using the charger provided with this unit or the
same standard with the host input port.
22.After jump start the car,don’t charge this unit immediately.
23.Do NOT use the unit to jump start a vehicle while charging the
internal battery.
24.U
nder extreme conditions, the battery may leak. If a liquid is
noticed coming from product do not handle with bare hands. In
case of skin contact wash with soap and water immediately. If
liquid comes in contact with eyes rinse eyes with cold running
water for at least 10 minutes and get medical attention
immediately.
25.Product contains lithium based battery, at end of product life
dispose of product according to local regulation.
C ha r gin g C ell P h o n e o r T a blet I n s tr uc ti o n :
1. Plug the switch cable to Quick Charge output port.
2. Select appropriate connector and connect it to y
our mobile phones
or tablet.
3. Touch the switch button, it can recognise eletronic products's
suitable parameters, start to charge for mobile phone/tabletc etc.
Dimension:
Weight 750g:
Battery Capacity: 21000mAh(77.7Wh)
Output: 5V 1A; 5V 2.1A;
12V j
ump start
Start current 550A:
Peak current 1300A:
Operating temperature :
Input: Quick Charge(5V 2A; 9V 2A)
D . 技 格:
技格:
尺寸: 2 2 5 X 9 1 X 3 4 m m
重量: 7 5 0g
容量: 2 1 0 0 0 m A h(7 7 .7 W h)
出: 5 V 1 A;5 V 2 .1 A ;
1 2 V 机启
入: (5V 2 A 9 V 2 A
启流: 5 5 0 A
峰流: 1 3 0 0 A
使用温度范 : - 2 0 - 6 0
快充 ; )
Lorem ipsum
L E D f la s h l ig h t
Press the switch 3 seconds to start the LED flash light.
There are 4 modes of LED light appear in order (normal. strobe.
SOS. off) if you press slightly.
93*130mm 单黑,157铜,正反折页
1 2
E po w e r C h a r g in g I n s tr uc ti o n:
1. Plug the home adaptor into the universal socket.
2. Connect the Type-c connector to the EPOWER host.
B . O P E R A T IO N G U ID A N C E
In d i c ato r
Press the switch to check the storage level of Epower.
Indicator Unlit 1 solid 2 solid 3 solid 4 solid
torage level
S 0% 25% 50% 75% 100%
U S E R M A N U A L
Thank you for choosing the EPower! Always follow basic safety
precautions when using electri cal appliances. Read all
instructions carefully, Please keep this instruction manual for
easy reference.
A . P R O DU C T L AY O U T:
The indicator will flash one by one during the period of charging.
Different number of solid indicators show different storage level
of EPower. All indicators light off when the charging is paused or
completed.
1 3 4
Jump start socket
Indicator
Switch
LED Flash Light
2
IN 5V/9V 5V 1A 5V 2.1A
E . 常:
1、:如何关移源?
答:品有智能功能,一旦没有,或者子品充束,移
源会自休眠,保存量,以免流失。
2、:E P O W E R 主机充需要多?
答:通快充入需要5 .5个小左右就可以完全充。
3、:E P O W ER 能手机充几次?
答:取决你的手机池的容量大小,以I p h o n e 6例,可以充9次左右。
4、:E P O W ER 能启2 . 0 L汽油多少次?
答:可以启汽5 0次左右。
5、:E P O W ER 的寿命是多?
答:正常使用情况下可以用3 - 5年。
6、:E P O W ER 充不用,存放多久能启汽?
答:E P O W E R 路很科学,不使用存放6 - 12个月都没,但了
延使用寿命,建每3个月充一次。
象 原 因 操 作
触开关按,
EP O W E R 没有任何反
由于E P O W E R低,低保
功能启,切断路
将充插插入快充入
口激活
G . 品中有毒有害物或元素的名称及含量
多功能汽/ 机 急启源 O O O O O O
O :表示有害物在部件所有均材料中的含量均在2 00 2/ 9 5 / EC (R oH s )准定的限量要求以下。
有毒有害物或元素
品名称 (P b) 汞 (H g) (C d)
(C r( V i) ( PB B) ( P BD E)
六 价鉻 多 溴苯 多 溴二苯
F . 故 障排除
如果以下“ 操作” 无法排除您的故障,停止使用E P O W E R 并系
品的商店.
品型号 出 厂号
日期 修日期
客姓名 系
客地址
售位
品异常象描述
本品客提供自之日起 个 月内的保修服
保修卡
保障条件: 需 要保修服,出示本保修卡,并尽填写相关内
容。本公司向品用提供从品之日起 个 月的保期。
保修范:
1、在正常使用的状下出品量。
2、如因操作失造成品的害,不在保修范。
3、自行拆机后,不予保修。
4、撕的机器,不予保修。
不在保修范内的品,我司可提供修服,修用需由客承
担。
4 5 6 7
G . T O X I C A ND H A R MF UL S U B S TA N C E S :
O:Indicate all homogeneous materials' hazardous substances content are
below the MCV limit specified in the Standard 2002/95/EC(RoHs).
Composition and amount of toxic and harmful substances in EPower.
Pb Hg Cd Cr( Vi) PBB PBDE
O O O O O O
E . FA Q :
Q. How to turn off this appliance?
A. This appliance will power off automatically when no load or charging is
complete
Q. How long time to full charge the EPOWER?
A. Approx. 5.5 hours through the Quick Charge input port.
Q. How many times can this appliance charge for my cell phone?
A. Depend on the battery capacity of your cell phone. Take iPhone6 as an
example, can full charging 9 times.
Q. What's the lifetime of EPOWER?
A. Usually 3-5 years in normal condition.
Q. How long the storage of battery will remain?
A. 6-12 months, however, we suggest to recharge it every 3 months.
Q. How
many times can this appliance jump start the 2.0L vehicle if it is in full battery?
A. Approx. 50 times.
F. T R O U B L E S H O O T IN G :
Finding Cause Remedies
No response when
pressing the switch
button.
Low voltage protection of
EPower is started.
Plug the adaptor into the
Quick Charge input port to
activate.
I. WA R R A N T Y I N F O R MAT IO N :
1.We offer a limited warranty for this product against any defects
in material and workmanship for a period of 6 months from the
date of purchase by the end user/consumer. The conditions of
the warranty are as follows:
2.The warranty is only valid upon presentation of the original
receipt (from dealer/retailer) by the original purchaser with the
product to be repaired or replaced.
3.The warranty is void if the serial number, date of purchase and
label has been removed.
4.The warr
anty does not cover damage or product failure
resulting from normal wear and tear, physical abuse, improper
installation, misuse, modification or repairs by unauthorized
third parties.
5.We do not assume responsibility for any loss or damage
incurred during shipment or as a result of a force majeure.
6.We are not liable for any incidental or consequential damages
arising from the use or misuse of this product.
7.All warranty claims are li
mited to repair or replacement of the
defective product and a
t the sole discretion of us.
8.If we repair or replace the product, the product will be covered
for the remaining time of the original warranty period. Repair or
replacement may involve the use of reconditioned units which
are equivalent in function. Replaced part or product becomes
the property of us.
9.Consumable components such as batteries are not covered by
the warranty.
Fu se P r ote ct io n
O ve rc h arg e a n d
O ve rd is ch arg e P r ote ct io n
A ga i ns t- re v er s e P l u g
A p p li e d S t an d a rd :G B / T 1 8 2 8 7 - 20 0 0
5 6 7
C . P A R T S L IS T:
# Parts Name Quantity
1 Host 1
2 Home adaptor 1
3 Switch cable 1
# Parts Name Quantity
4 Intelligent jumper cable 1
5
User Manual 1
5 V 1A O u tp u t p o r t
St a r ti n g S t a te
In d ic a to r
BOOST
Quick Charge
Input port
5 O u t p u t p o r tV 2.1 A
Home charger
Quick Charge Input port
USB Output port
Jumper Cable
G R E E N L IG H T o n : Telling the connection is correct and the circuit is
working, you can turn on the engine to jump-start directly.
R E D L IG H T o n w ith A la r m b u z z e r : Telling the connection is wrong,
or short-circuit happens.Check and correct the clamps till the
GREEN LIGHT on, then turn on the engine.
R E D L IG H T o n w ith A la r m b l e ep: Telling the load is short-circuit.
Check and correct the connection till the GREEN LIGHT on, then turn
on the engine.
G R E E N L IG H T b l ink in g : Saying the vehicle battery is low voltage,
press the “BOOST” button, wait GREEN LIGHT becomes solid
, then
turn on the engine within 30s.
N O L IG H T o n : Saying the vehicle’s battery maybe damaged, after
confirming the clamps connection is correct, press the “BOOST” button,
wait GREEN LIGHT is on, and then turn on the engine within 30s.
R E D L IG H T a n d G R E E N l i g h t b l in k i ng: Saying the host goes to
Protection Situation after 4times continuously start, wait for 120s
then turn on the engine.
If it still can not start the car, please consult Professional persons,
NOT make jump-start again.
1
5
3
2
4
1
5
225 x 91 x 34mm
-20°C
~ 60°C
3
2
4
Jump star t 12V vehicle instruction:
1.Connect the blue plug fully seat ed into the host, and mak e sur e the
Star ting Stat e Indicat or is o.
2.Connect batt er y clamps to car batt er y terminals corr ectly .
Red Clamp to the positiv e(+) batt er y terminal, Black Clamp to the
negativ e(-) batt er y terminal.
3.Try the ignition to “S tar t” position
4.S tar t engine successfully , remov e the blue plug from the host
5.R emov e the batt er y clamps from the car batt er y terminals.
H .警 告:
1 .在使用本品前,仔明。
2 .禁止替代汽瓶使用。
3 .勿当玩具使用。
4 .降低受,在儿童附近使用本品,必行密切督。
5 .品用于1 2 V 启,如果用于其他启可能会有危。
6 .使用随机配送的瓶夹,当瓶夹或者材坏,停止使
用,以免出火灾、等人身害。
7 .勿夹瓶夹正极。
8 .在启前,确保接口无、无异物附着,将主机与瓶夹密
接,避免因接口接影响品的启性能。
9 .成功启汽后,在3 0 s内将品从汽瓶上取下,否可能
引起坏。
1 0 .勿启3次以
上。否会引起品而坏品。多次启
,每次启隔两分。
1 1 .勿用夹子其他行供。
1 2 .不要把品放置于温度超6 0 的境中。
1 3 .在0 到 4 5 室温境下充
1 4 .勿将品淋雨或置于水中。
1 5 .勿将品置于极条件下或火中。
1 6 .勿在爆炸性境中操作品,如有易燃液体、气体或灰的
情况下。
1 7 .确保在使用品,有人在能听到你的声音范内,或者足够
赶来帮助你的距离内。
1 8 .使用品前,摘掉佩戴的金属品,如戒指,手,。
1 9 .降低源插和源坏的,在瓶夹插断开
主机与夹子接。
2 0 .勿使用坏或者改装的池,芯坏或改装可能出
不可的后果,致火灾,爆炸及受等。
2 1 .使用随机配送或与主机入端同格的充器行充。
2 2 .使用本品启汽后不允立即本品行充。
2 3 .勿在主机充启汽。
2 4 .在极
端情况下,池可能会漏液。不可用手或者皮肤直接接触
漏液,在有接触的情况下,立即用肥皂和水冲洗。若不慎入
眼睛,用冷水冲洗眼睛至少1 0分,并立即就医。
2 5 .基于池的品在品寿命束根据当地法行置。
H . WA R N IN G :
1.Read the instruction manual carefully before using this unit.
2.DO NOT use in place of a vehicle battery.
3.Do NOT use as a toy.
4.To reduce the risk of injury, close supervision is necessary
when the product is used near children.
5.Jump for 12V vehicles , it would be hazard if for other jumping.
6.Use of an attachment not recommended or sold by power pack
manufacturer may result in a risk of fire, electric shock, or
inj
ury to persons.
7.Do NOT connect the two clamps together.
8.Before starting, ensure that there is no corrosion at the
interface and no foreign matter adheres. Connect the main
unit to the battery holder tightly to avoid the impact of the
interface connection.
9.After successfully starting the car, please remove the product
from the car battery within 30s, otherwise it may cause
damage.
10.Do NOT Jump Start more than 3 times in a row,It could
damage the unit by overheating. When starting up multiple
times, each start-up interval is two minutes.
11.Don’t use the jumper cable t
o charge other equipments.
12.Do NOT store in locations where the temperature may
exceed 60 .
13.Charge only at ambient temperature between 0
and 45 .
14.D o n o t e x p o s e t h e p ro d u c t t o r a in o r w a t e r
15.Do NOT expose product to extreme heat or fire.
16.Do NOT operate the product in explosive atmospheres, such
as in the presence of flammable liquids, gases or dust.
17.Make sure someone should be within range of your voice or
close enough to come to your aid when working with batteries.
18.Remove personal metal items like rings, bracelets,
necklaces, etc. When using the pr
oducts.
19.To reduce risk of damage to the electric plug and cord, pull
the plug rather than the cord when disconnecting the power
pack.
20.Do not use a battery pack or appliance that is damaged or
modified. Damaged or modified batteries may exhibit
unpredictable behavior resulting in fire, explosion or risk of
injury.
21.Charge only using the charger provided with this unit or the
same standard with the host input port.
22.After jump start the car,don’t charge this unit immediately.
23.Do NOT use the unit to jump start a vehicle while charging the
internal battery.
24.U
nder extreme conditions, the battery may leak. If a liquid is
noticed coming from product do not handle with bare hands. In
case of skin contact wash with soap and water immediately. If
liquid comes in contact with eyes rinse eyes with cold running
water for at least 10 minutes and get medical attention
immediately.
25.Product contains lithium based battery, at end of product life
dispose of product according to local regulation.
C ha r g i n g C e l l P ho n e o r T a ble t I n s tr u c tio n :
1. Plug the switch cable to Quick Charge output port.
2. Select appropriate connector and connect it to y
our mobile phones
or tablet.
3. Touch the switch button, it can recognise eletronic products's
suitable parameters, start to charge for mobile phone/tabletc etc.
Dimension:
Weight 750g:
Battery Capacity: 21000mAh(77.7Wh)
Output: 5V 1A; 5V 2.1A;
12V j
ump start
Start current 550A:
Peak current 1300A:
Operating temperature :
Input: Quick Charge(5V 2A; 9V 2A)
D . 技 格:
技格:
尺寸: 2 2 5 X9 1 X 3 4m m
重量: 7 5 0 g
容量: 2 1 0 00 m A h(7 7 .7 W h)
出: 5 V 1 A;5 V 2 .1 A ;
1 2 V 机启
入: (5 V 2 A 9 V 2 A
启流: 5 5 0 A
峰流: 1 3 0 0 A
使用温度范 : - 2 0 - 6 0
快充 ; )
Lorem ipsum
No Light: Vehicle battery may be damaged. Check the connections at
the battery are correct, then press the Boost button. Wait for a solid
Green LED, then start the vehicle.
Red and Green alternating: The jump starter is in protection mode and is
locked for 2 minutes. This will happen after 4 consecutive start attempts,
or if the unit is too hot. Wait for a solid Green LED, then attempt to start
again.
Note – Once Green LED is activated, you have 30 seconds to start the
vehicle before the unit will switch o.
4. Once the vehicle has started, immediately remove the jump start leads
from the jump starter, then disconnect the clamps from the vehicle
battery.
If the vehicle does not start after 4 attempts, there is probably something
other than the battery causing the issue, consult an automotive
professional.
Boost Button
Power Button
LED Torch
Quick Charge Input Port
5V 1A Output Port
5V 2.1A Output Port
Jump Start Socket
Charge Status Indicators
Starting Status Indicator


Praat mee over dit product
Laat hier weten wat jij vindt van de Matson MA21000 Accubooster. Als je een vraag hebt, lees dan eerst zorgvuldig de handleiding door. Een handleiding aanvragen kan via ons contactformulier.