
Riding at Night
While the SlickRock 900 will improve your control and
enjoyment of night riding, please remember that cycling
at night is an inherently dangerous activity. In addition to
using your lighting system properly and riding with
extreme caution,
NiteRider urges you to:
• never ride alone
• always let someone know where you are going
• wear a helmet and reflective clothing
• carry an auxiliary light and emergency supplies.
Quick Start
1. Fully charge the battery before the first use. See
“Using the 2.5
-
hour Fast Charger”
2. To mount the headlamp and battery, see “Mounting
the Headlamp” and “Mounting the Battery”.
3. Connect the battery to the headlamp.
4. To turn the system on and off, simply press and
release the headlamp power
button.
Mounting the Headlamp
The HID headlamp can be mounted to the handlebar or
a helmet.
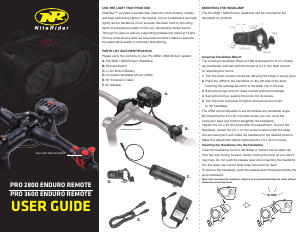
Universal Handlebar Mount
The Universal Handlebar Mount (UHM) is designed to fit
on virtually any handlebar. I
ncluded with the mount is a
2.5
mm Allen wrench,
a pair of black rubber bumpers
already in place, and a thin rubber shim to customize the
fit on large handlebars up to 32 mm in diameter.
Turn the knob counter
-
clockwise, allowing the hinge to
swing open. Place the mount on the handlebar on the left
side
the stem, orienting the rectangular notch in the
slider clip to the rear. Swing the hinge down to make
contact with the handlebar. Swing the hex bolt up,
seating the knob into its recess. Turn the knob clockwise
to tighten and secure the mount to the hand
lebar.
The UHM can be adjusted to accommodate any
handlebar angle. By loosening the 2.5 x 30 mm Allen
screw, you can move the swing arm back and forth to
straighten the headlamp. Tighten the 2.5 x 30 mm screw
after the adjustment.
To pivot the headlamp,
loosen the
2.5 x 12 mm screw
located under the slider clip and swing arm and rotate
the headlamp to the desired position. Make this
adjustment before tightening the 2.5 x 30 mm screw.
Helmet Mount
1.
Unclamp the straps on each side of the helmet moun
t and
pull them free.
2.
Position the plastic mounting plate as close to the centerline
of the he
lmet as possible, orienting the
parallel grooves on
the slider clip to the rear.
3.
Feed each strap into and out of two helmet vents, circling
each strap back to the upper edge of the corresponding
clamp.
4.
Fasten the straps by inserting them into the clamps.
Inserting the Headlamp into the Handlebar or Helmet
Mount
Insert the headlamp mount into the handlebar or helmet mount
slide
r clip from the rear of the slider clip forward. Gently rocking
the lamp as you slide it may help. Do not push the release
lever when inserting the headlamp into the slider clip; let the
lamp snap into place by itself.
To remove the headlamp, push the release lever and slide the
lamp backward.
Note:
After mounting the headlamp, adjust the headlamp so it
illuminates the road properly without distracting oncoming
riders.
Mounting the Battery
The NiMH battery can be mounted to the bike frame or placed
in
a jersey pocket, hydration pack, or fanny pack.
Warning:
For safety reasons, a cyclist should never be
tethered to the bike. If the headlamp is mounted to the helmet,
do not mount the battery to the frame. Conversely, if the
headlamp is mounted to the h
andlebar, do not place the
battery in a pocket or pack.
Frame Mount
1.
Thread the wide Velcro strap through the slots on the top of
the battery clip.
2.
Attach the concave surface of the battery to a safe,
convenient location on the frame (t
ypically under the top or
down tube), placing the Velcro strap over the tube but
under any shift or brake cables.
3.
Secure the handlebar cord to the frame using the thin
Velcro tie. Make sure the cord does not interfere with any
movi
ng parts.
Pocket or Pack
1. Route the helmet cord through a helmet vent or along the
outside of the helmet using the thin Velcro tie to secure the
cord.
2. Connect the helmet cord to the battery, making sure
the cord does not interfere with
any moving parts.
3. Simply place the battery in a pocket or pack.
Operation
1. Connect the battery cord to the headlamp or helmet
cord.
2. To turn the lamp on, press and release the headlamp
power button. The LED will turn green indicating
power. It is normal for the HID bulb to flicker and
change color as the bulb stabilizes.
3. Cycle through the two brightness levels by
pressing
and releasing the power button.
4. To turn the lamp off, press and release the power
button. The lamp will go out and the LED will glow
amber for four seconds.
T
he lamp cannot be restruck
for eight seconds
.
5
. When the LED turns red, it is time to recharge your
battery. Turn off your lamp to avoid over
-discharging
and damaging your battery.
Note:
If the LED is flashing, the battery must be
disconnected to unlock this batter
y protection feature.
Warning:
HID headlamps require adequate
airflow
during operation (as in riding
conditions). NiteRider
discourages use of the
light in stationary conditions as
excessive heat
retention
will occur.
Battery Charging and
Care
Rechargeable batteries can last years with proper care.
Most importantly, fully charge your battery:
• before the first use
• aft
er each use
• before storing
•
ever
y 45 to 60 days when not in use
Thermal Step Down
If the SlickRock 900 HID headlamp is used in a
stationary condition, such as bench testing,
heat retention, due to inadequate airflow, will
cause the light output to
“step down” to a lower
level to avoid damage to the lamp.
Simultaneously, the LED indicator on the
headlamp will be set to flash, red
-
green. When
the temperature drops into a safe range, the
LED indicator will return to solid green and then
return to “hi
gh” light output by pressing and
releasing the headlamp power button.


Praat mee over dit product
Laat hier weten wat jij vindt van de NiteRider SlickRock 900 Fietslamp. Als je een vraag hebt, lees dan eerst zorgvuldig de handleiding door. Een handleiding aanvragen kan via ons contactformulier.