
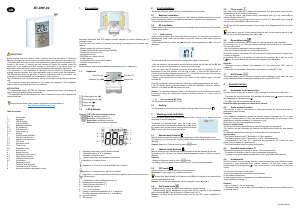
PPLIMW15250Ba
5 Parameter’s menu
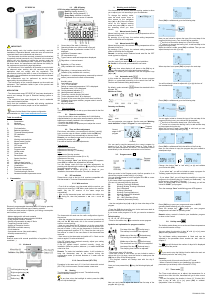
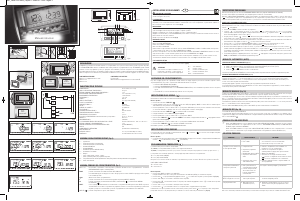
Your thermostat has a parameter’s menu. To enter in this menu, press and maintain the
edition key ( ) during 5 sec. Then parameter menu will appear and first parameter
screen will be displayed
You can select a parameter which must be adjusted with navigation keys (◄) or (►).
Once the parameter is chosen, toggle the value with the (OK) key, modify it with (-) or
(+) and confirm your adjustment with (OK).
To leave the parameter menu, choose the parameter « End » and press (OK) or press
Return key ( ).
N° Default value & other possibilities
00
INI: Radio configuration
Radio configuration mode for wireless communication (refer to chapter 2.2)
01
dEG: Unit of the displayed temperatures
°C Celsius
°F Fahrenheit
04
Calibration of the internal probe
The calibration must be done after 1 day working with the same setting
temperature in accordance with the following description:
Put a thermometer in the room at 1.5M distance from the floor and check
the real temperature in the room after 1 hour.
When you enter on the calibration parameter “no” is displayed on the right
to indicate no calibration has made.
To enter the value shown on the thermometer, use the (-) or (+) keys to
enter the real value. Then, press (Ok) to confirm. The message “Yes”
should be displayed; the value will be stored in the internal memory.
If you need to erase a calibration press on the escape key ( ).
The old value will be erased and the message “no” will be displayed.
* Pay attention:
Only the heating element driven by the thermostat must be used during the
complete step of the calibration.
05
Calibration of the external wired probe
Same calibration method as described in parameter 04 above.
06
HG: Anti-freeze temperature
Default value 10°C.
Use the (-) or (+) keys to change the anti-freeze setting temperature. Then
press (Ok) to confirm.
08
Clr: Reset to Factory setting
Press and maintain (Ok) key during 10s to reset set point temperatures and
user parameters in this menu, to factory default settings.
* Pay attention:
Ensure you that you have all necessary elements to re-setup your
installation before to use this function.
09
Displayed only if the BT-DRF-02 is linked with a multizones receiver
CHA—
--: number of the linked zone
10
Software version
11
End: Exit the parameter’s menu
Press (OK) key to exit installation parameter menu and return to normal
operation.
6 Technical characteristics
Environmental:
Operating temperature:
Shipping and storage temperature:
0°C - 40°C
-10°C to +50°C
Electrical Protection
Installation Category
Pollution Degree
IP30
Class II
2
Temperature precision 0.1°C
Setting temperature range
Comfort, Reduced
Holiday (Antifreeze)
Timer
0,5°C step
5°C to 37°C
0,5°C to 10,0°C
5°C to 37°C
Regulation characteristics
Proportional Band (PWM 2°C/10min)
or Hysteresis 0.5°C
Power Supply
Operating life
2 AAA LR03 1.5V Alkaline ~2 years
Sensing elements:
Internal & External (option)
Internal: NTC 10k
at 25°C
External: NTC 10k at 25°C (ß = 3950)
Radio Frequency 868 MHz, <10mW.
Software version
Showed in parameter menu.
Compatible receivers
BT-M6Z02 RF
BT-FR02RF
BT-WR02RF / BT-WR02HC
BT-PR02RF
BT-CT02
Other receivers can be compatible, check
on the instruction manual of your receiver
Your product has been designed in
conformity with the European Directives.
R&TTE 1999/5/EC
EMC 004/108/EC
RoHS 2011/65/EU
Classification :
Contribution :
UE 811/2013 and 2010/30/UE
IV
(2%)
7 Troubleshooting & Solution
My BT DRF-02 doesn’t start
Batteries Problem
- Check if the protection sticker on the batteries is removed.
- Check the batteries orientation.
- Check the capacity of the batteries
My BT DRF-02 Led, blinks in Red
Problem on sensors
The logo blinks (ambient sensor)
- Contact your installer or seller.
The logo blinks (Floor sensor)
- Check the connection of the sensor.
- Disconnect the sensor, and check it with an ohmmeter (the
value must be around 10kohms)
Batteries level is too less
The logo blinks (Batteries)
- Replace the batteries.
Humidity measurement
problem (*)
The logo blinks and the thermostat displays ‘Err »
- Contact your intaller
My BT DRF-02 seems work correctly but the heating or the cooling doesn’t
work correctly
Output
On the receiver:
- Check the good reception of RF signal (
refer to
chapter
2.2.1)
- Check the connections.
- Check the power supply of the heating element.
- Contact your installer.
RF
communication
Check the following points :
- The receiver must be put at a minimum distance of 50cm
of all others electrical or wireless materials (GSM, Wi-Fi..)
- The receiver shouldn’t be fixed on a metallic part or too
close of hydraulic pipes… (Copper…)
Sensor calibration
- Try to calibrate your thermostat (
refer to
user menu
parameter 04)
- Contact your installer, to check & adjust the regulation
parameters with your heating system.
Configuration
The logo blinks :
- Cooling request is made by the central (BTCT02) but
the thermostat doesn’t allow (refer to parameter 21
chapter 8).
Humidity protection
(*)
The logo blinks:
- humidity regulation is activated (refer to parameter 34
chapter 8)
- condensation is detected (refer to parameter 35 chapter 8)
8 Advanced installer’s parameters menu
In order to enter in the menu, press on the escape key
during 5 seconds
The following display with the first parameter appears:
- Once you entered in the menu, go to the parameter which you want change by using
the keys (◄) or (►).
- Use the keys (+) or (-) to edit and modify and confirm by pushing the (OK) key.
- To leave the parameter menu, go to the parameter “End” and press the (OK) key
.
Parameters Installer’s Advanced Menu
N°
nam
es
Description of the
parameter
Factory
value
Other possibility
20
REG
Selection of the sensor used
for the regulation.
“AIR”
Internal
ambient
sensor
“amb”
External ambient
sensor
Following options
aren’t available with all
receivers:
“FLR”
Floor sensor
regulation
“FL.L”
Air regulation with
floor limitation
possibilities
(refer to parameters
25&26)
21
MOd
Working mode selection of
the thermostat
“Hot”
Heating
mode
“Cld”
Cooling mode
“rEv”
reversible menu
activation
“Aut”
Automatic mode
21
(**)
Cld
Use this option if you want
to allow the zone to work in
cooling mode
“yes”
Function
activated
“no”
Function deactivated
22
View of the measured
values of the internal
sensor.
“__._” °C/°F
23
View of the measured
values of the external
(Ambient) sensor.
“__._”°C/°F
24
View of the measured
values of the floor sensor
connected to the receiver.
“__._”°C/°F
25
FL.L
Lower limit of the floor
temperature.
“no”
The lower
limitation is
not used
From 5°C to
26
FL.H
Upper limit of the floor
temperature.
“no”
The upper
limitation is
not used
From “FL.Lo” to 40°C
27
tYP
Selection of regulation type.
“bp”
Proportional
band
(PWM)
“hys”
Hysteresis (On/Off)
28
UF1
Concrete choice.
“uf1”
For liquid
concrete
with low
thickness
< 6cm
“uf2”
For traditional
concrete with
thickness
> 6cm
29
Bp1
Floor covering choice.
“Bp1”
For tiling
“Bp2”
For wood parquet
(floating or not)
30
Uir
Pilot wire function for
French Market application
Use this option if your
installation has the pilot wire
installed in combination with
an energy saver.
“yes”
Function
activated
“no”
Function deactivated
31
min
Minimal value of the setting
range.
5.0°C From 5°C to 15.0°C
32
MAX
Maximal value of the setting
range.
37.0°C From 20°C to 37.0°C
33
Uin
Automatic open window
detection.
(refer to chapter 4.2)
“yes”
Function
activated
“no”
Function deactivated
34(*)
rH
Percentage value of the
humidity setting
55%
From 0% (“no”) to
100%
35(*)
dEv
Anti-condensation function
(when condensation is
detected, cooling system is
stopped or/and dehumidifier is
activated)
“yes”
Function
activated
“no”
Deactivated function
36
EEp
All parameters will be
reloaded with the factory
values
Press on the (OK) key during few
seconds.
37
End
To exit the installer’s menu
Press on the (OK) to exit.
(*):concerns version with humidity sensor
(**):concerns thermostat if it is linked with a central (BT-CT02) or with a BT-M6Z02 RF
http://www.wattselectronics.com


Praat mee over dit product
Laat hier weten wat jij vindt van de Watts BT-DRF-02 Thermostaat. Als je een vraag hebt, lees dan eerst zorgvuldig de handleiding door. Een handleiding aanvragen kan via ons contactformulier.
beantwoord | Ik vind dit nuttig (0)
beantwoord | Ik vind dit nuttig (0)