greater than
or equal to
greater than
or equal to
greater than
or equal to
greater than
or equal to
Home Blood Pressure Kit instructions – model uA-101
IMPORTANT INFORMATION
PLEASE READ THIS IMPORTANT INFORMATION BEFORE USING YOUR MONITOR.
☞
Please remember that only a medical practitioner is qualified to interpret your
blood pressure measurements. Use of this device should not replace regular
medical examinations.
☞
Have your physician review the procedure for using this device. He or she will
want to verify blood pressure measurements before prescribing or adjusting
medications.
☞
Consult your physician if you have any doubt about your readings. Should a
mechanical problem occur, contact A&D Medical.
☞
Clean the monitor and cuff with a dry, soft cloth or a cloth dampened with
water and a mild detergent. Never use alcohol, benzene, thinner or other harsh
chemicals to clean monitor or cuff.
PRECAUTIONS
This Blood Pressure monitor is designed to be used at home or in a doctor’s/nurse’s
office, by those who are eighteen (18) years and older, to monitor blood pressure
(systolic and diastolic) and pulse rate.
Caution: This product contains natural rubber latex which may cause allergic
reactions.
HOME BLOOD PRESSURE KIT COMPONENTS
LIST OF COMPONENTS:
ASSEMBLY INSTRUCTIONS
1. Place cuff on your upper arm.
2. Make sure cuff end has been inserted through the D-Ring.
3. Insert single end of the Y-Tube into stethoscope head.
4. Insert each arm of the Y-Tube into each bottom end of the binaurals.
5. Insert air release valve into left bladder tube.
6. Insert manometer into right bladder tube.
Ear tips
Binaurals
Inflation Bulb
Air Release Valve
Manometer
Left Bladder Tube
Right Bladder Tube
Y-Tube
Cuff D-Ring
Cuff
Stethoscope Head
Carrying Case
Calibration Screwdriver
TAKING YOUR BLOOD PRESSURE
BLOOD PRESSURE TAKING TIPS
• Relax for several moments before measurement.
• Do not smoke or ingest caffeine at least 30 minutes prior to measurement.
• Remove constricting clothing and place cuff on bare arm.
• Unless your physician recommends otherwise, use left arm to measure pressure.
• Do not talk during measurement.
• Do not cross legs and keep your feet flat on the floor.
NOW YOU ARE READY. FOLLOW THESE SIMPLE STEPS:
1. Sit comfortably with your left arm resting on a flat
surface so that the center of your upper arm is at
the same height as your heart.
2. Lay left arm on the table with palm up. Place the
cuff on upper arm with the tube facing downward
and toward the inside of your arm. Fasten cuff securely
with hook and loop fastener strap.
3. The cuff should be snug but not too tight. You should be
able to insert two fingers between the cuff and your arm.
4. With your palm facing up, place the stethoscope head
one-inch above the bend of the elbow on the inside of
the arm. This is where the main artery is located.
5. Insert the ear tips of the stethoscope into your ears.
Adjust by turning ear tips to fit comfortably in your
ears.
6. Hold the manometer in your left hand and the inflation bulb in your right hand.
7. Close the air release valve on the bulb by turning the valve clockwise.
8. Inflate the cuff by repeatedly squeezing the bulb with your right hand. Listen to
the pulse beat while inflating the cuff.
9. Watch the gauge. When you can no longer hear the pulse beat, raise the pressure
an additional 30 mmHg.
NOTE: Do not inflate the cuff above 280 mmHg. You may injure yourself or
damage the equipment. If you are uncertain about the proper cuff inflation
level, consult your physician.
10. After reaching your inflation level, slowly deflate the cuff by opening the air
release valve. To open the air release valve, turn it counter-clockwise so that the
pressure drops 2-4 mmHg per second. The needle on the manometer should drop
an average of one to two marks every second.
NOTE: Pressurizing the cuff shuts off all blood flow to the arm. Do not leave it
fully inflated any longer than absolutely necessary.
11. After opening the air release valve, listen carefully for a pulse beat. The moment
you hear the first thumping sounds of your pulse beat, note the reading on the
gauge. This is your systolic blood pressure measurement.
12. When you can no longer hear any sounds, read the gauge. This is your diastolic
blood pressure measurement.
13. Remove cuff and make note of your blood pressure.
NOTE: To be certain your technique was good and the readings were as
accurate as possible, wait 10-15 minutes and repeat the procedure.
TWO-PARTY METHOD:
1. If you plan on taking someone else’s blood pressure, have the person whose blood
pressure is to be taken to rest and relax at least 15 minutes beforehand.
2. Have the person extend his or her left arm toward you, palm up. Be sure the arm
rests at the same level as the heart.
3. Position the cuff as indicated in the self-taking instructions.
4. Attach the manometer to the loop on the cuff, so that it is clearly visible to you.
5. Perform Steps 1-13 in Taking Your Blood Pressure. If possible, have your physician
watch your technique to be sure it is correct.
ABOUT BLOOD PRESSURE
WHAT IS BLOOD PRESSURE?
Blood pressure is the force exerted by blood against the walls of the arteries. Systolic
pressure occurs when the heart contracts; diastolic pressure occurs when the heart
expands. Blood pressure is measured in millimeters of mercury (mmHg).
WHAT AFFECTS BLOOD PRESSURE?
Blood pressure is affected by many factors: age, weight, time of day, activity level,
climate, altitude and season. Certain activities can significantly alter one’s blood
pressure. Walking will likely raise an individual’s blood pressure. Sleeping will likely
decrease blood pressure. Not relaxing for several moments before measurements can
influence readings as well.
In addition to these factors, beverages containing caffeine or alcohol, certain
medications, emotional stress and even tight-fitting clothes can make a difference in
the readings.
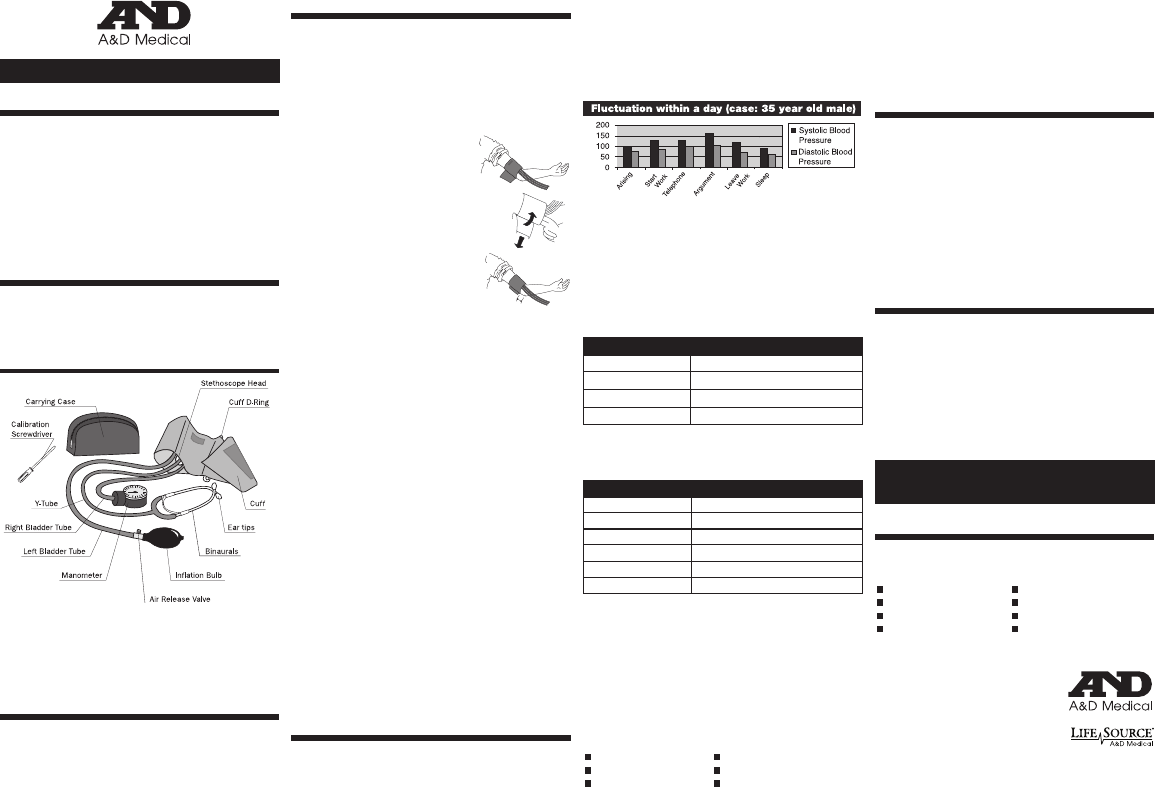
WHAT CAUSES VARIATIONS IN BLOOD PRESSURE?
An individual’s blood pressure varies greatly from day to day and season to season.
For hypersensitive individuals, these variations are even more pronounced. Normally,
blood pressure rises during work or play and falls to its lowest levels during sleep.
ASSESSING HIGH BLOOD PRESSURE FOR ADULTS
The following standards for assessing high blood pressure (without regard to age or
gender) have been established as a guideline. Please note that other risk factors (e.g.
diabetes, obesity, smoking, etc.) need to be taken into consideration and may affect
these figures. Consult with your physician for an accurate assessment.
JNC7 Classification Table – for adults within the U.S.
BP Classification Systolic (mmHg) Diastolic (mmHg)
Normal less than 120 and less than 80
Prehypertension 120-139 or 80-89
Stage 1 Hypertension 140-159 or 90-99
Stage 2 Hypertension 160 or 100
SOURCE: The Seventh Report of the Joint National Committee on Prevention, Evaluation
and Treatment of High Blood Pressure for adults. National Heart, Lung and
Blood Institute - May 2003.
WHO Classification Table – for adults outside of the U.S. (e.g. Canada, Mexico)
BP Classification Systolic (mmHg) Diastolic (mmHg)
Optimal less than
120 and less than 80
Normal less than 130 or less than
85
High-Normal 130-139 or 85-89
Grade 1 Hypertension 140-159 or 90-99
Grade 2 Hypertension 160-179 or 100-109
Grade 3 Hypertension 180 or 110
SOURCE: Standards to assess high blood pressure, without regard to age or gender, have
been established by the World Health Organization (WHO).
WHAT IS HYPERTENSION?
Hypertension (high blood pressure) is the diagnosis given when readings consistently
rise above normal. It is well known that hypertension can lead to stroke, heart attack
or other illness if left untreated. Referred to as a “silent killer” because it does not
always produce symptoms that alert you to the problem, hypertension is treatable
when diagnosed early.
CAN HYPERTENSION BE CONTROLLED?
In many individuals, hypertension can be controlled by altering lifestyle and
minimizing stress, and by appropriate medication prescribed and monitored by
your doctor. The American Heart Association recommends the following lifestyle
suggestions to prevent or control hypertension:
Don’t smoke. Have regular physical checkups.
Reduce salt and fat intake. Maintain proper weight.
Exercise routinely. Monitor your blood pressure at periodic
intervals.
WHY MEASURE BLOOD PRESSURE AT HOME?
It is now well known that, for many individuals, blood pressure readings taken in a
doctor’s office or hospital setting might be elevated as a result of apprehension and
anxiety. This response is commonly called “white coat hypertension.”
In any case, self-measurement at home supplements your doctor’s readings and
provides a more accurate, complete blood pressure history. In addition, clinical studies
have shown that the detection and treatment of hypertension is improved when
patients both consult their physicians and monitor their own blood pressure at home.
MAINTENANCE INSTRUCTIONS
BASIC CARE OF YOUR HOME BLOOD PRESSURE KIT
With proper care, your Home Blood Pressure Kit will provide many years of reliable
service. To insure a well functioning unit, follow these basic rules:
• Handle the pressure manometer with care. Do not drop or jar. The needle should
indicate zero when cuff is fully deflated.
• Always deflate cuff before storing.
• Avoid hitting objects against surface of stethoscope.
• Store all items, including instruction booklet, in the convenient storage case
provided.
A&D Medical has checked your blood pressure unit to assure reliability and accuracy
prior to shipment. How ever, as with any sensitive instrument subject to repeated
use, we recommend your blood pressure unit be checked periodically for proper
calibration to ensure accurate blood pressure readings.
CHECKING FOR ACCURACY
HOW TO CHECK YOUR HOME BLOOD PRESSURE KIT FOR ACCURACY
1. Detach manometer from bladder tube. Hold manometer in a vertical position.
2. If the needle on the dial rests within the zero indicator on the face plate, your unit
is guaranteed to be accurate.
3. If the needle rests outside the zero indicator, it should be recalibrated.
4. To recalibrate, insert the small screwdriver into the hose connector end of the
manometer. Turn the screw driver in either direction without going all the way
around the dial to get the needle back to the zero indicator.
5. If the unit cannot be recalibrated using this method, please contact A&D Medical
at 1-888-726-9966.
CONTACT INFORMATION
Our products are designed and manufactured using the latest scientific and techno-
logical methods, and offer accurate, easy to use, home monitoring and treatment
options. Our full product line includes:
Digital Blood Pressure Monitors Personal Health Scales
Manual Blood Pressure Monitors Activity Monitors
Blood Pressure Cuffs Digital Thermometers
Wireless Products Stethoscopes
This A&D blood pressure product is covered by a two year warranty.
Distributed by:
A&D Engineering, Inc.
1756 Automation Parkway
San Jose, CA 95131
1-888-726-9966
www.andmedical.com
LifeSource is a trademark of A&D Medical. ©2012 A&D Medical. All rights reserved.
Specifications subject to change without notice. I-MAN-UA-101-062012-REV-a
Printed in China
Visit our weBsite At www.AndmedicAl.com
for AdditionAl suPPort.

Praat mee over dit product
Laat hier weten wat jij vindt van de A and D Medical UA-101 Bloeddrukmeter. Als je een vraag hebt, lees dan eerst zorgvuldig de handleiding door. Een handleiding aanvragen kan via ons contactformulier.