PLL FM RADIO
Model No.: DR002A-521
110mm(H) X 78mm(W)
TR-521 IM-EN (with alarm clock function)
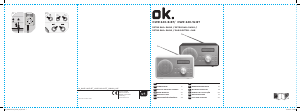
1. Display
2. Power ON/OFF
3. MP3/Radio
4. Play/Pause
5. Previous
6. Next
7. Numerical Keys
8. Volume Control
9. FM Antenna
10. Aux-in Jack
11. Headphone Jack
12. SD/MMC Card Slot
13. DC 5V USB Cable connector
14. TF Card Slot
15. USB Connector
14 15
1
2
3
4
5
6
7 8
9
10
11
12
13
EN-1
EN-2
OPERATING INSTRUCTION
Battery Supply
Open the battery compartment and insert as
indicated in the compartment one Rechargeable
Batteries, Li-ion 3.7V
Battery Charging
Connect the unit by inserting the USB cable into DC
5V IN jack, and inserting the other end into the USB
interface or USB charger. The charging time is
around 2 hours. The charging indicator will flash
during battery charging.
To use 5V AC/DC adapter for external DC charging,
plug the connecting cable to the DC jack. (Voltage
adapter is an optional accessory. Do not charge the
battery with the AC / DC adapter for more than 24
hours.)
IMPORTANT
If the unit has not been used for a long period of
time, the rechargeable battery may be completely
discharged into a “sleep mode” condition. This is the
characteristics of all the rechargeable battery. For
the first time to recharge (to wake up) the battery, it
is recommended to charge for a period exceed 5
hours but not exceed 24 hours.
Standby Mode
1. Press Power Button for 1 second to power on the
unit.
2. The unit will be in Standby Mode automatically.
EN-3
Setting The Clock
1. Check the unit is in Standby Mode.
2. Press Numerical Key 1 x 2 times for 2 seconds
each on the front panel to start clock setting.
3. To set the hours, press Previous or Next while the
display is still flashing.
4. Press Numerical Key 1 on the front panel to
minute setting.
5. To set the minutes, press Previous or Next while
the display is still flashing.
6. Press Numerical Key 1 on the front panel to
complete the clock setting.
Setting The Alarm
1. Check the radio is in Standby Mode.
2. Press Numerical Key 2 x 2times for 2 seconds
each on the front panel to start alarm setting.
3. To set the hours, press Previous or Next while the
display is still flashing.
4. Press Numerical Key 2 on the front panel to
minute setting.
5. To set the minutes, press Previous or Next while
the display is still flashing.
6. Press Numerical Key 2 each on the front panel to
complete the alarm setting.
Remark: Press Numerical Key 3 to enable / disable
the alarm function by pressing Previous or Next. To
make sure the display is showing “A ON” if alarm
function is in using,
To turn off the alarm, press MP3/Radio button once.
EN-4
Radio
1. Press Power button for 2 seconds to switch on the
unit into Standby Mode.
2. Press MP3/Radio button once into Radio Mode.
3. Press Next or Previous button for a second to
start radio scanning.
4. Adjust the sound volume by pressing Vol- & Vol+
5. Press Power button for 2 seconds to switch off the
unit.
Radio Preset
1. Press Play Button for 2 seconds to start Auto-
Scan Preset Stations. It will auto-stop when all the
stations have been found out.
2. Press Next or Previous button once to select
preset stations.
Input Radio Station
Press Number Keys to direct enter the frequency of
Radio Station. The unit will tune to the entered radio
station immediately.
To improve reception:
Pull out the telescopic aerial. To improve FM Recep-
tion incline and turn the aerial, reduce its length if
the FM-signal is too strong (very close to a transmit-
ter).
EN-6
EN-5
USB, SD/MMC CARD, TF Card PLAYBACK
Able to decode and playback all MP3 files which
stored in the memory media with USB connector,
SD or MMC Card Slot, TF Card.
1. Press Power button for 2 seconds to switch on
the unit into Standby Mode.
2. Press MP3/Radio button once into MP3 Mode.
3. Before connecting the USB media to the unit,
make sure the port is in correct direction and will
connect. Or insert SD/MMC/TF Card straightly
without bending.
4. The system will automatically start reading the
MP3 files in the USB Storage Media, SD or MMC
Card, TF Card.
5. Press Next / Previous / PLAY Buttons for Next /
Previous / PLAY FUNCTION.
6. Press Number Keys to direct enter the sound
track sequence.
Wrongly connect the USB Storage Media, or
SD/MMC/TF Card upside down could damage the
unit or the USB Storage Media or SD/MMC/TF
Card. A locked SD/MMC/TF Card cannot detected
or playback.
Sleep Function
1. Press Numerical Key 4 for 2 seconds during in
Radio or MP3 Mode.
2. Press Numerical Key 4 to select the auto-sleep
time.
EN-7
SPECIFICATIONS
Power Output: 1.3W RMS
Input Power: DC 5V
Rechargeable Battery: DC Li-ion 3.7V 400mAh
PRECAUTIONS:
1. Do not expose the unit to extreme temperature
nor high humidity to ensure normal functioning for a
long lifetime.
For instances, never place the unit in bathing areas
nor around stoves and radiators.
2. If you find the unit is not working properly, please
take it to your nearest services centre. Do not
attempt to repair by yourself.
WARNING :
To prevent fire or shock hazard, do not expose the
unit to rain or moisture.
To avoid electrical shock, do not open the cabinet,
refer to service agent or qualified engineer only.
Disposal of used electrical and electronic equipment
The meaning of the symbol on the
material, its accessory or packaging
indicates that this product shall not be
treated as household waste.
Please, dispose of this equipment at
your applicable collection point for the
recycling of electrical and electronic
equipments waste. In the European
Union and Other European countries which there
are separate collection systems for used electrical
and electronic product. By ensuring the correct
disposal of this product, you will help prevent
otentially hazardous to the environment and to
human health, which could otherwise be caused by
unsuitable waste handling of this product. The
recycling of materials will help conserve natural
resources. Please do not therefore dispose of your
old electrical and electronic equipment with your
household waste.
For more detailed information about recycling of
this product, please contact your local city office,
your household waste disposal service or the shop
where you purchased the product.
For more information and warranty conditions,
please visit: www.akai.com.ro
1. Afisaj
2. Pornit/Oprit
3. MP3/Radio
4. Play/Pauza
5. Anterior
6. Urmator
7. Taste numerice
8. Control Volum
9. Antena FM
10. Jack Aux-In
11. Jack Casca
12. Slot Card SD/MMC
13. Conector cablu USB DC 5V
14. Slot Card TF
15. Conector USB
14 15
1
2
3
4
5
6
7 8
9
10
11
12
13
RO-1
RO-2
INSTRUCTIUNI DE OPERARE
Alimentarea cu baterii
Deschideti compartimentul pentru baterii si introduceti
după cum este indicat în compartimentul bateriilor o
baterie reîncărcabila, Li-Ion de 3.7V.
Incarcarea bateriei
Conectati unitatea prin introducerea cablului USB în
jack DC IN 5V, si introduceti celălalt capăt la
interfata USB sau încă rcă tor USB. Timpul de
încărcare este de aproximativ 2 ore. Indicatorul de
încărcare a bateriei va clipi in timpul încărcarii.
Pentru a utiliza Adaptorul 5V AC / DC pentru
incarcare externa DC, conectati cablul de conectare
la mufa DC. (Adaptorul de tensiune este un acceso-
riu optional. Nu încărcati bateria cu adaptorul AC/DC
pentru mai mult de 24 ore).
IMPORTANT
Dacă aparatul nu a fost folosit pentru o perioadă
lungă de timp Bateria reîncărcabilă poate fi complet
descărcată într-o conditie "sleep mode". Aceasta
este caracteristica la toate bateriile reîncărcabile.
Pentru prima dată sa reîncărcati (să te trezesti)
bateria, se recomandă sa fie incarcata pentru o
perioadă de 5 ore, dar nu trebuie să depăsească 24
de ore.
Modul Standby
1. Apasati butonul Power o secunda pentru pornirea
aparatului.
2. Aparatul va fi automat in standby.
RO-3
Programarea ceasului
1. Verificati daca aparatul este in standby.
2. Apasati tasta numerica 1 de 2 ori timp de 2
secunde fiecare de pe panoul fata pentru pornirea
programarii ceasului.
3. Pentru a programa orele, apasati butonul
Previous sau Next in timp ce afisajul palpaie.
4. Apasati tasta numerica de pe panoul frontal
pentru programarea minutelor.
5. Pentru a programa minutele, apasati Previous sau
Next in timp ce afisaul palpaie.
6. Apasati tasta numerica 1 de pe panoul forntal
pentru a finaliza programarea ceasului.
Programarea alarmei
1. Verificati ca radio este in standby
2. Apasati tasta numerica 2 de 2 ori timp de 2
secunde fiecare, de pe panoul frontal pentru a porni
programarea alarmei.
3. Pentru programarea orei, apasati Previous sau
Next in timp ce afisajul palpaie.
4. Apasati tasta numerica 2 de pe panoul frontal
pentru programarea minutelor.
5. Pentru programarea minutelor, apasati Previous
sau Next in timp ce afisajul palpaie.
6. Apasati tasta numerica 2 de fiecare data, de pe
panoul frontal pentru a finaliza programarea alarmei.
Pentru a opri alarma apasati o data butonul
MP3/Radio.
RO-4
Radio
1. Apasati butonul Power timp de 2 secunde pentru
a comuta radio in standby.
2. Apasati o data butonul MP3/Radio pentru a intra
in modul radio.
3. Apasati butonul Previous sau Next timp de o
secunda pentru a porni scanarea radio.
4. Reglati nivelul volumului folosind butoanele V+
sau V-.
5. Apasati butonul Power timp de 2 secunde pentru
a opri radio.
Presetarea Radio
1. Apăsati butonul Play timp de 2 secunde pentru a
porni Auto-Scanarea Posturilor presetate. Acesta se
va opri automat atunci când au fost gasite toate
posturile.
2. Apăsati butonul Next sau Previous o dată pentru a
selecta posturile presetate.
Introducerea posturilor radio
Apăsati tastele numerice pentru a introduce direct
frecventa postului radio. Unitatea va trece imediat la
postul radio introdus.
Imbunatatirea receptiei
Scoateti complet antena telescopică. Pentru a
îmbunătăti receptia FM înclinati si rotiti antena,
reduceti lungimea sa în cazul în care semnalul FM
este prea puternic (foarte aproape de transmitător).
RO-6
Dezafectarea echipamentelor electrice si electronice
uzate
Semnificatia simbolului de pe material,
accesorii sau de pe ambalaj indică ca
acest produs nu poate fi tratat ca deseuri
menajere.
Vă rugăm, aruncati acest echipament la
punctul de colectare pentru reciclarea
echipamentelor electrice si electronice
uzate. În Uniunea Europeană si în alte
tări europene există colectare separată pentru
produse electrice si electronice uzate. Asigurand
eliminarea corectă a acestui produs, veti ajuta la
prevenirea substantelor potential periculoase pentru
mediu si pentru sănătatea umană, care, altfel, ar
putea fi cauzate de manipularea necorespunză toare
a deseurilor din acest produs. Reciclarea materi-
alelor va ajuta la conservarea resurselor naturale.
Prin urmare, vă rugăm să nu aruncati echipamentele
electrice si electronice vechi împreună cu deseurile
menajere.
Pentru mai multe informatii detaliate despre
reciclarea acestui produs, vă rugăm să contactati
biroul local din orasul dumneavoastră, serviciul de
eliminare a deseurilor menajere sau magazinul de la
care ati achizitionat produsul.
Pentru mai multe informatii si conditii de garantie,
vă rugăm să vizitati: www.akai.com.ro
RO-5
Redarea USB, Card SD/MMC, Card TF
Aparatul este capabil să decodeze si sa redea
toate fisierele MP3 stocate in memoria mass-
media cu conector USB, slot SD sau MMC,slot TF.
1. Apasati butonul Power timp de 2 secunde
pentru a comuta radio in standby.
2. Apăsati o dată MP3/Radio pentru modul MP3.
3. Înainte de a conecta aparatul la mass-media
USB, asigurati-vă că portul este în directia corectă
si se va conecta. Sau introduceti un card SD /
MMC / TF direct fără îndoire.
4. Sistemul va porni automat citirea fisierelor MP3
din memoria USB, cardul SD sau MMC, Cardul TF.
5. Apăsati Butoanele Next / Previous / PLAY
pentru Urmator/Anterior / functia PLAY.
6. Apăsati tastele numerice pentru a introduce
secventa melodiilor.
Conectarea gresita a USB sau cardului
SD/MMC/TF poate defecta aparatul sau cardurile
de memorie. Un card SD/MMC blocat nu poate fi
recunoscut sau redat.
Functia Sleep(somn)
1. Apasati tasta numerica 4 timp de 2 secunde in
timpul redarii Radio sau MP3.
2. Apasati tasta numerica 4 pentru a selecta timpul
auto sleep.
RO-7
SPECIFICATII TEHNICE
Putere de iesire: 1.3W RMS
Putere de intrare: DC 5V
Baterie reîncărcabilă: DC 3.7V 400mAh Li-ion
ATENTIE
1. Nu expuneti aparatul la temperaturi extreme sau
la umiditate ridicata pentru a asigura functionarea o
perioada mare de timp.
Nu asezati unitatea în zonele bailor nici în jurul
sobelor sau radiatoarelor.
2. Dacă găsiti ca unitatea nu functioneaza în mod
corespunzător, vă rugăm duceti-o la cel mai
apropiat centru service. Nu incercati să reparati de
unul singur.
ATENTIE
Pentru a preveni riscul de incendiu sau electrocu-
tare, nu expuneti aparatul la ploaie sau umezeală.
Pentru a evita electrocutarea, nu deschideti
carcasa, apelati la persoane de service calificate.


Praat mee over dit product
Laat hier weten wat jij vindt van de Akai DR002A-521 Radio. Als je een vraag hebt, lees dan eerst zorgvuldig de handleiding door. Een handleiding aanvragen kan via ons contactformulier.
beantwoord | Ik vind dit nuttig (0) (Vertaald door Google)