GREAT BRITAIN • CUSTOMER SERVICE
ENGLISH
8
1 2 3
5
4
6
7
€
SENSOR
max 2 mm
10
11
12
14
15
13
9
Ver. 20150211
Wireless Cycle
Computer
Art.no 31-5371 Model 401-KS20TUL
Please read theentire instruction manual before using
theproduct and save it for future reference. Wereserve
theright for any errors in text or images and any neces-
sary changes made to technicaldata. Ifyou have any
questions regarding technical problems please contact
our Customer Services.
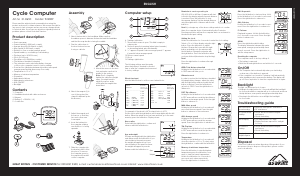
Product description
• Speedometer (0–99.9 km/h or mph)
• Trip meter (0–999.99 km or miles)
• Odometer (0–999.99 km or miles)
• Theodometer can be reset after battery changes or
if thecyclecomputer is reset to factory settings.
• Automatic trip timer (up to 9:59:59 hours)
• Max speed history (up to 99.9 km/h or mph)
• Clock (12/24 hour)
• Average speed display (0–99.9 km/h or mph)
• Auto Scan (alternating display of trip distance,
maxspeed, averagespeed and trip time)
• Relation to (above or below) average speed display
• Speed tendency; accelerating or decelerating
• Service reminder
• Thermometer (-10 to +50 ºC or 14 to 122 ºF)
• Approximate calorieburn
• Backlight
• Approximate fatburn
• Automatic activation and deactivation
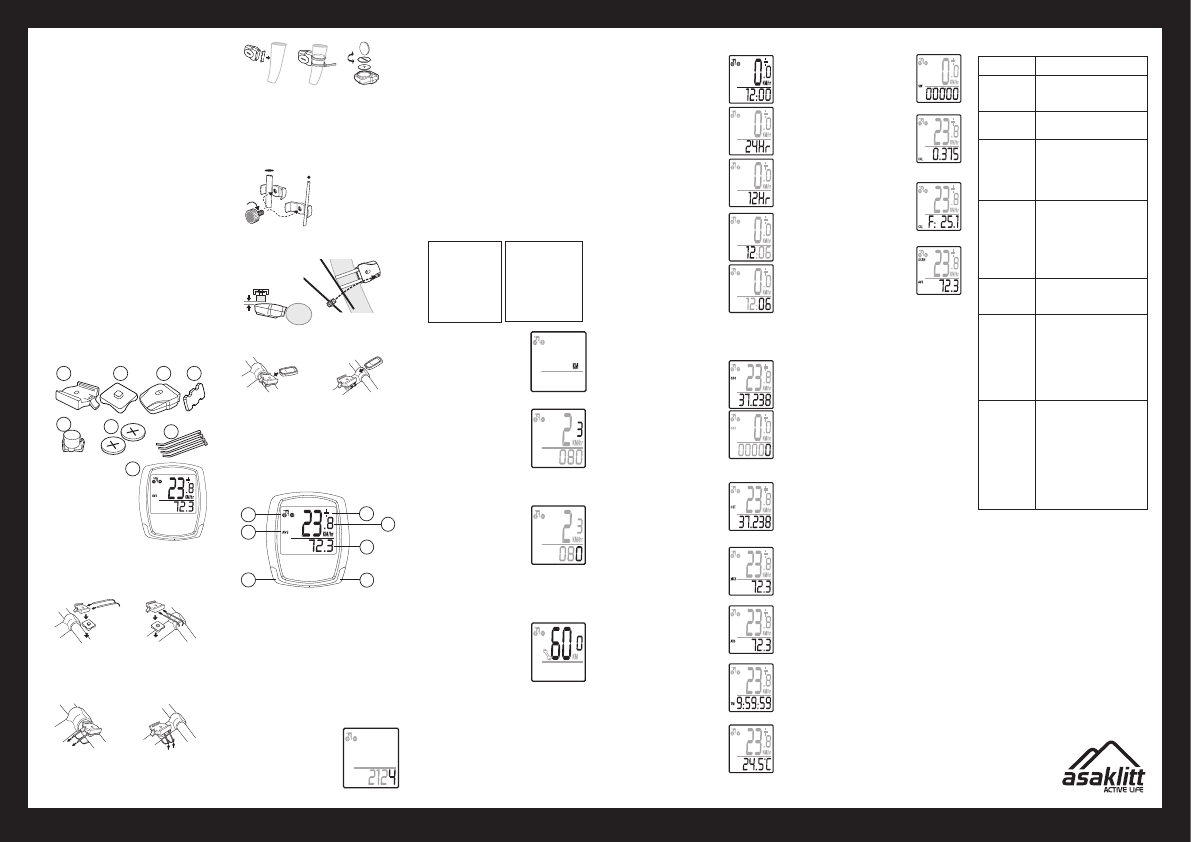
Contents
1. Quick-release
bracket
2. Framemounting
plate
3. Sensor/transmitter
4. Rubberpad
5. Magnet
6. Batteries for
thecomputer
and sensor
(2×CR2032, 3 V)
7. Cableties
8. Cyclecomputer
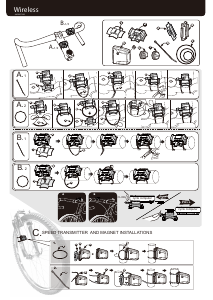
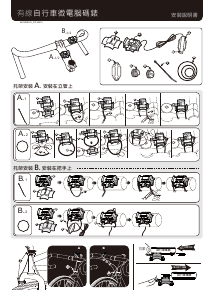
Assembly
1. Thequick-release bracket (1) can be attached to
different parts of theframe, such as thehandlebar or
thestem. Themounting plate (2) can be aligned in
one of two ways when it is attached to theback of
thequick-release bracket.
2. Clamp thequick-release bracket and themounting
plate together and fasten them to theframe using
thecable ties (7).
3. Insert 1×CR2032 battery into thesensor/
transmitter (3) and attach it, together with therubber
pad onto thefrontfork. Makesure that thesensor
is facing thespokes. Note: Don’t completely tighten
thecable ties (7) that hold thesensor straightaway.
Itmust be possible to adjust theposition of
thesensor/transmitter (3) so that it is within range of
themagnet (5).
4. Attachthemagnet (5) to one of thespokes.
Themagnet’s clamp will fit spokes of different
thicknesses.
5. Adjustthemagnet and thesensor/transmitter so
that they face each other with agap of 2mm.
6. Insert1×CR2032 battery into thecycle computer
(8) with thepositive terminal (+) facingup. Makesure
that theo-ring is seated correctly before screwing
thelidon. Pushthecomputer into thequick-
release bracket until it clicks intoplace. Toremove
thecomputer, press down thesnap buckle and pull
out thecomputer.
Setting
9. Leftarrow button: Pressto confirm or select
asubmenu.
10. Showswhich menu isopen. Thisfield is empty in
setupmode.
11. Showsif speed is increasing (wheel spins forwards)
or decreasing (wheel spins backwards).
12. A“+” appears if speed is above average speed;
a“–”appears if speed is below averagespeed.
13. Showscurrentspeed.
14. Showsdistance travelled (trip meter).
15. Rightarrow button: Pressto turn thecomputer on
or select afunction.
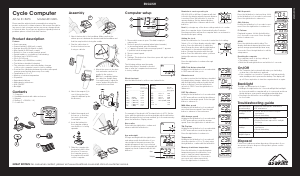
Setting the wheel size
(circumference in mm)
When thebattery is inserted for
thefirst time or when thecycle
computer has been reset to its
factory settings, thewheel size
setting will appear on thedisplay
and thelast digit of thesetting
willflash.
Enter thelast digit of thecircumference with theright
arrow button, confirm and proceed to thenext digit with
theleft arrow button. Continueuntil all thedigits have
been entered.
When thewheel circumference has been entered, go to
thenext menu by pressing theleft arrow button.
How do Ifind out thecircumference of thewheel?
• Use thetable on theright to find thecorrect value
for thecircumference of thewheel. Iffor example
thewheel is 26″ (650A), thevalue you should enter
is2073.
• Use theformula C = 3.14 × diameter to calculate
thecircumference of thewheel.
• One method of measuring thecircumference:
Makeamark on thetyre and on theground
where thetyre makes contact.Rollthecycle/
wheel forwards until themark on thetyre is
once again at thecontact point with theground.
Thewheel has now travelled through one revolution.
Markthesecond point on theground and measure
thedistance between thetwo marks to get
thecircumference of thewheel.
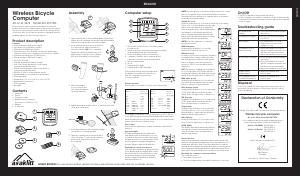
Wheel Circum-
diameter ferenceof
wheel (mm)
------------------------------------
20″ 1596
22″ 1759
24″ 1916
26″ (650A) 2073
26.5″ (Tubular) 2117
26.8″ (700×25C) 2124
26.8″ (700×28C) 2136
27″ (700×32 C) 2155
28″ (700B) 2237
(w/tire)
Wheel Circum-
diameter ferenceof
wheel (mm)
--------------------------------------
ATB 24″×1.75 1888
ATB 26″×1.4 1995
ATB 26″×1.5 2030
ATB 26″×1.75 2045
ATB 26″×2 (650B) 2099
27″×1 2136
27″×1 1/4 2155
Km or miles
Select either KM or M by pressing
theright arrow button repeatedly.
Presstheleft arrow button to
confirm and proceed to thenext
setting:
Age
Enter thelast digit of thevalue with
theright arrow button, confirm
and proceed to thenext digit with
theleft arrow button. Continue
until all thedigits in theage have
been entered. Whenthewheel
circumference has been entered,
go to thenext menu by pressing
theleft arrow button.
Weight
Enter thelast digit of thevalue with
theright arrow button, confirm
and proceed to thenext digit with
theleft arrow button. Continue
until thecorrect weight has been
entered. Whentheentire value has
been entered, go to thenext menu
by pressing theleft arrow button.
Note!If you selected km in theprevious menu,
theweight will appear inkg. Ifyou selected miles in
theprevious menu, theweight will appear in pounds.
Reminder to service your bicycle
Select either 200, 400, 600 or 800
km by pressing theright arrow
button repeatedly. Presstheleft
arrow button to confirm. Aspanner
flashes in thedisplay when thepreset
distance to thenext service has been
reached. Oncetheservice distance
has been reached theflashing
spanner can be turned off by
pressing theleft arrow button.
Note! Ifyou begin any of theabove settings and do not
confirm them, thecomputer shuts off automatically after
5 minutes. Pressing any button will turn thecomputer
back on and revert to thewheel size input setting.
Setting the clock
1. Holddown theleft arrow button
for 2 seconds to enter theclock
settingmode.
2. Selecteither 24 Hr or 12Hr
(12-or 24-hour clock) by pressing
theright arrow button repeatedly.
Presstheleft arrow button to
confirm and proceed to thenext
setting.
3. Set thetime (hours and minutes.
Setthehours by pressing theright
arrow button, confirm and proceed
to theminutes by pressing theleft
arrow button. Settheminutes
in thesame way as thehours.
Presstheleft arrow button when
you have finished (theminutes will
stop flashing).
Note! Presstheright arrow button to advance through
themenus, in thisorder:
ODO (total distance travelled)
In order to set thetotal distance
travelled on theodometer after
changing thebattery: Holddown
theleft arrow button for 2 seconds
to enter thesettingsmode.
Changethevalue with theright arrow
button and advance to thenext digit
using theleft arrow button in thesame
way as before. Presstheleft arrow
button to display theODO setting.
Presstheright arrow button to
advanceto:
DST (trip meter)
Hold down theleft arrow button for
2 seconds to reset thetrip meter,
trip timer and average speed tozero.
Presstheright arrow button to
advanceto:
MXS (top speed history)
Hold down theleft arrow button for
2 seconds to zero-reset thevalue of
thetop speed reached. Presstheright
arrow button to advanceto:
AVS (average speed)
Hold down theleft arrow button for
2 seconds to zero-reset thevalue of
theaveragespeed. Presstheright
arrow button to advanceto:
TM (trip timer)
Hold down theleft arrow button for
2 seconds to reset thetrip timer
tozero. Presstheright arrow button to
advanceto:
Temperature
Hold down theleft arrow button for
2seconds to display thetemperature in
ºC orºF. Selectthedesired temperature
scale using theright arrow button,
confirm by pressing theleft arrow
button. Presstheright arrow button to
advanceto:
SW (stopwatch)
Min, sec, 1/10sec. Presstheleft arrow
button once to start thestopwatch
and once again to stopit. Holddown
theleft arrow button for 2 seconds to
zero-reset. Presstheright arrow button
to advanceto:
CAL (calories)
Hold down theleft arrow button for
2 seconds to reset thecalories value
tozero. Presstheright arrow button to
advanceto:
F (fat burn in grams)
Showshow many grams of fat have
been burned. Holddown theleft arrow
button for 2seconds to reset thefat
burn tozero. Presstheright arrow
button to advanceto:
SCAN
Alternating 4-second display of trip
distance, top speed, average speed
and triptime. Presstheright arrow
button to exit thesetupmenus.
Resetting the cycle computer
to factory settings
Thecycle computer resetsif:
• Thebattery is removed.
• Theleft and right arrow buttons are held in together
for 2 seconds.
Switching the cycle
computer on/off
• Turn thecycle computer on by pressing any button.
• If thecomputer is not used for 5 minutes it shuts off
automatically to preserve thebattery. Pressing any
button will turn thecomputer back onagain.
Automatic shut-off
Thecycle computer shuts off automatically after
5minutes inactivity.
Backlight
Thebacklight can be activated in twoways.
• Holdtheright arrow button down for 2 seconds to
switch thebacklight on for about 8 seconds. Thetrip
distance, top speed, average speed and trip time will
all appear once briefly on thedisplay.
• Presstheleft arrow button once to switch
thebacklight on for ashort time (4 seconds).
Troubleshooting guide
No speedometer
reading.
Check thedistance between
themagnet and sensor/transmitter.
Thedisplay
is sluggish,
shows delayed
readings.
It is too cold, theworking temp is
0–55ºC.
Black display. • Thetemperature is toohigh.
• Display has been exposed to
sunlight toolong.
Thesymbols
on thedisplay
areweak.
• Check thebattery in
thesensor/transmitter and
thecycle computer and make
sure that they are correctly
inserted.
• Replace thebatteries if
necessary.
Thespeed
and distance
travelled are not
displayed.
• Check thedistance between
themagnet and sensor/
transmitter.
• Check thebattery in thesensor/
transmitter and thecycle
computer and make sure that
they are correctly inserted.
• Replace thebatteries if
necessary.
Irregular
characters
appear on
thedisplay.
Remove thebattery from thecycle
computer and insert itagain.
Thecycle
computer is
reset or displays
thewrong top
speed due
to external
interference from
amobile phone
or electronic
device.
• Move thecause of
theinterference away from
thecycle computer.
• Remove thebattery from
thecycle computer and insert
itagain.
• Press thechannel selector
button on thesensor/
transmitter to change
thechannel.
External
interference
of thecycle
computer
caused by other
transmitters in
thevicinity.
Change thedigital ID code
between thesensor/transmitter
and thecomputer as follows:
1. Pressthechannel selector
button on thesensor/
transmitter.
2. Keeppedalling to activate
thesensor/transmitter.
3. Thenew ID code will be
registered after about 1minute.
Thedisplay will be blank whilst
thechanges takeplace.
Disposal
This product should be disposed of in accordance with
local regulations. Ifyou are unsure how to proceed,
contact your localauthority.


Praat mee over dit product
Laat hier weten wat jij vindt van de Asaklitt 401-KS20TUL Fietscomputer. Als je een vraag hebt, lees dan eerst zorgvuldig de handleiding door. Een handleiding aanvragen kan via ons contactformulier.