
GREAT BRITAIN • CUSTOMER SERVICE
Tel: 020 8247 9300, e-mail: customerservice@clasohlson.co.uk internet: www.clasohlson.co.uk
ENGLISH
00000
0
0
0:80
23
KM/hr
KM/hr
+
37.2 38
23
8
KM/hr
ODO
KM/hr
F: 25.I
23
8
CAL
72.3
23
8
KM/hr
SCAN
AVS
+
37.2 38
23
8
KM/hr
DST
+
72.3
23
8
KM/hr
MXS
+
72.3
23
8
KM/hr
AVS
+
24.5
˚
C
23
8
KM/hr
+
9:5 9:59
23
8
KM/hr
TM
+
KM
KM/hr
24:H
0
0
0:80
23
KM/hr
0.375
23
8
KM/hr
CAL
+
SW
00000
0.
0
KM/hr
+
60
0
KM
H:25.0
˚
C
23
8
KM/hr
+
2I24
KM/hr
7
6
8
9
10
11
I3
.
8
I2:32
12
KM/hr
38
.
2
32.5
1
2
3
4
5
2
3
Ver. 20150901
Km or miles
Select with the right button, confirm and
advance with the left button to:
Age and weight
Set age and weight with the right button
and advance with the left button. Ifyou
selected km in the previous menu,
theweight will appear in kg. If you
selected miles in the previous menu,
theweight will appear in pounds.
Advancewith the left button to:
Age
Weight
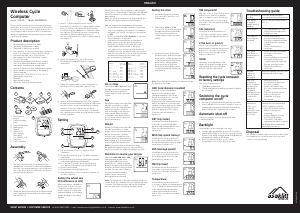
Cycle Computer
Art.no 31-8650 Model 922089
Please read the entire instruction manual before using the
product and save it for future reference. We reserve the right for
any errors in text or images and any necessary changes made
to technical data. If you have any questions regarding technical
problems please contact Customer Services.
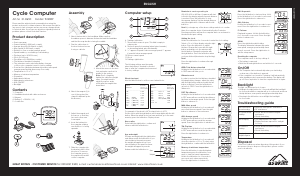
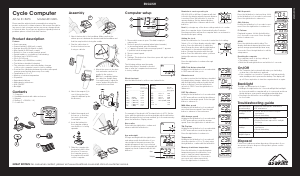
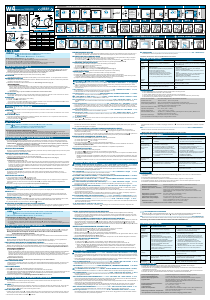
Product description
Features
• Service program
• Current speed (0–99.9 km/h or mph)
• Average speed (0–99.9 km/h or mph)
• Max. speed (0–99.9 km/h or mph)
• Relation to (over or under) average speed
• Speed tendency; accelerating or decelerating
• Trip timer (up to 9:59:59 hours)
• Clock (12/24 hour)
• Trip distance (0–999.99 km or miles)
• Total distance travelled (odometer)
• The odometer can be reset after battery changes
or if the cycle computer is reset to factory settings
• Scan function (alternates between trip meter, max speed,
average speed and trip timer every 4 seconds)
• Temperature in ºC or ºF
• Memory of min/max temperature
• Stopwatch
• Approximate fat burn
• Approximate calorie burn
• Auto ON/OFF
• Backlight
Contents
1. Computer
2. Handlebar bracket with cable and sensor
3. Magnet
4. Battery (1 × CR2032, 3 V)
5. 6 cable ties
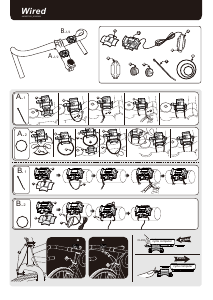
Assembly
1. Attach the bracket to the handlebar. Make sure that
therubber spacer is between the bracket and the handlebar
and that the snap buckle is facing the saddle.
2. Run the cable down to
the front fork and secure
it using a cable tie.
3. Attach the sensor to the front
fork and make sure that it is
parallel to the spokes.
Note: Don’t completely
tighten the cable ties straight
away. You might need to
adjust thesensor angle
alittle after the magnet has
been fitted.
4. Attach the magnet (3) to
one of the spokes (the
clamp fits different spoke
thicknesses).
5. Adjust the magnet and
the sensor so that they
face each other, max
2 mm apart.
6. Insert the battery into
the computer, making
sure that the + is facing
upwards.
7. Slide the computer into
the bracket until it clicks
into place. To remove
the computer, press in
the snap buckle and lift
out the computer.
Computer setup
6. Settings, left button
7. Shows which menu is open. This field is empty in
setup mode.
8. Shows if speed is increasing (wheel spins forwards)
or decreasing (wheel spins backwards).
9. “+” appears if speed is above average speed;“–” appears
if speed is below average speed.
10. Shows current speed
11. Clock
12. Settings, right button
The following settings must be made
when the battery is inserted for the first
time or after the computer has been reset
to factory settings:
Wheel size input
Use the tables below to set the correct wheel factor.
For example, if the wheel is 26″ the input factor is 2073.
Setthefactor with the right button and change digits with the left
button. When the wheel factor has been entered, go to the next
menu by press the left button. Display shows:
Reminder to service your bicycle
200, 400, 600 or 800 km. A spanner will start
to flash in the display when the preset distance
is reached. Press the left button to stop
thespanner flashing. Set the desired distance
using the right button. Advance with the left
button to:
Note! If you begin any of the above settings and do not confirm
them, the computer shuts off automatically after 5 minutes.
Pressing any button will turn the computer back on and revert to
the wheel size input setting.
Setting the clock
Hold in the left button for 3 seconds to enter the clock setting.
Select a 12 or 24 hour display using theright
button. Press the left button to adjust
thetime. Change the hours with the right
button and advance to the minutes with
theleft button. Change the minutes with
theright button. Press the left button when
you have finished (the minutes stop flashing).
Note!
Press the right button to advance through
the menus.
ODO: Total distance travelled
Holding in the left button for 3 seconds while
in ODO menu will take you to:
Odometer reset
In order to restore the total distance travelled
following battery changes, adjust the value
with the right button and move with the left
button as before. Press the left button to
go back to ODO. Press the right button to
advance to:
DST: Trip distance
Holding in the left button for 3 seconds while
in DST menu will zero-reset the trip distance,
trip timer and average speed. Press the right
button to advance to:
MXS: Max. speed
Holding in the left button for 3 seconds will
zero-reset the max speed. Press the right
button to advance to the next menu:
AVS: Average speed
Holding in the left button for 3 seconds while
in DST menu will zero-reset the average
speed. Press the right button to advance to:
TM: Trip time
Holding in the left button for 3 seconds while
in DST menu will zero-reset the trip time.
Press the right button to advance to:
Temperature
Holding in the left button for 3 seconds will
show the selection of ºC or ºF, select using
the right button, confirm with the left button.
Memory of min/max. temperature
Press the left button to view the highest
temperature, press the left button once
more to view the lowest temperature.
Hold in the left button for 3 seconds to
zero-reset each value respectively.
Press the right button to advance to:
SW: Stopwatch
Press the left button to start and stop. Hold
in the left button for 3 seconds to zero-reset.
Press the right button to advance to:
CAL: Calories
Hold in the left button for 3 seconds to zero-
reset. Press the right button to advance to:
F: Fat burn
Displayed in grams. Hold in the left button
for 3 seconds to zero-reset. Press the right
button to advance to:
SCAN
Press the right button whilst riding.
Thedisplay alternates between trip meter,
max speed, average speed and trip timer
every 4 seconds. Press the right button to
exit the setup menus.
Resetting the computer
The computer resets to factory settings if:
• The battery is removed.
• Both the left and right buttons are held in for 3 seconds.
On/Off
• The computer starts automatically when you start riding
or when any of the buttons is pressed.
• If the computer is not used for 5 minutes it will automatically
enter standby mode to preserve the battery. The display will
go off. Press any button to turn the computer back on again.
Backlight
The light can be turned on in 2 ways:
• Holding in the right button for 3 seconds will light the backlight
for 8 seconds and the computer will go to scan mode and show
the trip distance, max speed, average speed and trip time.
• Pressing in the left button once will light the backlight
for 4 seconds.
Troubleshooting guide
Inaccurate max
speed reading.
• Unknown atmospheric interference.
• RF interference.
No speedometer
reading.
• Check distance between magnet
and sensor.
• Check the battery.
Black display. • The temperature is too high.
• Display has been exposed to sunlight
too long.
No distance
reading.
• Check distance between magnet
and sensor.
• Check the battery.
Display shows
irregular figures.
• Remove the battery and insert it again.
Disposal
Follow local ordinances when disposing of this product. If you
are unsure of how to dispose of this product, please contact
your local authority.
Wheel Circum-
diameter ference of
wheel (mm)
------------------------------------
20″ 1596
22″ 1759
24″ 1916
26″ (650A) 2073
26.5″ (Tubular) 2117
26.8″ (700x25C) 2124
26.8″ (700x28C) 2136
27″ (700x32C) 2155
28″ (700B) 2237
Wheel Circum-
diameter ference of
wheel (mm)
----------------------------------------
ATB 24″x1.75 1888
ATB 26″x1.4 1995
ATB 26″x1.5 2030
ATB 26″x1.75 2045
ATB 26″x2 (650B) 2099
27″x1 2136
27″x1 1/4 2155


Praat mee over dit product
Laat hier weten wat jij vindt van de Asaklitt 922089 Fietscomputer. Als je een vraag hebt, lees dan eerst zorgvuldig de handleiding door. Een handleiding aanvragen kan via ons contactformulier.