简体中文
使用方法:
在使用三脚架前,把脚架的高度和角度调整
到合适的位置,以确保三脚架能平稳地放置
在一个水平面上,然后把相机固定在三脚架
云台上面,确保脚架和云台完全锁紧,防止
照相机意外滑落。
使用方法:
三脚架有三个角度调节,以适应在凹凸地面和
高低角度拍摄。每只脚管可以分别调节高中低
档三个角度,调整好角度后,要把角度调节片
推到锁紧的位置。
三脚架脚管为多节数脚管,通过伸缩脚管调节
三脚架高度。
每一节脚管(除最后一节外),都有防转槽和
防转条防止脚管转动。这样可以快捷的打开和
收放三脚架。
逆时针拧开中轴锁紧圈,把中轴调到合适位置,
然后顺时针旋转中轴锁紧圈锁紧中轴,记住不
要过度锁紧中轴,这样会毁损坏螺纹。
互换不锈钢脚钉和橡胶脚垫。根据不同地面使
用不同脚垫。
逆时针旋转水平中轴缩进旋钮,可使承载板在
水平调节范围正负15度调节。水平中轴锁紧旋
钮可拔出调整至合适的位置。
在刮风时,需要挂上重物增加三脚架的稳定性
可在挂钩上挂上沙袋、照相机袋或类似的物品。
注意不能超重,否则反而会影响三脚架的稳定
性。
百诺经典板扣系列脚架都有一个方便调节扳扣
锁紧力度的扳手扣在脚管上,在扳扣锁紧力度
过松或者过紧时,可根据自己的喜好调节扳扣
锁紧力度。
通过六角扳手调节脚架螺丝松紧度。
三脚架角度调节:(如图1所示)
三脚架高度调节:(如图2&3 所示)
中轴:(如图4、5、6所示)
水平中轴及锁紧旋钮:(如图8&9所示)
使用调节方法:(如图11、12、13所示)
可转换脚钉和橡胶脚垫:(如图7所示)
可伸缩挂钩:(如图10所示)
English
SET UP:
繁体中文
Before using your tripod, adjust each leg section to thedesired
height and leg angle setting. Ensure that thetripod is firmly
resting on a level surface and mount your camera carefully
on the tripod head. Always engage safety locks on the tripod
head to prevent any accidental dismounting.
1
6
5
4
8
10
9
11
2
3
12
13
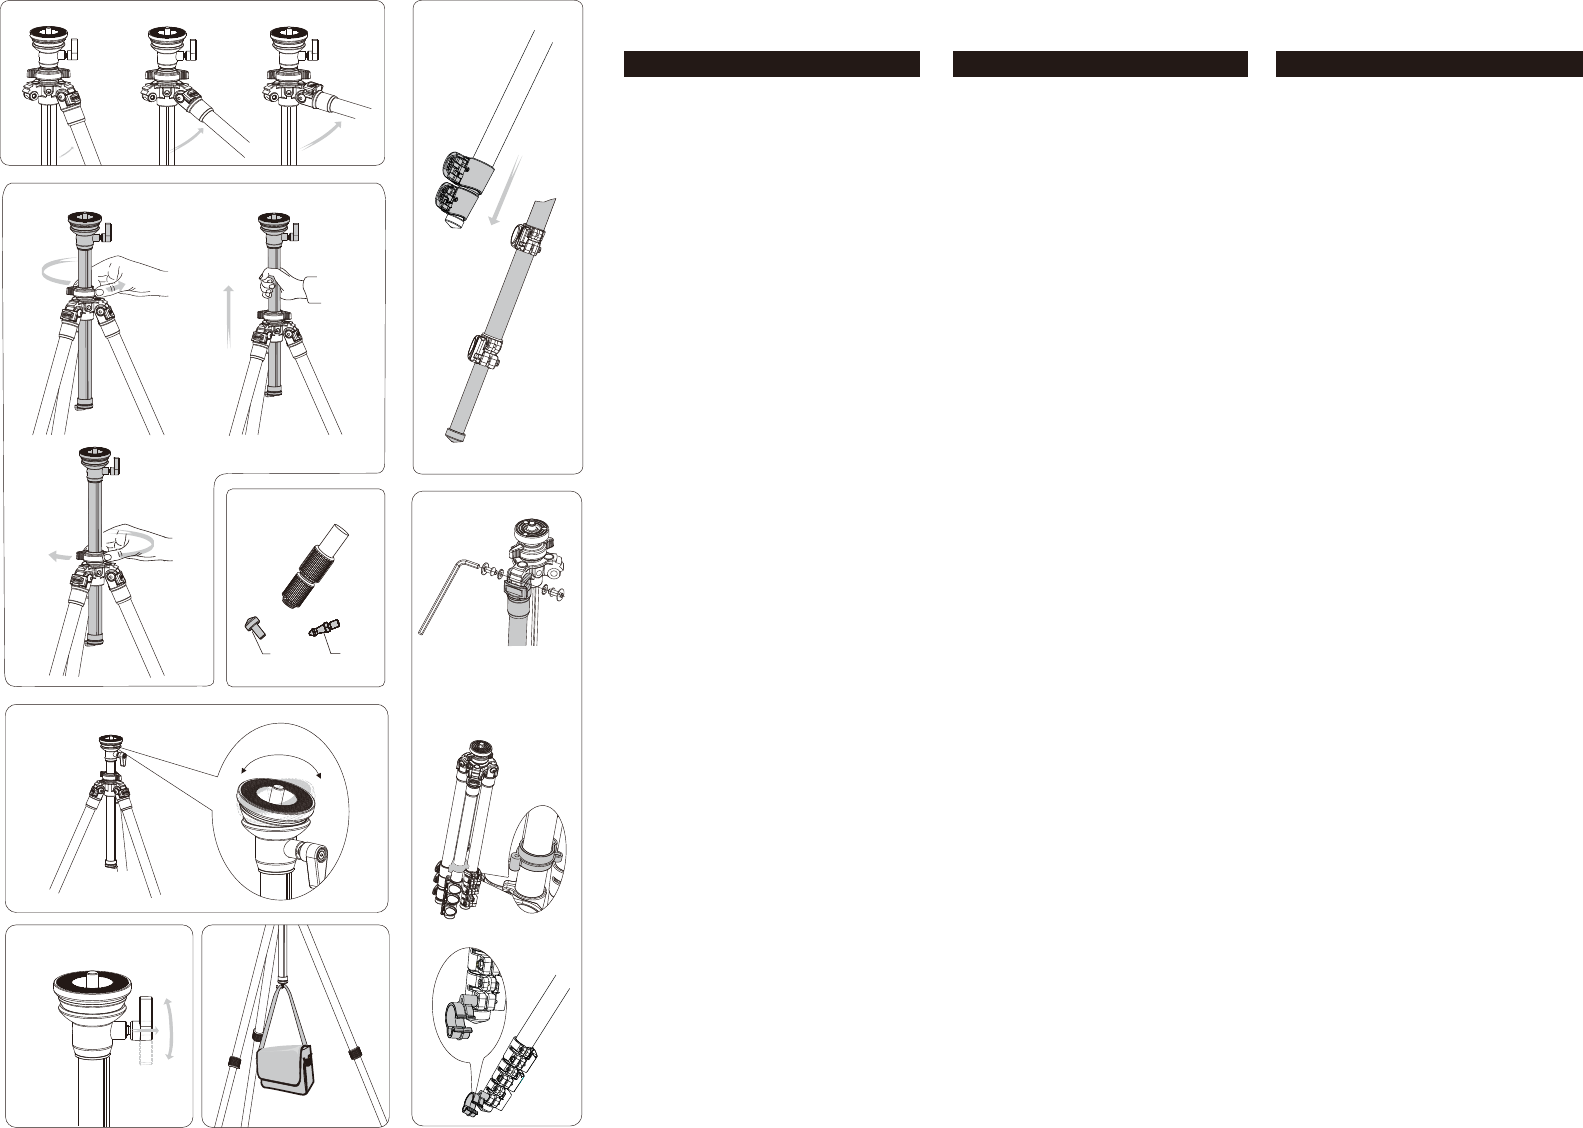
Leg Angle Adjustment: (See figure 1)
To accommodate uneven terrain, awkward shooting
situations or for low angle shooting, your Benro tripod includes
a 3-position leg angle adjustment sliding lock. Each leg can be
independently adjusted by pulling the sliding leg angle lock out
and selecting one of the three step positions. Ensure that the
leg angle lock is securely pushed back into the lock position
after you have selected the desired leg angle.
Leg Section Adjustment: (See figure 2 & 3)
Each Leg section can be adjusted to the desired length by
opening the Flip Lock Lever so the Leg is free to slide in or out.
Once the desired length is achieved, snap the Flip Lock Lever
closed so that the Leg Section is securely locked. Repeat this
step for each Leg and each Section until the Tripod is set to
the desired height.
NOTE: To prevent any accidental damage to your gear, always
remove any mounted equipment (camera, etc.) from the Tripod
before adjusting the Leg Sections.
Raising and Lowering the Center Column:
(See figure 4, 5, 6)
To raise or lower the center column, turn the center locking
knob counter-clockwise and set the column to the desired
position. While holding the column in position, turn the column
locking knob clockwise to secure the column in place. Don't
over tighten the center column lock, as this could damage the
threads.
Interchangeable Spiked and Rubber Feet: (See figure 7)
Most Benro tripods include interchangeable stainless steel
spiked and rubber feet. They provide the right contact
depending on the surface or terrain that the tripod will be used
in. To remove the rubber feet simple unscrew each rubber foot
clockwise and replace with a spiked foot (provided in the tool
kit) screwing counterclockwise. Secure using the included
wrench. The unused feet can be stored in the tool kit pouch.
The tool pouch can be clipped onto the tripod strap ring or
attached to the tripod leg with the Velcro strap on the back of
the tool kit pouch.
Leveling center column: (See figure 8 & 9)
The top plate can pivot ±15°horizontally. To adjust first loosen
by turning the locking handle counter clockwise. Position and
then turn the locking handle clockwise to secure. The locking
handle can be oriented by first pulling the handle to disengage,
then rotating to the desired angle and reseating the handle.
Retractable Weight Hook: (See figure 10)
When additional weight is necessary to add to the tripod for
stability during windy conditions, the retractable weight hook
can be used to hold a sand bag, camera bag or any similar
item. Take care not to overload the tripod with weight as this
could have a reverse effect on increasing the tripods stability.
User Adjustments: (See figure 11, 12, 13)
Leg Angle Hinge Pivot tension can be adjusted using the 4mm
Allen Key. Flip Lock Lever tension is adjusted using the 3mm
Allen Key plus the special Six-sided Socket Wrench built into
the plastic clip which comes attached to one of the tripod legs.
7
脚垫
脚钉
Rubber feet
Spike
±15°
在使用三脚架前,把脚架的高度和角度调整
到合适的位置,以确保三脚架能平稳地放置
在一个水平面上,然后把相机固定在三脚架
云台上面,确保脚架和云台完全锁紧,防止
照相机意外滑落。
三脚架有三个角度调节,以适应在凹凸地面和
高低角度拍摄。每只脚管可以分别调节高中低
档三个角度,调整好角度后,要把角度调节片
推到锁紧的位置。
三脚架脚管为多节数脚管,通过伸缩脚管调节
三脚架高度。
每一节脚管(除最后一节外),都有防转槽和
防转条防止脚管转动。这样可以快捷的打开和
收放三脚架。
逆时针拧开中轴锁紧圈,把中轴调到合适位置,
然后顺时针旋转中轴锁紧圈锁紧中轴,记住不
要过度锁紧中轴,这样会毁损坏螺纹。
互换不锈钢脚钉和橡胶脚垫。根据不同地面使
用不同脚垫。
逆时针旋转水平中轴缩进旋钮,可使承载板在
水平调节范围正负15度调节。水平中轴锁紧旋
钮可拔出调整至合适的位置。
在刮风时,需要挂上重物增加三脚架的稳定性
可在挂钩上挂上沙袋、照相机袋或类似的物品。
注意不能超重,否则反而会影响三脚架的稳定
性。
百诺经典板扣系列脚架都有一个方便调节扳扣
锁紧力度的扳手扣在脚管上,在扳扣锁紧力度
过松或者过紧时,可根据自己的喜好调节扳扣
锁紧力度。
通过六角扳手调节脚架螺丝松紧度。
三脚架角度调节:(如图1所示)
三脚架高度调节:(如图2&3 所示)
中轴:(如图4、5、6所示)
水平中轴及锁紧旋钮:(如图8&9所示)
使用调节方法:(如图11、12、13所示)
可转换脚钉和橡胶脚垫:(如图7所示)
可伸缩挂钩:(如图10所示)


Praat mee over dit product
Laat hier weten wat jij vindt van de Benro A2573FS6 Statief. Als je een vraag hebt, lees dan eerst zorgvuldig de handleiding door. Een handleiding aanvragen kan via ons contactformulier.