
derecha hasta que encaje en su lugar.
Importante: Como medida de protección, este aparato cuenta con un mecanismo
de entrecierre. El procesador no funciona a menos que el recipiente y la tapa estén
debidamente instalados.
3. Introduzca el empujador de alimentos en el conducto de alimentos.
Nota: El empujador de alimentos se utiliza para guiar los alimentos por el conducto
de alimentos y se puede
quitar para agregar líquido o alimentos adicionales mientras el procesador está en
funcionamiento.
CONSEJOS PRÁCTICOS
CONSEJOS PARA PROCESAR ALIMENTOS
• Supervisedecercalosalimentosparanosobreprocesarlos.
• Lafuncióndepulso(PULSE)ofrecemáscontrol.
• Paramejoresresultados,serecomiendaprocesaralimentossimilares
en tamaño.
• Nollenedemasiadoelrecipiente,nolleneelrecipientepasadodelamarca“Max
LiquidLevel”(nivelmáximodelíquido).(I)
• Nuncadesatiendaelprocesadormientrasestáenfuncionamiento.
• Sepuedeprocesarlíquidocalienteperonohirviendo.
• Nousemásde3tazasdeliquidoalavezenelrecipiente.
• Cortelacarneencubosde¾depulgada(2tazasalavez),yuse
lafuncióndepulso(PULSE)enintervalosde5segundos.
• Useunembudoenelconductodealimentosalagregar
ingredientes tales como, aceite, harina y azúcar.
CONSEJOS PRÁCTICOS PARA REBANAR O RALLAR
• Antesdecortarfrutasyverdurasredondasenelprocesador,corte
una raja delgada de la parte de abajo para que sea plana. Coloque el lado del corte de
alimento hacia abajo en el conducto de alimentos.
• Siemprequitelassemillasantesdeprocesar.
• Seleccionealimentosqueseanfirmesynopasadosdemaduros.
• Quiteelcentrodelasverdurasduras,comolacol.
• Paralasverduras,córtelasmásdelgadas,unpocomáspequeñasqueellargodel
conductodealimentosycolóquelasverticalmentehastaquedarfirmesparaqueno
puedan girar ni caer.
• Rallelosquesosdurosalatemperaturaambiental.
• Losquesosblandosymediofirmesdebenserenfriadosbienantesderallar.
• Despuésdeprocesarlosalimentos,retirelatapaeinviértalaenlasuperficiede
trabajo.Retireeldiscoderebanaryrallarantesdequitarelrecipientedelprocesador.
Inviertalatapadelrecipienteycoloqueeldiscoencima.
CUIDADO Y LIMPIEZA
Esteproductonocontienepiezasreparablesporelconsumidor.Paracualquiertipo
deservicio,acudaapersonalcalificado.
Nota: Notratedeafilarlosbordescortantesdelacuchillaparapicaroeldisco
pararebanaryrallar.Estosvienenafiladosdefábricaysearruinansiunotratade
afilarlos.
LIMPIEZA
Nota: Antesdelimpiar,asegúresequeelaparatoestéapagadoyqueelcableesté
desconectado.
• Desarmeporcompletelaspiezasdelprocesadorantesdelavarlas.
• Parafacilitarlalimpieza,cuandoseaposible,enjuaguelaspiezasdelaparato
inmediatamente después de procesar los alimentos.
Advertencia: La cuchilla para picar y las cuchillas del disco para rebanar y
rallar son muy afiladas. Tenga cuidado al manejarlas o guardarlas.
• Limpielabaseylospiesconunpañohúmedoyséquelabien.Lasmanchas
persistentes pueden eliminarse frotando con un paño húmedo y un detergente
suave,noabrasivo.Nosumerjalabaseenlíquido.
• Todaslaspiezasdesmontablessepuedenlavaramanooenellavavajillas.El
lavadodemanosdelaspiezasdeplásticoleayudaráamantenersuapariencia
en el procesador de alimentos.
• Siusalamáquinalavaplatos,coloquelaspiezasremoviblesenlabandeja
superior solamente - no en o cerca de canasta utensilio.
• Algunasmanchasdepartespuedeocurrir.Siesasí,hagaunapastacompuesta
de2cucharadasdebicarbonatodesodioy1cucharadadeagua.Aplicaralas
manchas y dejar reposar durante la noche. Enjuague y seque.
• Nousealmohadillasnilimpiadoresabrasivosenningunapartedeplásticoode
metal para limpiar.
• Nopermitaquelacuchilladecortarorebanarytriturardiscoenremojoenagua
durante largos períodos de tiempo.
• Recuerdelimpiarelejeinternodelacuchilladepicar,elusodeuncepillode
botella de bebé para eliminar las partículas de alimentos tapados.
• Siustedestáteniendoproblemasparacerrarlatapasobreelrecipiente,aplique
unapequeñacantidaddeaceitevegetalenelbordedelatapayelrecipiente.
Estodeberíahacerquelaspiezasdetrabajomássuavealcolocarlatapaal
recipiente.
¿NECESITA AYUDA?
Paraservicio,reparacionesopreguntasrelacionadasalproducto,porfavorllame
alnúmerodelcentrodeservicioqueseindicaparaelpaísdondeustedcomprósu
producto.NOdevuélvaelproductoalfabricante.Llameolleveelproductoauncentro
deservicioautorizado.
DOS AÑOS DE GARANTÍA LIMITADA
(NoaplicaenMéxico,EstadosUnidosyCanada)
¿Qué cubre la garantía?
•Lagarantíacubrecualquierdefectodematerialesodemanodeobraquenohaya
sido generado por el uso incorrecto del producto.
¿Por cuánto tiempo es válida la garantía?
•Pordosañosapartirdelafechaoriginaldecompramientrasquetengaunaprueba
de la compra.
¿Cómo se obtiene el servicio necesario?
•Conserveelrecibooriginalcomocomprobantedelafechadecompra,comuníquese
conelcentrodeserviciodesupaísyhagaefectivasugarantíasicumpleloindicado
en el manual de instrucciones.
¿Cómo se puede obtener servicio?
•Conserveelrecibooriginaldecompra.
•Porfavorllamealnúmerodelcentrodeservicioautorizado.
¿Qué aspectos no cubre esta garantía?
•Losproductosquehansidoutilizadosencondicionesdistintasalasnormales.
•Losdañosocasionadosporelmaluso,elabusoonegligencia.
•Losproductosquehansidoalteradosdealgunamanera.
•Losdañosocasionadosporelusocomercialdelproducto.
•Losproductosutilizadosoreparadosfueradelpaísoriginaldecompra.
•Laspiezasdevidrioydemásaccesoriosempacadosconelaparato.
•Losgastosdetramitaciónyembarqueasociadosalreemplazodelproducto.
•Losdañosyperjuiciosindirectosoincidentales.
¿Qué relación tiene la ley estatal con esta garantía?
•Estagarantíaleotorgaderechoslegalesespecíficosyelconsumidorpodríatener
otrosderechosquevaríandeunaregiónaotra.
Please Read and Save this Use and Care Book.
IMPORTANT SAFEGUARDS.
When using electrical appliances, basic safety precautions should
always be followed, including the following:
•Read all instructions.
•To protect against risk of electrical shock do not immerse cord,
plugs or appliance in water or other liquid.
•Close supervision is necessary when any appliance is used by or
near children.
•Unplug from outlet when not in use, before putting on or taking off
parts and before cleaning.
•Avoid contacting moving parts.
•Do not operate any appliance with a damaged cord or plug or after
the appliance malfunctions, or is dropped damaged in any manner.
Call the appropriate toll-free number on the cover of this manual.
•The use of attachments not recommended or sold by the
manufacturer may cause fire, electric shock or injury.
•Do not use outdoors.
•Do not let cord hang over the edge of table or counter, or touch with
hot surfaces.
•Keep hands and utensils away from moving blade or disc while
processing food to reduce the risk of severe injury to persons or
damage to the food processor. A scraper may be used, but must be
used only when the food processor is not running.
•To avoid product malfunction, do not fill the work bowl past the
“Max Liquid Level” mark.
•Blade is sharp. Handle carefully.
•To reduce the risk of injury, never place cutting blade or discs on
base without first putting bowl properly in place.
•Be certain cover is securely locked in place before operating
appliance.
•Never feed food by hand. Always use food pusher.
•Do not attempt to defeat the cover interlock mechanism.
•Do not use this appliance for other than intended use.
•Do not place on or near a hot gas or electric burner or in a heated oven.
•Always attach plug to appliance and check that the control is OFF
before plugging cord into wall outlet. To disconnect, turn the control
to off, then remove plug from wall outlet
SAVE THESE INSTRUCTIONS.
This product is for household use only.
Note: Themaximumratingisbasedonthechoppingblade.Other
attachments may draw significantly less power.
POLARIZED PLUG (120V MODELS ONLY)
This appliance has a polarized plug (one blade is wider than the
other). To reduce the risk of electric shock, this plug is intended to fit
into a polarized outlet only one way. If the plug does not fit fully into
the outlet, reverse the plug. If it still does not fit, contact a qualified
electrician. Do not attempt to modify the plug in any way.
TAMPER-RESISTANT SCREW
Warning: This appliance is equipped with a tamper-resistant screw to prevent
removal of the outer cover. To reduce the risk of fire or electric shock, do
not attempt to remove the outer cover. There are no user-serviceable parts
inside. Repair should be done only by authorized service personnel.
ELECTRICAL CORD
1)Ashortpower-supplycord(ordetachablepower-supplycord)isprovidedto
reducetheriskresultingfrombecomingentangledinortrippingoveralonger
cord.
2)Longerdetachablepower-supplycordsorextensioncordsareavailableandmay
beusedifcareisexercisedintheiruse.
3)Ifalongdetachablepower-supplycordorextensioncordisused,
a)Themarkedelectricalratingofthedetachablepower-supplycordorextension
cord should be at least as great as the electrical rating of the appliance,
b)Iftheapplianceisofthegroundedtype,theextensioncordshouldbea
grounding-type 3-wire cord, and
c)Thelongercordshouldbearrangedsothatitwillnotdrapeoverthecountertop
ortabletopwhereitcanbepulledonbychildrenortrippedover.
Note: If the power supply cord is damaged, it should be replaced by qualified
personnel;inLatinAmerica,byanauthorizedservicecenter.
CONTROL PANEL
The controls are located on the front of the base (A).
PressOFF/PULSEorONtoselectafunction(seedirectionsbelow).
OFF/PULSE CONTROL
• ProcessorshouldbestoredinOFFpositionandunpluggedwhen
not in use.
• UsePULSEforshortprocessingtasks.Thisletsyoucontrolthe
size and uniformity of foods being chopped.
• TheOFF/PULSEbuttonmustbepressedandheldforthe
appliancetooperateinPULSEmode.Whenreleased,theappliancewillstop.
• ThemotoroftheprocessorwillrunaslongastheOFF/PULSEbuttonisheld
down.Pressthebuttonandthenreleasetoallowthebladetostoprunningand
the food to fall to the bottom of the workbowl.
• Pulsinggivesbettercontrolwhenchopping,mincing,mixingandblendingfoods.
You can control the size of the foods, from coarse to fine.
ON CONTROL
WhentheONcontrolisselected,theprocessorwillruncontinuouslyuntiltheOFF/
PULSEbuttonispressed.
HOW TO USE
This product is for household use only.
GETTING STARTED
• Pleasegotowww.prodprotect.com/applicatoregisteryourwarranty.
Important: Handle chopping blade and slicing and shredding
diskcarefully.Theyareverysharp.
• WashallremovablepartsasinstructedinCAREAND
CLEANINGsectionofthismanual.
• Selectalevel,drycountertopwheretheapplianceisto
beused,allowingairspaceonallsidestoprovideproper
ventilationforthemotor.
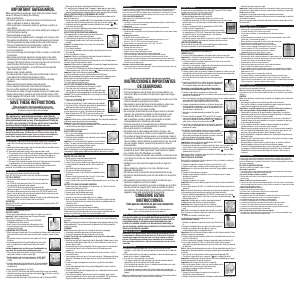
ASSEMBLING THE PROCESSOR
1.Attachcenterposttoworkbowl.Placeworkbowlonthebasewithhandleturned
totherightofthelockingmechanismovertheunlocksymbolasshowninfigure
(B).
2.Rotatebowlclockwisetowardsthelocksymboluntilitclicks
into place
3.InsertChoppingBladeorSlicing/ShreddingDiskontocenter
post.(Ifchopping,placefoodintoworkbowlafterbladeis
inserted).
Caution chopping blade and slicing and shredding disk are
very sharp. Use caution when handling and storing.
4.Placecoveronworkbowlwiththesmalllatchtotherightofthe
work bowl’s handle, as shown in figure (H).
5.Rotateclockwiseuntilcoverlocksintoplace.(NOTE:MUST
SECUREWORKBOWLTOTHEBASEBEFOREATTACHING
COVER)
6.Insertthefoodpusherintothefeedchute.(Ifslicing/shredding,
usefeedchuteandfoodpushertoinsertfoodintotheslicing/
shreddingdisk).
7.Selectyourdesiredspeed(OnorPULSE)
8.PresstheOFF/PULSEbuttonandallowtheblade/disktocometoacomplete
stopbeforeremovingcoverbytwistingcovertoward
.Atthistime,carefully
removetheslicing/shreddingdisk.
9.Removeworkbowlbyturningitcounterclockwiseandliftoffthebase(NOTE:
Mustunlockcoverbeforeunlockingworkbowlfrombase).
10.CarefullyremoveChoppingBladeifchopping.Unplugappliancewhennotin
use.(NOTE:Removeworkbowlfromappliancebeforeremovingthechopping
bladetopreventfoodfromleakingthroughthecenteropeningoftheworkbowl).
HOW TO LOCK THE PROCESS OR WORKBOWL IN POSITION
IMPORTANT: PresstheOFF/PULSEbuttonbeforeplacingtheworkbowlonthe
base of the processor.
1.Attachcenterposttoworkbowl(B). Placetheworkbowlonthebasewithhandle
turned to the right of the locking mechanism (C) overtheunlocksymbol
.
2.Holdhandleandrotateworkbowlclockwisetowardthelocksymbol until it
clicks firmly into place (D).
Note: Be sure to lock the workbowl in place before attaching the chopping blade or
theslicingandshreddingdiskandthecover.
HOW TO CHOP IN THE PROCESSING WORKBOWL
The chopping blade is used to coarsely or finely chop, mince,
mix,andpureefoodstoasmoothconsistency.
1.Lockworkbowlintoposition(seeIllustrationsC and D).
2.Holdchoppingbladebycentershaftandinsertontocenter
post (E).
Caution: Thechoppingbladeisverysharp.Usecautionwhen
handling and storing.
3.Placefoodinworkbowl.
4.Placecoveronworkbowlandlockintoplacebyrotatingclockwise(see
Illustration H).
5.Placethefoodpusherinplace.
Important:Neveruseyourfingerstodirectfoodthroughthefeedchute.
6.Selectyourdesiredspeed(PULSEorON).
Note: Processfoodsfornomorethanafewsecondsatatime.Pulsingproduces
excellentresultsandoffersgreatercontrol.
Important: Makesurethechoppingbladehascompletelystoppedspinningbefore
removingcoverfromprocessingbowl.
7.PresstheOFF/PULSEbuttonandallowthechoppingbladetostoprevolving
beforeremovingcover.Twistcovertoward (counterclockwise)toremove.
Important: Unlocklidfirstbeforeremovingworkbowl.
8.Unlockworkbowlbyturningitcounterclockwiseandliftoffbase.
Note:Removeworkbowlfromappliancebeforeremovingthechoppingbladeto
preventfoodfromleakingthroughthecenteropeningoftheworkbowl.
9.Carefullyremovethechoppingblade.
10.Unplugappliancewhennotinuse.
HOW TO SLICE OR SHRED IN THE WORKBOWL
1.Lockworkbowlintoposition(seeIllustrationsC and D).
2.Placediskstemontocenterpostinworkbowl.
3. Carefully place slicing and shredding disk on top of disk stem
withappropriatesideup(dependingonworktobedone)(F).
Caution: Theslicingandshreddingdiskisverysharp.Usecaution
when handling and storing.
4.Placecoveronworkbowlandlockintoplacebyrotatingcover
clockwise(seeIllustrationH).
5.Fillfeedchutewithfood.Positionfoodpusheroverfood(G).
6.SelectthePULSEorONcontrol;pressfirmlyonfoodpusherto
guide food through feed chute, but do not force it.
Note:Heavypressureonthepusherdoesnotspeedthework;
usethepusheronlyasaguide.Lettheprocessordothework.
7.Whenfinished,pressOFF/PULSEandwaitfordisktostop
rotatingbeforeremovingcover.Twistcovertoward
counterclockwise to
remove.
Important: Makesuretheslicingandshreddingdiskhascompletelystoppedspin
-
ningbeforeremovingcoverfromprocessingbowl.
Important:Unlocklidfirstbeforeremovingworkbowl.
8.Carefullyremovetheslicingandshreddingdisk.Unlockworkbowlbyturningit
counterclockwise and lifting it off the base.
9.Unplugappliancewhennotinuse.
HOW TO LOCK THE COVER
1.Placecoveroverworkbowlwiththesmalllatchtotherightof
the workbowl’s handle (H).
2.Holdfeedchuteofworkbowlcoverandrotatecoverclockwise
untilcoverlocksintoplace.
Important: Foryourprotectionthisappliancehasaninterlock
system. The processor will not operate unless the processing
workbowlandcoverareproperlylockedinplace.
3. Insert the food pusher into the feed chute.
Note: The food pusher is used to guide foods through the feed chute and can be
removedwhenaddingliquidoradditionalfoodswhiletheprocessorisrunning.
HELPFUL TIPS
HELPFUL TIPS FOR CHOPPING
• Watchcarefullytoavoidover-processingfoods.
• ThePULSEbuttonoffersthebestcontrol.
• Forbestresults,processfoodsthatareaboutthesamesize.
• Donotoverloadtheworkbowl,pastthe“MaxLiquidLevel”
mark (I).
• Neverwalkawayfromtheprocessorwhileitison.
• You may use hot but not boiling liquids.
• Donotprocessmore3cupsofliquidintheworkbowlatany
giventime.
• Toprocessmeat,usenomorethan2cupsof¾-inchcubes.
ProcessusingPULSEin5secondintervals.
• Insert a funnel into the feed chute when adding ingredients such as, oil, flour and
sugar.
HELPFUL TIPS WHEN SLICING AND SHREDDING
• Beforeslicingfruitsandvegetablesintheprocessor,cutathinslicefromthe
bottom of the food to make it flat.
• Placethefoodcutsidedowninfeedchute.
• Removeseedsandpitsbeforeprocessing.
• Selectfoodsthatarermandnotoverripe.
• Removethecorefromhardvegetablessuchascabbage.
• Whenslicingthinnervegetables,cutthemjustshortofthelengthofthefeed
chuteandstandthemverticallyinfeedchutesotheyaresolidlypackedand
cannot turn or tilt.
• Shredhardcheesesatroomtemperature.
• Chill soft and semi-hard cheeses before shredding.
Afterfoodhasbeenprocessed,removethecoverandinvertoncountertop.
Removetheslicingandshreddingdiscbeforeremovingtheworkbowlfromthe
processor.Placethediskontopoftheinvertedworkbowlcover.
CARE AND CLEANING
Thisproductcontainsnouserserviceableparts.Referservicetoqualifiedservice
personnel.
Note: Donotattempttosharpenthecuttingedgesofthechoppingbladeorslicing
and shredding disk. They are permanently sharpened at the factory and will be
ruined if sharpened.
CLEANING
Note: Before cleaning, be sure unit is turned off and cord is unplugged.
• Completely disassemble processor parts before washing.
• Rinsepartsimmediatelyafterprocessingforeasycleanup.
Caution: The slicing and shredding disk is very sharp. Use caution when
handling and storing.
• Wipebaseandfeetwithadampclothanddrythoroughly.Stubbornspotscanbe
removedbyrubbingwithadampclothandamild,nonabrasivecleaner.Donot
immerse base in liquid.
• Allremovablepartscanbewashedbyhandhot,soapywaterorinadishwasher.
Hand washing of plastic parts will help to maintain the food processor’s
appearance.
• Ifwashinginadishwasher,placeremovablepartsontoprackonly—notinor
near utensil basket.
• Somestainingofpartsmayoccur.Ifso,makeapasteof2tablespoonsofbaking
sodaand1tablespoonofwater.Applytostainsandletstandovernight.Rinse
and dry.
• Donotuseroughscouringpadsorcleansersonanyplasticormetalparts
to clean.
• Donotallowchoppingbladeorslicingandshreddingdisktosoakinwaterfor
long periods of time.
• Cleantheinternalshaftofthechoppingblade;useababybottlebrushtoremove
any clogged food particles.
• Ifyouarehavingtroubleclosingthecoverovertheworkbowl,applyasmall
amountofvegetableoiltotherimofthecoverandworkbowl.Thisshouldmake
thepiecesworksmootherwhenattachingthecovertotheworkbowl.
NEED HELP?
Forservice,repairoranyquestionsregardingyourappliance,calltheappropriate800
numberoncoverofthisbook.PleaseDONOTreturntheproducttotheplaceofpur-
chase.Also,pleaseDONOTmailproductbacktomanufacturer,norbringittoaservice
center.Youmayalsowanttoconsultthewebsitelistedonthecoverofthismanual.
TWO-YEAR LIMITED WARRANTY
(AppliesonlyintheUnitedStatesandCanada)
What does it cover?
• Anydefectinmaterialorworkmanshipprovided;however,Applica’sliabilitywillnot
exceedthepurchasepriceofproduct.
For how long?
• Twoyearsfromthedateoforiginalpurchasewithproofofsuchpurchase.
What will we do to help you?
• Provideyouwithareasonablysimilarreplacementproductthatiseitherneworfactory
refurbished.
How do you get service?
• Saveyourreceiptasproofofdateofsale.
• Visittheonlineservicewebsiteatwww.prodprotect.com/applica,orcall
toll-free1-800-231-9786,forgeneralwarrantyservice.
• Ifyouneedpartsoraccessories,pleasecall1-800-738-0245.
What does your warranty not cover?
• Damagefromcommercialuse
• Damagefrommisuse,abuseorneglect
• Productsthathavebeenmodifiedinanyway
• Productsusedorservicedoutsidethecountryofpurchase
• Glasspartsandotheraccessoryitemsthatarepackedwiththeunit
• Shippingandhandlingcostsassociatedwiththereplacementoftheunit
• Consequentialorincidentaldamages(Pleasenote,however,thatsomestatesdo
notallowtheexclusionorlimitationofconsequentialorincidentaldamages,sothis
limitation may not apply to you.)
How does state law relate to this warranty?
• Thiswarrantygivesyouspecificlegalrights.Youmayalsohaveotherrightsthatvary
fromstatetostateorprovincetoprovince.
Por favor lea este instructivo antes de usar el producto
INSTRUCCIONES IMPORTANTES
DE SEGURIDAD.
•Por favor lea todas las instrucciones.
•A fin de protegerse contra el riesgo de un choque electrico, no
sumerja el cable, los enchufes ni el aparato en agua ni en ningun
otro liquido.
•Todo aparato electrico usado en la presencia de los ninos o por ellos
mismos requiere la supervision de un adulto.
•Desconecte el aparato del tomacorriente cuando no este en uso,
antes de instalarle o retirarle piezas y antes de limpiarlo.
•Evite el contacto con las piezas moviles.
•No use ningun aparato electrico que tenga el cable o el enchufe
averiado, que presente un problema de funcionamiento o que
este danado. Acuda a un centro de servicio autorizado para
que lo examinen, reparen o ajusten o llame gratis al numero
correspondiente en la cubierta de este manual.
•El uso de accesorios no recomendados por el fabricante del aparato
puede ocasionar incendio, choque electrico o lesiones.
•No use este aparato a la intemperie.
•No permita que el cable cuelgue del borde de la mesa o del
mostrador ni que entre en contacto con las superficies calientes.
•Para reducir el riesgo de lesiones severas a las personas o dano al
procesador de alimentos, mantenga las manos y utensilios alejados
de las cuchillas o discos mientras el aparato esta en uso. Se puede
usar un raspador siempre y cuando el procesador no este en
funcionamiento.
•Para evitar mal funcionamiento del producto, no llene el recipiente
pasado de la marca “Max Liquid Level” (nivel máximo de líquido).
•Las cuchillas tienen filo. Manejelas con cuidado.
•Para reducir el riesgo de lesiones, nunca instale la cuchilla de cortar
ni los discos en la base sin antes colocar el recipiente debidamente
en su lugar.
•Verifique que la tapa este bien asegurada antes de operar el
aparato.
•Nunca empuje los alimentos con la mano. Siempre use el
empujador de alimentos.
•No trate de anular el mecanismo de enclavamiento de la tapa.
•No utilice el electrodoméstico para otro uso distinto con el que fue
diseñado.
•No coloque el aparato sobre ni cerca de las hornillas de gas o
eléctricas ni adentro de un horno caliente.
•Siempre conecte el enchufe en el aparato y verifique que el control
está en posición de apagado (OFF) antes de enchufar el cable al
tomacorriente. Para desconectar, gire el control a la posición de
apagado y luego retire el enchufe del tomacorriente.
CONSERVE ESTAS
INSTRUCCIONES.
Este aparato electrico es para uso domestico
unicamente.
Nota: Lacalificacióneléctricaesbasadaenlacuchillaparapicary
otrosaccesoriospuedenextraermenospotencia.
ENCHUFE POLARIZADO (SOLAMENTE PARA LOS MODELOS DE 120V)
Este aparato cuenta con un enchufe polarizado (un contacto es más
ancho que el otro). A fin de reducir el riesgo de un choque eléctrico,
este enchufe encaja en un tomacorriente polarizado en un solo
sentido. Si el enchufe no entra en el tomacorriente, inviértalo y si
aun así no encaja, consulte con un electricista. Por favor no trate de
alterar esta medida de seguridad.
TORNILLO DE SEGURIDAD
Advertencia: Este aparato cuenta con un tornillo de seguridad para evitar
la remoción de la cubierta exterior del mismo. A fin de reducir el riesgo de
incendio o de choque eléctrico, por favor no trate de remover la cubierta
exterior. Este producto no contiene piezas reparables por el consumidor.
Toda reparación se debe llevar a cabo únicamente por personal de servicio
autorizado.
CABLE ELÉCTRICO
a)Elproductosedebedeproporcionarconuncableeléctricocorto(ouno
separable),afindereducirelriesgodetropezarodeenredarseenuncablemás
largo.
b)Existencableseléctricosmáslargosyseparablesocablesdeextensiónqueuno
puede utilizar si toma el cuidado debido.
c)Siseutilizauncableseparableodeextensión,
1)Elrégimennominaldelcableseparableodelcabledeextensióndebeser,
como mínimo, igual al del régimen nominal del aparato.
2)Sielaparatoesdeconexiónatierra,elcabledeextensióndebeseruncable
detresalambresdeconexiónatierra.
3)Unodebedeacomodarelcablemáslargodemaneraquenocuelguedel
mostradorodelamesa,paraevitarqueunniñotiredelmismooquealguiense
tropiece.
Nota: Sielcordóndealimentaciónestadañado,enAméricaLatinadebesustituirse
porpersonalcalicadooporelcentrodeservicioautorizado.
PANEL DE CONTROL
El control está en la parte delantera de la base
(A).
PresionePULSEoONpara
escogerunafunción(verlasinstruccionesabajo).
CONTROL DE APAGADO/PULSO (OFF/PULSE)
• El aparato debe de permanecer en la posición
deapagado(OFF)ydesenchufadosiemprequenoestéenuso.
• Eldispositivodepulsación(PULSE)serecomiendaparalasfuncionescortas;
permitesupervisarycontrolarmejorlauniformidadytexturade
los alimentos.
• Presioneysostengaelbotóndeapagado/pulso(OFF/PULSE).
Cuándo se suelta, el aparato para.
• El motor del procesador funciona mientras uno presiona el botón
deapagado/pulso(OFF/PULSE).Presioneelbotónyluegosuéltelo
para permitir que las cuchillas dejen de girar y los alimentos
puedan caer al fondo del recipiente.
• Esta función permite mejor control al cortar, picar, mezclar y combinar alimentos.
Ustedpuedecontrolareltamañodelosalimentos,degruesosanos.
CONTROL DE ENCENDER (ON)
Conelcontroldeencender(ON),elprocesadorfuncionacontinuamente
hastaqueunopresioneelcontroldeapagado(OFF).
COMO USAR
Este aparato es solamente para uso doméstico.
PRIMEROS PASOS
• Porfavor,visitewww.prodprotect.com/applicapararegistrarsugarantía.
Importante:Envistadelfiloagudoquetraenlacuchillaparapicaryeldiscopara
rebanar y rallar, manéjelos con mucho cuidado.
• Lavetodaslaspiezasremoviblessegúnlasinstruccionesenlasecciónde
Cuidado y limpieza en este manual.
• Antesdeusaresteaparato,asegúresedecolocarlosobreunasupercieplana,
secaylimpiaconsucienteventilaciónparaelmotor.
ENSAMBLAJE DEL PROCESADOR DE ALIMENTOS
1.Conecteelpostecentralalrecipiente.Coloqueelrecipienteenlabaseconelasa
orientada hacia la derecha del mecanismo de cierre de manera que quede sobre
el símbolo de abrir, según se muestra en la ilustración B.
2.Gireelrecipientehaciaelsímbolodecierrehastaqueencaje
en su lugar.
3. Inserte la cuchilla de picar y el disco de rebanar y desmenuzar
sobreelpostecentral.(Sivaapicar,coloquelosingredientes
enelrecipientedespuésdehaberinsertadolacuchilla.)
Precaución: La cuchilla de picar y el disco tienen mucho
filo. Proceda con cuidado al manipularlos y almacenarlos.
4. Coloque la tapa sobre el recipiente con la palanca del
mecanismo de seguro orientada hacia la derecha del asa del recipiente, según se
muestra en la ilustración H.
5.Gireelrecipientehacialaderechahastaquelatapasecierreyquedeasegurada
ensulugar.(NOTA:ELRECIPIENTEDEBEESTARBIEN
ASEGURADOALABASEANTESDECOLOCARLATAPA).
6. Coloque el empujador de alimentos en el tubo de alimentación.
(Sidesearebanarodesmenuzar,useeltubodealimentacióny
el empujador de alimentos para colocar los ingredientes en el
discoderebanarydesmenuzar).
7.Seleccionelavelocidaddeseada(encendido(On)opulso
(PULSE).
8.Presioneelbotóndeapagado(OFF)/pulso(PULSE)yespere
a que el disco pare de funcionar completamente, luego gire la
tapa hacia el símbolo de abrir para retirarla.
Despuésde
retirar la tapa, retire el disco con mucho cuidado.
9.Pararetirarelrecipiente,gírelohacialaizquierdaysáquelode
labase.(Nota:Primerodebeabrirlatapaantesdeliberarel
recipientedelabase).
10.Siutilizólacuchilladepicar,retírelaconmuchocuidado.
Desenchufeelprocesadordeailmentoscuandonoestéenuso.
(Nota:Primeroretireelrecipienteantesderetirarlacuchilla
depicarparaprevenirquelosalimentossesalganatravésdel
orificiolocalizadoenelcentrodelrecipiente).
COMO ASEGURAR EL RECIPIENTE EN SU LUGAR
Importante: Presioneelbotóndeapagado/pulso(OFF/PULSE)
antes de colocar el recipiente en la base.
1.Coloqueelrecipientesobreelvástagocentraldelabase,conelasaorientada
hacialaderechadelmecanismodecierreC)sobredelsímbolodeabrir .
2.Sujeteelasaygireelrecipientehaciaelsímbolodecierre hasta encajar
firmementeensulugar(D).
Nota:Asegurebienelrecipienteantesdeinsertarlacuchillaparapicaroeldisco
para rebanar y rallar, y colocar la tapa.
COMO PICAR EN EL RECIPIENTE
Estacuchillaseusaparapicartexturasgruesasonas,paramezclarydeshacer
losalimentosaconsistenciasuave.
1.Coloqueelrecipienteenlaposicióncorrecta(verilustraciónCyD).
2.Sujetelacuchillaporelvástagoydeslícelasobrelaguíacentral(E).
Advertencia:Lacuchillaparapicartienenmuchofilo.Tengacuidadoalmanejarla
o guardarla.
3. Coloque los alimentos en el recipiente.
4. Coloque la tapa arriba del recipiente y cierre hasta que encaje en su lugar,
girándolo a la izquierda
(verIlustraciónH).
5.Coloqueelempujador,ensulugar.
Importante:Nuncausesusdedosparaguiarlosalimentosatravésdelconducto
de alimentos.
6.Useelcontroldepulso(PULSE),oelcontroldeencender(ON)paraprocesarlos
alimentos.
Nota: Serecomiendaprocesarlosalimentosenincrementosdesegundosalavez.
Lafuncióndepulsaciónpermitemejorcontrolyresultadosexcelentes.
7.Presioneelbotóndeapagado/pulso(OFF/PULSE)yespereaquelascuchillas
dejendegirarantesdequitarlatapa.Girelatapahacialaposicióndeabrir
(derecha)paraquitarla.
Importante: Verifiquequelascuchillashayandejadodegirar
completamente antes de quitar la tapa del recipiente.
Importante:Abralatapaantesderetirarelrecipiente.
8.Desprendaelrecipientegirándoloaladerechayretírelodela
base.
Nota: Retireelrecipientedelaparatoantesdequitarlacuchilla
paraevitarquelosalimentossalganporlaaperturadelcentrodel
recipiente.
9.Retireconcuidadolacuchillaparapicar.
10.Desenchufeelaparatocuandonoestéenuso.
COMO REBANAR O RALLAR
1.Coloqueelrecipienteenlaposicióncorrecta(verIlustraciónCy
D).
2.Coloqueelvástagodeldiscoenlaguíacentraldelrecipiente.
3. Coloque con cuidado el disco de rebanar y rallar con
elladoapropiadosobreelvástagodeldisco(F).
Advertencia:Lascuchillasdeldiscopararebanaryrallartienenmuchofilo.Tenga
cuidado al manejarlas o guardarlas.
4. Coloque la tapa sobre el recipiente y gírela hacia la izquierda hasta encajar en su
lugar(verIlustraciónH).
5.Lleneelconductodealimentos.Coloqueelempujadorsobrelosalimentos(G).
6.Useelcontroldepulso(PULSE)oelcontroldeencender(ON),presioneel
empujador,firmeperoligeramenteparaguiarlosalimentosatravésdelconducto
de alimentos.
Nota: Elaplicardemasiadapresiónnoaceleraelfuncionamientodelaparato.Useel
empujador de alimentos solamente como guía y permita que el procesador realice
su función.
7.Antesderetirarlatapa,ajusteelcontrolalaposicióndeapagado(OFF).
Pararetirarlatapa,gírelahacialaposición abrircerradura(derecha).
Importante: Verifiquequeeldiscoderebanaryrallarhayadejadodegirarcomple-
tamente antes de quitar la tapa del recipiente.
Importante:Abralatapaantesderetirarelrecipiente.
8.Retireeldiscopararebanaryrallarconmuchocuidado;gireel
recipiente hacia la derecha para retirarlo de la base.
9.Desconecteelaparatocuandonoestéenuso.
COMO CERRAR LA TAPA
1.Coloquelacubiertasobreelrecipienteconelseguroala
derechadelasadelrecipiente(H).
2.Coloquelatapasobreelrecipiente.Sostengaelconductodealimentosygireala
F
G
H
A
B
D
E
C
I
A
B
D
E
C
I
F
G
H

Praat mee over dit product
Laat hier weten wat jij vindt van de Black and Decker FP1600B Keukenmachine. Als je een vraag hebt, lees dan eerst zorgvuldig de handleiding door. Een handleiding aanvragen kan via ons contactformulier.