Here’s How:
Before you start, set up your tent in a dry, shady place where it can be
left up for 1-2 days to allow the Seam Grip to dry completely. Be sure to
stake it down. Be sure there is enough ventilation in your work area. A
supply of paper towels might prove handy.
After setting up your tent, carefully fill the syringe applicator about 1.
three-quarters full with McNett Seam Grip.
Using the applicator, run a small bead of Seam Grip directly down the 2.
center of ALL exterior seams, taking particular care around the door
awnings. Be sure to seal both sides of webbing loops that are sewn
into the seams.
Seal the corner snaps on the interior of the tent. Using the applicator, 3.
seal the edge around the metal snap on the inside of the tent. Also
put a small amount of sealer directly into the center of the snap,
letting the sealer seep inside.
Let sealer dry completely before storing your tent. This usually takes 4.
24 to 48 hours, but may take longer in some circumstances.
STAKING
Always stake out your tent using all points provided. Staking out your tent
must not be considered optional! YES, your tent can easily be dragged
by modest winds even with 45 kg (100 lbs) of gear in it! Tent stakes and
guylines are included with your tent. The webbing loops stitched into
the seams above ground-level stakeout points must be utilized to ensure
strength and stability of the tent (especially in broadside winds).
STAKING OUT FOR HIGH WINDS
Proper staking out will allow your Bibler to easily withstand high winds.
To set up your guy lines, cut .3 cm (1/8 in) cord into 2 meter (6 ft)
lengths. Tie one end to the stake out loop at each corner, and tie the
other end to the bracing loop located about .7 m (2 ft) above the stake
out loop. On many of the tents, there are additional tie-out points—tie
a 1.6 m (5 ft) piece of cord to these as well. When pitching, insert the
poles and stake out the corners first, then stake out the bracing loops
and all the other tie out points. The more rigidly braced the tent is, the
more effectively it will resist high winds.
SNOW CONDITIONS
Be extremely careful when shoveling snow from around your tent,
because the shovel can easily tear the fabric. NEVER brush snow off
your tent with any hard objects, such as sticks, shovels, ice axes, etc.
ATTACHING OPTIONAL GROUND CLOTH
Fitted ground cloths are available for most Bibler products. Along the
edges of the ground cloths are reinforced grommets. These can be used
to attach the ground cloth to the tent pullouts so that it is secured under
the tent. Tie a short loop of cord through each of the corner ground
cloth grommets. Slip this loop over the corner tent pullout when staking
out the tent. The ground cloth can also be used as a tarp—use the
grommets along the edges to suspend or anchor it.
WARNING
Black Diamond Equipment is not responsible for the consequences,
whether direct, indirect, or accidental, or for any other type of damage
arising or resulting from the use of its products. You are responsible
for your actions and activities and for any consequences that may result
from them.
LIMITED WARRANTY
We warrant for one year from purchase date and only to the original
retail buyer (Buyer) that our products (Products) are free from defects
in material and workmanship. If Buyer discovers a covered defect, Buyer
should deliver the Product to us at the address provided. We will replace
such Product free of charge. That is the extent of our liability under this
Warranty and, upon the expiration of the applicable warranty period, all
such liability shall terminate.
Warranty Exclusions
We do not warrant Products against normal wear and tear, unauthorized
modifications or alterations, improper use, improper maintenance,
accident, misuse, negligence, damage, or if the Product is used for a
purpose for which it was not designed. This Warranty gives you specific
legal rights, and you may also have other rights which vary from state to
state. Except as expressly stated in this Warranty, we shall not be liable
for direct, indirect, incidental, or other types of damages arising out
of, or resulting from the use of the Product. This Warranty is in lieu of
all other warranties, express or implied, including, but not limited to,
implied warranties of merchantability or fitness for a particular purpose
(some states do not allow the exclusion or limitation of incidental
or consequential damages or allow limitations on the duration of an
implied warranty, so the above exclusions may not apply to you).
INSTRUCTIONS FOR USE
BOMBSHELTER
SET UP
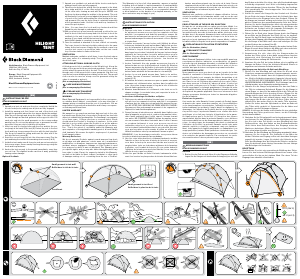
Setting up your Bombshelter is best done with two people.
The Bombshelter has five poles—two “Main Poles” that are the same
length, go corner to corner, crossing at top center, and are installed first;
and two “Arch Poles” that fit in pole pockets and arch above each end.
The Arch Poles are straight and the same length as the Main Poles, so
all four poles are interchangeable. The Bombshelter also has a shorter
Vestibule Pole that goes in last. This pole has short studs on the ends
that go into grommets. The Bombshelter has two doors. The doors are
the same size, but the front door has a larger vestibule.
INSTALLING POLES IN THE BOMBSHELTER
Spread your tent out and zip the front door open. Unfold the shock-1.
corded poles, making sure all joints are fully engaged. Joints not
fully engaged can break. Do not toss the poles open! The sections
snapping together can damage the poles. Note: When setting up in
windy conditions, keep the wind at your back and stake down the front
of the tent before inserting poles, with the back door closed. The wind
will blow into the doorway and inflate the tent like a balloon, making it
easy to insert the poles. Don’t let the wind blow the tent away!
Install the first main pole. Insert one end of a pole into the front door, 2.
and carefully put it into the back corner on one side (a). Be careful not
to catch the net pockets or any of the doors. Be ABSOLUTELY sure it
makes it into the corner of the floor (a second person can guide this
into position from outside the tent). Arch the pole into the roof of the
tent, and carefully position the end into the front corner opposite the
back corner (b), so the pole crosses the tent. Place the pole ends into
the snaps. Twist a couple of pole ties into place around the pole, to
hold it in position while getting the other poles in place. Note: due to
the asymmetric shape of the door, it is easier to install the pole that
runs from back-left to front-right first (a to b).
Install the second main pole. Install the second pole just like the first. 3.
The poles should cross at top center. Clip into place.
Install the front Arch Pole. Holding one end of one pole in one hand, 4.
grasp the other end of the Arch Pole with the other hand. With the
pole flexed in front of you, back into the tent, flexing the pole no
more than required to get it into the door. Cover the pole ends with
your hands to prevent them from pushing against the fabric. Move
backward into the tent and place each end into the pole pockets (e &
f) with the pole slanting forward, first one side, then the other. Once
securely in the pole pockets, rotate the arch upward until the pole sits
above the door. Fasten some pole ties to hold it in place.
Install the back Arch Pole. Again, grasp the pole ends with both hands, 5.
arms spread. This time, with the arch in front of you, insert the peak of
the arch into the front door and enter the tent. Keep your hands over
the pole ends to prevent piercing the fabric. Put the Arch Pole out the
back door, and insert the ends into the pole pockets. Rotate the Arch
Pole up until it is above the door, and fasten the pole ties (g & h).
Fasten all pole ties. Some hold one pole, some hold two. Fastening all 6.
the pole ties makes the tent much more stable in high winds.
Make sure all pole ends are securely seated in pole pockets or in snap 7.
heads at the corners.
Install the Vestibule Pole. At each end, the Vestibule Pole inserts into 8.
two grommets (i & k)—one on a short strap attached to the tent floor,
and one on a short strap attached to the vestibule. Insert one end of the
vestibule pole into one of the tent floor grommets, flex the pole and insert
the other end into the other tent floor grommet. Unzip the vestibule and
pull it over the pole, positioning the pole along the seam line. At each
end, pull the vestibule down and pop the grommet over the pole end.
Fasten the Velcro loops around the pole to hold it in place.
Anchor the tent securely to the ground immediately, every time you set it 9.
up. The slightest breeze can blow it away, causing severe damage.
SEAM SEALING
All of the interior seams of your Bibler Tent are completely seam taped.
Note: The Seam Grip provided should be sufficient to do the exterior of
your tent. Extra tubes and/or applicators may be purchased. The interior
seam taping enhances the strength of the seams and provides excellent
weather protection. As a second line of defense, all the exterior stitching
should be sealed completely with the liquid seam sealer provided.
ENGLISH
FRANÇAIS
North America: Black Diamond Equipment, Ltd.
2084 East 3900 South
Salt Lake City, UT 84124
Phone: (801) 278-5533, Fax: (801) 278-5544
Europe: Black Diamond Equipment AG
Christoph Merian Ring 7
4153 Reinach, Switzerland
Phone: +41/61 564 33 33, Fax: +41/61 564 33 34
Asia: Black Diamond Equipment Asia
No. 3 Lianfeng Road, Zhuhai Free Trade Zone
Guangdong, P.R. China 519030
Please contact us for a free catalog!
Demandez notre catalogue gratuit!
Bitte kontaktieren Sie uns für einen kostenlosen Katalog.
www.BlackDiamondEquipment.com
MM6088_A
Black Diamond Equipment, Ltd. 2007
bombshelter pitching instructions
notice de montage bombshelter
aufbauanleitung für bombshelter
INSTRUCTIONS D’UTILISATION
BOMBSHELTER
Il est préférable d’être deux personnes pour monter la tente
Bombshelter.
La Bombshelter comprend cinq arceaux : deux arceaux “principaux”
de même longueur, qui s’installent en premier, se fixent coin à coin
et se croisent au centre de la partie sommitale ainsi que deux arceaux
“secondaires" qui s’insèrent dans des manchons pour arceaux. Les
arceaux “secondaires” sont droits et de même longueur que les
arceaux principaux : les quatre arceaux sont ainsi interchangeables. La
Bombshelter comprend également un arceau plus petit pour l’abside,
qui s’installe en dernier. Les extrémités de cet arceau sont munies de
petits embouts destinés à être insérés dans les œillets. La Bombshelter
possède deux portes. Ces portes sont de taille identique mais l’abside
de la porte avant est plus large.
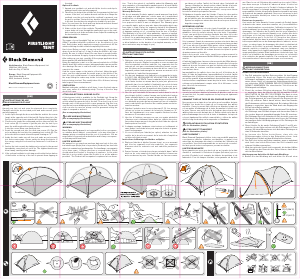
INSTALLATION DES ARCEAUX DE LA BOMBSHELTER
Déployez votre tente et ouvrez complètement la fermeture à glissière 1.
de la porte avant. Dépliez les arceaux en vous assurant que tous
les segments sont bien emboîtés. Les segments dont les embouts
ne sont pas correctement emboîtés peuvent se rompre. Ne jetez
pas les arceaux par terre afin de les ouvrir ! Les segments d’arceaux
BLACK DIAMOND BOMBSHELTER
Illustration 1
Illustration 4
Illustration 2
Illustration 3
pourraient être endommagés au moment où ils se déplient et
s'emboîtent brusquement.
À noter : en cas de vent lors du montage, mettez-vous dos au vent et
haubanez l’avant de la tente avant d’insérer les arceaux (maintenez la
porte arrière fermée). Le vent pénètrera par la porte avant et permettre
à la tente de se gonfler comme un ballon, facilitant ainsi l’insertion des
arceaux. Ne laissez pas le vent emporter votre tente !
Installez le premier arceau principal. Introduisez une extrémité 2.
d’arceau par la porte avant et insérez-la soigneusement dans un
des coins arrière (a). Prenez soin de ne pas accrocher les poches en
maille ni l’une des portes. ASSUREZ-VOUS À 100 % que l’arceau est
inséré dans le coin du tapis de sol (depuis l’extérieur de la tente, une
seconde personne peut guider cette opération). Courbez l’arceau
en direction du plafond de la tente puis positionnez soigneusement
l’extrémité de l’arceau dans le coin avant diagonalement opposé au
coin arrière (b), de telle sorte que l’arceau traverse la surface de la
tente. Positionnez les extrémités de l’arceau dans les œillets. Attachez
quelques attaches Twistlocks autour de l’arceau afin qu’il reste en
place pendant que vous installerez les autres arceaux. À noter : en
raison de la forme asymétrique de la porte, il est plus facile d’installer
tout d’abord l’arceau partant du coin arrière gauche jusqu’au coin
avant droit (de a vers b).
Installez le second arceau principal de la même façon que le premier. 3.
Les arceaux doivent se croiser au centre de la partie sommitale. Fixez
avec les attaches Twistlocks.
Installez l’arceau secondaire avant. Saisissez l’extrémité d’un des 4.
arceaux d’une main puis saisissez l’autre extrémité de l’arceau de
l’autre main. L’arceau ainsi courbé face à vous et dos à la tente,
courbez celui-ci de manière à pouvoir pénétrer par la porte (ne pas
courber plus que nécessaire). Recouvrez les extrémités des arceaux
avec vos mains pour éviter qu’elles ne poussent et percent la toile.
Avancez à reculons dans la tente et positionnez chaque extrémité
dans les manchons “e” et “f”, l’arceau incliné vers l’avant, en insérant
une extrémité après l’autre. Une fois les extrémités correctement
insérées dans les manchons, faites pivoter l’arc de cercle vers le haut
jusqu’à ce que l’arceau soit positionné au-dessus de la porte. Attachez
quelques attaches Twistlocks pour le maintenir en place.
Installez l’arceau secondaire arrière. À nouveau, saisissez l’extrémité 5.
de l’arceau à deux mains, bras écartés. Cette fois-ci, avec l’arceau face
à vous, entrez dans la tente en faisant pénétrer l’arche de l’arceau
par la porte avant. Gardez vos mains sur les pointes de l’arceau afin
d’empêcher qu’elles ne poussent ou percent la toile. Laissez ressortir
l’arc de cercle par la porte arrière et insérez les extrémités dans les
manchons prévus à cet effet. Faites pivoter l’arceau secondaire vers le
haut jusqu’à ce que celui-ci soit positionné au-dessus de la porte puis
attachez les attaches (g & h).
Attachez toutes les attaches pour arceaux – certaines permettent de 6.
maintenir un seul arceau, d’autres permettent d’en maintenir deux.
Le fait d’attacher toutes les attaches pour arceaux rend la tente bien
plus stable par vents forts.
Assurez-vous que toutes les extrémités d’arceaux sont bien insérées 7.
dans les manchons ou dans les œillets des coins.
Installez l’arceau de l’abside. Notez bien : chacune des extrémités 8.
de cet arceau doit être insérée dans deux oeillets (i & k) – un oeillet
se trouvant sur une patte fixée au sol de la tente et l’autre oeillet
se trouvant sur une patte fixée à l’abside. Insérez une extrémité de
l’arceau de l’abside dans un des œillets du sol de la tente, courbez
l’arceau et insérez l’autre extrémité dans l’œillet du sol de la tente
correspondant. Ouvrez la fermeture à glissière de l’abside et passez-
la par-dessus l’arceau, en positionnant l’arceau le long de la couture.
Ensuite, à chaque extrémité, tirez l’abside vers le bas et enfilez l’oeillet
(situé sur la patte de l’abside) sur l’extrémité de l’arceau. Attachez les
attaches Velcro autour de l’arceau afin qu’il reste en place.
À chaque montage, haubanez la tente au sol solidement et sans tarder. 9.
La moindre brise peut emporter votre tente et gravement l’endommager.
IMPERMÉABILISATION
Toutes les coutures intérieures de votre tente Bibler sont complètement
étanchées.
Notez bien : le produit Seam Grip fourni doit suffire à imperméabiliser
toute la surface externe de votre tente. Cependant, il vous sera peut-être
nécessaire d’acheter des tubes et/ou des applicateurs supplémentaires.
L’imperméabilisation des coutures intérieures améliore leur résistance
et offre une excellente protection contre les intempéries. Pour compléter
cette protection, toutes les coutures extérieures doivent être complètement
imperméabilisées à l’aide de l’imperméabilisant liquide fourni.
Voici comment :
Avant de commencer, montez votre tente dans un endroit sec et
ombragé où vous pourrez la laisser en place pendant 1 à 2 jours afin que
le produit Seam Grip puisse sécher complètement. Prenez soin de bien
l’haubaner. Vérifiez si votre espace de travail est suffisamment ventilé.
Un rouleau d’essuie-tout placé à portée de main pourra vous être utile.
Après avoir monté votre tente, remplissez soigneusement la seringue de 1.
l’applicateur avec McNett Seam Grip jusqu’aux trois-quarts environ.
A l’aide de l’applicateur, laissez couler un fin filet de Seam Grip 2.
directement sur TOUTES les coutures externes, en particulier le long
des rabats de la porte. Assurez-vous que les deux boucles de sangles
cousues dans les coutures sont bien rendues étanches sur chacune
de leurs faces.
Imperméabilisez les œillets des coins (au sol) à l’intérieur de la tente. 3.
A l’aide de l’applicateur, imperméabilisez le bord de l’œillet métallique
situé à l’intérieur de la tente. Laissez également pénétrer une petite
quantité d’imperméabilisant directement dans l’oeillet.
Laissez sécher complètement avant de plier la tente. Le temps de 4.
séchage est généralement compris entre 24 et 48 heures – voire plus,
selon les circonstances.
HAUBANAGE
”HAUBANAGE EN CAS DE VENTS VIOLENTS
Un haubanage correct permettra à votre Bibler de résister facilement aux
vents violents. Pour le montage de vos haubans, coupez la cordelette
de 0,3 cm en bouts de 2 mètres de long. Attachez une extrémité à la
boucle d’haubanage d’un coin puis attachez l’autre extrémité à la boucle
de renfort située environ 0,7 m au-dessus. Répétez l’opération pour
chaque coin. La plupart des tentes comporte des points d’haubanage
supplémentaires – attachez à ceux-ci de la même façon un bout de
cordelette de 1,6 m de long. Lors du montage de la toile, insérez les
arceaux et haubanez tout d’abord les coins. Puis haubanez les boucles de
renfort ainsi que tous les autres points d’haubanage. Plus l’haubanage de
la tente est tendu, plus elle résistera efficacement aux vents forts.
EN CAS DE NEIGE
Soyez extrêmement prudent lorsque vous déblayez la neige autour de
votre tente car le godet de votre pelle à neige peut facilement déchirer
la toile. NE DÉBLAYEZ JAMAIS la surface enneigée de votre tente à
l’aide d’objets durs et/ou pointus tels que bâtons de randonnée, pelles
à neige, piolets, etc.
POUR FIXER LE TAPIS DE SOL PROPOSÉ EN OPTION
Nous proposons des tapis de sol en option pour la plupart des produits
Bibler. Les bords de ces tapis de sol comportent des œillets renforcés.
Ceux-ci peuvent être utilisés pour attacher le tapis de sol aux pattes
d’haubanage de la tente de manière à le fixer sous la tente. Passez une
petite boucle de cordelette dans chacun des œillets situés aux coins du
tapis de sol. Enfilez cette boucle dans la patte d’haubanage des coins de
la tente et haubanez. Le tapis de sol peut également être utilisé comme
bâche – utilisez les œillets situés le long des bords pour la suspendre
ou l’haubaner.
AVERTISSEMENT
Black Diamond Equipment décline toute responsabilité quant aux
conséquences directes, indirectes ou accidentelles, ou quant à tout
autre type de dommage découlant ou résultant de l’utilisation de ses
produits. Vous êtes responsable de vos actes et de vos activités ainsi
que de toutes conséquences pouvant en résulter.
LIMITES DE GARANTIE
Nous garantissons pour une durée d’un an à partir de la date d’achat et
seulement à l’Acheteur d’origine (Acheteur) que nos produits (Produits)
sont exempts de défauts de matériau et de fabrication. Dans le cas où
l’Acheteur découvrirait un vice caché, l’Acheteur devra nous renvoyer
le Produit à l’adresse indiquée ci-dessous. Ce Produit sera échangé
gratuitement. L’étendue de notre responsabilité se limite à la présente
Garantie et prend fin au terme de la période de garantie applicable.
Exclusions de garantie
Sont exclus de cette Garantie l’usure normale du Produit, les
modifications ou les transformations non autorisées, l’utilisation
incorrecte, l’entretien inadéquat, les accidents, l’emploi abusif, la
négligence, les dommages, ou l’utilisation du Produit à des fins pour
lesquelles il n’a pas été conçu. La présente Garantie vous confère des
droits spécifiques et ne fait pas obstacle à l’application de la garantie
légale prévue par le Code Civil. A l’exception des clauses expressément
décrites dans la présente Garantie, nous déclinons toute responsabilité
en cas de dommages directs, indirects, accessoires, ou autres types de
dommages provenant ou résultant de l’utilisation du Produit. La présente
Garantie exclut toute autre garantie, explicite ou implicite, notamment,
mais non limitativement, toute garantie de qualité marchande ou
d’adaptation à un usage particulier (certains Etats/juridictions
n’autorisent pas l’exclusion ou la limitation de dommages accessoires
ou consécutifs ni la restriction de garantie implicite. Par conséquent, les
exclusions mentionnées ci-dessus peuvent ne pas vous concerner).
GEBRAUCHSANLEITUNG
BOMBSHELTER
Das Aufstellen des Bombshelter funktioniert am besten zu zweit.
Das Bombshelter hat fünf Zeltstangen. Die zwei gleich langen Hauptstangen,
die von Ecke zu Ecke verlaufen und sich in der Mitte der Zeltdecke kreuzen,
werden zuerst installiert. Dann werden die beiden Bogenstangen in die
Stangentaschen eingesetzt, die sich an den Seitenwänden kreuzen und
jeweils über einem Zeltende einen Bogen formen. Die Bogenstangen sind
in diesem Fall gerade und genauso lang wie die Hauptstangen. Es können
also alle vier Stangen beliebig vertauscht werden. Außerdem gibt es eine
Stange für den Windfang, die zuletzt eingesetzt wird. Sie ist an jedem Ende
mit einem kleinen Aufsatz versehen, der in die Tüllen eingesetzt wird. Das
Bombshelter hat zwei Eingänge. Die Türen sind gleich groß, der vordere
Eingang besitzt jedoch einen größeren Windfang.
EINSETZEN DER STANGEN IM BOMBSHELTER
Breiten Sie das Zelt aus und öffnen Sie den Reißverschluss am vorderen 1.
Zelteingang. Falten Sie die mit einer Zugschnur zusammengehaltenen
Stangensegmente auseinander und achten Sie darauf, dass alle
Segmente richtig einrasten. Nicht vollständig eingerastete Segmente
können brechen. Falten Sie die Stangensegmente nicht in einer
Wurfbewegung auseinander. Ruckartig einrastende Segmente
können beschädigt werden. Hinweis: Wenn Sie das Zelt bei windigen
Verhältnissen aufbauen, drehen Sie sich mit dem Rücken zum Wind
und befestigen Sie die Vorderseite des Zelts mit Heringen, bevor Sie
die Stangen installieren. Der hintere Eingang sollte hierbei verschlossen
bleiben. Der Wind kann so in den Eingang wehen und bläst das Zelt wie
einen Ballon auf, so dass Sie die Zeltstangen leicht einsetzen können.
Lassen Sie das Zelt nicht vom Wind davonwehen!
Setzen Sie die erste gerade Stange ein. Führen Sie ein Stangenende 2.
durch den Eingang und setzen Sie sie in einer der hinteren Ecken
ein (a). Verfangen Sie die Stange nicht in den Netztaschen oder
in einem der Eingänge. Stellen Sie ABSOLUT sicher, dass Sie die
Stange in die verstärkte Zeltecke am Boden einsetzen (eine zweite
Person kann Ihnen hierbei von außen behilflich sein). Biegen Sie
die Stange entlang der Zeltdecke und positionieren Sie das andere
Ende in der diagonal gegenüberliegenden vorderen Ecke (b). Setzen
Sie die Stangenenden in die Einrastpunkte ein. Fixieren Sie die
Stangen mit den Twistlock-Elementen, um sie in Position zu halten,
während Sie die anderen Stangen installieren. Hinweis: Aufgrund der
asymmetrischen Form des Eingangs ist es einfacher, die erste Stange
von hinten links nach vorne rechts einzusetzen (von a nach b).
Setzen Sie die zweite gerade Stange ein. Installieren Sie diese Stange 3.
wie die erste. Die beiden Stangen sollten sich in der Mitte der
Zeltdecke kreuzen. Befestigen Sie sie mit den Twistlock-Elementen.
Installieren Sie die vordere Bogenstange. Nehmen Sie ein Ende 4.
DEUTSCH


Praat mee over dit product
Laat hier weten wat jij vindt van de Black Diamond Bombshelter Tent. Als je een vraag hebt, lees dan eerst zorgvuldig de handleiding door. Een handleiding aanvragen kan via ons contactformulier.