Using Your Iron
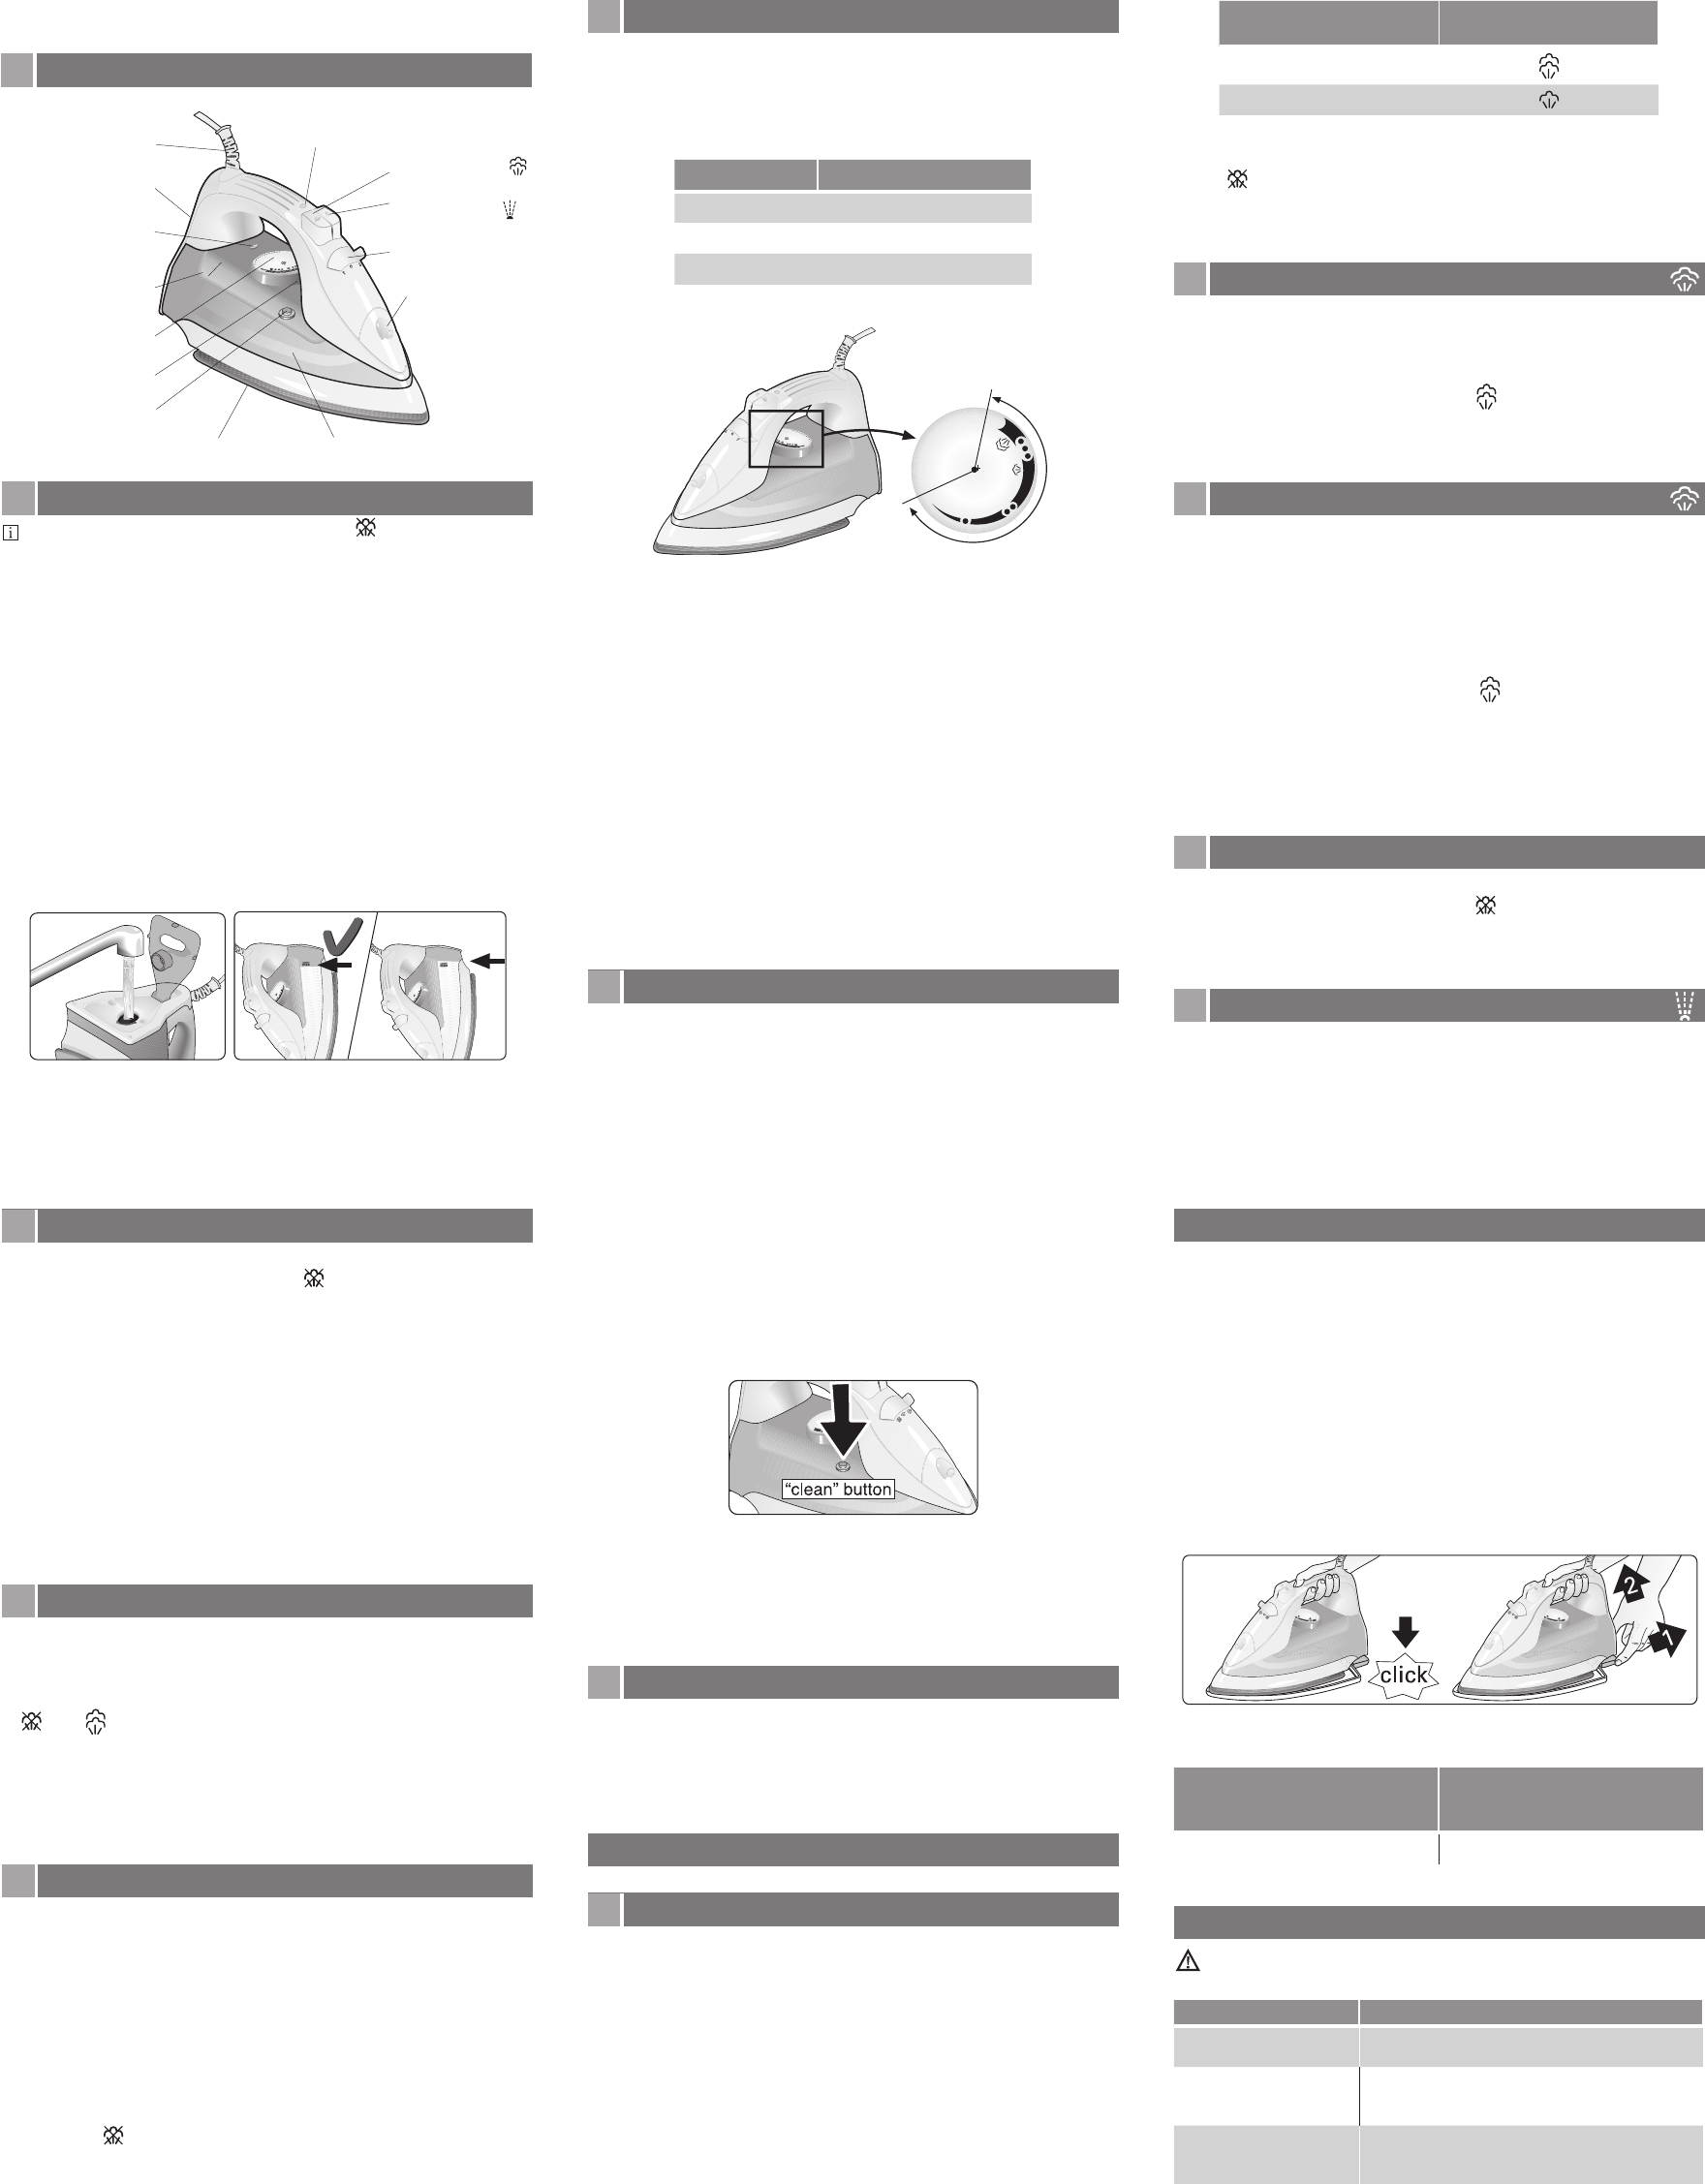
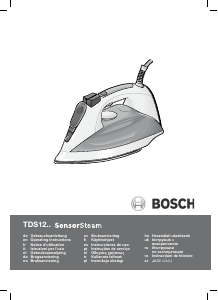
1 Your iron
max.
N. Auto shut off
indicator lamp*
E. Water tankF. Soleplate
A. Shot of steam
D. Spray outlet
C. Steam regulator
B. Spray button
M. Power cable
K. Pilot light
H. Pointer
J. Max. Water
I. Temperature control
L. Water tank cover
G. "Clean" button
* Model dependent
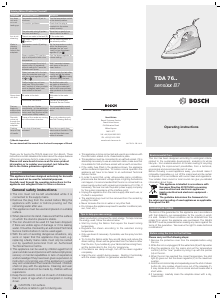
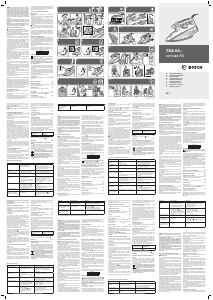
2 Filling the water tank
Set the steam regulator (C) to the position and
unplug the iron from the mains!
Use only clean water from the tap without mixing anything with
it. The addition of other liquids, such as perfume, will damage
the appliance.
Any damage caused by the use of the aforementioned
products, will make the guarantee void.
Do not use condensation water from tumble dryers, air conditioners
or similar appliances. This appliance has been designed to use
normal tap water.
To prolong the optimum steam function, mix tap water with distilled
water 1:1. If the tap water in your district is very hard, mix tap
water with distilled water 1:2.
You can inquire about the water hardness with your local water
supplier.
To prevent spillage of water out of the appliance in vertical position,
never fill beyond the “max” water level mark!
9 After finishing each ironing session
1. Unplug the iron from the mains socket.
2. Set the steam regulator (C) to the position.
3. Open the water tank cover (L).
4. Hold the iron with the point facing up and shake it gently until
all the water has come out.
5. lf the iron is only slightly soiled, pull out the plug and allow the
soleplate to cool down. Wipe the housing and the soleplate
with a damp cloth only.
lf synthetic cloth melts due to too high temperature on the
soleplate, switch off the steam and rub off the residue immediately
with a thickly folded, dry cotton cloth.
6. Coil the power cable (M) loosely around the heel of the iron,
before storing.
7. Store the iron in an upright position.
10 Self Cleaning
The self clean function helps remove lime scale that has
built up around the steam valve.
This should be performed once every 3 or 4 uses.
1. When the iron is cold, slide the steam regulator (C) between the
and positions in quick succession about 3 or 4 times to
help loosen any lime scale and clean the valve inside.
2. Heat up the iron. Before starting ironing, hold the iron horizontally
over a sink and press the shot of steam button (A) 3 or 4 times.
This will help force out any lime scale and dirt deposits through
the holes in the soleplate.
11 Multiple de-scaling system
This range of irons is equipped with the following de-
scaling features “AntiCalc”.
A. self-clean
Each time you use the steam regulator (C), the “self-clean” system
cleans the mechanism of any scale deposits.
B. calc‘n-clean
The “calc’nclean” function helps to remove scale particles out
of the steam chamber. Use this function approximately every 2
weeks, if the water in your area is very hard.
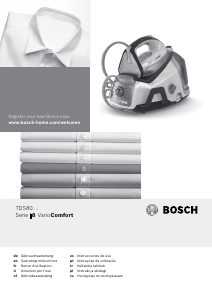
1. Unplug the iron from the mains socket, set the steam regulator
(C) to the position and fill the water tank (E) with water.
2. Set the temperature selector (I) to the “max” position and plug
in the iron.
3. After the necessary warm-up period, the pilot light (K) goes out.
Then, unplug the iron (very important!).
4. Hold the iron over a sink. Press the “clean” button (G) until
approximately one third of the water capacity of the tank is
evaporated. Boiling water and steam will come out, carrying
scale or deposits that might be there.
5. Release the “clean” button, and gently shake the iron for some
seconds.
6. Repeat the steps 4 and 5 three times until the tank is empty.
Then plug the iron in and heat it up again until the remaining
water has evaporated.
7. Unplug the iron and let the soleplate (F) cool down. Wipe the
soleplate with a damp cotton cloth only.
C. anti-calc cartridge
The anti-calc cartridge has been designed to reduce the build-
up of scale produced during steam ironing, helping to extend
the useful life of your iron. Nevertheless, the “anti-calc” cartridge
cannot remove all of the scale that is produced naturally over time.
12 Anti-drip system “Drip Stop”
The irons in this range are equipped with an anti-drip system.
This will automatically stop the iron producing steam when the
selected temperature setting is too low to prevent water from
dripping out of the soleplate. You may hear a clicking sound when
this system is in operation.
Additional Features
13 Auto shut-off “secure”
(Model Dependent)
Some irons in this range are equipped with an auto-shut off
system.
The “secure” auto shut-off function switches off the iron
automatically when it is not being used, thus helping to prevent
accidents and saving energy. When the appliance is first plugged
in, this function will be inactive for the first 2 minutes to allow it to
reach the set temperature.
If during ironing, the iron is not moved for a certain length of time,
the iron will automatically switch off. The length of time will depend
on the position the iron has been left in:
Horizontally (flat) or on its side: 30 seconds
Vertically (upright): 8 minutes
The pilot light on the top of the handle (N) will flash when auto
shut-off has been activated. To switch the iron back on, move it
gently from side to side. The light will stop flashing.
Fabric protection soleplate cover “Protect”
(Model Dependent)
Some irons in this range are equipped with a fabric
protection soleplate cover
The fabric protector is used for steam-ironing delicate garments
at maximum temperature without damaging them. Use of the
protector also does away with the need for a cloth to prevent
shine on dark materials.
It is advisable to first iron a small section on the inside of the
garment to see if it is suitable.
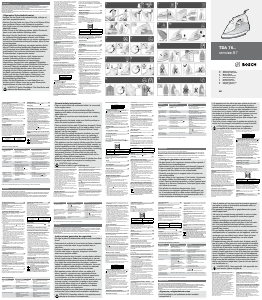
To attach the fabric protection soleplate cover to the iron, place the
tip of the iron into the end of the fabric protector and press the rear
of the protector upward until you hear a click. To release the fabric
protector, pull down on the clip at the rear and remove the iron.
The protective cover can be purchased from After-sales or the
Bosch online shop.
Accessory code
(After-sales)
Name of accessory:
Protect cover soleplate
(online shop)
464851 TDZ1510
Cleaning and Maintenance
Attention ! Risk of burns !
For general cleaning, follow the information below:
Problem Solution
Dirty/lightly marked iron
body or soleplate
Clean the body of iron or soleplate with a damp
cloth then dry it.
Mark develops on
soleplate during use
Set the iron to its maximum temperature setting.
Rub the iron a few times over with a dry cotton
cloth folded several times.
Heavily stained soleplate While the iron is cold, iron a linen cloth soaked in
white vinegar. Then dampen a cloth with water
and wipe the soleplate clean and dry thoroughly.
DO NOT de-scale or clean the water tank with cleaning products
or solvents, as these could cause the iron to drip when using the
steam function.
DO NOT use a “professional steam cleaner” for cleaning the
appliance.
DO NOT use sharp objects or abrasive products to clean the soleplate
or any other part of the appliance. To keep the soleplate in good
condition, do not allow it to come into contact with metal objects.
Temperature
Setting
Steam Regulator
Setting
••• to “max”
••
Note: At a temperature setting of “•”, the soleplate is not hot
enough to produce steam so the steam regulator should be set
to the position to avoid water dripping from the soleplate (F).
Tip: for better ironing results, iron the last strokes without steam
to dry the garment.
5 Ironing with shot of steam
This can be used to remove stubborn wrinkles or to
press in a sharp crease or pleat. It cannot be used on a
synthetic setting for delicate items.
1. Set the temperature control (I) to the “•••” or “max” position.
2. Set the steam regulator (C) to the position.
3. Press the shot of steam (A) button on the handle repeatedly at
intervals of 5 seconds.
6 Vertical steaming with shot of steam
This can be used to remove creases from hanging
clothes, curtains etc. It cannot be used on a synthetic
setting for delicate items.
WARNING! Do not vertical steam while the item is being worn.
Never spray or aim steam at people or animals!
1. Make sure that there is water in the tank (E).
2. Set the temperature control (I) to the «•••» or «max» position
and the steam regulator (C) to the position.
3. Hold the iron in an upright position about 15 cm away from the
garment being steamed.
4. Press the shot of steam button (A) on the handle at intervals of
5 seconds, however, after 4 jets of steam, wait for 10 seconds
to allow for continued steam production.
7 Ironing without steam
This function enables the iron to be used for dry ironing.
1. Set the steam regulator (C) to the position.
2. Select an appropriate temperature for the type of material
being ironed.
8 Spray
This can be used to remove stubborn wrinkles.
1. Do not use the spray function with silk as staining may occur.
2. Make sure that there is water in the tank (E).
3. When ironing, press the spray button (B) and water will spray
out of the spray outlet (D) onto the garment.
3 Setting the temperature
The temperature control (I) adjusts the temperature of
the soleplate (F).
1. Check the temperature instructions shown on the care label of the
garment you are ironing and set the temperature control (I) to the
corresponding position by lining it up with the pointer (H) on the iron:
Fabric Temperature Setting
Synthetics •
Silk - Wool ••
Cotton - Linen •••
min
max
2. If you are unsure what type of material the garment is made from,
start ironing on the lowest temperature setting and increase
accordingly. If the garment is made from mixed fabrics, set the
temperature for the most delicate material.
3. For silk, woollen or synthetic materials iron the reverse side
of the fabric to prevent shiny patches. Avoid using the spray
function to prevent stains.
4. Sort your garments based on their care labels, always starting
with clothes that have to be ironed at the lowest temperature.
5. The pilot lamp (K) will stay lit while the iron is heating up and go
out once the selected temperature has been reached. Wait a
few seconds after the lamp goes out before you start ironing.
Once the iron is ready, you can continue to iron even if the pilot
lamp comes on again.
6. If your iron has auto shut-off and the pilot light (N) is flashing,
the auto shut-off has activated. Gently move the iron side to
side to restart it.
4 Ironing with steam
The steam regulator (C) is used to adjust the amount of
steam produced when ironing.
1. Make sure that there is water in the tank (E).
2. Adjust the temperature setting and then set the steam regulator
according to the table below. Steam will automatically be produced:


Praat mee over dit product
Laat hier weten wat jij vindt van de Bosch TDA7630GB Strijkijzer. Als je een vraag hebt, lees dan eerst zorgvuldig de handleiding door. Een handleiding aanvragen kan via ons contactformulier.