
Qualité professionnelle depuis 1946
professional quality since 1946
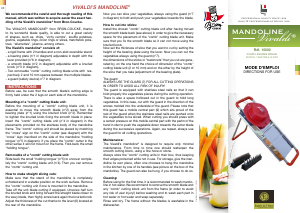
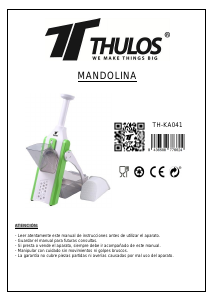
MANDOLINE
MODE D’EMPLOI
DIRECTIONS FOR USE
Coupe-légumes manuel
manual vegetable slicer
VIVALDI’S MANDOLINE
We recommanded the careful and thorough reading of this
manual, which was written to acquire easier the exact
handling of the Vivaldi’s mandoline from Bron-Coucke.
The VIVALDI’S MANDOLINE from BRON-COUCKE, thanks to its
wonderful blade quality, is able to cut a great variety of shapes, such
as, chips, «vichy carrots», souffle potatoes, gratins, vegetable rings,
onion rings or slices, matchstick potatoes, «allumettes», julienne,
among others.
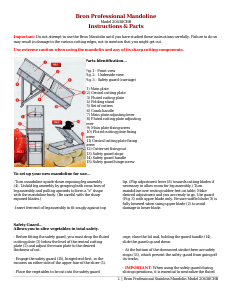
The Vivaldi’s mandoline consists of:
- a rigid frame with 2 handles and a non-skid reversible stand.
- a bearing plate (n°1 in diagram) adjustable in depth with the lever
provided (n°6 in diagram).
- a smooth blade (n°2 in diagram) adjustable with a knurled knob. (n°3
in diagram).
- Two removable «comb» cutting cutting blade units with respectively
2 and 10 mm spaces between the multiple blades.
- a guard (safety device) n°7 in diagram.
INSTRUCTIONS
Before use, be sure that the smooth bladeʼs cutting edge is firmly held
under the 2 lugs on each side of the mandoline.
! Mounting of a «comb» cutting blade unit:
Before the mounting of a «comb» cutting blade unit, it is essential to
move the smooth blade (n°2) away from the bearing plate (n°1) using
the knurled knob(n°3). Remember to tighten the knurled knob fixing the
smooth blade in place.
Insert the «comb» cutting blade unit (n°4 in diagram) in the placements
provided on the stainless body of the mandoline frame. The «comb»
cutting unit should be placed by matching the «cross» sign on the
«comb» cutter (see diagram) with the «cross» sign inscribed on the
side of the mandoline «holding tongue» (n°5 in diagram). If you place
the «comb» cutter in the other sense it will not mount on the frame.
Fold-back the small «holding tongue".
" Removable of a «comb» cutting blade unit:
Slide back the small «holding tongue» (n°5) to uncover completely the
«comb» cutting blade unit (n°4). Then you can remove the «comb»
cutting unit.
" How to make straight slicing cuts:
Make sure that the stand of the mandoline is completely unfolded and
in a stable position on the work surface.
Remove the «comb» cutting unit if one is mounted in the mandoline.
Take off the unit blade cutting if equipped. Unscrew half turn the knurled
knob and bring forward the straight blade closer to the wavy blade, then
highly screw back again the knurled knob. Adjust the thickness of the
cut thanks to the lever (6) located at the rear of the mandoline.
Now you can slice your vegetables, always using the guard (n°7 in
diagram) to hold and push your vegetables towards the blade.
" How to cut into sticks:
Install the chosen «comb» cutting blade unit after having moved
the smooth blade back (see above) in order to give the necessary
space for the placement of the «comb» cutting blade unit. Make
sure that you fix the smooth blade so it can not move using the
knurled knob.
Now set the thickness of slice that you want to cut by setting the
height of the bearing plate using the lever. Now you can cut the
vegetables always using the guard (n°7).
the dimensions of the sticks or «batonnets» that you cut are
generated by, on the one hand the choice of dimension of the
«comb» cutting blade unit (2 or 10mm) and on the other by the
height of the slice that you take (adjustment of the bearing plate).
The guard:
ALWAYS USE T H E GUA R D (7) F OR ALL C U TTI N G
OPERATIONS IN ORDER TO AVOID ALL RISK OF INJURY!
The guard is equipped with stainless steel nails so that it can hold
properly the vegetables pieces during the cutting operation. There
is also a space hollowed out in the guard to hold long vegetables.
In this case, cut with the guard in the direction of the arrows
molded into the underside of the guard. Please note that this guard
has a mobile central part (9) which sits proud of the rest of the
guard when the stainless steel nails are pushed onto the
vegetables to be sliced. When cutting you should press with a
certain pressure on this mobile central part with the parlm of the
hand in rder to push the vegetable down towards the cutter blade
during the successive operations. Again, we repeat, always use
the guard for all cutting operations.
! Maintenance :
The Vivaldiʼs mandoline is designed to require only minimal
maintenance. From time to time one should resharpen the smooth
cutting block, using a fine hone or stone.
Always store the «comb» cutting units in their box, thus keeping
their edges protected while not in use. For storage, give the
mandoline its own place, often one chooses to hang the mandoline
in the kitchen by one of its handles (see picture on the box of the
mandoline). The guard can also be hung, if you choose to do so.
! Cleaning:
Before using for the first time, it is recommended to wash
mandoline in hot water. We recommend to remove the smooth
blade and any «comb» cutting block unit from the frame (in order
to avoid any risk of user injury!) before washing and to wash each
part in hot water or hot water and soap separately.
Rinse and dry. The frame without the blades is washable in the
dishwasher.
04 50 26 29 13 - 02/2014
PROFESSIONAL QUALITY SINCE 1946
QUALITÉ PROFESSIONNELLE DEPUIS 1946
MADE IN FRANCE
MANDOLINE
Vvadi
®
Coupe-légumes manuel
Manual vegetable slicer
MODE D’EMPLOI
DireCtions for use
GB
Réf. 10000
We recommanded the careful and thorough reading of this
manual, which was written to acquire easier the exact han-
dling of the Vivaldi’s mandoline
®
from Bron-Coucke.
The Vivaldi’s mandoline
®
consists of:
INSTRUCTIONS
Mounting of a "comb" cutting blade unit:
Removable of a "comb" cutting blade unit:
How to make straight slicing cuts:
How to cut into sticks:
Maintenance:
Cleaning:
ViValdi’S MaNdOliNE
®
Qualité professionnelle depuis 1946
professional quality since 1946
MANDOLINE
MODE D’EMPLOI
DIRECTIONS FOR USE
Coupe-légumes manuel
manual vegetable slicer
VIVALDI’S MANDOLINE
We recommanded the careful and thorough reading of this
manual, which was written to acquire easier the exact
handling of the Vivaldi’s mandoline from Bron-Coucke.
The VIVALDI’S MANDOLINE from BRON-COUCKE, thanks to its
wonderful blade quality, is able to cut a great variety of shapes, such
as, chips, «vichy carrots», souffle potatoes, gratins, vegetable rings,
onion rings or slices, matchstick potatoes, «allumettes», julienne,
among others.
The Vivaldi’s mandoline consists of:
- a rigid frame with 2 handles and a non-skid reversible stand.
- a bearing plate (n°1 in diagram) adjustable in depth with the lever
provided (n°6 in diagram).
- a smooth blade (n°2 in diagram) adjustable with a knurled knob. (n°3
in diagram).
- Two removable «comb» cutting cutting blade units with respectively
2 and 10 mm spaces between the multiple blades.
- a guard (safety device) n°7 in diagram.
INSTRUCTIONS
Before use, be sure that the smooth bladeʼs cutting edge is firmly held
under the 2 lugs on each side of the mandoline.
! Mounting of a «comb» cutting blade unit:
Before the mounting of a «comb» cutting blade unit, it is essential to
move the smooth blade (n°2) away from the bearing plate (n°1) using
the knurled knob(n°3). Remember to tighten the knurled knob fixing the
smooth blade in place.
Insert the «comb» cutting blade unit (n°4 in diagram) in the placements
provided on the stainless body of the mandoline frame. The «comb»
cutting unit should be placed by matching the «cross» sign on the
«comb» cutter (see diagram) with the «cross» sign inscribed on the
side of the mandoline «holding tongue» (n°5 in diagram). If you place
the «comb» cutter in the other sense it will not mount on the frame.
Fold-back the small «holding tongue".
" Removable of a «comb» cutting blade unit:
Slide back the small «holding tongue» (n°5) to uncover completely the
«comb» cutting blade unit (n°4). Then you can remove the «comb»
cutting unit.
" How to make straight slicing cuts:
Make sure that the stand of the mandoline is completely unfolded and
in a stable position on the work surface.
Remove the «comb» cutting unit if one is mounted in the mandoline.
Take off the unit blade cutting if equipped. Unscrew half turn the knurled
knob and bring forward the straight blade closer to the wavy blade, then
highly screw back again the knurled knob. Adjust the thickness of the
cut thanks to the lever (6) located at the rear of the mandoline.
Now you can slice your vegetables, always using the guard (n°7 in
diagram) to hold and push your vegetables towards the blade.
" How to cut into sticks:
Install the chosen «comb» cutting blade unit after having moved
the smooth blade back (see above) in order to give the necessary
space for the placement of the «comb» cutting blade unit. Make
sure that you fix the smooth blade so it can not move using the
knurled knob.
Now set the thickness of slice that you want to cut by setting the
height of the bearing plate using the lever. Now you can cut the
vegetables always using the guard (n°7).
the dimensions of the sticks or «batonnets» that you cut are
generated by, on the one hand the choice of dimension of the
«comb» cutting blade unit (2 or 10mm) and on the other by the
height of the slice that you take (adjustment of the bearing plate).
The guard:
ALWAYS U SE THE GUA R D (7 ) F OR AL L CU TTI N G
OPERATIONS IN ORDER TO AVOID ALL RISK OF INJURY!
The guard is equipped with stainless steel nails so that it can hold
properly the vegetables pieces during the cutting operation. There
is also a space hollowed out in the guard to hold long vegetables.
In this case, cut with the guard in the direction of the arrows
molded into the underside of the guard. Please note that this guard
has a mobile central part (9) which sits proud of the rest of the
guard when the stainless steel nails are pushed onto the
vegetables to be sliced. When cutting you should press with a
certain pressure on this mobile central part with the parlm of the
hand in rder to push the vegetable down towards the cutter blade
during the successive operations. Again, we repeat, always use
the guard for all cutting operations.
! Maintenance :
The Vivaldiʼs mandoline is designed to require only minimal
maintenance. From time to time one should resharpen the smooth
cutting block, using a fine hone or stone.
Always store the «comb» cutting units in their box, thus keeping
their edges protected while not in use. For storage, give the
mandoline its own place, often one chooses to hang the mandoline
in the kitchen by one of its handles (see picture on the box of the
mandoline). The guard can also be hung, if you choose to do so.
! Cleaning:
Before using for the first time, it is recommended to wash
mandoline in hot water. We recommend to remove the smooth
blade and any «comb» cutting block unit from the frame (in order
to avoid any risk of user injury!) before washing and to wash each
part in hot water or hot water and soap separately.
Rinse and dry. The frame without the blades is washable in the
dishwasher.


Praat mee over dit product
Laat hier weten wat jij vindt van de Bron-Coucke 10000 Vivaldi Mandoline. Als je een vraag hebt, lees dan eerst zorgvuldig de handleiding door. Een handleiding aanvragen kan via ons contactformulier.