CGS28HWK
Date
12/2/2014
Customer
CFEL-KOREA
Model No.
CGS28HWK
Description
IB
Job No.
14CF018
Reference No.
IB-11/642A
Revision No.
4
Color
1C+1C(Black)
Open Size
920mm(W) X 214mm(H)
Folded Size
92mm(W) X 214mm(H)
Material
80gsm Artpaper
Prepared by
Betty bai
Approved by
Jimmy Ng / Maria Jang
Vendor
MILLPLAN
Supplier
CONTINENTAL CONAIR LIMITED
CHINA CREATIVE DEPARTMENT
INSTRUCTION
BOOKLET
ຫဧ໕
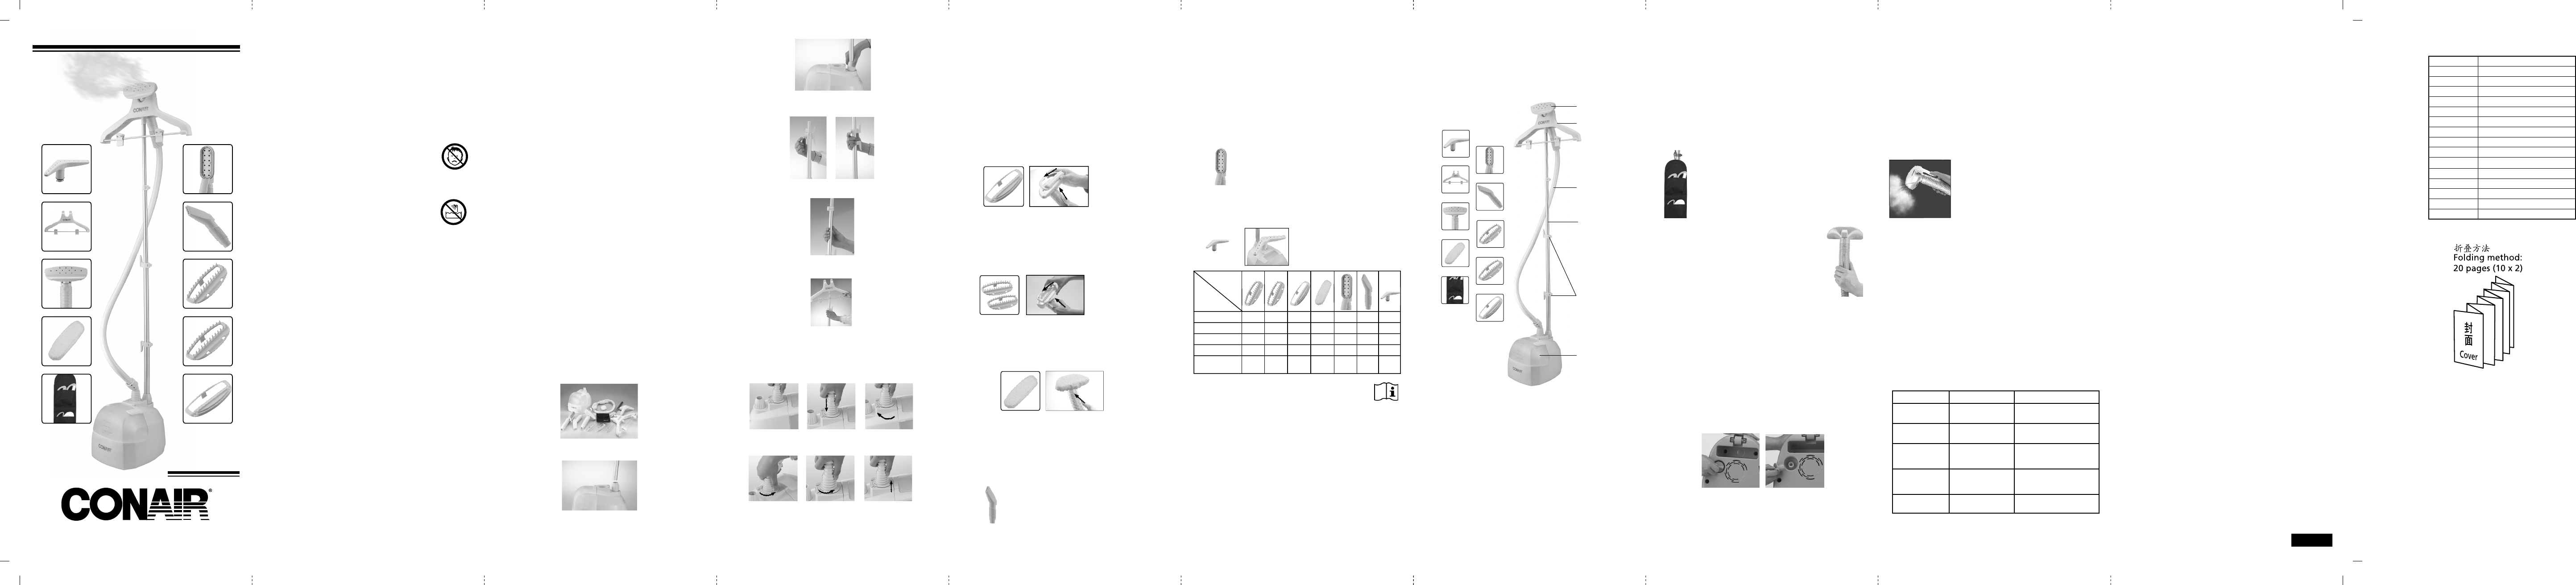
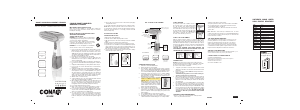
12-in-ONE Multi-tasking Garment Steamer
콘에어
12 IN 1
다기능 스팀 다리미
CONAIR 12-in-ONE
Multi-tasking Garment Steamer
IMPORTANT SAFETY INSTRUCTIONS
When using electrical appliances, especially when children are
present, basic safety precautions should always be followed,
including the following:
READ ALL INSTRUCTIONS BEFORE USING
KEEP AWAY FROM WATER
SAFETY PRECAUTIONS
• WARNING: The polyethylene bags over the
product or its packaging may be dangerous.
Keep these bags out of the reach of babies
and children.
Never use them in cribs, children’s beds,
pushchairs or playpens. The thin lm may
cling to the nose and mouth and prevent
breathing. A bag is not a toy.
• WARNING: Do not use this appliance near
bathtubs, showers, basins or other vessels
containing water.
1. If you are using the unit in a bathroom, unplug it after you
have nished using it. Using the unit close to a source of
water can, in fact, be dangerous, even if the unit is switched
off. To ensure additional protection, have installed in your
bathroom a residual current device (RCD) with a nominal
trip current no higher than 30 mA. Ask your electrical tter
for advice.
2. Never immerse the unit in water or any other liquid.
3. If the supply cord is damaged, it must be replaced by
the manufacturer, its service agent or similarly quali ed
persons in order to avoid a hazard.
4. Do not use the unit if it has fallen or if it appears to be
damaged.
5. Do not leave the unit unattended when it is plugged in or
switched on.
6. Unplug the unit immediately if you have problems when
using it.
7. Do not use any accessories other than those recommended
by manufacturer.
8. Unplug the unit after each use and before cleaning it.
9. This unit is not intended for use by people (including
children) with reduced physical, sensory or mental
capabilities, or by persons who lack experience or
knowledge, unless they are supervised or have been given
instructions beforehand on the use of the unit by a person
responsible for their safety. Children should be supervised
to make sure they do not treat the unit like a toy.
10. Allow the unit to cool before storing.
11. To prevent damage to the cord, do not wrap it around the
unit and ensure it is stored without twisting or folding it.
12. When emitting steam, this appliance may cause burns if
it is used too close to the skin or eyes, or if it is used
incorrectly. To reduce the risk of contact with hot water
emitting from the steam vents, test appliance before use
by holding it away from the body.
13. Do not steam garments while on a person.
14. Always keep the hose and nozzle elevated above the
water container.
15. Burns could accur from touching hot metal parts, hot
water or steam. Use care when you turn steam appliance
upside down.
16. Do not operate steamer without correctly lling the
water container. Only use clean cold water for lling this
appliance. In hard water areas, we recommend the use of
distilled water.
17. Use of an extension cord is not recommended. If an
extension cord is absolutely necessary, a 13-ampere-
rated cord should be used. Cord rated for less amperage
may overheat. Care should be taken to arrange the cord
so that it cannot be pulled or tripped over.
CAUTION
1. Never drop or insert any object into any opening or hose.
2. Do not place the steam nozzle directly on any surface or on
the appliance power cord while it is hot or plugged in .
3. While emitting steam, this appliance may cause burns if it
is used too close to the skin, scale or eyes, or if it is used
incorrectly. To reduce the risk of contact with hot water emitting
from steam vents, test appliance before use by holding it away
from body.
4. Before unit is turned on the hose must be extended, and place
it in the hook.
5. Never yank cord to disconnect from outlet, instead, grasp plug
and pull to disconnect.
6. Burns could occur from touching hot metal parts, hot water
or steam. Use care when you turn a steam appliance upside
down - there may be hot water in reservoir.
7. Use with caution when carrying steamer as it contains hot
water.
Caution: Hose will be hot when in use. Avoid prolonged
contact.
KEEP THESE INSTRUCTIONS
FOR HOUSEHOLD USE ONLY
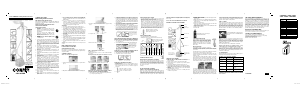
UNPACKING INSTRUCTIONS
Place the box on a large sturdy flat surface. Carefully remove
the appliance from the packing material. Keep all plastic bags
away from children.
STEAMER ASSEMBLY
STEP 1 – Assembling the Support Rod
1. Insert pole with bigger diameter side into receptacle i base
(Fig. a)
2. Slide plastic connector onto it and fix the connector tightly (Fig. b)
3. Open the locking tab and pull out the telescope pole totally
(Fig. c)
4. Lock up the tab (Fig. d)
5. Slide hook into the top of the pole (Fig. e)
STEP 2 – Attaching the steamer Hose
Assembly process:
1. Align to unlock arrow 2. Press 3. Turn clockwise till align
to lock arrow
Removing the Steamer Hose (make sure unit has been cooled)
Disassembly process:
1. Turn counterclockwise till align to unlock arrow 2. Pull
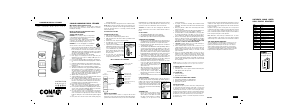
USING THE SILICON BRUSH ATTACHMENT (USED IN
CONJUNCTION WITH STEAM ATTACHMENT)
g This attachment is ideal for ultimate pressing performance,
e.g. cotton, polyester and nylon etc.
g To attach the Silicon brush attachment to the T-nozzle, rst
ensure that the appliance is “ O ” and the T-nozzle is cool.
Position the lugs on the bottom of the Silicon brush attachment
over the corresponding grooves on the base of the T-nozzzle.
Then push the upper part of the Silicon brush attachment
towards the T-nozzle till the latch on the top of the attachment
clicks into place.
g Use it in the same manner as the T-nozzle but begin at the
top of the garment and move downwards to ensure that the
attachment head touches the surface of the fabric.
g After use, switch the appliance “ O ” and wait for the T-nozzle
to cool. Then remove the Silicon brush attachment from the
T-nozzle by pressing the base of the latch on top of the Silicon
brush attachment. Push upwards until the latch becomes
dislodged and remove from the T-nozzle. Brush away any lint
that may have gathered on the attachment head.
USING THE BRISTLE BRUSH AND RIGID COMB BRUSH
(USED IN CONJUNCTION WITH STEAM ATTACHMENT)
g This attachment is ideal for ultimate pressing performance,
e.g. cotton, Wool etc..
g Use it in the same manner as the Silicon brush attachment.
USING THE COTTON COVER ATTACHMENT (USED IN
CONJUNCTION WITH STEAM ATTACHMENT)
g This attachment is idea for hard surface cleaning.
g To attach the cotton cover to the T-nozzle.
USING THE CONCENTRATOR NOZZLE
• Use this attachment for more focused steaming to remove
stubborn creases.
• Simply aim the steam jets on the nozzle directly at the area
to be steamed. (Take care not to jet steam at any part of
your body)
•
When the steamer cool down,
take the T shape nozzle off and
put the concentrator nozzle on.
Concentrator nozzle
normal steam rate returns, usually 2-3 times. With each repeated
cycle, use a fresh solution of vinegar and water. Run one cycle
of fresh, cold water after the completion of decalcification before
using the steamer again to steam garments.
HOW TO STEAM
Grasp the steam nozzle with the steam jets facing away from
you. Begin at the bottom of the fabric to allow the steam to rise
inside and outside, removing wrinkles, slowly move the nozzle
from the bottom to the top of the fabric. Remove the nozzle from
the garment and smooth the fabric with your free hand. Some
fabrics are best steamed on the underside of the material. This
will allow the fibers of the fabric to relax, eliminating wrinkles.
Burst of steam
For more difficult fabrics, simply press the
lever on the T-nozzle for an additional burst
of steam.
NOTE: Test fabric for color fastness in an inconspicuous spot.
Drape linens, towels, handkerchiefs and napkins over a rod or
place on a towel rack, Heavier fabrics may require repeated
steaming. Repeat as necessary with practice, you will gain
speed and efficiency, You will soon learn which fabrics require
multiple steam applications.
Do not directly touch velvet or silk with the steam head.
Always steam with hose in upright position, so any
condensation is free to flow back into the steamer.
If you steam with hose not upright, condensation will collect
inside the hose. This will cause gurgling and some water
droplets to form near the steam jets on the handle. To avoid
this, frequently lift the steam handle upward until the hose is
extended to its full height.
To STEAM DRAPES
Wash and dry drapes as directed according to fabric type. Re-
hang drapes and steam drapes when in place.
TROUBLE - SHOOTING THE STEAMER
Note: Minerals in water will vary in different areas. To insure
continued operation of the steamer, never store without
cleaning and removing excess water from the reservoir and
water container.
ONE YEAR LIMITED WARRANTY
This Conair Appliance is guaranteed for consumer use for
one year. Please fill in and return the Warranty Registration as
instructed or log into www.conair-asia. com to register. This
guarantee is no longer valid in case of alteration or repair by
any unauthorized persons and only covers defects under normal
use from the date of purchase. If your product does not perform
satisfactorily because of defects in materials or manufacture, it
will be repaired or replaced under guarantee through the Conair
Service Centre. Conair reserves the right to amend terms and
specifications without prior notice.To obtain service under
this warranty, please send in registration within one month of
purchase through either one of the following ways.
THE DATE CODE MENTIONED
WWYYXXX was mentioned on unit as manufactured date so you
can see W as week and Y as year for your reference.
CONAIR CUSTOMER SERVICE:
35/F., Standard Chartered Tower, Millennium City,
388 Kwun Tong Road, Kwun Tong, Kowloon, Hong Kong
Conair Customer Hotline: (852) 2751 4604
Website: www.conair-asia.com
USING THE PRESSING NOZZLE
• Use this attachment for creating creases in trousers and
shirt sleeves and for general smoothing.
• Firstly, determine the desired crease line and hold the crease
taut with one hand. Press the lever on the attachment
handle to open the plate and clamp and place it over the
crease close to where it is being held taut, being careful to
keep your hand away from the attachment head and steam.
Place the top of the crease in between the plate and clamp
of the attachment. Release the lever to hold the attachment
in place and carefully move the attachment along the crease
and away from yourself. Press the lever on the handle to
open the attachment and remove from the garment.
•
When the steamer cool down,
take the T shape nozzle off and
put the pressing nozzle on.
Pressing nozzle
USING V SHAPE NOZZLE
• Use this attachment for refreshing clothes.
• Putting the clothes on the hanger and let the steam up.
When the steamer cool down,
take the hose off and put the
V shape nozzle on.
V shape nozzle
OPERATING INSTRUCTIONS
BEFORE FILLING THE WATER CONTAINER
Turn the water container upside down and inspect to make
sure the valve and spring assembly are functioning. Place the
container in the reservoir and check that it is seated securely.
If the container has been stored with water inside, it may be
necessary to remove the water and clean the container. Follow
the steps for care and
cleaning.
FILLING THE WATER CONTAINER
(PRIOR TO PLUGGING IN THE APPLIANCE)
Remove the water container with the handle and turn upside
down. Unscrew the valve in the center of the base. Fill
container by holding container under a source of running cold
water until the container is filled to the desired level. Do not
overfill. Screw the valve cap onto the water container and
return the container to the upright position. Place the water
container onto the base and make certain it is seated properly
in the cavity.
DO NOT FILL THE CONTAINER WITH HOT WATER
GETTING TO KNOW YOUR STEAMER
OPERATING THE STEAMER
1. Make sure all hose connections are secure and tight.
2. Make sure the rod is fully assembled and the hose is not
twisted or kinked.
3. Plug the power cord into a normal electrical outlet.
4. Turn the switch to the "I" position or "II" position for high or
low steam rate.
5. The indicator will light to indicate when power is on.
6. Steam will be produced from the nozzle in about one minute.
Caution: Hose will be hot when in use. Avoid prolonged
contact.
7. Should the water container run out of water, the unit with
automatically turn on and off.
8. Switch off the unit for end of use or refilling the water
container for reoperation.
CLEANING AND STORING
1. Turn the switch to the "OFF" position and unplug from the
power source.
2. Wait for the steamer to cool completely for at least 30 minutes.
3. Unplug power cord and gently wrap abound built-in cord
wrap for storage.
4. Remove the steamer hose.
5. Remove the water container from unit, unscrew valve and
empty unused contents. Allow to air dry.
6. Remove excess water from the reservoir by lifting the unit
and pouring into a sink.
7. Replace water container.
8. Store the unit.
Cord wrap hook for easy storage of
hooks and attachments
OTHER IMPORTANT NOTES
During operation, the steamer hose may gurgle.
This is a normal result of condensation collection
inside the hose. Simply lift the handle upward
until the hose is extended to its full height. The
gurgling will stop when the excess moisture
inside the hose has had a chance to drain back
into the base.
DECALCIFICATION
If the appliance begins to produce steam more
slowly than usual, stops producing steam and then starts again,
even when the water tank is full , you may need to decalcify
your steamer.
Decalcification refers to removing the calcium deposits which
form over time on the metal parts of the steamer.
For best performance, decalcify the unit from time to time .The
frequency depends upon the hardness of the water used and
frequency of use.
To decalcify, fill the water tank with a solution of 1/3 white
vinegar and 2/3 water and replace the tank into its cavity in
the steamer housing. Place the attachment head over a sink
and switch the steamer to ‘II’ run until half the amout has
steamed(1 liter). Turn the steamer to the ‘OFF’ positon, unplug
from electrical outlet, and allow to stand for 30 minutes.
Unscrew the drain hole cap on the base, and than place the
main unit at normal operation position, insert the water tank
into the base that water will drain out from the drain hole and
bringing with limescale. Finally, fastened up the drain hole cap.
Repeat the above procedure as many times as necessary until a
PROBLEM CAUSE SOLUTION
Steamer fails to
heat
Steamer not plugged
in
Plug into electrical outlet
No steam Water level is low Turn switch to "OFF" and
refill water container
Water drips from
nozzle
Condensation in
hose
Hold the hose vertically and
allow water to drain
back into unit
Nozzle gurgles C ondensation in
hose
Hold the hose vertically and
allow water to drain back
into unit
Poor steam
performance
Scale exist in the tank Decalcify reservoir and
water container
To attach the cotton
cover to the T-nozzle
Cotton cover
attachment
CGS28HWK
IB-11/642A
Position and push the
lugs on the bottom
of the silicon brush
attachment towards
the T-nozzle till clicks
into place
Silicon brush
Bristle brush and rigid
comb brush the lugs on
the bottom of the silicon
brush attachment
towards the T-nozzle
till clicks into place
Bristle brush and
rigid comb brush


Praat mee over dit product
Laat hier weten wat jij vindt van de Conair CGS28HWK Kledingstomer. Als je een vraag hebt, lees dan eerst zorgvuldig de handleiding door. Een handleiding aanvragen kan via ons contactformulier.