
HR HR RO RO
GB/CYGB/CY
Apăsaţi mânerul de strângere din nou în jos, atunci
când procedeul de pompare este încheiat și îndepăr-
taţi mini-pompa de aer de pe ventilul roţii de bicicletă.
Utilizare cu furtunul pompei și manometru
Introduceţi furtunul pompei cu manometru în orificiul
ventilului (imag. C) și trageţi mânerul de strângere.
Deschideţi piuliţa
13
capului de pompare.
Pentru ventilele Schrader introduceţi capul reversibil și
cauciucul conform descrierii din imaginea C/I.
Indicaţie: Conectaţi orificiul mic din cauciuc cu
știftul de conectare al capului reversibil (imag. C/I).
Pentru ventilele Schrader introduceţi capul reversibil și
cauciucul conform descrierii din imaginea C/I I.
Indicaţie: Conectaţi orificiul mare din cauciuc cu
știftul de conectare al capului reversibil (imag. C/I I).
Strângeţi piuliţa și introduceţi capul pompei pe ventil.
Trageţi sistemul de închidere în sus.
Apăsaţi mânerul de strângere din nou în jos, atunci
când procedeul de pompare este încheiat.
Îndepărtaţi furtunul pompei cu manometru din orificiul
ventilului.
Curăţare şi întreţinere
Pentru curăţare şi îngrijire utilizaţi numai o lavetă fără
scame, uşor umezită.
Înlăturare
Ambalajul este produs din materiale ecologice,
care pot fi eliminate la punctele locale de reci-
clare.
Administraţia locală vă poate oferi mai multe informaţii cu
privire la posibilităţile de eliminare a produsului.
Mini-pompă telescopică
Utilizare corespunzătoare scopului
Produsul este prevăzut pentru umflarea roţilor de bicicletă.
Produsul nu este proiectat pentru utilizare industrială.
Date tehnice
Mini pompă de aer: cca. 23–41 x 5 x 3 cm
(lăţime x înălţime x adâncime)
Suport: cca. 9 x 5,5 x 3 cm
(lăţime x înălţime x adâncime)
Suprapresiune nominală: 5 bari (70 psi)
Manometru: până la 8 bar (120 psi)
Indicaţii de siguranţă
CITIŢI CU ATENŢIE MANUALUL DE UTILIZARE ÎNAINTE
DE UTILIZAREA PRODUSULUI! PĂSTRAŢI TOATE
INDICAŢIILE DE SIGURANŢĂ ŞI INSTRUCŢIUNILE
PENTRU CONSULTAREA ULTERIOARĂ!
PERICOL DE
MOARTE ŞI DE ACCIDENTARE
PENTRU COPII! Nu lăsaţi produsul la
îndemâna copiilor. Acest produs nu este o jucărie!
Înainte de a începe cu umflarea roţii de bicicletă, veri-
ficaţi presiunea de aer maximă admisă a acesteia.
Umflaţi roata de bicicletă până când s-a atins presiu-
nea maxima admisa.
ATENŢIE! PERICOL DE ACCIDENTARE! Nu utili-
zaţi o pompă deteriorată sau o pompă cu elementele
de racord deteriorate. Un produs deteriorat poate
pune în pericol siguranţa și funcţionalitatea.
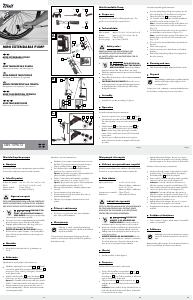
Montaj
Montaţi produsul conform figurii A.
Deservire
Utilizare fără furtunul pompei și manometru
Puneţi orificiul ventilului corespunzător
7
sau
8
(fig. B) pe ventilul roţii de bicicletă şi trageţi mânerul
de strângere
6
în sus. Orificiul ventilului se află acum
sigur pe ventilul roţii de bicicletă.
Trageţi de mânerul
10
din mini pompa de aer
3
şi
apăsaţi-l din nou până când roata de bicicletă este
umflată.
Indicaţie: Pentru ventilele de tip Schrader folositi ori-
ficiul mare de ventil. Pentru ventile Blitz și Sclaverand
folosiţi orificiul mic de ventile.
Upotreba s crijevom i manometrom
Nataknite crijevo pumpe s manometrom na otvor ven-
tila (slika C) i potegnite zateznu polugu prema gore.
Otvorite poklopac matice
13
na glavi pumpe.
Za Schrader ventile nataknite reverzibilni umetak i
gumu, kao što je opisano na slici C / I.
Uputa: Spojite mali otvor gume s tankom priključnom
iglom reverziblog umetka (slika C / I).
Za blic i Sclaverand ventile nataknite reverzibilni
umetak i gumu, kao što je opisano na slici C / I I.
Uputa: Spojite veliki otvor gume s velikom priključnim
iglom reverzibilnog umetka (slika C / I I).
Zatvorite poklopac matice i nataknite glavu pumpe
na ventil.
Povucite zateznu polugu prema gore.
Pritisnite zateznu polugu opet prema dolje, ako ste
završili napumpavanje.
Otklonite crijevo pumpe s manometrom iz otvora
ventila.
Čišćenje i održavanje
Za čišćenje i njegu koristite samo malo navlaženu
krpu, koja ne pušta vlakanca.
Zbrinjavanje
Pakiranje se sastoji od ekološki prihvatljivog
materijala, kojeg možete odložiti preko lokalnih
mjesta za reciklažu.
O mogućnostima zbrinjavanja dotrajalog proizvoda
možete se informirati pri Vašem općinskom ili gradskom
komunalnom uredu.
Mini teleskopska pumpa
Namjena
Proizvod je namjenjen za napumpavanje gume na biciklu.
Proizvod nije namjenjen za profesionalnu upotrebu.
Tehnički podaci
Zračna mini pumpa: cca. 23 – 41 x 5 x 3 cm (š x v x d)
Držač: cca. 9 x 5,5 x 3 cm (š x v x d)
Nazivni pretlak: 5 bara (70 psi)
Manometar: do 8 bara (120 psi)
Sigurnosne upute
PRIJE UPOTREBE PROIZVODA PAŽLJIVO PROČITAJTE
UPUTE ZA KORIŠTENJE! SAČUVAJTE SVE SIGURNO-
SNE UPUTE I OSTALE UPUTE ZA BUDUĆU UPOTREBU!
OPASNOST PO
ŽIVOT I OD OZLIJEDA ZA MALU I
VEĆU DJECU! Držite djecu uvijek podalje
od proizvoda. Proizvod nije igračka!
Prije nego što počnete s napumpavanjem gume bicikla,
provjerite njegov najveći dozvoljeni tlak zraka.
Pumpajte gumu bicikla samo tako dugo, dok se ne
postigne najveći dozvoljeni tlak zraka.
OPREZ! OPASNOST OD OZLJEDA! Nemojte
koristiti oštećene crpke ili pumpe s oštećenim priključ-
cima. Oštećeni proizvod može utjecati na sigurnost i
funkcionalnost.
Montaža
Montirajte proizvod tako kao što je prikazano na
slici A.
Rukovanje
Upotreba bez crijeva pumpe i bez manometra
Nataknite odgovarajući otvor ventila
7
ili
8
(slika B)
na ventil na gumi bicikla i potegnite zateznu polugu
6
prema gore. Otvor ventila je sad sigurno učvršćen na
ventilu gume bicikla.
Izvlačite i uvlačite dršku
10
zračne mini pumpe
3
toliko često, sve dok je guma bicikla napumpana.
Uputa: Za Schrader ventile koristite veliki otvor ventila.
Za blic i Sclaverand ventile koristite mali otvor ventila.
Pritisnite zateznu polugu opet prema dolje, ako ste
završili napumpavanje i otklonite zračnu mini pumpu
sa ventila gume bicikla.
Use with pump tubing and manometer
Insert the pump tubing with pressure gauge into the
valve opening (Fig. C) and lift the tensioning lever.
Open the swivel nut
13
on the pump head.
For Schrader valves insert the reversible attachment
and rubber seal as shown in Figure C / I.
Note: connect the small opening of the rubber seal
with the slim connector pin on the reversible insert
(Fig. C / I).
For Dunlop and Presta valves insert the reversible in-
sert and rubber seal as shown in Figure C / I I.
Note: connect the large opening of the rubber seal
with the large connector pin of the reversible insert
(Fig. C / I I).
Close the swivel nut and attach the pump head onto
the valve.
Lift the tensioning lever.
Push the tensioning lever back down once finished
pumping.
Remove the pump tubing with pressure gauge from
the valve opening.
Cleaning and care
Only clean with a slightly dampened, lint-free cloth.
Disposal
The packaging is made from recyclable materials,
which may be disposed through your local
recycling facilities.
Contact your local community or municipal administration
for information on disposing of worn-out products.
Mini Extendable Pump
Proper use
This product is intended for inflating bicycle tyres. The
product is not intended for commercial use.
Technical data
Mini air pump: approx. 23–41 x 5 x 3 cm (w x h x d)
Bracket: approx. 9 x 5.5 x 3 cm (w x h x d)
Rated pressure: 5 bar (70 PSI)
Pressure gauge: up to 8 bar (120 PSI)
Safety notes
CAREFULLY READ THE INSTRUCTIONS FOR
USE BEFORE USING THIS PRODUCT! KEEP
ALL SAFETY NOTES AND INSTRUCTIONS FOR FU-
TURE REFERENCE!
RISK OF FATAL IN-
JURY AND ACCIDENT FOR INFANTS
AND CHILDREN! Always keep children
away from the product. This product is not a toy!
Check the maximum rated tyre pressure before inflating
the bicycle tyre.
Only inflate the bicycle tyre until it reaches its maximum
rated pressure.
CAUTION! RISK OF INJURY! Please do not use
a damaged pump or a pump with damaged junctions.
A damaged product could adversely affect safety
and proper function.
Assembly
Assemble the product according to Figure A.
Operation
Use without pump tubing and manometer
Insert the respective valve opening
7
or
8
(Fig. B)
onto the bicycle tyre valve and lift the tensioning lever
6
.
The valve opening is now secured to the bicycle tyre
valve.
Pull the handle
10
out of the mini air pump
3
then
push in, and repeat until the bicycle tyre is inflated.
Note: use the large valve opening for Schrader
valves. Use the small valve opening for Dunlop and
Presta valves.
Once the tyre is inflated push the tensioning lever
down and remove the mini air pump from the bicycle
tyre valve.
MINI EXTENDABLE PUMP
Operation and Safety Notes
MINI-TELESK OPPUMPE
Bedienungs- und Sicherheitshinweise
MINI TELESKOPSKA PUMPA
Upute za posluživanje i za Vašu sigurnost
ΜΙΝΙ ΤΗΛΕΣΚΟΠΙΚΗ ΤΡΟΜΠΑ
Υποδείξεις χειρισμού και ασφαλείας
MINI-POMP Ă TELESCOPICĂ
Instrucţiuni de utilizare şi de siguranţă
МИНИ ТЕЛЕСКОПИЧНА ПОМПА
Инструкции за обслужване и безопасност
MINI EXTENDABLE PUMP
(I)
(II)
A
B
C
1 2
1 x 1 x
3
1 x
15
2 x
4
2 x
3
5
4
1
6
10
7
8
9
14
1011 12 13
15
IAN 109612

Praat mee over dit product
Laat hier weten wat jij vindt van de Crivit IAN 109612 Fietspomp. Als je een vraag hebt, lees dan eerst zorgvuldig de handleiding door. Een handleiding aanvragen kan via ons contactformulier.