GB/IE GB/IE GB/IE
GB/IE
GB/IE
LED Bike Light Set
Introduction
Congratulations on the purchase of your new
device. In doing so you have chosen a
top-quality product. The instructions for use
are to be considered as part of this product. It contains
important safety, assembly and disposal information.
Before using the product, please familiarise yourself
with all the safety information and instructions for use.
The product must only be used as described and for
the specified fields of application. If you pass the prod-
uct on to anyone else, please be sure to also include all
documentation.
Intended use
This product is suitable for lighting the roadway whilst
cycling. The LED Bicycle Light Set is approved as exclu-
sive lighting for all bicycles. Light distribution must not
be impaired by other bicycle parts or luggage. The
product is intended for outdoor use. Any use other than
the aforementioned or any product modification is pro-
hibited and can result in injuries and product damage.
The manufacturer is not liable for damages resulting
from improper use. This product is not intended for
commercial use.
Parts Description
1
Headlight bracket
2
Reducer rubber
3
Headlight bracket retaining screw
4
Headlight on/off switch
5
Headlight battery/rechargeable battery control light
6
Head lamp battery compartment
7
Headlight
8
Headlight angle adjustment screw
9
Headlight lock
10
Tail light bracket
11
Tail light lock
12
Tail light bracket rubber tab
13
Tail light on/off switch
14
Tail light battery control lamp
15
Tail light
16
Tail light retaining screw
17
Battery cover
Scope of delivery
1 Headlight
1 Tail light
1 Headlight bracket
1 Tail light bracket
4 Batteries AA
2 Batteries AAA
Reducer rubbers
1 Instructions for assembly and use
Technical Data
Headlight
Model designation: XC-196A / L-Lux 40
Rated output: 1 W
kinderen) met beperkte fysieke, sensorische of
geestelijke capaciteiten of met een gebrek aan
ervaring en/of kennis gebruikt te worden. Behalve
als ze door een persoon in de gaten worden ge-
houden, die voor hun veiligheid verantwoordelijk
is. Houd er rekening mee dat beschadigingen door
ondeskundig gebruik, het negeren van de gebruiks-
aanwijzing of ingrepen door niet-geautoriseerde
personen van de garantie zijn uitgesloten.
Demonteer het product in geen geval. Door ondes-
kundige reparaties kunnen aanzienlijke gevaren
voor de gebruiker ontstaan. Laat reparaties alleen
uitvoeren door een vakman. De LED‘s kunnen niet
worden vervangen.
Veiligheidsinstructies omtrent
de batterijen/accu‘s
VOORZICHTIG! EXPLOSIEGE-
VAAR! Laad batterijen in géén geval op!
Verwijder de batterijen uit het product als u het
gedurende een langere periode niet gebruikt.
Let bij het plaatsen van de batterijen op de juiste
polariteit! Deze wordt aangegeven in het batterijvak.
Reinig de contacten van het product en van de bat-
terijen zo nodig voordat u de batterijen plaatst.
Verwijder verbruikte batterijen per omgaande uit
het apparaat. Er is sprake van een verhoogde kans
op lekkage!
Vervang altijd alle batterijen tegelijkertijd.
Gebruik geen alkali batterij in combinatie met een
oplaadbare batterij.
Gebruik geen nieuwe batterijen in combinatie met
oude.
Batterijen/accu‘s dienen niet bij het huisvuil
gedeponeerd te worden.
Iedere verbruiker is wettelijk verplicht, batterijen/
accu‘s volgens de voorschriften af te voeren!
VOORZICHTIG! EXPLOSIEGE-
VAAR! Houd de batterijen/accu‘s uit de
buurt van kinderen, gooi de batterijen/
accu‘s niet in open vuur, sluit deze niet kort en
neem ze niet uit elkaar.
Bij negeren van de instructies kunnen batterijen
over hun eindspanning heen ontladen worden. In
dat geval bestaat het gevaar dat ze gaan lekken.
Als de batterijen in het apparaat zijn uitgelopen,
dient u deze direct te verwijderen om schade aan
het apparaat te voorkomen!
Vermijd contact met huid, ogen en slijmvliezen als
vloeistof uit de batterijen/accu‘s gelekt is. Spoel in
geval van contact met batterijzuur de desbetreffen-
de plekken af met voldoende schoon water en
raadpleeg onmiddellijk een arts.
Batterijen nooit opnieuw opladen! Explosiegevaar!
Aanwijzing: Als het rode controlelampje van de
accu/batterij
5
14
in de koplamp
7
of in het
achterlicht
15
brandt, dient u de batterijen resp. de
accu‘s direct te vervangen of op te laden.
Let erop dat na het branden van het controlelampje
de lampen niet meer met de regels van de wet
overeenkomen.
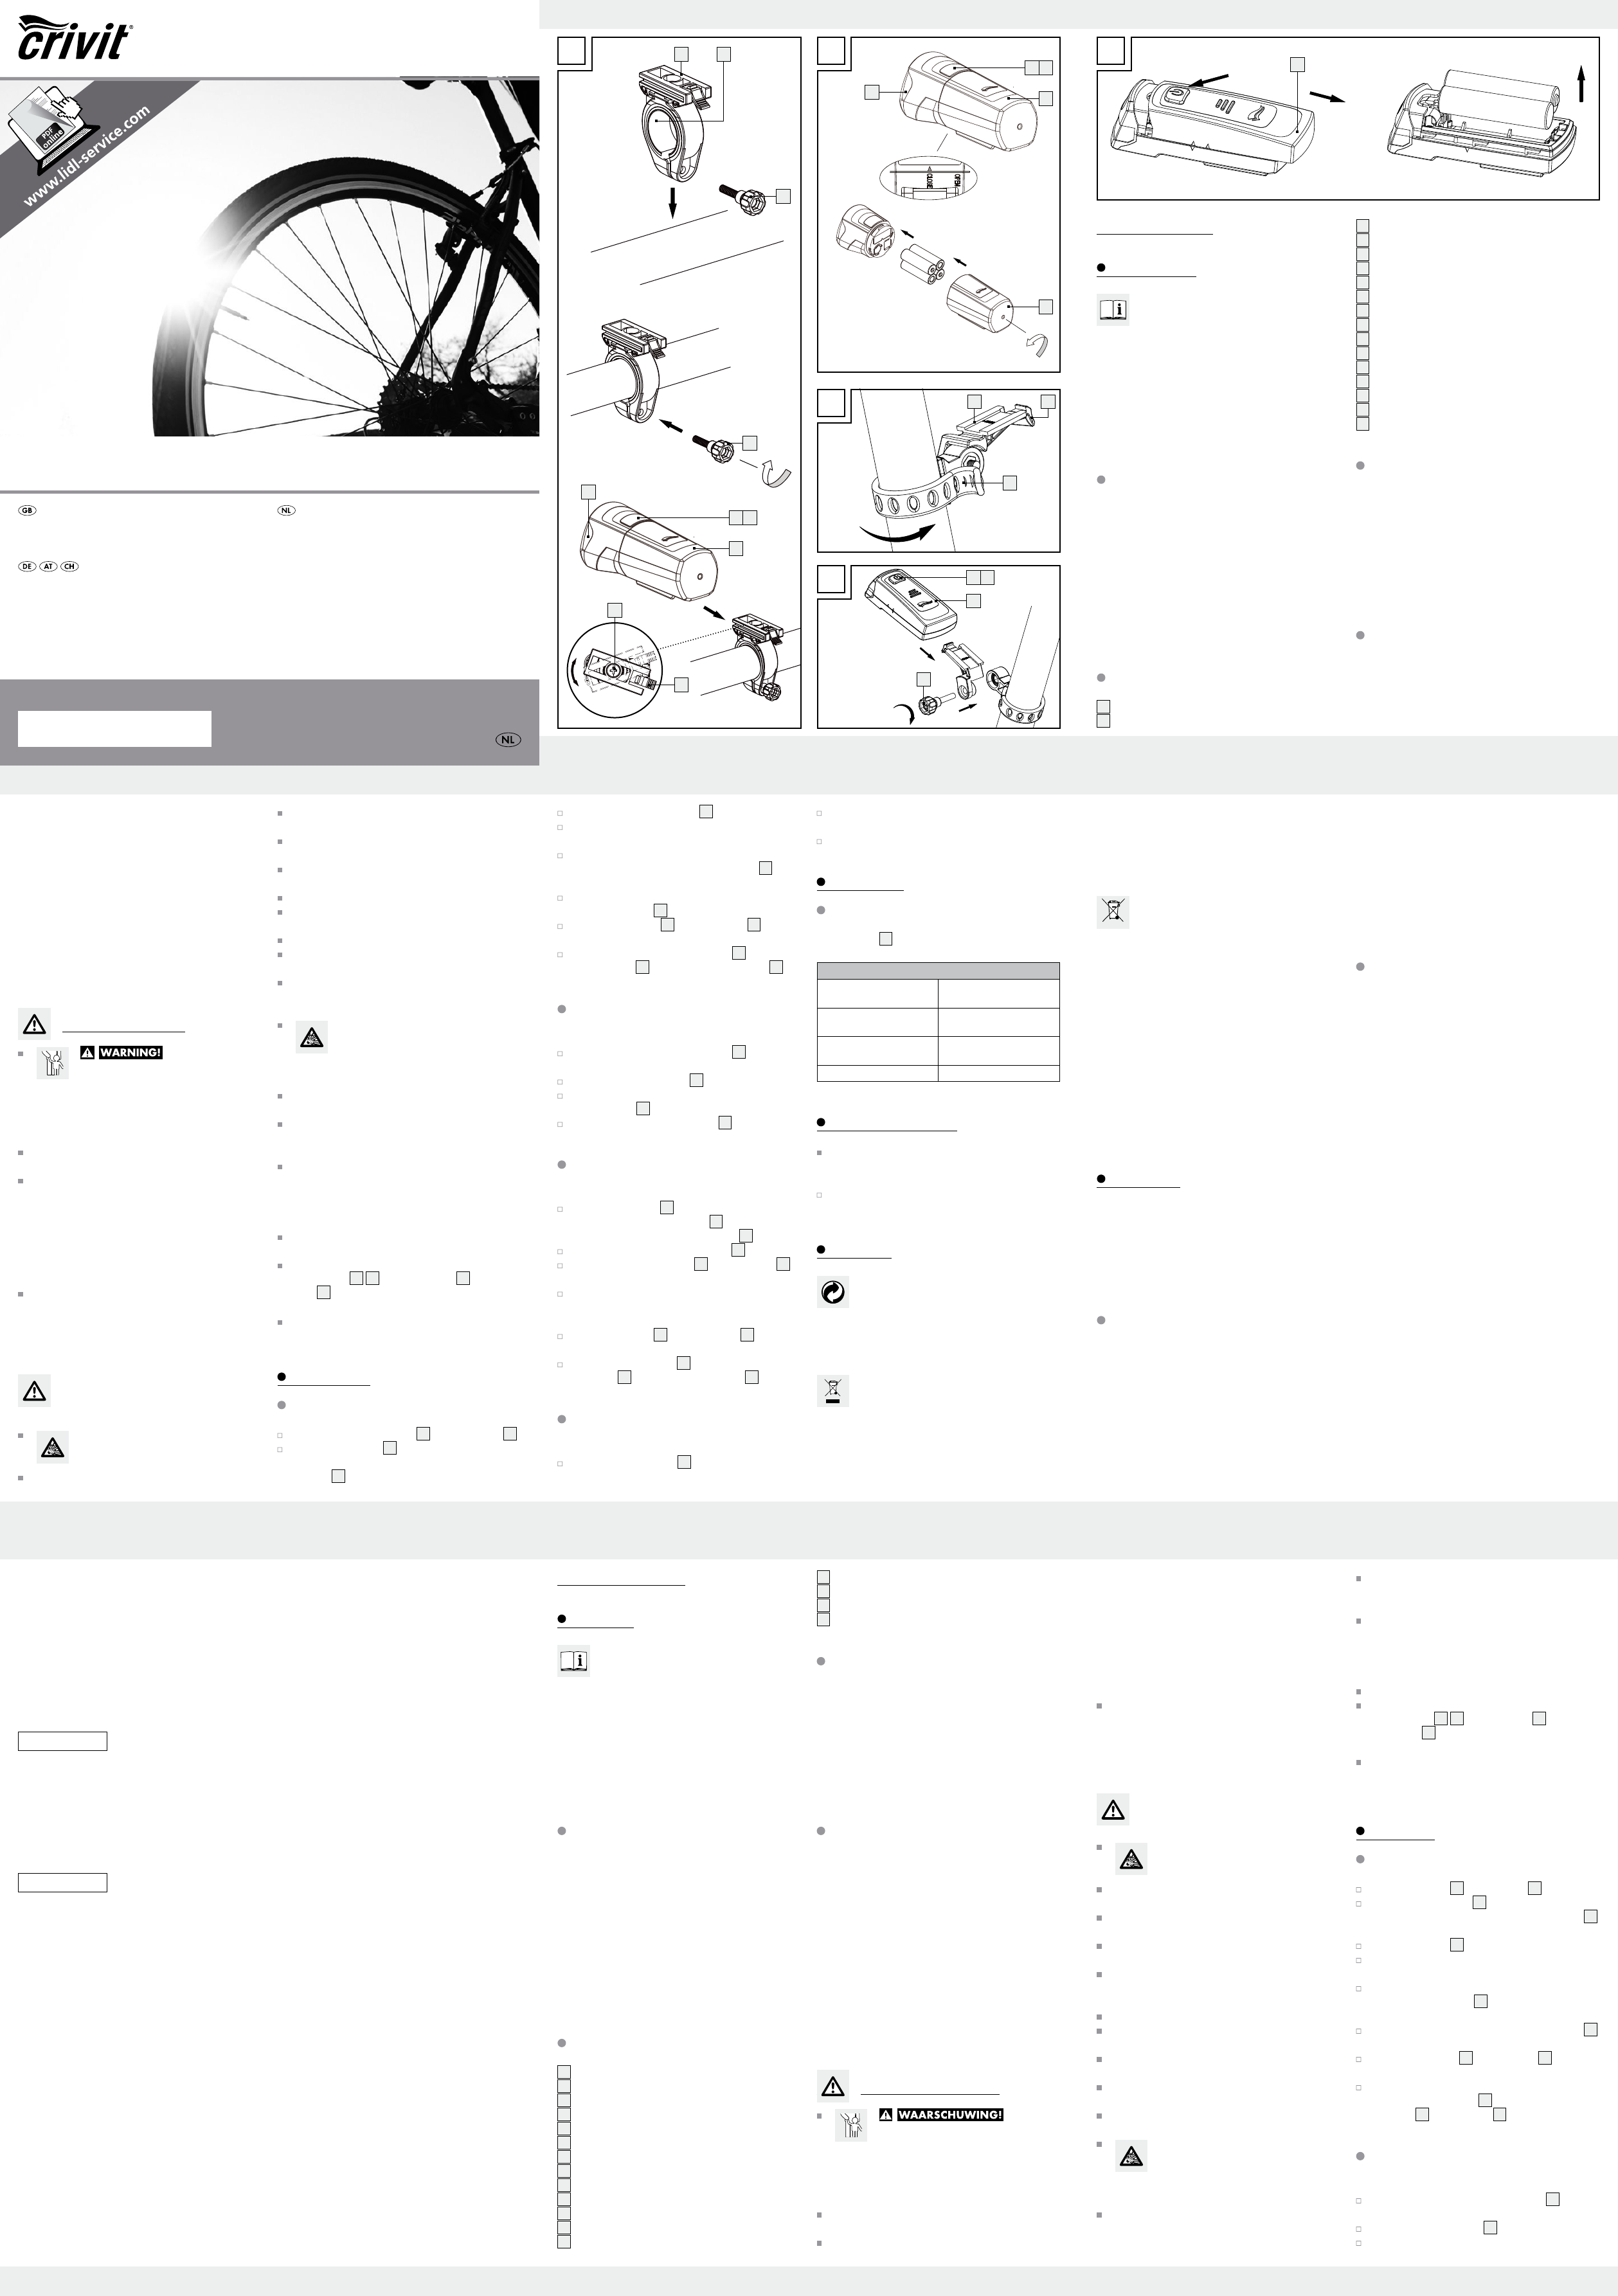
Montage
Koplamp monteren (z. afb. A)
Draai de schroef
3
uit de houder
1
.
Positioneer de houder
1
op de gewenste plek op
het stuur. Gebruik zo nodig het reduceerrubber
2
om een optimale pasvorm te kunnen waarborgen.
Draai de schroef
3
weer terug.
Draai de schroef stevig vast. Gebruik hiervoor
geen werktuigen om beschadigingen te vermijden.
Om de optimale hoek tot de rijbaan in te stellen,
draait u de stelschroef
8
met een kruisschroeven-
draaier 2-3 rondes om.
Stel de gewenste hoek en in draai de stelschroef
8
weer vast.
Schuif de koplamp
7
op de houder
1
, totdat
deze hoorbaar vastklikt.
Om de koplamp lost te maken, drukt u de vergren-
deling van de koplamp
9
en schuift u de
koplamp
7
uit de houder
1
naar voren.
Batterijen in de koplamp plaatsen
(zie afb. B)
Draai het voorste deel van de koplamp
7
, totdat
de kleine pijl op de positie „open“ staat.
Verwijder het batterijvak
6
.
Plaats de batterijen (4 x AA, 1,5 V) in het batterij-
LED-fietslampen-set
Inleiding
Hartelijk gefeliciteerd met de aankoop van
uw nieuwe apparaat. U hebt voor een hoog-
waardig product gekozen. De gebruiksaanwij-
zing maakt deel uit van dit product. Ze bevat belangrijke
aanwijzingen voor de veiligheid, de montage en de
verwijdering. Maak uzelf vóór gebruik van het product
vertrouwd met alle bedienings- en veiligheidsinstructies.
Gebruik het product alleen zoals beschreven en voor
de aangegeven gebruiksdoeleinden. Geef, wanneer
u het product doorgeeft aan derden, ook alle docu-
menten mee.
Correct gebruik
Dit product is geschikt voor de verlichting van de rijbaan
tijdens het fietsen. Het LED fietsverlichting set is als
enkele verlichting voor alle fietsen toegelaten. Het licht
mag niet door andere fietsonderdelen of bagage wor-
den gehinderd. Dit product is bedoeld voor gebruik
buitenshuis. Een ander gebruik dan eerder beschreven
of een verandering aan het product is niet toegestaan
en kan tot letsel en tot schade aan het product leiden.
De fabrikant is niet aansprakelijk voor schade als ge-
volg van onjuist gebruik. Het product is niet bedoeld
voor commerciële doeleinden.
Beschrijving van de onderdelen
1
Houder koplamp
2
Reduceerrubber
3
Schroef koplamphouder
4
Aan-/uit-knop koplamp
5
Controlelampje accu/batterij koplamp
6
Batterijvak koplamp
7
Koplamp
8
Hoekse stelschroef koplamp
9
Vergrendeling koplamp
10
Houder achterlicht
11
Vergrendeling achterlicht
12
Rubberen beugel houder achterlicht
13
Aan-/uit-knop achterlicht
14
Controlelampje batterij achterlicht
15
Achterlicht
16
Schroef houder achterlicht
17
Batterijvakdeksel
Omvang van de levering
1 Koplamp
1 Achterlicht
1 Houder koplamp
1 Houder achterlicht
4 Batterijen AA
2 Batterijen AAA
Reduceerrubber
1 Montage- en gebruiksaanwijzing
Technische gegevens
Koplamp
Type-aanduiding: XC-196A / L-Lux 40
Nominaal vermogen: 1W
Beschermingsklasse: IP44 conform DIN EN 60529
Batterijen: 4 x 1,5 V AA LR6
Achterlicht
Type-aanduiding: XC-117E / D-LED 4
Nominaal vermogen: 0,2 W
Beschermingsklasse: IP44 conform DIN EN 60529
Batterijen: 2 x 1,5 V AAA LR03
Opmerking: gebruik alstublieft uitsluitend alkali-
ne-batterijen of vergelijkbare accu‘s met 1,2 V.
Veiligheidsinstructies
LEVENS-
GEVAAR EN KANS OP ONGEVAL-
LEN BIJ KLEUTERS EN KINDEREN!
Laat kinderen nooit zonder toezicht bij het verpak-
kingsmateriaal, er bestaat verstikkingsgevaar door
het inslikken van verpakkingsonderdelen. Kinderen
onderschatten vaak de gevaren.
Houd het product altijd buiten bereik van kinderen.
Het product is geen speelgoed!
Het product is niet bestemd om door mensen (en
This and many other manuals, product videos and
software are available for download at
www.lidl-service.com.
GB
KLB GmbH
Diekbree 8
48157 Münster, Germany
Tel: +49 2 51 132 37 57
E-Mail: gb@klb-service.eu
www.klb-service.eu
IAN 271496
IE
KLB GmbH
Diekbree 8
48157 Münster, Germany
Tel: +49 2 51 132 37 57
E-Mail: ie@klb-service.eu
www.klb-service.eu
IAN 271496
Defective or used batteries/rechargeable batteries must
be recycled according to 2006 / 66 / EC and its
amendments. Return batteries/rechargeable batteries
and / or the appliance using the recycling facilities
provided.
Environmental damage due to
incorrect battery/rechargeable
battery disposal!
Never dispose of batteries/rechargeable batteries in your
household waste. They may contain toxic heavy metals
and are subject to hazardous waste regulations. The
chemical symbols of the heavy metals are: Cd = cadmium,
Hg = mercury, Pb = lead. Therefore, dispose of used
batteries/rechargeable batteries through your local
collection site.
Improper battery disposal destroys valuable resources
and the hazardous substances in the batteries may pose
a significant danger to the health and environment.
Separate collection/disposal of old batteries prevents
dangers to the health and environment, and valuable
resources regained by recycling.
Warranty
Dear customer,
This device is covered by a 3-year warranty from the
date of purchase. In the event of product defects, you
have legal rights against the retailer of this product.
Your statutory rights are not limited in any way by our
warranty detailed below.
Warranty terms
The warranty period begins on the date of purchase.
Please retain the original receipt safely. This documen-
tation is required as the proof of purchase. Should a
defect in material or manufacture occur within three
years from the date of purchase of this product, we will
repair or replace - at our choice - it free of charge. This
warranty is conditional on the defective device and the
receipt of purchase being presented within the three
year warranty period, and that there is a brief written
description of the nature of the defect and of the date it
arose. If the defect is covered by our warranty, you will
receive the repaired product or a replacement. A repair
or exchange of the device does not extend a new war-
ranty period. The warranty period will not be extended
by repairs made under warranty. This also applies to
replaced and repaired parts. Any damage or defects
present at the time of purchase must be reported imme-
diately after unpacking. Repairs made after the expira-
tion of the warranty period are subject to payment.
Extent of warranty
The device was manufactured to strict quality guide-
lines and diligently inspected prior to shipment. The
warranty applies to defects in material or manufacture.
This warranty does not apply to product parts subject
to regular wear and therefore considered wear parts or
damage to fragile parts, e.g. switches, rechargeable
batteries, or made from glass. This warranty becomes
void if the device has been damaged or improperly
used or maintained. Proper use of the product requires
strictly observing all instructions for use. Purposes and
practices which the operating instructions warn of or
advise against must be avoided without fail. This prod-
uct is only intended for private, non-commercial use.
Any incorrect or improper use of the device, use of
force and changes not performed by our authorized
service branch will void the warranty. Please follow the
instructions below to ensure your claim is processed
quickly:
· Please have your receipt and the product number
ready as your proof of purchase.
· Please refer to the type plate or the cover sheet of
these instructions for the product number.
· In the event of malfunctions or other defects,
please first contact the following service depart-
ment by phone or e-mail.
· A product determined defective may then be
returned to the specified service address free of
charge, including the proof of purchase (receipt)
and information about the defect and when it
occurred.
Please note, the service department must be
notified before returning the product!
Reinstall the retaining screw
3
.
Tighten the screw hand tight. To prevent damage,
do not use tools for this step.
To adjust to the optimal angle to the direction of
travel, loosen the angle adjustment screw
8
2–3 turns using a cross-tip screwdriver.
Adjust to the desired angle and tighten the angle
adjustment screw
8
.
Slide the headlight
7
into the bracket
1
until you
hear it lock into place.
To release, press the headlight lock
9
and slide
the headlight
7
forward out of the bracket
1
.
Inserting the batteries in the head
lamp (see Fig. B)
Turn the front part of the head lamp
7
until the
small arrow is in the „open“ position.
Remove the battery cover
6
.
Insert the batteries (4 x AA, 1.5 V) in the battery
compartment
6
. Ensure the correct polarity.
Then reassemble the head lamp
7
.
Installing the tail light
(see Fig. C, D and E)
Secure the bracket
10
to the seat post or the rear
cross-bar using the rubber tab
12
. Be sure there
are no objects in front of the tail light
15
.
Tighten and hook in the rubber tab
12
.
Loosen the retaining screw
16
on the bracket
10
and adjust to the desired angle.
Then tighten the screw. Tighten the screw hand
tight. To prevent damage, do not use tools for this
step.
Slide the tail light
15
into the bracket
10
until you
hear it lock into place.
To release the tail light
15
, pull down on the tail
light lock
11
and slide off the tail light
15
.
Inserting batteries into the tail
light (see Fig. E)
Slide the battery cover
17
off to the back.
Insert the batteries into the tail light (2 x AAA
1.5 V). Ensure the correct polarity.
Then reassemble the light.
Operation
Switching on / off
The headlight
7
has three brightnesses.
On/Off switch
press once Power mode (40 Lux) for
riding in unlit areas
press twice Standard mode (20 Lux)
for riding in lit areas
press three times Eco mode (10 Lux) for
riding in well lit areas
press four times off
Cleaning and Care
Never fully immerse the lights. Do not use corrosive
or abrasive cleaning agents. Doing so will damage
the lights.
Clean the LED bicycle light set with a slightly damp,
lint-free cloth.
Disposal
The packaging is made of environmentally
friendly materials, which may be disposed of
through your local recycling facilities.
Contact your local refuse disposal authority for more
details on how to dispose of your worn-out product.
To help protect the environment, please
dispose of the product properly, not without
household waste, when it has reached the
end of its useful life. Please contact your local
authority for information on collection points
and their opening hours.
Protection type: IP44 according to
DIN EN 60529
Batteries: 4 x 1.5 V AA LR6
Tail light
Model designation: XC-117E / D-LED 4
Rated output: 0.2W
Protection type: IP44 according to
DIN EN 60529
Batteries: 2 x 1.5 V AAA LR03
Note: Please only use alkaline batteries or similar
1.2 V rechargeable batteries.
Safety instructions
DANGER TO LIFE
AND RISK OF ACCIDENT FOR IN-
FANTS AND CHILDREN! Never leave
children unsupervised with the packing material
due to the suffocation hazard posed by swallowing
parts thereof. Children frequently underestimate the
dangers.
Always keep the product away from children. This
product is not a toy!
This product is not intended to be used by persons
(including children) with impaired physical, sensory
or mental capacity, or lacking experience or knowl-
edge unless supervised by a person responsible for
their safety. Please note, damages caused by incor-
rect handling, non-compliance with the operating
instructions or interference with the device by
unauthorised individuals are excluded.
Never take the product apart. Improper repairs
may result in considerable danger to the user.
Repairs should only be carried out by specialist
personnel. The LED lights are not replaceable.
Safety advice concerning
batteries/rechargeable
batteries
CAUTION! EXPLOSION HAZARD!
Never recharge the batteries!
Remove batteries during extended periods of non-use.
When inserting the battery ensure the polarity is
correct! This is shown in the battery compartment.
If necessary, clean the battery and device contacts
before inserting the battery.
Remove spent batteries immediately from the
device. There is an increased risk of leaks!
Always replace all the batteries at the same time.
Do not mix alkaline batteries and rechargeable
batteries.
Never mix old and new batteries.
Do not dispose of battery/rechargeable batteries
in household waste!
Every consumer is legally obliged to dispose of
batteries/rechargeable batteries in the proper
manner!
CAUTION! EXPLOSION HAZARD!
Keep battery/rechargeable batteries
away from children, do not throw batter-
ies/rechargeable batteries into fire, do not short-
circuit and do not take apart.
Failure to observe this notice may result in deep dis-
charging the batteries. This poses a risk of leaking.
If the batteries have leaked inside the product,
please remove them immediately to prevent prod-
uct damage!
Avoid contact with the skin, eyes and mucous mem-
branes if fluid has leaked from the batteries / re-
chargeable battery. In the event of contact with
battery acid, thoroughly flush the affected area with
clean water and seek immediate medical attention.
Never recharge single-use batteries! Explosion
hazard!
Note: If the red rechargeable battery/battery
control light
5
14
on the headlight
7
or the tail
light
15
lights up, please replace the batteries or
recharge the rechargeable batteries immediately.
Please note, once the battery indicator lights up,
the lights no longer comply with the Road Traffic Act.
Installation
Installing the headlight (see Fig. A)
Unscrew the retaining screw
3
from the bracket
1
.
Position the bracket
1
in the desired location on
the handlebar. If necessary, use the reducer
rubbers
2
to ensure an optimal fit.
A B
D
C
3
3
7
6
6
6
1
10 11
2
4 5
4 5
13 14
12
15
7
8
9
E
17
16
LED BIKE LIGHT SET
IAN 271496
Model-No. 14121
LED-FAHRRADLEUCHTEN-SET
Bedienungs- und Sicherheitshinweise
LED BIKE LIGHT SET
Operation and Safety Notes
NLNL
LED-FIETSLAMPEN-SET
Bedienings- en veiligheidsinstructies

Praat mee over dit product
Laat hier weten wat jij vindt van de Crivit IAN 271496 Fietslamp. Als je een vraag hebt, lees dan eerst zorgvuldig de handleiding door. Een handleiding aanvragen kan via ons contactformulier.