DE/AT/CH DE/AT/CH DE/AT/CH DE/AT/CH DE/AT/CH DE/AT/CH DE/AT/CH DE/AT/CH DE/AT/CH
DE/AT/CH DE/AT/CH DE/AT/CH DE/AT/CH DE/AT/CH DE/AT/CH DE/AT/CH DE/AT/CH DE/AT/CH DE/AT/CH DE/AT/CH
DE/AT/CH DE/AT/CH DE/AT/CH
NL/BE
Stappenteller
Inleiding
Hartelijk gefeliciteerd met de aankoop van uw
nieuwe product. U heeft voor een hoogwaardig
product gekozen. De gebruiksaanwijzing is een
deel van het product. Deze bevat belangrijke aan-
wijzingen voor veiligheid, gebruik en verwijdering.
Maakt U zich voor de ingebruikname van het pro-
duct met alle bedienings- en veiligheidsvoorschrif-
ten vertrouwd. Gebruik het product alleen zoals
beschreven en voor de aangegeven toepassings-
gebieden. Overhandig alle documenten bij
doorgifte van het product aan derden.
Correct gebruik
Het product registreert het aantal gezette stappen,
de afgelegde afstand, de benodigde tijd en het
calorieëngebruik. Het product is bestemd voor
Mode Veille et mémoire 7 jours :
Le nombre de pas, le temps d‘exercice, la distance
parcourue, le nombre de calories, la combustion
de graisses réalisés chaque jour sont automatique-
ment sauvegardés par le produit. Les valeurs sont
respectivement réinitialisées à 0:00 heures.
Appuyez plusieurs fois sur la touche SET
3
,
afin de naviguer au travers des données sau-
vegardées durant les 7 derniers jours, et de la
distance ODO (km) parcourue au total.
Régler le rétroéclairage
Enfoncez la touche MODE
2
pendant 3 se-
condes. Le rétroéclairage s’allume pendant
3 secondes.
Mode d‘économie d‘énergie
Lorsque le produit n‘est pas utilisé pendant env.
trois minutes, il passe automatiquement en mode
14
Symbole PM (format 12 heures)
15
Affichage piles faibles
16
Nombre de pas
REMARQUE : L’écran à cristaux liquides
1
du
produit ne s‘éteint pas. Cependant, la consomma-
tion en électricité relative au fonctionnement de
l’écran à cristaux liquides est très faible, et compa-
rable à une montre normale.
Caractéristiques techniques
Méthode de mesure : capteur
Affichage des pas: 0 à 99999pas
Affichage de la distance: 0 à 9999 km
Affichage des calories: 0 à 99999 kcal
Poids utilisateur réglable : 30 - 219 kg (ré-
glable au kg près)
Pré-réglage : 50 kg
Taille : 100–249 cm
Pré-réglage : 150 cm
FR/BE
FR/BE
Previous Day Mode and 7-day storage:
The number of steps, exercise time, distance comple-
ted, calorie counter and fat burnt per day is saved
automatically by the product. The values are re-set
respectively at 0:00 o‘clock.
Press the SET button
3
repeatedly to browse
through the saved data from the last 7 days,
total week record for the last 7 days and the
accumulated total trip distance ODO (km).
Activating background
lighting
Press the MODE button
2
for approx. 3 sec-
onds. The backlight illuminates for 3 seconds.
Energy savings mode
If the product is not used for approx. three
minutes, it switches automatically to the energy
savings mode. The LC-display
1
only indicates the
time.
GB/IE
GB/IE
private use and is not suitable for the recording of
medical data.
Parts description
Product:
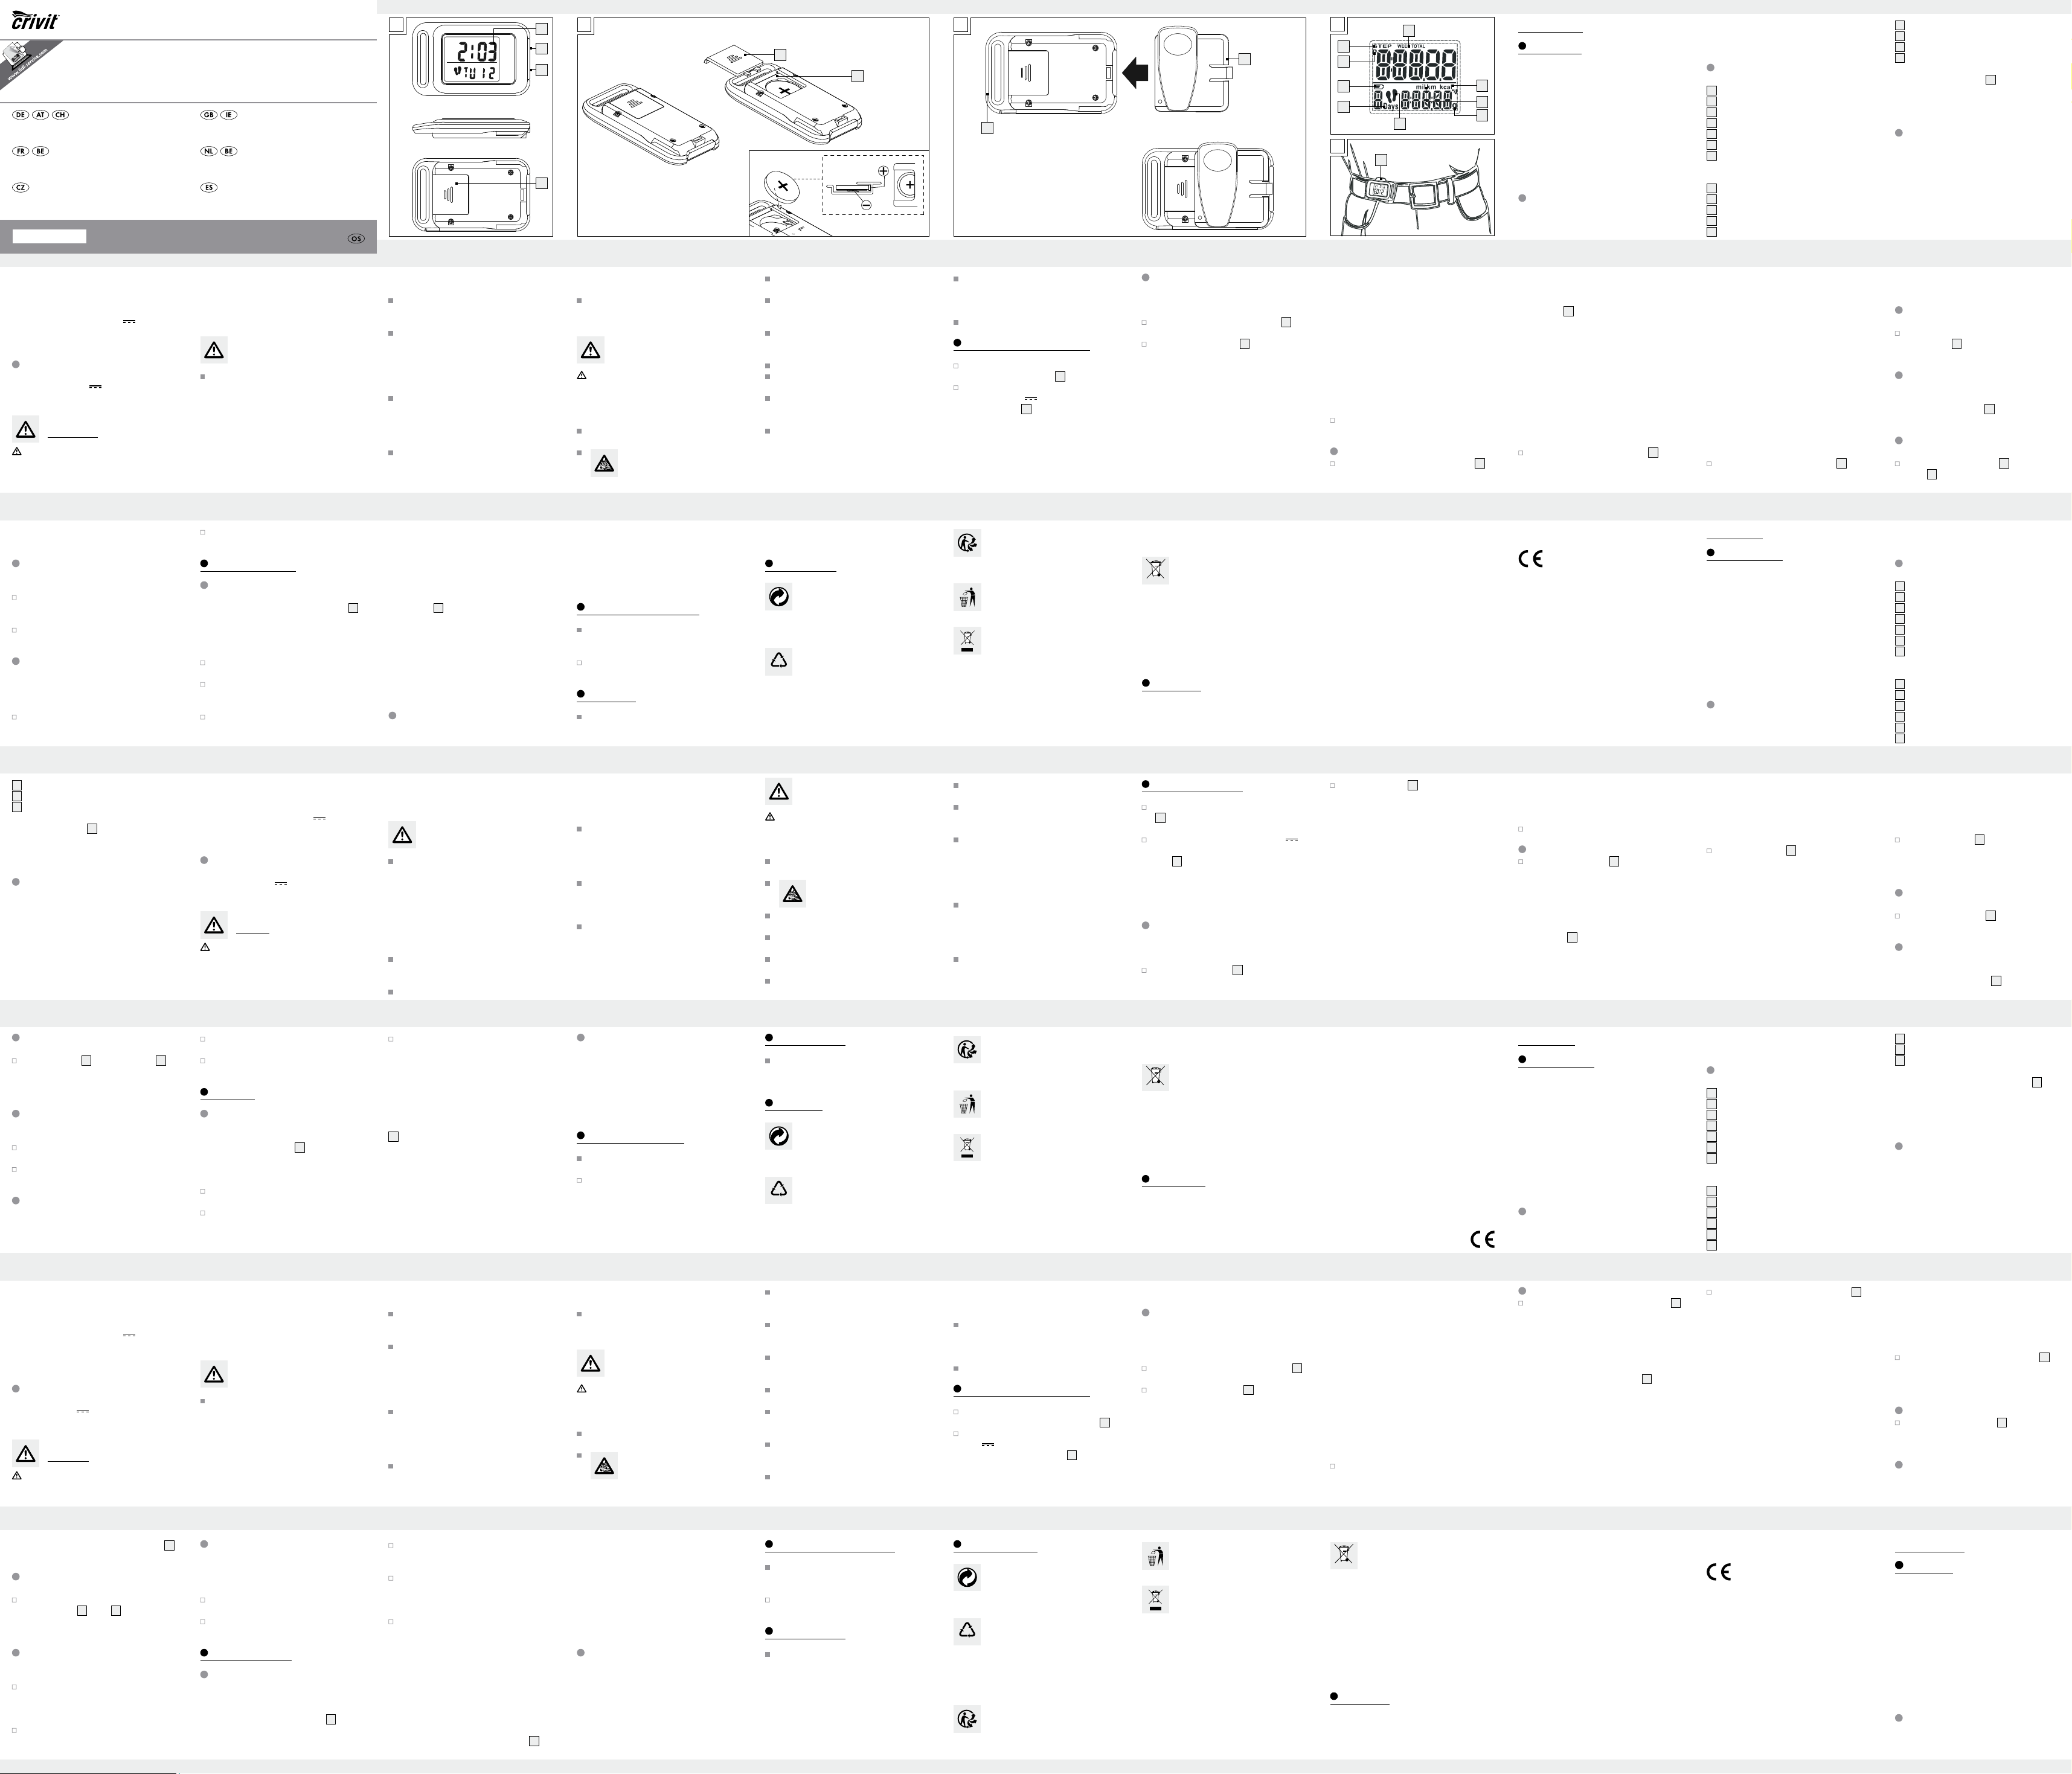
1
LC display
2
MODE button
3
SET button
4
Battery compartment cover
5
Battery compartment
6
Anti-shock ring
7
Belt clip
Display:
8
Week display
9
Calorie display
10
km / m per hour
11
Grams symbol (fat burn)
12
Pedometer on / off
13
Day display
14
PM symbol (afternoon in 12hr format)
15
Display for low battery warning
16
Number of steps
NOTE: The LC display
1
of the product cannot
be switched off. However, the power consumption
required to operate the LCD is very low and com-
parable to that of a wristwatch.
Technical Data
Measuring method: sensor
Step display: 0–99999 steps
Distance display: 0–9999 km
Calorie display: 0–99999 kcal
Adjustable user weight: 30–219 kg (can be
set to 1 kg accuracy)
Default: 50 kg
Body height: 100–249 cm
Default: 150 cm
Adjustable step length: 25–249 cm
Tage sowie die bisher insgesamt zurückgelegte
Strecke ODO (km) zu blättern.
Hintergrundbeleuchtung
einschalten
Drücken Sie für ca. 3 Sekunden lang die
MODE-Taste
2
. Die Hintergrundbeleuchtung
schaltet sich für ca. 3 Sekunden lang an.
Energiesparmodus
Wenn
das
Produkt ca. drei Minuten lang nicht be-
nutzt wird, schaltet es automatisch in den Energie-
sparmodus. Das LC-Display
1
zeigt lediglich die
Uhrzeit an.
Produkt zurücksetzen
Komplette Zurücksetzung
Halten Sie die MODE-Taste
2
und die SET-
Taste
3
gleichzeitig gedrückt. Alle
13
Tages-Anzeige
14
PM-Symbol (12-Std. - Format)
15
Anzeige für niedrigen Batteriestand
16
Schrittzahl
HINWEIS: Das LC-Display
1
des Produkts lässt
sich nicht ausschalten. Der Stromverbrauch zum Be-
trieb des LC-Displays ist aber sehr gering und lässt
sich mit dem einer Armbanduhr vergleichen.
Technische Daten
Messmethode: Sensor
Schrittanzeige: 0–99999 Schritte
Entfernungsanzeige: 0–9999 km
Kalorienanzeige: 0–99999 kcal
Einstellbares Nutzergewicht: 30–219 kg (auf 1 kg
genau einstellbar)
Voreinstellung: 50 kg
Körpergröße: 100–249 cm
Voreinstellung: 150 cm
Longueur des pas réglable: 25–249 cm
Pré-réglage : 62 cm
Format horaire : 12 / 24 heures
Pile : 1 pile CR2032
(3 V
(courant
continu), lithium)
Plage de température
admissible: 0 à 50°C
Contenu de la livraison
1 podomètre
1 pile CR2032 (3 V
(courant continu), lithium)
1 mode d’emploi
Sécurité
AVERTISSEMENT ! Lisez l’ensemble des
instructions de sécurité et des consignes. Tout
manquement aux consignes de sécurité et aux
instructions peut provoquer une électrocution,
un incendie et / ou de graves blessures.
CONSERVEZ TOUTES LES CONSIGNES DE SÉ-
CURITÉ ET L‘ENSEMBLE DES INSTRUCTIONS
POUR CONSULTATION ULTÉRIEURE !
Instructions générales
de sécurité
Le produit peut être utilisé par des enfants
âgés de 8 ans et plus ainsi que par des
personnes ayant des capacités physiques, sen-
sorielles ou mentales réduites ou manquant
d‘expérience ou de connaissances, s‘ils sont
surveillés ou s‘ils ont été informés de l‘utilisa-
tion sûre du produit et comprennent les risques
liés à son utilisation. Les enfants ne doivent pas
jouer avec le produit. Le nettoyage et l‘entre-
tien de le produit ne doivent pas être
enregistrer des données médicales, et convient
uniquement à un usage privé.
Descriptif des pièces
Produit :
1
Écran à cristaux liquides
2
Touche MODE
3
Touche SET
4
Couvercle du boîtier à piles
5
Compartiment à pile
6
Anneau anti-choc
7
Pince de fixation à la ceinture
Écran:
8
Affichage de la semaine
9
Affichage des calories
10
km / m par heure
11
Symbole Gramme (combustion des graisses)
12
Podomètre on / off
13
Affichage du jour
Podomètre
Introduction
Nous vous félicitons pour l‘achat de votre nouveau
produit. Vous avez opté pour un produit de grande
qualité. Le mode d‘emploi fait partie intégrante de
ce produit. Il contient des indications importantes
pour la sécurité, l’utilisation et la mise au rebut.
Veuillez lire consciencieusement toutes les indica-
tions d‘utilisation et de sécurité du produit. Ce pro-
duit doit uniquement être utilisé conformément aux
instructions et dans les domaines d‘application
spécifiés. Lors d‘une cession à tiers, veuillez
également remettre tous les documents.
Utilisation conforme
Le produit enregistre le nombre de pas effectués,
la distance parcourue, le temps nécessaire et les
calories brûlées. Le produit n‘est pas destiné à
rights are not limited in any way by our warranty
detailed below.
The warranty for this product is 3 years from the
date of purchase. Should this product show any
fault in materials or manufacture within 3 years
from the date of purchase, we will repair or re-
place it – at our choice – free of charge to you.
The warranty period begins on the date of
purchase. Please keep the original sales receipt in
a safe location. This document is required as your
proof of purchase. This warranty becomes void if
the product has been damaged, or used or main-
tained improperly.
The warranty applies to defects in material or ma-
nufacture. This warranty does not cover product
parts subject to normal wear, thus possibly conside-
red consumables (e.g. batteries) or for damage to
fragile parts, e.g. switches, rechargeable batteries
or glass parts.
amendments. Return batteries and / or the product
to the provided recycling facilities.
Improper disposal of batteries
can harm the environment!
Never dispose of batteries in your household waste.
They may contain toxic heavy metals and are sub-
ject to hazardous waste regulations. The chemical
symbols of the heavy metals are: Cd = cadmium,
Hg = mercury, Pb = lead. Therefore, dispose of used
batteries through your municipal collection site.
Warranty
The product has been manufactured to strict quality
guidelines and meticulously examined before deli-
very. In the event of product defects you have legal
rights against the retailer of this product. Your legal
The product and packaging materials
are recyclable, dispose of it separately
for better waste treatment. The Triman
logo is valid in France only.
Contact your local refuse disposal
authority for more details of how to
dispose of your worn-out product.
In the interest of the environment, do not
throw out your product with your house-
hold refuse. Take it to a suitable centre
where it can be disposed of properly.
Your local council will be able to tell you
where the collection centres are located
and their opening times.
Faulty or used batteries must be recycled in accord-
ance with Directive 2006 / 66 / EC and its
Maintenance
At longer time the product is not used, take out
the battery and change it as described in the
chapter “Replacing batteries “
Disposal
The packaging is made entirely of recy-
clable materials, which you may dispose
of at local recycling facilities. The Green
Dot is not valid for Germany.
b
a
Observe the marking of the packaging
materials for waste separation, which
are marked with abbreviations (a) and
numbers (b) with following meaning:
1–7: plastics / 20–22: paper and fibre-
board / 80–98: composite materials.
Troubleshooting
The product contains electronic components. There-
fore, interference may occur when it is near devices,
which transmit radio signals.
If error messages appear in the display, remove
these devices from the proximity of the product. In
the event of such malfunctions, remove the batteries
briefly and reinsert them.
Cleaning and Care
Never use liquids or abrasive cleaning agents
as they could damage the product.
Only the exterior of the product should be
cleaned with a soft, dry and lint-free cloth.
Add a cord to hang the product around your
neck. Use the fastening eye on the left of the
product.
Note: Do not hang the product around your neck
when you are jogging or running.
The product now registers the impacts of the body
and records the number of steps covered, the dis-
tance covered, the calories burnt and the time re-
quired. You can read the values in the LC display
1
, as described in chapter „Prior to start-up“. You
can also read the data from the last 7days and
the entire number of steps walked during the last
7 days.
Note: The recorded values are approximate. A
varying step length and external factors such as
clothing, terrain etc. can hinder exact measurement.
Proceed with changing the batteries as illus-
trated in Ill. B.
Ensure correct polarity. This is indicated in the
battery compartment.
Start-up
Using the product
Wear the product as described below:
You can securely attach the product to your trouser
belt by means of the belt clip
7
(see fig. C, E), put
in your trouser pocket, or hang it around your neck.
Read the following instructions to obtain an accu-
rate measurement:
Put the product in your front trouser pocket and
not in your back pockets.
Ensure that the product lies securely against
your body / clothing in order to obtain an ac-
curate measurement.
Re-set the product
Complete re-set
Keep the MODE
2
and the SET button
3
si-
multaneously pressed. All stored data will be
deleted. The product then switches back into
the set-up mode.
Setting Clock
Note: You may also change the time without
losing the stored training data.
In the time mode, keep the SET button pressed
until TIME is displayed on the LC-display.
To change the time, proceed as described in
the chapter „Set mode“.
Replacing batteries
Note: All stored data will be deleted when you
remove the batteries.
Note: Please ensure the LC-Display is protected
from scratches when replacing batteries.
FR/BE FR/BE FR/BE FR/BE FR/BE FR/BE FR/BE FR/BE FR/BE FR/BE
FR/BEFR/BEFR/BEFR/BEFR/BEFR/BEFR/BEFR/BEFR/BE
interrupteurs, des batteries ou des éléments fabri-
qués en verre.
garantie ne constitue pas une restriction de vos
droits légaux.
Ce produit bénéficie d‘une garantie de 3 ans à
compter de sa date d’achat. La durée de garantie
débute à la date d’achat. Veuillez conserver le
ticket de caisse original. Il fera office de preuve
d’achat.
Si un problème matériel ou de fabrication devait
survenir dans 3 ans suivant la date d‘achat de ce
produit, nous assurons à notre discrétion la répara-
tion ou le remplacement du produit sans frais sup-
plémentaires. La garantie prend fin si le produit est
endommagé suite à une utilisation inappropriée ou
à un entretien défaillant.
La garantie couvre les vices matériels et de fabrica-
tion. Cette garantie ne s’étend ni aux pièces du
produit soumises à une usure normale (p. ex. des
piles) et qui, par conséquent, peuvent être considé-
rées comme des pièces d’usure, ni aux dommages
sur des composants fragiles, comme des
Pollution de l’environnement
causée par une mise au rebut
inappropriée des piles !
Les piles ne doivent pas être mises au rebut dans
les ordures ménagères. Elles peuvent contenir des
métaux lourds toxiques et doivent être considérées
comme des déchets spéciaux. Les symboles
chimiques des métaux lourds sont les suivants :
Cd = cadmium, Hg = mercure, Pb = plomb. Pour
cette raison, veuillez toujours déposer les piles usa-
gées dans les conteneurs de recyclage de votre
commune.
Garantie
Le produit a été fabriqué selon des critères de qua-
lité stricts et contrôlé consciencieusement avant sa
livraison. En cas de défaillance, vous êtes en droit
de retourner ce produit au vendeur. La présente
Votre mairie ou votre municipalité vous
renseigneront sur les possibilités de mise
au rebut des produits usagés.
Afin de contribuer à la protection de
l’environnement, veuillez ne pas jeter
votre appareil usagé dans les ordures
ménagères, mais éliminez-le de manière
appropriée. Pour obtenir des renseigne-
ments concernant les points de collecte
et leurs horaires d’ouverture, vous pou-
vez contacter votre municipalité.
Les piles défectueuses ou usagées doivent être
recyclées conformément à la directive 2006 / 66 / CE
et ses modifications. Les piles et / ou le produit
doivent être retournés dans les centres de collecte
proposés.
Mise au rebut
L’emballage se compose de matières re-
cyclables pouvant être mises au rebut
dans les déchetteries locales. Le «point
vert» n‘est pas valable en Allemagne.
b
a
Veuillez respecter l‘identification des ma-
tériaux d‘emballage pour le tri sélectif,
ils sont identifiés avec des abbréviations
(a) et des chiffres (b) ayant la significa-
tion suivante : 1–7 : plastiques /
20–22 : papiers et cartons / 80–98 :
matériaux composite.
Le produit et les matériaux d’emballage
sont recyclables, mettez-les au rebut
séparément pour un meilleur traitement
des déchets. Le logo Triman n’est
valable qu’en France.
Nettoyage et entretien
N’utilisez en aucun cas de liquides ni de pro-
duits nettoyant agressifs, qui endommageraient
le produit.
Pour nettoyer l’extérieur du produit, employez
un chiffon doux, sec et non pelucheux.
Maintenance
Si vous n‘utilisez pas le produit durant une
période prolongée, retirez la pile du produit,
comme indiqué au chapitre „Remplacement
des piles“.
en service“. Vous pouvez également consulter les
valeurs concernant les 7derniers jours et afficher
le nombre total de pas effectués au cours de ces
7jours passés.
Remarque: Les valeurs obtenues sont des va-
leurs approximatives. Une longueur de pas va-
riable ainsi que des facteurs externes tels que
vêtements, terrain et similaires ne permettent pas
de mesure exacte.
Problèmes et solutions
Le produit contient des composants électroniques.
Des interférences sont donc possibles à proximité
d‘appareils émettant des signaux radio.
En cas d’affichages erronés sur l’écran, éloignez
ces appareils de l’environnement du produit. En
cas de dysfonctionnements, enlevez les piles puis
les réinsérer.
Placez le produit dans une des poches avant
de votre pantalon, mais jamais dans une
poche arrière.
Pour une mesure d‘une grande précision, assu-
rez-vous que le produit repose sans bouger et
en toute sécurité contre votre corps/vos vête-
ments.
Munissez-vous d‘une cordelette pour suspendre
le produit autour votre cou. Utilisez alors l‘œil-
let de fixation situé à gauche du produit.
Remarque: évitez de suspendre le produit au-
tour de votre cou si vous faites du jogging ou de la
course.
Le produit enregistre maintenant les secousses de
votre corps, puis stocke le nombre de pas effec-
tués, la distance parcourue, les calories brûlées et
le temps nécessaire. Vous pouvez lire ces diffé-
rentes valeurs sur l‘écran à cristaux liquides
1
,
comme indiqué dans le paragraphe „Avant la mise
Remplacement des piles
Remarque: L‘ensemble des données mémori-
sées sont effacées après le retrait des piles.
Remarque : Veillez à ne pas rayer l‘écran à
cristaux liquides durant le changement de pile.
Procédez comme indiqué sur l‘illustration B,
afin de remplacer la pile.
Vérifiez que la polarité est correcte. Celle-ci est
indiquée dans le compartiment à pile.
Mise en service
Utiliser le produit
Voici comment attacher le produit
correctement :
Vous pouvez fixer le produit à la ceinture de votre
pantalon au moyen du clip de ceinture
7
(voir
ill.C et E), le placer dans l‘une de vos poches ou
le pendre autour de votre cou. Veuillez lire les
conseils suivants pour obtenir une mesure précise:
économie d‘énergie. L’écran à cristaux liquides
1
affiche uniquement l‘heure.
Réinitialisation du produit
Réinitialisation complète
Maintenez simultanément enfoncées les
touches MODE
2
et SET
3
. Toutes les don-
nées enregistrées seront supprimées. Le produit
retourne ensuite sur le mode de paramétrage.
Réglage de l’heure
Remarque : Vous pouvez également modifier
l‘heure, sans effacer les données d‘entraînement.
À cet effet, maintenez en mode heure la
touche SET enfoncée aussi longtemps que né-
cessaire, jusqu‘à voir apparaître l‘affichage
TIME sur l‘écran à cristaux liquides.
Pour modifier l‘heure, procédez comme décrit
à la section „Réglage du mode“.
Appuyez plusieurs fois sur la touche SET
3
,
afin d‘afficher la période active, distance, dé-
pense de calories et combustion de graisses
dans le mode STEP.
Période active
Affichage de la durée de déplacement du produit
pendant la journée.
Distance
Affichage de la distance parcourue durant la
journée (en km).
Dépense de calories et combustion de
graisses :
Affichage des calories brûlées et de la combustion
des graisses (en g) durant la journée.
Sélection d‘un mode
Appuyez plusieurs fois sur la touche MODE
2
pour basculer entre les différents modes
(heure, STEP, ainsi que mémoire 7 jours).
Le produit dispose des modes suivants:
Mode heure
Affichage de l‘heure actuelle et du jour de la
semaine sur l’écran à cristaux liquides
1
.
Mode STEP :
Affichage du nombre de pas mesurés durant la
journée, ainsi que de la période active.
Remarque : Le produit est équipé d‘un filtre
10 pas, afin d‘augmenter la précision du nombre
de pas. Ce dispositif requiert au moins 10 pas
pour déclencher le capteur, et prendre en compte
le comportement actif de l‘utilisateur en matière de
vitesse et de distance. De ce fait, l‘affichage initial
du nombre de pas se situe au-dessus de 10.
- Réglez le jour de la semaine.
- Réglez votre poids.
Remarque : Veuillez noter que des charges ad-
ditionnelles, telles qu‘engendrées par des vête-
ments ou un sac à dos, s‘enregistrent également
lors de la saisie du poids.
- Réglez votre taille.
- Réglez votre longueur de pas.
Remarque : Mesurer la longueur des pas.
1. Effectuer la mesure sur une distance
d‘environ 28 m.
Déterminez un point de départ et d‘arrivée.
2. Comptez le nombre de pas nécessaires
pour accomplir cette distance de 28 m.
3. Divisez 28 m par le nombre de pas, et vous
obtiendrez votre longueur de pas.
Validez votre sélection en rappuyant sur la
touche SET.
Votre produit peut alors être paramétré.
Réglage du mode
Avant de mettre en service le produit, vous devez
saisir un certain nombre de données personnelles.
Vous pouvez modifier les valeurs suivantes l‘une
après l‘autre:
Appuyez plusieurs fois sur la touche MODE
2
pour basculer entre les différentes valeurs.
Appuyez sur la touche SET
3
pour confirmer
la valeur souhaitée.
- Paramétrez l‘unité de distance (KM / Mile).
Remarque : Lorsque vous changez d‘unité de
distance (KM/Mile), vous changez automatique-
ment d‘unité de poids (kg / lb), d‘unité de longueur
(cm / inch) et de longueur de pas.
- Réglez le format horaire (12 / 24 heures).
- Réglez l‘heure (HR).
- Réglez les minutes (MIN).
- Réglez les secondes (SEC).
pile. Si vous constatez que la pile a coulé dans
le produit, retirez-la immédiatement pour pré-
venir tout endommagement du produit!
Évitez tout contact avec la peau, les yeux et
les muqueuses. En cas de contact avec l’acide,
rincez abondamment la zone à l’eau claire
et / ou consultez un médecin !
Utilisez exclusivement le type de pile spécifié.
Avant la mise en service
Retirez le film de protection de l‘écran à cris-
taux liquides avant la première utilisation
1
.
Insérez ensuite une pile de type CR2032
(3 V
(courant continu), lithium) dans le
compartiment prévu à cet effet
5
(voir ill. B).
Remarque: Le produit exécute un contrôle ra-
pide de l‘écran. Tous les textes affichés sur l‘écran
apparaissent environ 1seconde. Le produit bas-
cule ensuite sur le mode de paramétrage.
Lors de la mise en place des piles, veillez à
respecter la polarité! Celle-ci est indiquée
dans le compartiment à pile.
Au besoin, nettoyez les contacts de la pile et
de l’appareil avec un chiffon sec avant d‘insé-
rer la pile.
Retirez sans délai la pile du produit si elle est
usée. Le risque d‘écoulement des piles est
élevé !
Ne pas jeter les piles dans les ordures ména-
gères !
Chaque consommateur est tenu par la loi de
mettre les piles au rebut en respectant la
réglementation applicable !
Tenez la pile hors de portée des enfants, ne la
jetez pas au feu, ne la court-circuitez en aucun
cas et ne la démontez pas.
En cas de non-respect de ces instructions, la
pile peut se décharger au-delà de sa tension
finale. Il y a alors un risque d‘écoulement de la
FR/BE
GB/IE GB/IE GB/IE GB/IE GB/IE GB/IE GB/IE GB/IE FR/BE FR/BE
GB/IE
Note: This product is equipped with 10-step-filter
to enhance the step count accuracy. This requires
at least 10 steps for the sensor to gather user’s trip
behavior for speed and distance calculation.
Hence the initial display of the step count will be
above 10.
Press the SET button
3
repeatedly to browse
through Trip time / Trip distance / Calories
used/ Fat burnt in STEP mode.
Trip time
The activity time of the product for the current day
is displayed.
Trip distance
The distance covered on the current day (in km).
Calories used and fat burnt:
The calories used and fat burnt (in g) on the current
day are displayed.
GB/IE
Aktivzeit
Die Bewegungszeit des Produkts am aktuellen Tag
wird angezeigt.
Strecke
Die zurückgelegte Strecke des aktuellen Tages
(in km) wird angezeigt.
Kalorienverbrauch und Fettverbrennung:
Die verbrauchten Kalorien und Fettverbrennung (in g)
des aktuellen Tages werden angezeigt.
Vortages-Modus und 7-Tage-Speicher:
Die Schrittzahl, Übungstimer, zurückgelegte Strecke,
Kalorienzähler, Fettverbrennung eines jeden Tages
speichert das Produkt automatisch. Die Werte wer-
den jeweils um 0:00 Uhr zurückgesetzt.
Drücken Sie mehrfach die SET-Taste
3
, um
durch die gespeicherten Daten der letzten 7
Zeit und den Kalorienverbrauch. Das Produkt ist
nur für den privaten Gebrauch und nicht zur Erfas-
sung medizinischer Daten geeignet.
Teilebeschreibung
Produkt:
1
LC-Display
2
MODE-Taste
3
SET-Taste
4
Batteriefachabdeckung
5
Batteriefach
6
Antischockring
7
Gürtelclip
Display:
8
Wochen-Anzeige
9
Kalorienanzeige
10
km / m pro Stunde
11
Gramm-Symbol (Fettverbrennung)
12
Schrittzähler ein / aus
GB/IE GB/IE GB/IE GB/IE GB/IE GB/IE GB/IE GB/IE GB/IE
gespeicherten Daten werden gelöscht. Das
Produkt kehrt in den Einstellmodus zurück.
Uhrzeit einstellen
Hinweis: Sie können auch die Uhrzeit ändern,
ohne die gespeicherten Trainingsdaten zu löschen.
Halten Sie dazu im Uhrzeitmodus die SET-
Taste solange gedrückt, bis die TIME-Anzeige
im LC-Display erscheint.
Gehen Sie zum Ändern der Uhrzeit vor, wie im
Kapitel „Modus einstellen“ beschrieben.
Batterien wechseln
Hinweis: Beim Entfernen der Batterien werden
alle gespeicherten Daten gelöscht.
Hinweis: Achten Sie darauf, dass Sie das LC-Dis-
play während des Batteriewechsels nicht zerkratzen.
Gehen Sie zum Wechseln der Batterien vor wie
in Abbildung B gezeigt.
Achten Sie dabei auf die richtige Polarität.
Diese wird im Batteriefach angezeigt.
Inbetriebnahme
Produkt verwenden
So legen Sie das Produkt richtig an:
Sie können
das
Produkt mittels des Gürtelclips
7
fest am Gürtel Ihrer Hose anlegen (siehe Abb. C,
E), in die Hosentasche stecken oder es sich um den
Hals hängen. Um eine genaue Messung zu
erzielen, lesen Sie die folgenden Hinweise:
S
tecken Sie das
Produkt
nur in die vordere
n Ho-
sentaschen und nicht in die Gesäßtaschen.
Um eine genaue Messung zu erhalten, stellen
Sie sicher, dass
das
Produkt fest und sicher an
Ihrem Körper / Ihrer Kleidung anliegt.
Fügen Sie ein Band hinzu, um
das
Produkt um
den Hals zu hängen. Nutzen Sie dazu die Be-
festigungsöse links am Produkt.
Hinweis: Hängen Sie
das
Produkt nicht um den
Hals, wenn Sie joggen oder rennen.
Das
Produkt registriert nun die Erschütterungen
des
Körpers und erfasst die Anzahl der zurückge
legten
Schritte, die zurückgelegte Entfernung, verbrauchten
Kalorien und benötigte Zeit. Die Werte können Sie
im LC-Display
1
ablesen, wie im Kapitel „Vor der
Inbetriebnahme“ beschrieben. Ebenfalls können Sie
die Daten der vergangenen 7 Tage und die Gesamt-
zahl der in den vergangenen 7 Tagen getätigten
Schritte ablesen.
Hinweis: Bei den ermittelten Werten handelt es
sich um Näherungswerte. Eine variierende Schritt-
länge sowie externe Faktoren wie Kleidung, Ge-
lände o. ä. ermöglichen keine exakte Messung.
Fehler beheben
Das Produkt enthält elektronische Bauteile. Daher
kann es, wenn es sich in der Nähe von Geräten
befindet, die Radiosignale aussenden, Störungen
auslösen.
Treten Fehlanzeigen im Display auf, entfernen Sie
solche Geräte aus der Umgebung des Produkts.
Entfernen Sie bei solchen Funktionsstörungen kurz-
zeitig die Batterien und setzen Sie sie erneut ein.
Reinigung und Pflege
Verwenden Sie in keinem Fall Flüssigkeiten und
scharfe Reinigungsmittel, da diese das Produkt
beschädigen.
Reinigen Sie das Produkt nur äußerlich mit ei-
nem weichen, trockenen und fusselfreien Tuch.
Wartung
Wenn Sie das Produkt längere Zeit nicht ver-
wenden, entfernen Sie die Batterien aus dem
Das Produkt und Verpackungsmaterialen
sind recycelbar, entsorgen Sie diese ge -
trennt für eine bessere Abfallbehandlung.
Das Triman-Logo gilt nur für Frankreich.
Möglichkeiten zur Entsorgung des aus-
gedienten Produkts erfahren Sie bei Ih-
rer Gemeinde- oder Stadtverwaltung.
Werfen Sie Ihr Produkt, wenn es ausge-
dient hat, im Interesse des Umweltschut-
zes nicht in den Hausmüll, sondern
führen Sie es einer fachgerechten Entsor-
gung zu. Über Sammelstellen und deren
Öffnungszeiten können Sie sich bei Ihrer
zuständigen Verwaltung informieren.
Defekte oder verbrauchte Batterien müssen gemäß
Richtlinie 2006 / 66 / EG und deren Änderungen
recycelt werden. Geben Sie Batterien und / oder
Produkt, wie im Kapitel “Batterien wechseln”
beschrieben.
Entsorgung
Die Verpackung besteht aus umwelt-
freundlichen Materialien, die Sie über
die örtlichen Recyclingstellen entsorgen
können. Der Grüne Punkt gilt nicht für
Deutschland.
b
a
Beachten Sie die Kennzeichnung der
Verpackungsmaterialien bei der Abfall-
trennung, diese sind gekennzeichnet mit
Abkürzungen (a) und Nummern (b) mit
folgender Bedeutung: 1–7: Kunststoffe /
20–22: Papier und Pappe / 80–98:
Verbundstoffe.
das Produkt über die angebotenen Sammeleinrich-
tungen zurück.
Umweltschäden durch falsche
Entsorgung der Batterien!
Batterien dürfen nicht über den Hausmüll entsorgt
werden. Sie können giftige Schwermetalle enthalten
und unterliegen der Sondermüllbehandlung. Die
chemischen Symbole der Schwermetalle sind wie
folgt: Cd = Cadmium, Hg = Quecksilber, Pb = Blei.
Geben Sie deshalb verbrauchte Batterien bei einer
kommunalen Sammelstelle ab.
Garantie
Das Produkt wurde nach strengen Qualitätsrichtlini
en
sorgfältig produziert und vor Anlieferung gewissen-
haft geprüft. Im Falle von Mängeln dieses Produkts
stehen Ihnen gegen den Verkäufer des Produkts
gesetzliche Rechte zu. Diese gesetzlichen Rechte
werden durch unsere im Folgenden dargestellte
Garantie nicht eingeschränkt.
Sie erhalten auf dieses Produkt 3 Jahre Garantie
ab Kaufdatum. Die Garantiefrist beginnt mit dem
Kaufdatum. Bitte bewahren Sie den Original-
Kassenbon gut auf. Diese Unterlage wird als
Nachweis für den Kauf benötigt.
Tritt innerhalb von 3 Jahren ab dem Kaufdatum
dieses Produkts ein Material- oder Fabrikationsfehler
auf, wird das Produkt von uns – nach unserer Wahl
–
für Sie kostenlos repariert oder ersetzt. Diese
Garanti
e verfällt, wenn das Produkt beschädigt,
nicht sachgemäß benutzt oder gewartet wurde.
Die Garantieleistung gilt für Material- oder Fabrika-
tionsfehler. Diese Garantie erstreckt sich nicht auf
Produktteile, die normaler Abnutzung ausgesetzt
sind
(z. B. Batterien) und daher als Verschleißteile ange-
sehen werden können oder für Beschädigungen an
zerbrechlichen Teilen, z. B. Schalter, Akkus oder die
aus Glas gefertigt sind.
Pedometer
Introduction
We congratulate you on the purchase of your new
product. You have chosen a high quality product.
The instructions for use are part of the product.
They contain important information concerning
safety, use and disposal. Before using the product,
please familiarise yourself with all of the safety
information and instructions for use. Only use the
product as described and for the specified applica-
tions. If you pass the product on to anyone else,
please ensure that you also pass on all the
documentation with it.
Intended use
The product records the number of steps you have
taken, the distance covered, the required time and
the calorie consumption. The product is only for
Default: 62 cm
Time unit: 12 / 24 hr
Battery: 1 battery CR2032
(3 V
(direct
current), Lithium)
Permissable temperature range: 0–50 °C
Scope of delivery
1 Pedometer
1 Battery CR2032 (3 V
(direct current), Lithium)
1 Set of operating instructions
Safety
WARNING! Please read all the safety infor-
mation and instructions. Failure to observe the
safety information and instructions can result in
electric shock, fire and / or serious injury.
PLEASE KEEP ALL SAFETY INSTRUCTIONS
AND INSTRUCTIONS FOR USE FOR FUTURE
REFERENCE!
General Safety
Instructions
This product can be used by children aged from
8
years and above and persons with reduced
physical, sensory or mental capabilities or lack of
experience and knowledge if they have been
given supervision or instruction concerning use of
the product in a safe way and understand the
hazards involved. Children shall not play with the
product. Cleaning and user maintenance shall
not be made by children without supervision.
Do not use the product if damaged. Damaged
products represent a danger of death from
electric shock!
Do expose the product to
– extreme temperatures,
– to direct sunlight,
– humidity / rain.
Otherwise it may be damaged.
Please note that the guarantee does not cover
damage caused by incorrect handling, non-
compliance with the operating instructions or
interference with the product by unauthorised
individuals.
Never disassemble the product. Improper re-
pairs may result in considerable danger for the
user.
Always have repairs performed by a profes-
sional.
Keep the product dry. Never immerse the prod-
uct in water or other liquids.
Safety instructions
for batteries
WARNING! RISK OF FATAL INJURIES!
Batteries could be swallowed, which may be
life-threatening. If a battery has been swallowed,
seek medical help immediately.
Remove the battery from the product if it is not
going to be used for a prolonged period.
CAUTION! EXPLOSION HAZ-
ARD! The batteries may never be
recharged!
When inserting the battery ensure the correct po-
larity! This is indicated in the battery compart
ment.
Clean the battery and device contact before you
insert the battery with a dry cloth if necessary.
Remove the dead battery immediately from the
product. There is an increased risk of leaks!
Batteries may not be disposed of with normal
domestic waste!
Every consumer is legally obliged to dispose
of batteries in the proper manner!
Keep the battery out of reach of children, do not
throw the battery into fire, do not short-circuit
or take the battery apart.
If you do not observe these instructions, the
battery could be discharged beyond the cut-off
voltage. This will then pose a risk of leaking. If
the battery has leaked inside your product,
you should remove it immediately in order to
prevent damage to the product!
Avoid contact with the skin, eyes and mucous
membranes. Any part of the body coming into
contact with battery acid should be rinsed off
with a large amount of water and / or a doctor
should be contacted if necessary!
Use only the recommended battery type.
Before Initial Use
Remove the protective film from the LC display
1
before you use the product for the first
time.
Then place a battery type CR2032 (3 V
(direct current),
lithium) in the battery compart-
ment
5
(see Ill. B).
Note: The product will now perform a brief display
check. All displays will be shown for approx.1sec-
ond. The product then switches into the set-up mode.
Your product is now ready to be configured.
Setting the mode
You must enter your personal data before you use
the product for the first time. You can change the
following values successively:
Press the MODE button
2
repeatedly to
browse through the different values.
Press the SET button
3
to confirm the desired
value.
- Set the distance unit (km / mile).
Note: Changing the distance unit (km / mile) will
also change the unit for weight (kg / lb) and height
(cm / inch) and step length accordingly.
- Set the time format (12 / 24 hr).
- Set the hour (HR).
- Set the minutes (MIN).
- Set the seconds (SEC).
- Set the day of the week.
- Set your weight.
Note: Ensure when entering that you take addi-
tional weight into consideration such as clothing or
a backpack.
- Set your height.
- Set your step length.
Note: Measure the step length.
1. Measure a 28-meter distance. Mark the
starting and finishing line.
2. Count the number of steps you need to
finish the distance of 28 meters.
3. Divide 28 meters by the number of steps
and you will get the step length.
Confirm your setting by pressing the SET button.
Selecting the mode
Press the MODE button
2
repeatedly to
browse through the different modes (TIME,
STEP and 7-day storage modes).
The product is equipped with the
following modes:
Time Mode
The LC-Display
1
indicates the current time and
the day of the week.
STEP Mode:
The number of the measured steps of the current
day, as well as the trip time, are displayed.
Einstellbare Schrittlänge: 25–249 cm
Voreinstellung: 62 cm
Zeitformat: 12 / 24 Stunden
Batterie: 1 Batterie CR2032
(3 V
(Gleich-
strom), Lithium)
Zulässiger Temperaturbereich: 0–50 °C
Lieferumfang
1 Schrittzähler
1 Batterie CR2032 (3 V
(Gleichstrom), Lithium)
1 Bedienungsanleitung
Sicherheit
WARNUNG! Lesen Sie alle Sicherheitshinwe
ise
und Anweisungen. Versäumnisse bei der Einhal-
tung der Sicherheitshinweise und Anweisungen
können elektrischen Schlag, Brand und / oder
schwere Verletzungen verursachen.
BEWAHREN SIE ALLE SICHERHEITSHINWEISE
UND ANWEISUNGEN FÜR DIE ZUKUNFT AUF!
Allgemeine
Sicherheitshinweise
Dieses Produkt kann von Kindern ab 8 Jahren
und darüber sowie von Personen mit verringer-
ten physischen, sensorischen oder mentalen
Fähigkeiten oder Mangel an Erfahrung und
Wissen benutzt werden, wenn sie beaufsichtigt
oder bezüglich des sicheren Gebrauchs des
Produkts unterwiesen wurden und die daraus
resultierenden Gefahren verstehen. Kinder
dürfen nicht mit dem Produkt spielen. Reini-
gung und Benutzerwartung dürfen nicht von
Kindern ohne Beaufsichtigung durchgeführt
werden.
Nehmen Sie das Produkt nicht in Betrieb, wenn
es beschädigt ist. Beschädigte Produkte bedeu-
ten Lebensgefahr durch elektrischen Schlag!
Setzen Sie das Produkt
– keinen extremen Temperaturen,
– keiner direkten Sonneneinstrahlung,
– keiner Feuchtigkeit / keinem Regen aus.
Andernfalls droht eine Beschädigung des
Produkts.
Beachten Sie, dass Beschädigungen durch un-
sachgemäße Handhabung, Nichtbeachtung
der Bedienungsanleitung oder Eingriff durch
nicht autorisierte Personen von der Garantie
ausgeschlossen sind.
Nehmen Sie das Produkt keinesfalls auseinan-
der. Durch unsachgemäße Reparaturen kön-
nen erhebliche Gefahren für den Benutzer
entstehen. Lassen Sie Reparaturen nur von
Fachkräften durchführen.
Schützen Sie das Produkt vor Nässe und
Feuchtigkeit. Tauchen Sie das Produkt nicht in
Wasser oder andere Flüssigkeiten!
Sicherheitshinweise
zu Batterien
WARNUNG! LEBENSGEFAHR! Batterien
können verschluckt werden, was lebensgefährlich
sein kann. Ist eine Batterie verschluckt worden,
muss sofort medizinische Hilfe in Anspruch ge-
nommen werden.
Entfernen Sie die Batterie, wenn sie längere Zeit
nicht verwendet worden ist, aus dem Produkt.
VORSICHT! EXPLOSIONSGE-
FAHR! Laden Sie Batterien niemals
wieder auf!
Achten Sie beim Einlegen auf die richtige Pola-
rität. Diese wird im Batteriefach angezeigt.
Reinigen Sie Batterie- und Gerätekontakt vor
dem Einlegen falls erforderlich mit einem tro-
ckenen Tuch.
Entfernen Sie die erschöpfte Batterie umgehend
aus dem Produkt. Es besteht erhöhte Auslauf-
gefahr!
Batterien gehören nicht in den Hausmüll!
Jeder Verbraucher ist gesetzlich verpflichtet,
Batterien ordnungsgemäß zu entsorgen!
Halten Sie die Batterie von Kindern fern, werfen
Sie die Batterie nicht ins Feuer, schließen Sie sie
nicht kurz und nehmen Sie sie nicht auseinan
der.
Bei Nichtbeachtung der Hinweise kann die
Batterie über ihre Endspannung hinaus entla-
den werden. Es besteht dann die Gefahr des
Auslaufens. Falls die Batterie in Ihrem Produkt
ausgelaufen sein sollte, entnehmen Sie diese
sofort, um Schäden am Produkt vorzubeugen!
Vermeiden Sie den Kontakt mit Haut, Augen
und Schleimhäuten. Bei Kontakt mit Batteriesäure
spülen Sie die betroffene Stelle mit reichlich
Wasser ab und / oder suchen Sie einen Arzt auf!
Verwenden Sie nur den angegebenen Batterietyp.
Vor der Inbetriebnahme
Entfernen Sie vor dem ersten Gebrauch die
Schutzfolie vom LC-Display
1
.
Legen Sie anschließend eine Batterie vom
Typ CR2032 (3 V
(Gleichstrom), Lithium) in
das Batteriefach
5
ein (s. Abb. B).
Hinweis: Das Produkt führt nun einen kurzen Dis-
playcheck durch. Alle Anzeigetexte des Displays
erscheinen für ca.1 Sekunde. Das Produkt schaltet
dann in den Einstellmodus.
Ihr Produkt ist nun bereit zum Einrichten.
Modus einstellen
Bevor Sie das
Produkt
in Betrieb nehmen, müss
en Sie
einige persönliche Daten eingeben. Sie können
nacheinander folgende Werte verändern:
Drücken Sie mehrfach die MODE-Taste
2
, um
durch die verschiedenen Werte zu blättern.
Drücken Sie die SET-Taste
3
, um den ge-
wünschten Wert zu bestätigen.
- Stellen Sie die Streckeneinheit ein (KM / Mile).
Hinweis: Beim Wechseln der Streckeneinheit
(KM / Mile) wechseln Sie gleichzeitig automatisch
die Gewichts- (kg / lb), Längeneinheit (cm / inch)
und Schrittlänge.
- S
tellen Sie das Zeitformat ein (12 / 24 Stunden).
- Stellen Sie die Stunden ein (HR).
- Stellen Sie die Minuten ein (MIN).
- Stellen Sie die Sekunden ein (SEC).
- Stellen Sie den Wochentag ein.
- Stellen Sie Ihr Gewicht ein.
Hinweis: Achten Sie darauf, bei der Gewichtsein-
gabe zusätzliche Lasten wie Kleidung oder Ruck
sack
miteinzubeziehen.
- Stellen Sie Ihre Körpergröße ein.
- Stellen Sie Ihre Schrittlänge ein.
Hinweis: Schrittlänge messen.
1. Messen Sie einen Abstand von 28 m.
Markieren Sie Start- und Ziellinie.
2. Zählen Sie die Anzahl der Schritte, die Sie
benötigen, um die Entfernung von 28 m
zurück zu legen.
3. Teilen Sie 28 m durch die Anzahl der
Schritte und Sie erhalten Sie Schrittlänge.
Bestätigen Sie Ihre Auswahl durch nochmaliges
Drücken der SET-Taste.
Modus wählen
Drücken Sie wiederholt die MODE-Taste
2
,
um durch die verschiedenen Modi zu blättern
(Uhrzeit, STEP, sowie 7-Tage-Speicher).
Das Produkt verfügt über die folgenden
Modi:
Uhrzeit-Modus
Im LC-Display
1
wird die aktuelle Uhrzeit und der
Wochentag angezeigt.
STEP-Modus:
Die Anzahl der gemessenen Schritte des aktuellen
Tages sowie die Aktivzeit werden angezeigt.
Hinweis: Das Produkt ist mit einem 10-Schritt-Filter
ausgestattet, um die Genauigkeit der Schrittanzahl
zu erhöhen. Dies erfordert mindestens 10 Schritte
für den Sensor, um das aktive Verhalten des Benut-
zers in Bezug auf Geschwindigkeits- und Distanz-
berechnung zu erfassen. Die anfängliche Anzeige
der Schrittanzahl wird daher oberhalb von 10 liegen.
Drücken Sie mehrfach die SET-Taste
3
, um im
STEP-Modus durch die Anzeigen für Aktivzeit,
Strecke, Kalorienverbrauch und Fettverbrennung
zu blättern.
Schrittzähler
Einleitung
Wir beglückwünschen Sie zum Kauf Ihres neuen
Produkts. Sie haben sich damit für ein hochwertiges
Produkt entschieden. Die Bedienungsanleitung ist
Teil dieses Produkts. Sie enthält wichtige Hinweise
für Sicherheit, Gebrauch und Entsorgung. Machen
Sie sich vor der Benutzung des Produkts mit allen
Bedien- und Sicherheitshinweisen vertraut. Benut-
zen Sie das Produkt nur wie beschrieben und für
die angegebenen Einsatzbereiche. Händigen Sie
alle Unterlagen bei Weitergabe des Produkts an
Dritte mit aus.
Bestimmungsgemäße
Verwendung
Das Produkt erfasst die Anzahl der getätigten
Schritte, die zurückgelegte Strecke, die benötigte
SCHRITTZÄHLER / PEDOMETER / PODOMÈTRE
E
D
7
12
16
14
9
10
11
8
15
13
A
2
1
3
4
B
4
5
IAN 278509
C
6
7
effectués par des enfants laissés sans surveil-
lance.
Ne pas faire fonctionner le produit s’il est
endommagé. Des produits endommagés im-
pliquent un danger de mort par électrocution!
N’exposez pas le produit
– à des températures extrêmes,
– aux rayons directs du soleil,
– à l‘humidité ou à la pluie.
Risque d’endommagement du produit dans le
cas contraire.
N’oubliez pas que sont exclus de la garantie
les endommagements résultant d’une manipu-
lation incorrecte, du non respect du mode
d’emploi ou de l’intervention sur le produit de
personnes non autorisées.
Ne démontez en aucun cas le produit. Toute
réparation incorrecte peut exposer l‘utilisateur
à des dangers et des risques importants. Ne
confiez les réparations qu’à des personnes
qualifiées en la matière.
Protégez le produit de l‘humidité et de l‘eau.
Ne pas immerger le produit dans de l’eau ou
d’autres liquides !
Consignes de sécurité
sur l‘usage des piles
AVERTISSEMENT ! DANGER DE MORT !
Les piles peuvent être avalées et ainsi représen-
ter un danger mortel. Contactez immédiate-
ment un médecin en cas d’ingestion d’une pile.
Enlevez la pile du produit si celui-ci est resté
longtemps inutilisé.
ATTENTION ! RISQUE D’EX-
PLOSION ! Ne jamais recharger
les piles !
SCHRITTZÄHLER
Bedienungs- und Sicherheitshinweise
PEDOMETER
Operation and Safety Notes
PODOMÈTRE
Instructions d‘utilisation et consignes de sécurité
STAPPENTELLER
Bedienings- en veiligheidsinstructies
PODÓMETRO
Instrucciones de utilización y de seguridad
KROK OMĚR
Pokyny pro obsluhu a bezpečnostní pokyny

Praat mee over dit product
Laat hier weten wat jij vindt van de Crivit IAN 278509 Stappenteller. Als je een vraag hebt, lees dan eerst zorgvuldig de handleiding door. Een handleiding aanvragen kan via ons contactformulier.
beantwoord | Ik vind dit nuttig (5) (Vertaald door Google)