IMPORTANT INFORMATION
Correct usage will ensure you have valuable extra
time to escape. Every correctly installed smoke
alarm will increase your potential escape time.
• A smoke alarm is not a fire-prevention measure.
• Install the smoke alarm in the correct place, if pos-
sible in the middle of the ceiling.
• Keep the smoke alarm out of the reach of children.
• Test the unit on a monthly basis and after any peri-
od of absence. When the alarm does not sound,
have your smoke alarm inspected by the service
point or when the smoke alarm is more than 10
years old discard the alarm.
CAUTION: Never test with fire!
• Clean the smoke alarm regularly (once a month)
using the soft brush from a vacuum cleaner. In
addition the smoke alarm can also be cleaned
using a moist cloth.
• If the smoke alarm emits a beeping sound every 40
seconds, this means that the battery is nearly flat
and that you should replace the smoke alarm.
• The lifespan of smoke alarms is 10 years.
• A false alarm can be silenced by pressing the test
and silence button for 1-2 seconds.
• You can make your Model ASD-10Q smoke alarm
less sensitive for 8-9 minutes by pressing the test
button for 1-2 seconds. The smoke alarm will
none-theless sound the alarm if the quantity of
smoke is too significant.
IMPORTANT INFORMATION IN CASE OF
ALARM IN THE EVENT OF A FIRE
• Plan TWO escape routes and practice these with
all members of the family.
• Agree upon a location, where everyone goes to in
case of a fire.
In the event of a fire:
• Leave the building immediately and go to the
agreed location.
• Make sure everyone has left the building.
• Close the doors behind you and never open a
warm door. In case of a warm door, choose a diffe-
rent escape route.
• In the event of considerable build-up of smoke,
crawl out of the building keeping as close to the
floor as possible.
• Wherever possible, breathe through a cloth (pre-
ferably moist), or else hold your breath as much as
you can. The majority of deaths and injuries are
caused by smoke inhalation rather than fire itself.
• Call the fire brigade outside or at the neighbours.
• NEVER go back into a burning building.
• Additional information can be obtained at the local
fire department.
SPECIFICATIONS
Power: 3 V (DC) Lithium AA-Batterie
Battery life: 10 years under normal condi-
tions
Usage: < 8 µA continuous
< 60 mA in alarm
Usage temperature: 0 ºC - 55 ºC
Humidity: ± 3% at 93% RH at 40ºC
Sensitivity: In accordance with EN14604
Alarm volume: >85dB at 3 metres
&HUWLILFDWLRQ .ULZDQ(1±9G6
vfdb 14-01, CE-15.
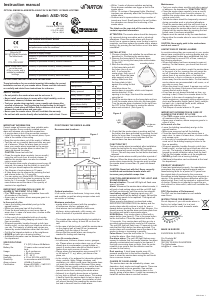
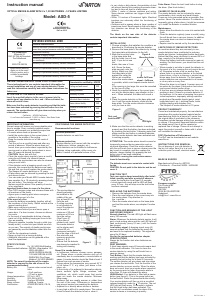
POSITIONING THE SMOKE ALARM
Recommended locations:
Optimal protection:
In all rooms, such as bedrooms, living room, study
and suchlike, as well as along escape routes such
as corridor or hallway.
Maximum protection:
- smoke alarm in all rooms (with the exception
of bathrooms, kitchen, garages, etc.)
- Heat alarms can be installed in bathrooms,
kitchens, airing cupboards, utility rooms, etc.
within 5 metres of a potential source of fire.
• The smoke alarm should preferably be installed in
the middle of the ceiling, at least 50 cm from the
wall.
• In the case of pitched roofs, install the smoke alarm
on the sloping wall, at least 90 cm (measured
vertically) from the ridge of the roof.
• Ensure that the smoke alarm can always be
reached for testing and cleaning.
Never fit a smoke alarm:
• In bathrooms, kitchens, shower rooms, garages,
etc. Places where a smoke alarm may go off nee-
dlessly due to condensation, normal smoke or
gases. A smoke alarm should be fitted at least 5
metres from such sources of smoke.
• Places where the temperature may exceed 55° C
or fall below 0° C, e.g. attics, just above a fire-
place, etc.
• In the vicinity of (or adjacent to) decorative objects,
doors, sockets, lights, fittings, windows, wall
ventilators, etc. which could mean that smoke does
not reach the smoke alarm. Minimum 50cm away.
• Surfaces that are usually warmer or colder than the
rest of the room. Differences in temperature can
prevent smoke from reaching the smoke alarm.
• Adjacent to or directly above stoves or heaters.
• In very high or difficult to reach places. This makes
it hard to reach the smoke alarm to test or clean it.
• In very dusty or dirty places. Accumulation of dust
will prevent smoke from reaching the smoke cham-
ber and in time will lead to a false alarm.
1772
EN14604:2005/AC 2008
Essential characteristics: Performance:
1RPLQDODFWLYDWLRQFRQGLWLRQVVHQVLWLYLW\UHVSRQVHGHOD\UHVSRQVHWLPH
DQGSHUIRUPDQFHXQGHU¿UHFRQGLWLRQV
Passed
Fito Products BV
Molenvliet 22
3961 MV Wijk bij Duurstede
The Netherlands
15
1772-CPR-140007
Operational reliability: Passed
Tolerance to supply voltage: Passed
Durability of operational reliability and response delay, temperature
resistance:
Passed
Durability of operational reliability, vibration resistance: Passed
Optical smoke alarm, alerts
you in the event
RI¿UHRUVPRNHDQGLV
suitable for residential
buildings.
Durability of operational reliability, humidity resistance: Passed
Durability of operational reliability, corrosion resistance: Passed
Durability of operational reliability, electrical stability: Passed
• Within 1 metre of dimmer switches and wiring.
Some dimmer switches can trigger a fault in the
smoke alarm.
• Within 1.5 metres of fluorescent lights. Electrical
impulses can adversely affect the functioning of the
smoke alarm.
• Outdoors and in spaces where a large number of
insects are found. Small insects in the unit’s detec-
tion chamber can disrupt the functioning of the
smoke alarm.
The labels on the rear side of the smoke alarm
contain important information.
ATTENTION: The smoke alarm should be tempora-
rily removed during renovation work or structural
alterations. Clean the smoke alarm with the soft
brush from a vacuum cleaner once the day’s work is
complete, and then replace the smoke alarm, always
testing it by pressing the test button once it has been
reinstalled.
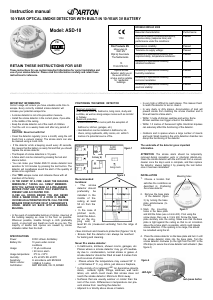
INSTALLATION
1. Choose a location that satisfies the conditions as
described in: Positioning the smoke alarm.
2. Remove the base plate of the smoke alarm
(figure 4) by turning the base plate anticlockwise
(to the left).
3. Mark the mounting holes
in the base plate and drill
the holes (use a 6 mm
drill). If not using the
screw plugs, then use a 3
mm drill. Screw the base
plate securely onto the
ceiling. Make sure that
the base plate is tight
against the ceiling so that
no air
circulation above the
smoke alarm is possible, which could impede
smoke detection. If the
opening is too large, this should be remedied
using the kit.
4. Place the smoke alarm on the base plate and turn
it until the smoke alarm clicks into the base plate.
Turn the smoke alarm clockwise (to the right from
the OFF to the ON stripe) to secure the smoke
alarm and activate it. (See figure 5)
5. Check that the smoke alarm is working and that
the battery has been activated by pressing the test
button for more then 2 seconds. A beeping noise
that stops of its own accord indicates that the
smoke alarm has been activated.
FUNCTION TEST
Test your smoke alarm immediately after installation:
• press the test button for more than 2 seconds
DORXGVLJQDOZLOOVRXQGDQGWKH/('ZLOOÀDVKHYHU\
0,5 sec., this will stop once the test button has been
released.
Test your smoke alarm monthly and after a period of
absence. When the alarm does not sound, have your
smoke alarm inspected by the service point or when
the smoke alarm is more than 10 years old discard
the alarm.
CAUTION: Never test with fire! Every correctly
installed nad maintained smoke alarm will
increase your potential escape time.
FUNCTION AND MEANING OF THE LIGHT AND
SOUND SIGNALS:
Normal situation: The red LED light will flash once
every 5 minutes.
Alarm: Whenever the smoke alarm detects smoke, it
will emit a loud pulsing alarm and the red LED light
will flash continuously until the smoke has cleared.
Low battery signal: A beeping signal every 40
seconds means that the battery is nearly flat and the
smoke alarm needs to be replaced. This signal will
sound for 30 days.
When properly maintained, as described under
IMPORTANT INFORMATION, the battery and the
smoke alarm should continue to work for over a
decade before reaching the end of their lifespan. You
should remove the smoke alarm and base plate from
the ceiling and install a new smoke alarm.
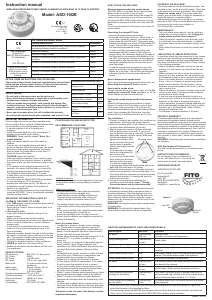
HUSH Button: Your smoke alarm is fitted with a
pause button (see figure 4). This is the same button
DVWKHWHVWEXWWRQ3UHVVWKHSDXVHWHVWEXWWRQIRU
1-2 seconds. Your smoke alarm will then go into a
so-called reduced sensitivity mode for 8-9 minutes.
The red LED light will flash every 10 seconds to indi-
cate that the Hush button has been activated. The
smoke alarm will nonetheless sound the alarm if the
smoke is dense or increasing in quantity.
False Alarm: Press the test button for 1-2 seconds
to stop the alarm. (See Hush button)
Pre-alarm status: The red LED light flashes every
second to indicate that the smoke chamber has been
abruptly contaminated and needs to be cleaned. If
thorough vacuuming does not help, then the conta-
mination is so serious that the detector must be
returned to the factory.
Dust warning: 3 short beep signals every 40
seconds means dust in the smoke chamber. You
have to clean the smoke alarm using the soft brush
from a vacuum cleaner.
CAUSES OF FALSE ALARM
The smoke alarm can be activated by steam, con-
densation, dust, smoke and small insects. These are
to be prevented as far as possible. See section:
Never fit a smoke alarm. If a smoke alarm is fre-
quently giving a false alarm, it might be necessary to
install the smoke alarm in another location.
Maintenance:
• Test your smoke alarm monthly and after a period
of absence. As described in “
FUNCTION TEST”
• Clean the smoke alarm regularly (once a month)
using the soft brush from a vacuum cleaner. In
addition the smoke alarm can also be cleaned by
using a moist cloth.
• The smoke alarm should be temporarily removed
during renovation work or structural alterations.
Clean the smoke alarm with the soft brush from a
vacuum cleaner once the day’s work is complete,
and then place the smoke alarm back on the base.
Always test the smoke alarm by pressing the test
button once it has been reinstalled.
• Repairs must be carried out by the manufacturer.
• Never allow the smoke alarm to come into contact
with fluids.
CAUTION: Never apply paint to the smoke alarm
and do not cover it.
LIMITATIONS OF SMOKE ALARMS
In countries where they are commonly in use, smoke
alarms have contributed to reducing deaths and inju-
ries. Independent bodies have established that they
were insufficient in around 35% of fires, namely in
the following situations:
• Where the battery had been removed or was not
working. For that reason, you should test the unit
regularly.
• Where smoke is not able to reach the smoke alarm
in the event of a fire, meaning the unit cannot be
set off. Examples include a fire on another floor
where there is no smoke alarm, a fire behind
closed doors, a fire in a chimney or smoke being
blown away from the smoke alarm. For that reason,
smoke alarms are recommended in all rooms, or at
any rate on every floor.
• Where the alarm is not heard. A person may not be
woken by the alarm if that person had consumed
H[FHVVDOFRKRODQGRUGUXJV
• A few fires are not always detected on time, e.g.
smoking in bed, if there is no smoke alarm in the
bedroom. In the case of escaping from gas or
violent explosions, improperly storing explosive pro-
ducts and flammable liquids (petrol, paint, methyla-
ted spirit, etc.), electrical faults, acids, children
playing with matches (fire).
• The lifespan of smoke alarms is 10 years.
IMPORTANT INFORMATION IN CASE OF
ALARM IN THE EVENT OF A FIRE
• Plan TWO escape routes and practice these with
all members of the family.
• Agree upon a location, where everyone goes to in
case of a fire.
In the event of a fire:
• Leave the building immediately and go to the
agreed location.
• Make sure everyone has left the building.
• Close the doors behind you and never open a
warm door. In case of a warm door, choose a diffe-
rent escape route.
• In the event of considerable build-up of smoke,
crawl out of the building keeping as close to the
floor as possible.
• Wherever possible, breathe through a cloth (pre-
ferably moist), or else hold your breath as much as
you can. The majority of deaths and injuries are
caused by smoke inhalation rather than fire itself.
• Call the fire brigade outside or at the neighbours.
• NEVER go back into a burning building.
• Additional information can be obtained at the local
fire department.
PRODUCT WARRANTY
If used and maintained properly, the manufacturer
JXDUDQWHHVWKLVSURGXFWDJDLQVWPDWHULDODQGRU
manufacturing faults for a period of 10 years from
the original date of purchase by the consumer.
Exceptions include damage arising from accidents or
misuse. If the product becomes defective within the
stated period, then it will be repaired or replaced free
of charge. Please do not attempt to repair the pro-
duct yourself or tinker with it, which will invalidate the
warranty.
DOP (Declaration of Performance)
The DoP can be downloaded on our website
www.fito.eu
INSTRUCTIONS FOR REMOVAL
Do not dispose of your old smoke alarm in
the bin, but rather hand it in to a local
collection point for small, domestic waste.
MADE IN EUROPE
EUROPEAN SUPPLIER:
Fito Products BV
Molenvliet 22
3961 MV WIJK BIJ DUURSTEDE
The Netherlands
Kitchen
Living room
Bathroom
Bedroom
Bedroom
Bedroom
Hallway
Bedroom
Figure 1
Bedroom
Hallway
Kitchen
Living
room
Figure 2
Hallway
Bedroom
60-90cm
Figure 4
mounting holes
2018-6 vers. 1
SAFETY ISSUES:
•
Do not paint to the smoke alarm and do not cover it.
• Never install smoke alarm in rooms with a high humidity, such as
bathrooms, showers, kitchens and saunas.
• Test your smoke alarm regularly, once a month and always after
a period of absence. Test by pressing the test button for at least 2
seconds, a loud alarm will follow. Keep a distance of at least 50 cm.
between the smoke alarm and your ears.
• Never open the smoke alarm, this will invalidate the warranty.
• Do not test with smoke directly after instalation, wait at least 1 hour.
Figure 5
LED-
light
Test-/pause
button
Instruction manual
OPTICAL SMOKE ALARM WITH A BUILT-IN 3V BATTERY 10 YEARS LIFETIME
Model: ASD-10Q
(1$&
YIGE
1772-CPR-140007
DoP no: 10Q14
15
RETAIN THESE INSTRUCTIONS FOR FUTURE USE!
These instructions for use contain important information for correct
installation and use of your smoke alarm. Please read this informati
-
on carefully and retain these instructions for reference.
&KDUDFWHULVWLFVFHUWL¿HG
Ceiling mount YES
Battery powered YES
Battery lifetime 10 years YES
Individual Alarm Indicator YES
Alarm silence facility YES
Suitable for installation in a
caravan
NO
Interconnectable NO


Praat mee over dit product
Laat hier weten wat jij vindt van de Fito ASD-10Q Rookmelder. Als je een vraag hebt, lees dan eerst zorgvuldig de handleiding door. Een handleiding aanvragen kan via ons contactformulier.