To enhance the bass effect
Set the BASS BOOST switch to the ON position.
Note: The bass boost performance will be dependent on the VOLUME
control setting.
Remove the disc
Hold the edge and gently press the
center pivot as illustrated, then pick
up the disc.
Caution: Wait for the disc to stop
rotating before pressing the OPEN
button.
Note: This unit can play 3" (8cm)
single CDs without an adaptor. Do
not use a CD single adaptor for
these discs.
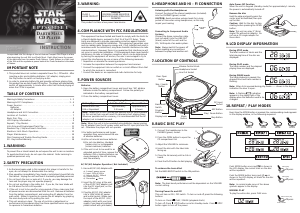
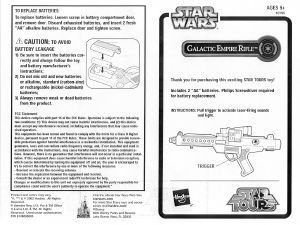
1.WARNING:
To prevent fire or shock hazard, do not expose the unit to rain or moisture.
To avoid electrical shock, do not open the cabinet. Refer servicing to
qualified personnel only.
IMPORTANT NOTE
1.This product does not contain a separate Power On / Off switch. After
inserting a disc and installing batteries / AC adaptor, simply press
the Play button to switch on and play a disc.
2.In order to maximize battery life and provide optimum playing time,
this product has an Auto Power Off function. The player will automatically
switch off approximately 1 minute after a disc has finished playing or
when the CD lid is opened.
INSTRUCTION
AGES 5 & UP
MODEL 88-308
883080001IWTI-01
7.LOCATION OF CONTROLS
TABLE OF CONTENTS
Warning & Safety Precautions . . . . . . . . . . . . . . . . . . . . . . . . . . . . . . 1 - 2
Warning & FCC Compliance . . . . . . . . . . . . . . . . . . . . . . . . . . . . . . . 3 - 4
Power Sources . . . . . . . . . . . . . . . . . . . . . . . . . . . . . . . . . . . . . 5
Batteries
AC Adaptor
Headphone and Hi-Fi Connection . . . . . . . . . . . . . . . . . . . . . . . . . . . . . . 6
Location of Controls . . . . . . . . . . . . . . . . . . . . . . . . . . . . . . . . . 7
Basic Disc Play . . . . . . . . . . . . . . . . . . . . . . . . . . . . . . . . . . . . . 8
LCD Display Information . . . . . . . . . . . . . . . . . . . . . . . . . . . . . . . 9
Repeat / Play Modes . . . . . . . . . . . . . . . . . . . . . . . . . . . . . . . 10
Intro Scan and Programmed Track Play . . . . . . . . . . . . . . . . . . . . . . . . 11
Random Play / Skip and Search Functions . . . . . . . . . . . . . . . . . . . . . . 12
Electronic Anti-Shock Operation . . . . . . . . . . . . . . . . . . . . . . . . 13
Player Maintenance . . . . . . . . . . . . . . . . . . . . . . . . . . . . . . . 14
Disc Cleaning and Trouble-Shooting Guide . . . . . . . . . . . . . . . . . . . . . 15
90 - Day Limited Warranty . . . . . . . . . . . . . . . . . . . . . . . . . . . . . . . . . . . 16
2.SAFETY PRECAUTION
1.As the laser beam used in this compact disc player is harmful to the
eyes, do not attempt to disassemble the casing.
2.Stop operation immediately if any liquid or solid object should fall into
the cabinet. Unplug the unit and have it checked by qualified personnel.
3.Do not touch the lens or poke at it. If you do, you may damage the
lens and the player may not operate properly.
4.Do not put anything in the safety slot. If you do, the laser diode will
be ON when the lid is still opened.
5.If the unit is not to be used for a long period of time, make sure that
all power sources are disconnected from the unit. Remove all batteries
from the battery compartment, and unplug the AC adaptor from the
wall outlet. Make it a practice to remove the AC adaptor by grasping
the main body and not by pulling the cord.
6.This unit employs a laser. The use of controls or adjustment or
performance of procedures other than those specified herein may result
in exposure to hazardous radiation.
4.COMPLIANCE WITH FCC REGULATIONS
This equipment has been tested and found to comply with the limits for
a Class B digital device, pursuant to Part 15 of the FCC Rules. These
limits are designed to provide reasonable protection against harmful
interference in a residential installation. This equipment generates, uses
and can radiate radio frequency energy and, if not installed and used in
accordance with the instructions, may cause harmful interference to radio
communications. However, there is no guarantee that interference will
not occur in a particular installation. If this equipment does cause harmful
interference to radio or television reception, which can be determined
by turning the equipment off and on, the user is encouraged to try to
correct the interference by one or more of the following measures:
* Reposition or relocate the receiving antenna.
* Increase the separation between the equipment and receiver.
* Connect the equipment into an outlet on a circuit different from that
to which the receiver is connected.
* Consult the dealer or an experienced radio technician for help.
5.POWER SOURCES
Batteries
1.Open the battery compartment cover and insert two "AA" alkaline
batteries inside the battery compartment. Follow the polarity as
indicated in the battery compartment.
2.Close the battery compartment cover.
Note: When the unit is to be operated using batteries, always unplug
the AC adaptor from the AC power outlet and the DC input jack from the
set. Otherwise the player will not operate.
AC/DC (6V) Adaptor Operation ( Not Included )
9.LCD DISPLAY INFORMATION
During STOP mode
The total number of tracks and the
total playing time of the disc are
displayed.
During PLAY mode
The track number and the elapsed
playing time are displayed.
During PAUSE mode
The track playback is paused, the
elapsed time and track number is
flashing.
Note: When lid is opened during play mode ----- shows in the display
indication the door is open.
Note: A flashing
indication
appears in the upper right of the
display when the batteries need to be
changed.
10.REPEAT / PLAY MODES
Every time the MODE button is pressed, the corresponding mode appears
in the display window, in the following sequence:
Push MODE button once and
is shown in
the LCD display, the current track on the disc
will be repeated.
Push the MODE button twice and
is
shown in the LCD display, all tracks on the disc
will be repeated.
Note: In normal mode none of the above
symbols appear in the display.
NORMAL PLAY
To play the entire disc, press PLAY once.
3.WARNING:
6.HEADPHONE AND HI - FI CONNECTION
Listening with the Headphones
Connect the plug of the stereo headphones (included)
into the PHONES (green) socket.
CAUTION: Avoid excessive volume levels for a long
period of time when using headphones, as this may
impair your hearing.
Connecting to Component Audio
Systems
Connect the stereo connection cable
(not included)) into the LINE OUT
(black) socket of the unit and the
CD / AUX inputs of an audio system.
Note: Always switch the power off
before making any connections
between the player and another unit.
8.BASIC DISC PLAY
1.Connect the headphones to the
PHONES (green) socket.
2.Press the OPEN button to open the
CD compartment lid.
3.Adjust the VOLUME to minimum.
4.Insert the disc with the label side
facing up.
5.Close the lid securely until a click is
heard.
6.Press the PLAY button to start playing.
1
3
1
2
Approximately
6 hours
Note: Carbon-zinc or Zinc Chloride type batteries are not recommended
for this unit as their use will result in extremely short playing times.
Wherever possible and for economy, it is recommended that the AC
adaptor (not included) be used.
Alkaline MN 1500,
LR6 or Equivalent
Battery Type
Average Playing Time (continuous play)
Approximately
3.5 hours
Anti Shock Mode Normal Mode
3.For better performance and longer
operation time, wrecommend the use
of alkaline batteries.
4.a)Do not mix old and new batteries.
b)Do not mix alkaline, standard
(carbon-zinc) or rechargeable
(nickel-cadmium) batteries.
5.If the unit is not to be used for an
extended period of time, remove the
batteries. Old or leaking batteries can
cause damage to the unit and may
void the warranty.
Turning Power On and Off
This unit has no ON / OFF switch. To turn on and off, press the following
buttons.
To turn on: Press
PLAY / PAUSE (playback starts)
To turn off: Press
STOP button once for standby mode. Press STOP
button again to turn off the power.
Auto Power-Off Function
When the unit is stopped (standby mode) for approximately 1 minute,
the power is automatically turned off.
This product contains a low power laser device.
CLASS 1
LASER PRODUCT
CAUTION
INVISIBLE LASER RADIATION
WHEN OPEN AND INTERLOCKS
DEFEATED
Total no. of tracks Total playing time
This sixth track has elapsed 2 min. 30 sec.
MODE MODE MODE MODE
MODE
x 1 press
During play
PLAY / PAUSE
x 1 press
Press once to play
MODE
x 2 press
During play
Volume Control Knob
Headphone Socket
Line Out Socket
Door Open
Button
Skip / Search
Button
Bass Boost
Switch
Program
Button
Display Lens Mode
Button
Stop Button
Play / Pause Button
ASP Button
DC Input
Socket
Incorporated into the design of this full-feature Compact Disc Player is a face
plate depicting the evil Sith Lord Darth Maul. Darth Maul learns the power
of the dark side from his master Darth Sidious. Darth Sidious is a Dark Lord
of the Sith and the mysterious power behind the Trade Federation's blockade
of Naboo.
TO
TO CD / AUX
IMPUT
TO LINE OUT
2
3
5
4
6
DARTH MAUL
CD PLAYER
DARTH MAUL
CD PLAYER
TM
1. Use an AC/DC (6V) Adaptor with
a). A class 2 power source.
b). Input: 120V AC/60Hz
c). Output: 6V D.C., 500mA
d). Centre positive
e). Dimension 4mm
2. Insert the DC plug, at the end
of the AC/DC (6V) adaptor cord
into the DC input jack, on the
side of the unit.
3. Plug the AC/DC (6V) adaptor
into a 120V, 60Hz AC power
wall outlet socket. (Make sure
the input of the AC/DC (6V)
adaptor match with your local
supply, if you have any problem,
please consult with your dealer.)


Praat mee over dit product
Laat hier weten wat jij vindt van de Hasbro Star Wars Darth Maul Audio Player. Als je een vraag hebt, lees dan eerst zorgvuldig de handleiding door. Een handleiding aanvragen kan via ons contactformulier.