
INSTRUCTION MANUAL
CAL. W820 (RWP SERIES)
NREW820
03-2002
1. The compass function
a) The compass function may not work depending
on the condition of use such as season,
weather or obstacles intercepting view
of the sun or moon.
b) For such activities as mountain climbing
and orienteering which require very accurate
directions, be sure to use a conventional
magnetic compass together with this watch
for safety’s sake.
2. The signal function
a) Do not use the watch as a distress signal
transmitter as it is not designed for such
purpose. The signal light emitted from
the watch may not be perceived depend-
ing on such factors as distance to the
target and angle of the watch face.
CAUTION
■ CHARACTERISTICS
1. Time/calendar display:
• Hour, minutes, seconds, month, date and
day of the week.
• Fully automatic calendar: Calendar adjusts
automatically for odd and even months including
February of leap years from the year 1994 up
to the end of 2043.
• Time indication: Changeover between 12-
and 24-hour indications is possible.
• Daylight saving time: Daylight saving
time can be set.
2. Compass: Indicates 16 directions on the basis
of the directions of the sun and moon.
• Moon phase display with the age of the
moon.
3. Stopwatch: Measures up to 10 hours with
1 ⁄100 second readout.
• Split time measurement
4. Daily alarm: The alarm can be set to ring on
a 24-hour basis.
• Hourly time signal: Can be set to ring
every hour on the hour with a single beep.
5. Signal function: Four preset Morse code
messages can be sent by illuminating light.
6. Illuminating light: The light evenly illumi-
nates the display in the dark.
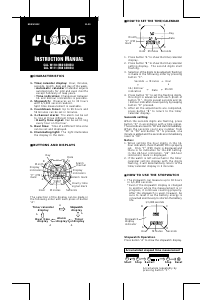
■ BUTTONS AND DISPLAYS
Alarm mark
Date
Month
Day
“A”(AM)/
“P”(PM)
mark
Hour
Minutes
Seconds
Graphic display
Hourly time
signal mark
“DST”
(Daylight
Saving
Time)
mark
The selection of the displays can be made in the
following order with each depression of button
“A”.
A
Display
indicators
B
C
D
Rotating compass bezel
A
Compass
display
A
Alarm display
Stopwatch
display
A
Signal display
A
A
Time/calendar
display
* The confirmation sound beeps differently when
the time/calendar display appears, so that you
can easily know the display shown.
* Even if the stopwatch display is changed over
to another while the measurement is in progress,
the stopwatch continues counting properly and
the flashing stopwatch display indicator appears
in the display.
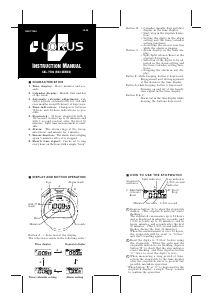
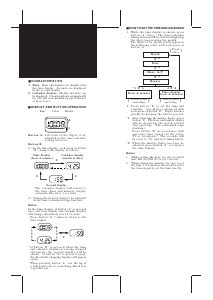
■ HOW TO SET THE TIME/CALENDAR
AND DAYLIGHT SAVING TIME
Month
Day
Date
Seconds
Minutes
Graphic display
Hourly time
signal mark
Display
indicators
“A”(AM)/
“P”(PM)
mark
Hour
“DST” mark
B
A
C
D
1. Depress button “A” to show the time/calendar
display.
2. Depress button “B” for 2 to 3 seconds to show
the time/calendar setting display. The “DST”
mark starts flashing and the flashing “ON” or
“OFF” mark is displayed in place of the day.
3. Selection of the digits to be adjusted (flashing)
is made in the following order by depressing
button “C”.
4. Depress button “D” to set the flashing digits.
One digit is advanced with each depression of
button “D”. Digits except seconds move quick-
ly by keeping button “D” depressed.
5. After all the adjustments are completed, de-
press button “B” to return to the time/calen-
dar display.
Daylight
saving time
HourMinutesSeconds
→→→
12- or 24-hour
indication
DateMonthYear
←←←
↑
↓
Seconds Setting
Depress button “D” in accordance with a time
signal. The seconds are reset to “00” and start
immediately.
When the seconds count any number from “30” to
“59” and button “D” is depressed, one minute is
added and the seconds are reset to “00”.
How to Set the Daylight Saving Time
With each depression of button “D”, “ON” and
“OFF” marks appear alternately. After showing
“ON” mark, depress button “C” to select the hour
digits, and then depress button “D” to set them
one hour ahead of the regular time. “DST” mark
remains displayed to indicate that the daylight
saving time is shown.
Notes:
1. When setting the hour digits in the 12-hour
indication, check that “A” (AM)/“P” (PM) mark
is properly set. In the 24-hour indication, there
is no indication.
2. Once the year, month and date have been set,
the day of the week is set automatically.
3. If the watch is left untouched in the time/
calendar setting display with the digits flash-
ing, it will automatically return to the time/
calendar display in 2 to 3 minutes.
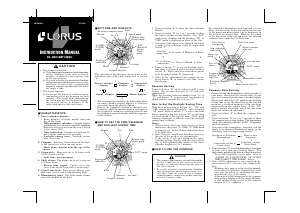
■ HOW TO USE THE COMPASS
CAUTION
1. The compass function may not work depending
on the condition of use such as season,
weather or obstacles intercepting view of
the sun or moon.
2. For such activities as mountain climbing
and orienteering which require very accu-
rate directions, be sure to use a conven-
tional magnetic compass together with this
watch for safety’s sake.
By setting the hemisphere and longitude of your
place, the directions of the sun and moon, the age
of the moon and moon phase can be displayed on
the basis of the current time. When set according
to the directions of the sun and moon, the rotating
compass bezel indicates 16 directions.
Compass Data Setting
• Before setting the hemisphere and longitude of
your place, check that the current time of your
place is set correctly in the time/calendar display.
(Please note that if the “ON” mark for the daylight
saving time is set, the directions of the sun and
moon are calculated inclusive of the one hour
advanced from the regular time. If the “ON”
mark is shown, therefore, check that the hour
digits are advanced one hour.)
1. Depress button “A” to show the compass dis-
play.
2. Depress button “B” for 2 to 3 seconds to show
the compass data setting display. The hemisphere
mark starts flashing with the “LONG.” (longitude)
mark displayed.
3. Selection of the hemisphere, longitude and the
digits to be adjusted (flashing) is made in the
following order by depressing button “C”.
Northern or Southern
Hemisphere
East or west
longitude
←
→
↑
↓
Longitude setting
(units digit)
Longitude setting
(tens digit)
4. Depress button “D” to set the hemisphere, longitude
of your place and the flashing digits. The
digits move quickly if the button is kept depressed.
* To set the longitude of your place, refer to
“TABLE OF LONGITUDES OF CITIES
THROUGHOUT THE WORLD” below.
5. After all the adjustments are completed, de-
press button “B” to return to the compass dis-
play.
* Flashing dots appear in the display immedi-
ately after the button is depressed, to indi-
cate that the watch is calculating the direc-
tion and the age of the moon.
* If the watch is left untouched in the compass
data setting display with the digits flashing,
it will automatically return to the compass
display in 2 to 3 minutes.
N
A
MOON
AGE
Direction of
sun/moon
Sun compass
indicator
Age of the
moon
Compass
display
indicator
Rotating compass
bezel
Moon phase display
Hemisphere mark
“DST” mark
Direction mark
Current time
Moon compass
indicator
A
C
D
Moon age
mark
B


Praat mee over dit product
Laat hier weten wat jij vindt van de Lorus W820 Uurwerk. Als je een vraag hebt, lees dan eerst zorgvuldig de handleiding door. Een handleiding aanvragen kan via ons contactformulier.