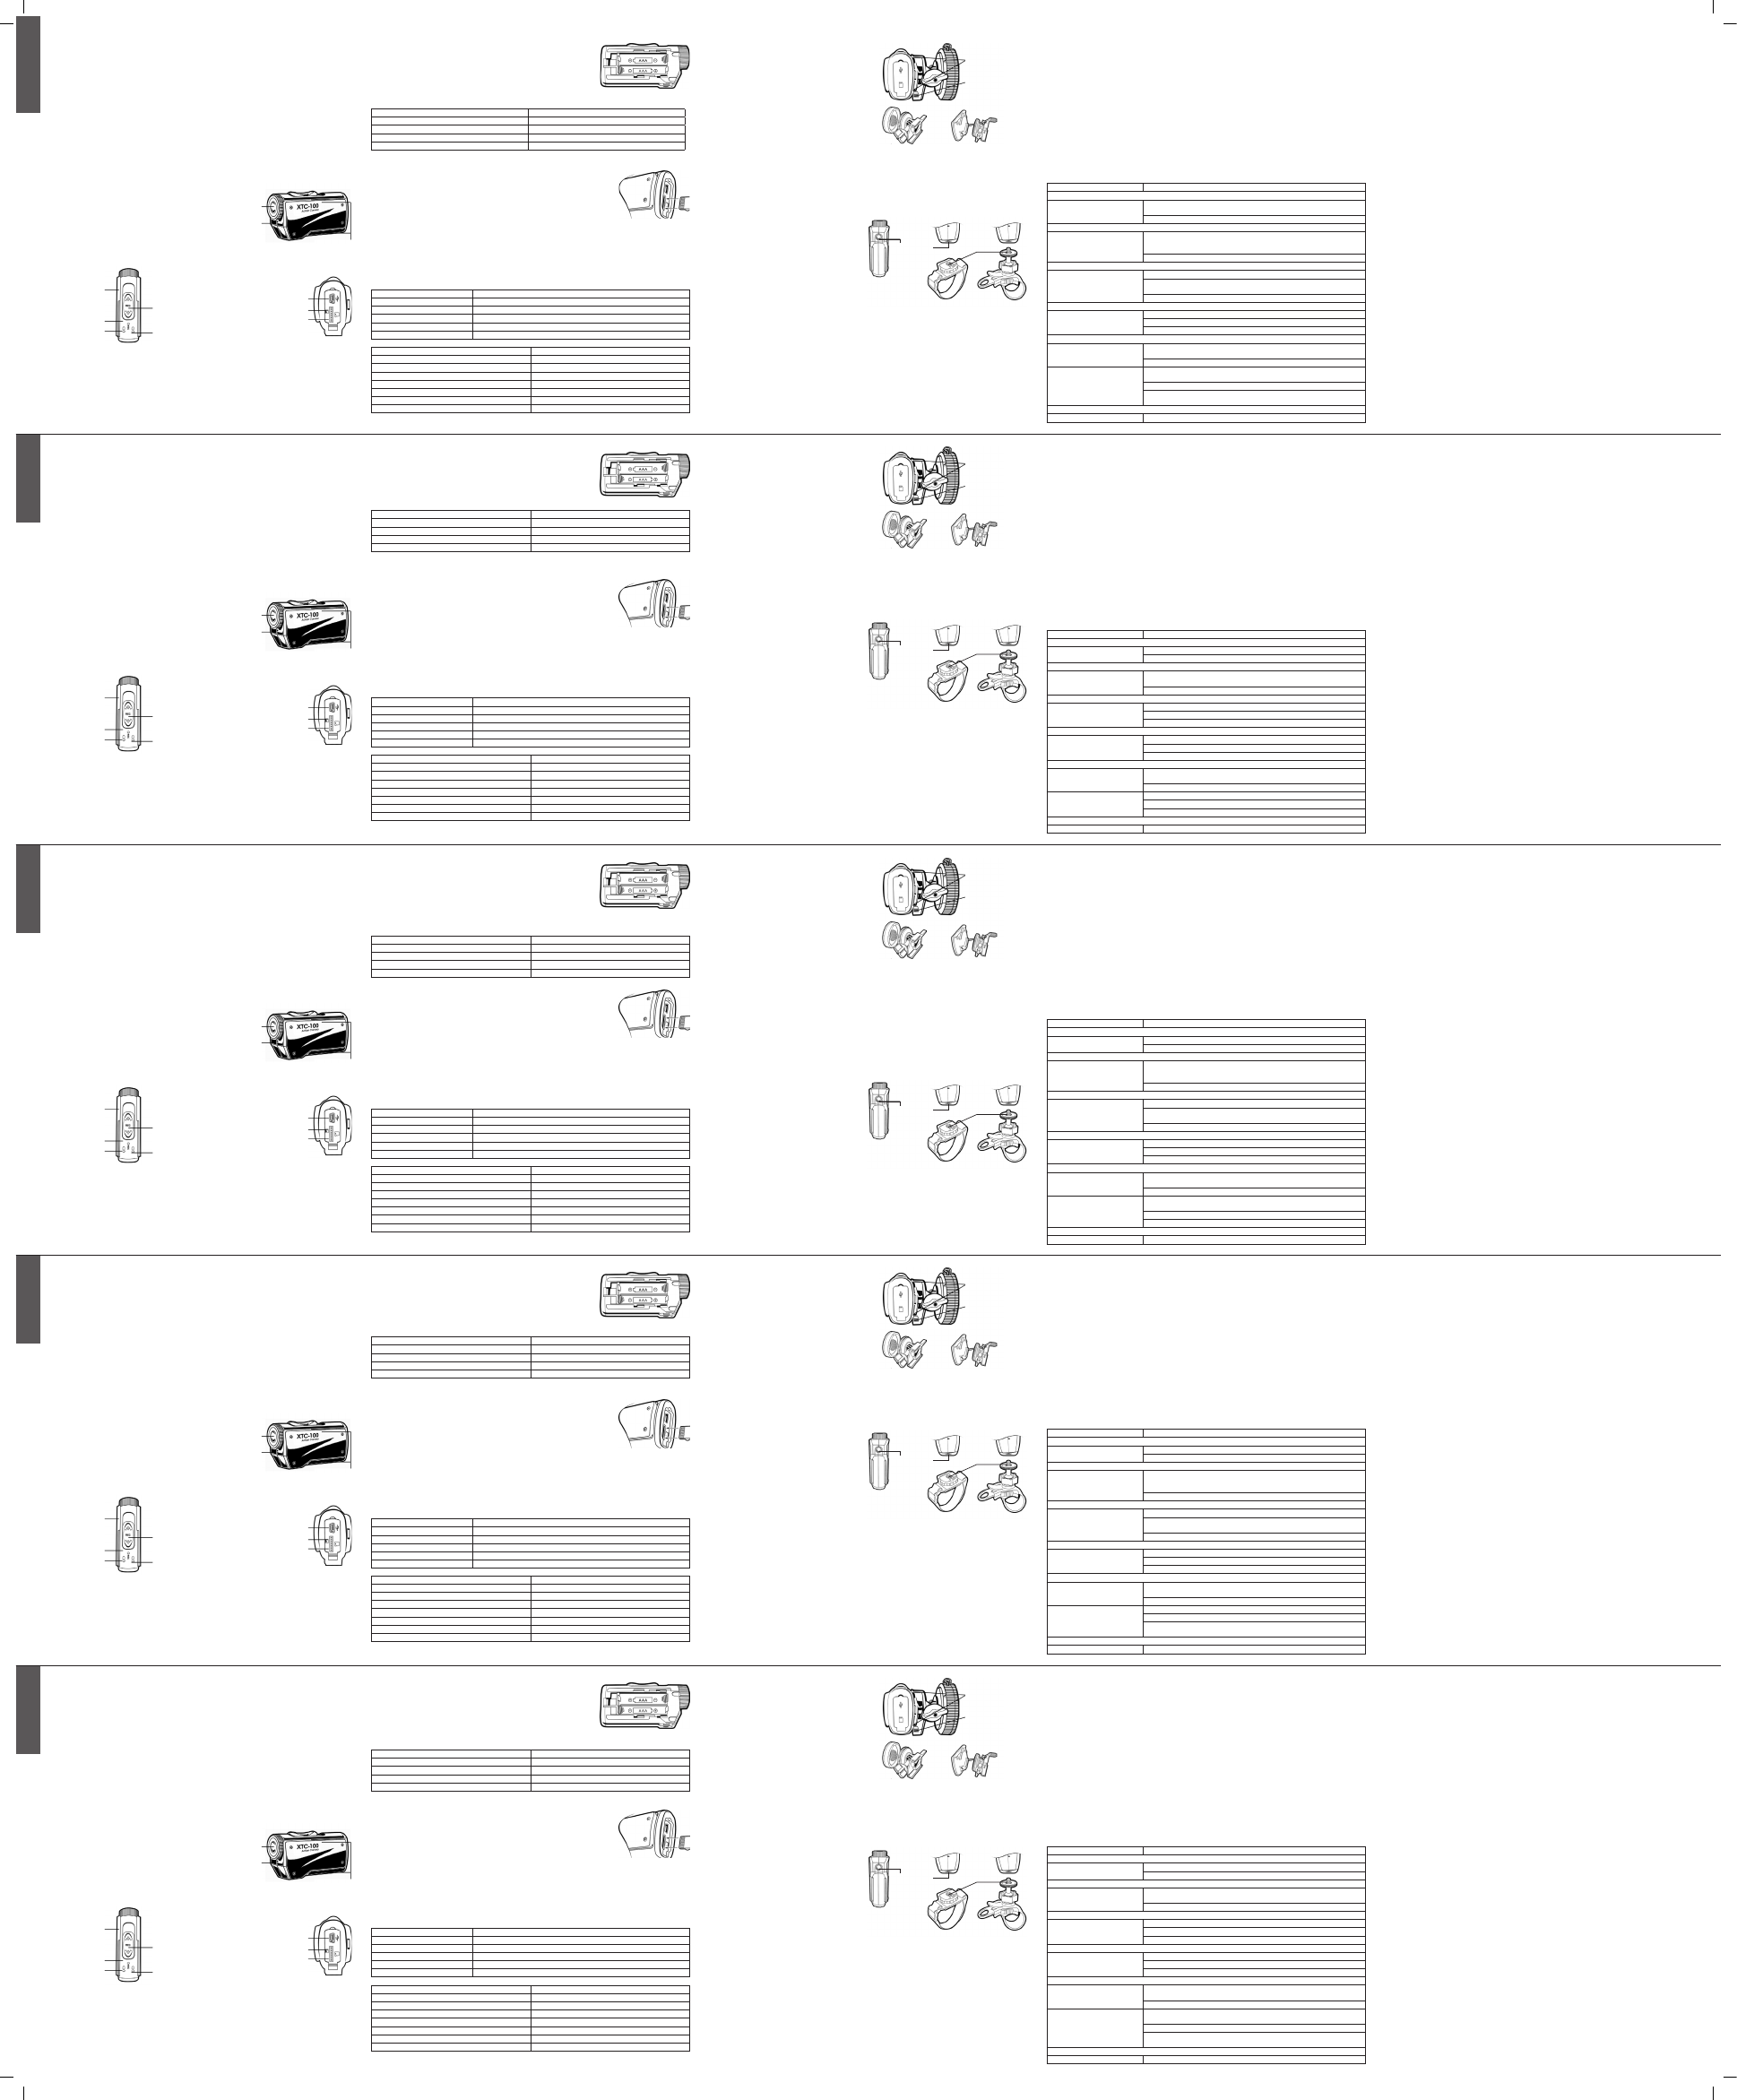
XTC-100 Action Camera
Grazie per aver acquistato XTC-100 Action Camera. XTC-100 è la nuovissima videocamera grandangolo in
grado di registrare ed immortalare i vostri momenti più importanti e divertenti! Facile da utilizzare: con il suo unico
comando (on-off/record), grandangolo con una visuale di 140° e 2 ore di batteria non vi perderete 1 minuto delle
vostre avventure! Terminata la registrazione, connettete semplicemente la videocamera al vostro computer e
scaricate i video registrati. Più facile di così! Buon divertimento!
Contenuto della confezione
› Midland XTC-100 Action camera
› Cavo USB
› Supporto montaggio per maschere da sci
› Supporto adesivo per montaggio al casco
› Supporto a cinghia per montaggio al casco da bici
› Supporto per manubrio da bici
Caratteristiche e pulsanti del XTC-100
Caratteristiche:
› Risoluzione 640x480 (4:3)
› Filmati AVI
› 30 frames per secondo
› Grandangolo di 140°
Guida rapida all’uso
1. Aprite il coperchio del vano batterie ed inserite le batterie facendo attenzione alla polarità. Riposizionate il
coperchio del vano batterie.
2. Aprite la cover di gomma della parte inferiore del dispositivo. Inserite la Micro SD card nell’opportuna direzione.
Chiudete la piccola cover gommosa.
3. Spostate il selettore RECORD in avanti. La registrazione inizierà dopo 8 secondi circa.
4. Per fermare la registrazione slittate il selettore verso il basso in posizione “off”.
5. Collegate la videocamera al computer e scaricate il video.
Imparando a conoscere XTC-100
Batterie
1. Per inserire le batterie, premete il pulsante posto sul lato destro della
videocamera e rimuovete il coperchio del vano batterie facendolo slittare in
avanti.
2. Inserite 2 batterie AAA facendo attenzione alla polarità di esse.
3. Riposizionate il coperchio del vano batterie
Indicatore stato batterie Signicato
Verde sso Batteria carica
Rosso sso Batteria parzialmente carica
Rosso lampeggiante Batteria quasi scarica
Led spento Batteria scarica
Nota: quando l’indicatore di batteria inizia a lampeggiare rosso, sarebbe opportuno cambiare le batterie in quanto
la telecamera si spegnerà a breve.
Micro SD Card
1. Aprite la cover di gomma posta sulla parte inferiore della videocamera
2. Inserite la Micro SD nell’apposita fessura come mostrato nell’immagine a lato.
3. Chiudete la cover di gomma.
NOTA: XTC-100 supporta no ad un massimo di 32 GB di memoria.
Registrazione
1. Slittate il selettore di registrazione in avanti per accendere la videocamera.
2. L’indicatore di batteria si illuminerà prima rosso, per poi passare a verde, mentre l’indicatore della Micro SD card si
illuminerà di verde. Dopo circa 8 secondi l’indicatore di registrazione inizierà a lampeggiare rosso, indicando
che la registrazione è iniziata.
3. Per fermare la registrazione, spostate il selettore “record” in posizione “off”.
Nota: pur avendo spostato il selettore in posizione “off”, la videocamera continuerà a registrare per altri 3
secondi; dopodiché si spegnerà denitivamente.
Indicatore stato del SD card Signicato
Verde Più di 1GB di spazio disponibile
Arancione Da 512 MB a1 GB di spazio disponibile
Rosso Meno di 512 MB di spazio disponibile o Micro SD card non inserita.
Rosso lampeggiante Micro SD card non letta correttamente
Verde lampeggiante Indica che la Micro SD card è stata riformattata
Spazio di memoria Tempo di registrazione
512 MB 7.5 minuti
1 GB 15 minuti
2 GB 30 minuti.
4 GB 60 minuti
8 GB 120 minuti
16 GB 240 minuti
32 GB 480 minuti
Nota: La videocamera dividerà automaticamente i video in documenti da 2GB di dimensione.
Supporti di montaggio
Supporti a slitta
XTC-100, con il suo innovativo design a scanalature può
essere facilmente montata su uno speciale supporto a
slitta. Tale supporto permette una più facile ed efcace
installazione del dispositivo.
Per montare la telecamera al supporto, posizionatela
nell’apposita scanalatura e fatela slittare.
Per staccare la telecamera dal supporto a slitta, tenete
la telecamera con la lente distante da voi e premendo il
pulsante di rilascio tirate il supporto verso di voi.
Questo supporto a slitta può essere abbinato sia al
supporto bi-adesivo da casco che al supporto per
maschera da sci, evitando così di dover rimontare la
telecamera ogni volta.
Una volta montata la telecamera al supporto a slitta
occorre:
1. Montare la telecamera al supporto intercambiabile
più adatto in base a ciò che si desidera lmare.
2. Aggiustare l’inquadratura della videocamera in modo
che non lmi il cielo o il terreno.
Supporti a vite
XTC-100 può essere montata sui caschi da bici o sui
manubri delle biciclette tramite due specici supporti
a vite. Nella parte inferiore del XTC-100 vi è un foro di
ssaggio che permette di montare la telecamera su tali
supporti, inserendo semplicemente la vite di ssaggio
nell’apposito foro e ruotando la telecamera in senso
orario.
Se volete ssare la telecamera al manubrio della vostra
bicicletta o montarla sul casco tramite supporto a
cinghia, dovete:
1. Montare la telecamera sul supporto a vite più adatto
a ciò che si desidera lmare.
2. Assicurarsi che la telecamera sia posizionata nel
modo corretto e che non inquadri cielo o terra.
Sistemi compatibili
XTC-100 è compatibile sia con sistemi operativi Windows che con MAC.
Il formato video è: AVI.
Download dei video
Non c’è bisogno di installare ulteriori software per il collegamento con XTC-100.
Prima di scaricare i video, assicuratevi che le batterie siano nuove o completamente cariche.
Connettete la telecamera alla porta USB usando il cavo in dotazione.
La telecamera viene vista dal PC come una normalissima memoria esterna (chiavetta USB), ma con solo la possibilità di
scaricare i lmati sul vostro PC; non è possibile caricare alcun dato sulla memoria SD.
Troverete i vostri video salvati nella cartella “DC IM”.
Come riformattare la Micro SD card
La riformattazione della Micro SD card permette di cancellare tutti i le video in un unico istante. Per far ciò occorre che la
micro SD card sia all’interno della stessa telecamera.
1. Posizionate la telecamera in “on” spostando il selettore “record” in posizione di registrazione.
2. Una volta che l’indicatore di batteria si illumina verde, tener premuto il pulsante di riformattazione della Micro SD card.
3. Tenete premuto il pulsante di riformattazione nché l’indicatore di registrazione non si spenga e l’indicatore dell’SD
card non lampeggi verde.
4. Spostate il selettore “record” in posizione off.
Nota: la Micro SD card non può essere riformattata se l’indicatore di batteria quasi scarica si accende (rosso
lampeggiante). Assicuratevi che le batterie siano completamente cariche o nuove prima di iniziare il processo di
riformattazione.
Problemi & Soluzioni
Problemi Soluzioni
Batterie
La telecamera non si accende Assicuratevi che le batterie siano installate correttamente facendo attenzione alla
polarità.
Assicuratevi che siano nuove o completamente cariche.
Registrazione
La telecamera non registra Assicuratevi di aver spostato correttamente il selettore “record” (totalmente in
avanti). Se l’indicatore di registrazione non si accende spegnete il dispositivo e
re-installate le batterie.
Vericate che ci sia abbastanza memoria nella Micro SD card.
Micro SD card
La Micro SD card non viene letta Assicuratevi che la Micro SD card sia stata inserita correttamente.
Connettete la telecamera al computer per vericare che ci sia abbastanza spazio
di memoria
Attendete che si concluda il processo di formattazione
Visualizzazione Video
Il video è lento e si inceppa Vericate che il cavo USB sia stato inserito correttamente nella presa della telecamera
Rimuovete dispositivi USB al momento non utilizzati
Trasferite i le video sul computer prima di vederli
Download del Video
Trasferimento dati lento Vericate che il cavo USB sia stato inserito correttamente nella presa della teleca-
mera. Scollegate e ricollegate il cavo USB
Rimuovete dispositivi USB al momento non utilizzati
Il computer non riconosce la tele-
camera
Assicuratevi che la telecamera collegata al computer abbia il selettore “record” po-
sizionato nella giusta posizione
Assicuratevi che la Micro SD card sia stata inserita correttamente
La Micro SD card potrebbe essere corrotta. Attendete che si concluda il processo
di formattazione
Audio
Disturbi causati dal vento Applicate del nastro adesivo sul foro del microfono
Garanzia
› Il consumatore è titolare di diritti secondo la legislazione nazionale applicabile disciplinante la vendita dei beni di
consumo e la garanzia lascia impregiudicati tali diritti;
› La durata della garanzia è di mesi 24 a decorrere dalla data di acquisto o dalla data della ricevuta rilasciata dal
rivenditore; per farla valere l’utente deve presentare lo scontrino d’acquisto assieme alla confezione dell’apparato
acquistato;
› La garanzia copre l’apparecchio nella totalità delle sue parti e comprende sia il materiale che la manodopera
necessaria per le riparazioni ;
› La garanzia non copre i difetti causati dall’uso o collegamento del Prodotto con accessori o/e software non prodotti o
forniti dal Produttore o da un uso del prodotto diverso da quello per cui il prodotto medesimo è stato realizzato. Essa
non è valida in caso di apertura, modica o riparazione da parte di soggetti diversi dai centri autorizzati o in caso di
riparazioni effettuate con ricambi non autorizzati.
› Nulla sarà dovuto all’acquirente per il tempo durante il quale l’apparecchio sarà rimasto inattivo né egli potrà
pretendere risarcimenti o indennizzi per spese sostenute come pure per danni diretti o indiretti derivanti dall’uso
improprio dell’apparecchio.
Noi, CTE International, dichiariamo che il prodotto XTC-100 è conforme ai requisiti essenziali e alle disposizioni della
Direttiva della Compatibilità Elettromagnetica 2004/108/CE. È possibile consultare una copia della Dichiarazione di
Conformità al seguente indirizzo internet: www.midlandradio.eu
Grandangolo 140°
Microfono
Scanalature per montaggio del supporto a slitta
Selettore Record
In avanti:
on/registrazione
Led di registrazione
lampeggia rosso
mentre registra
Led batteria
Selettore Record
Indietro:
Off/Stop registrazione
Led SD Card
Connettore
Mini USB
Pulsante per
riformattazione SD Card
Vano inserimento
Mini SD Card
Supporto a slitta
con regolazione
dell’inclinazione
Pulsante di rilascio
Supporto adesivo per casco Supporto per maschera da sci
Foro di ssaggio Vite di ssaggio
Supporto a cinghia per casco da bici Supporto al manubrio
IUK
XTC-100 Action Camera
Thank you for your purchase of the XTC-100 Action Camera. As someone who seeks adventure, we are proud to
offer you the ultimate tool in capturing and recording your adventures. With easy to use one switch operation, 140
degree algle lens and 2 hour battery life you never miss a minute of the action. Once captured, simply connect to
your computer and upload the videos to share with friends. It is that simple! Enjoy!
What’s in the box
› Midland XTC-100 Action camera
› USB cable
› Goggle mount
› Helmet adhesive mount
› Helmet strap mount
› Bicycle handlebar mount
XTC-100 Features and Controls
Features:
› 640x480 resolution (4:3 aspect ratio)
› Records as AVI
› 30 frames per second
› 140 degree angle lens
Quick Start Guide
1. Open battery door and install batteries observing polarity. Replace battery cover.
2. Open and fold down back rubber cover. Insert micro Sd card observing proper direction. Close cover.
3. Move RECORD switch forward, recording will start in 8 seconds.
4. To stop recording, slide switch back to the off position.
5. Plug in camera to computer and download video.
Getting to Know the XTC-100
Batteries
1. To insert the batteries, push down the battery door latch on the right side of
the camera. Door will release. Push forward to remove.
2. Install 2 AAA batteries observing polarity.
3. Return battery door and click into place.
Battery Status Indicator Meaning
Solid Green Indicates full battery life
Solid Red Indicates half battery life
Blinking Red* Indicates low battery life
No Light Batteries are dead
Note: When the red battery LED begins blinking, be prepared to change the batteries because the camera will
stop recording at this point.
Micro SD Card
1. Open and fold down the back rubber cover.
2. Insert Micro SD card into slot observing proper direction (shown sideways).
3. Return rubber ap into place.
NOTE: XTC-100 supports up to 32GB memory card size.
Recording
1. Move the RECORD switch forward. This turns the camera on.
2. The battery indicator will light from red to green. The SD card indicator will light green. The record indicator will begin
ashing red after 8 seconds. This indicates the camera is capturing video.
3. To stop recording, move the RECORD switch back to the off position.
Note: The camera will continue recording for 3 seconds after toggling the switch to the off position.
SD card LED Status Meaning
Green 1 GB or more avai lable
Orange 512 MB to1 GB available
Red Below 512 MB available or no MicroSD card installed.
Flashing Red Cannot read the card
Flashing Green Indicates card has been reformatted.
Memory Size Record Time
512 MB 7.5 Minutes
1 GB 15 Minutes
2 GB 30 Minutes
4 GB 60 Minutes
8 GB 120 Minutes
16 GB 240 Minutes
32 GB 480 Minutes
Note: The camera automatically splits the video into 2 GB segments.
Camera Mounting
Mount on Dual Track System
The XTC-100 was innovatively designed with an identi-
cal dual track mount system on either side of the came-
ra. This allows an ease of installation.
To mount the camera on the dual track mount, slide the
camera onto the dual track system with the two notches
on the mount facing towards the back of the camera.
To detach the camera from the dual track mount, hold
the camera with the lens facing away from you. Press
down the mount release switch and pull the mount to-
wards yourself.
The dual track mount allows the camera to be easily
mounted on both helmet mount and goggle mount. This
elimi nates the hassle of having to remount the camera
every time.
When mounting the camera on the dual track mount, you
must do the following:
1. Consider what you would like to shoot and use the
helmet mount or goggle mount accordingly.
2. Ensure, once attached, that the camera is aimed
straight and not towards the ground or at the sky.
Mount using the Thread Mount
On the bottom of the XTC-100 is a standard thread
mount that allows the camera to be mounted to an hel-
met strap mount or to a bicycle handlebar mount.
To x the camera, insert the screw on the mount into
the camera thread and rotate the camera clockwise to
tighten down onto the screw.
When mounting the camera on the handlebars of a bike
or with the vented helmet strap mount follow these steps:
1. Consider what you would like to shoot and mount
accordingly.
2. Ensure, once attached, that the camera is aimed
straight and not towards the ground or at the sky.
Compatible Systems
The XTC-100 can be used on both Windows operating system and MAC.
The camera records as AVI.
Downloading Videos
There is no need to install any software with the XTC-100. It is a plug and play device.
Ensure batteries are new or fully charged before downloading video.
Connect the camera to the USB port using the included cable.
The camera will be automatically recognized as an external hard drive (USB key) but videos could only be download; it is
not possible upload any data on your SD card.
All your videos will be saved into the DCIM folder.
Reformatting the Micro SD card
The Micro SD card can be reformatted while in the camera. This allows you to delete all the videos at one time. Follow
these steps:
1. Move the RECORD switch to the record position.
2. When the battery indicator turns green, press and hold the Micro SD card reformat button.
3. Keep the Micro SD card reformat button down until the record indicator turns off and the SD card indicator begins
blinking green.
4. Move the RECORD switch to the off position.
Note: The camera cannot reformat the Micro SD card if the low battery light is on. Ensure new batteries are instal-
led in the camera before attempting the reformat process.
Tips and Tricks
Problem Solution
Batteries
Camera not turning on Ensure the batteries are installed properly observing polarity.
Make sure batteries are new or fully charged.
Recording
Camera not recording Make sure the switch is pushed all the way forward. If the record LED does not
come on, turn off the device and reinstall the batteries.
Verify available memory.
Micro SD card
Micro SD card not reading Ensure the Micro SD card is inserted properly.
Plug camera into the computer to verify it has available storage.
Attempt formatting process.
Video Playback
Slow or choppy video Verify the camera is plugged into a USB 2.0 device.
Remove other unused USB devices.
Transfer video to computer before viewing.
Video Downloading
Slow data transfer Verify the camera is plugged into a USB 2.0 device. If registering as 1.1, unplug and
the re-plug the device.
Remove other unused USB devices.
Computer does notrecognize ca-
mera
Ensure record switch is in the record position while connected to computer.
Ensure the Micro SD card is inserted properly.
Micro SD card may becorrupted. Attempt formatting process.
Sound
Excessive Wind Noise Place piece of tape over microphone hole.
Limited Warranty
Midland will repair or replace, at its option without charge, any Midland XTC-100 Action camera which fails due to a
defect in material or workmanship within TWO Years following the initial consumer purchase.
In the event of a product defect, please return it to the authorized customer service or to the Manufacturer himself. To
make use of this warranty, it is necessary to return to the authorized service centre:
› The affected product (or accessory)
› The original proof of purchase, which clearly indicates the name and address of the seller and the date and place
of purchase.
This warranty does not apply to accidents of any kind, exposure to pressure, extreme temperatures (outside of -10°C
to 45°C), and submersion water damage as this product is water resistant but not waterproof, battery leak or abuse.
Hereby, CTE International declares that this XTC-100 is in compliance with the essential requirements and other rele-
vant provisions the Electromagnetic Compatibility Directive 2004/108/CE. A copy of Declaration of Conformity can be
found at: www.midlandradio.eu
140° degree glass lens
Microphone
Dual track mounting system
Record switch
forward:
on/record
Record led
ashes red when
camera is recording
Battery led
Record switch
backward:
Off/Stop recording
SD Card led
Mini USB
connector
SD Card
reformat button
Mini SD Card slot
dual track system mount
Release button
Helmet adhesive mount Goggle mount
Camera thread Mounting screw
Helmet strap mount Bicycle handle bar mount
D
XTC-100 Actionkamera
Vielen Dank, dass Sie sich für die XTC-100 Actionkamera entschieden haben. Wir sind stolz, Ihnen als Abenteurer
dieses ultimative Gerät zur Aufzeichnung Ihrer Abenteuer anbieten können. Mit der einfachen Bedienung,
140-Grad-Objektiv und 2 Stunden Batterielaufzeit vermissen Sie keinen Moment der Action. Nach der Aufzeichnung
schließen Sie das Gerät einfach an Ihrem Computer an und laden Sie die Videos zur gemeinsamen Betrachtung
mit Freunden herauf. So einfach ist das! Viel Spaß!
Lieferumfang
› Midland XTC-100 Actionkamera
› USB-Kabel
› Brillenhalterung
› Helm-Klebehalterung
› Helm-Bandhalterung
› Lenkerhalterung
XTC-100 Ausstattungsmerkmale und Bedienelemente
Ausstattungsmerkmale:
› 640x480 Auösung (4:3 Bildformat)
› Aufzeichnung im AVI-Format
› 30 Bilder pro Sekunde
› 140-Grad-Objektiv
Schnellanleitung
1. Öffnen Sie das Batteriefach und setzen Sie die Batterien mit korrekter Polarität ein. Schließen Sie das
Batteriefach wieder.
2. Öffnen Sie die hintere Gummiabdeckung und falten Sie sie herunter. Setzen Sie eine microSD-Karte richtig
herum ein. Schließen Sie die Abdeckung wieder.
3. Schieben Sie den Aufnahmeschalter REC nach vorn, die Aufnahme beginnt nach 8 Sekunden.
4. Zur Beendigung der Aufnahme schieben Sie den Aufnahmeschalter REC wieder zurück.
5. Schließen Sie die Kamera am Computer an und laden Sie das Video hoch.
XTC-100 Wissenswertes
Batterien
1. Zum Einsetzen der Batterien drücken Sie den Deckel des Batteriefachs auf
der rechten Seite der Kamera herunter. Die Verriegelung wird freigegeben.
Schieben Sie den Deckel zum Abnehmen nach vorn.
2. Setzen Sie 2 AAA-Batterien mit korrekter Polarität ein.
3. Setzen Sie den Deckel des Batteriefachs zurück und achten Sie darauf,
dass er einrastet.
Batterie-Statusanzeige Bedeutung
Leuchtet grün Batterien voll
Leuchtet rot Batterien halb voll
Blinkt rot* Batterien leer
Keine Anzeige Batterien völlig erschöpft
Bitte beachten Sie: Beginnt die rote Batterie-LED zu blinken, so sollten Sie die Batterien austauschen, da die
Aufnahme durch die Kamera jetzt beendet wird.
microSD-Karte
1. Öffnen Sie die hintere Gummiabdeckung und falten Sie sie herunter.
2. Setzen Sie eine microSD-Karte richtig herum ein (Seitenansicht).
3. Schließen Sie die Abdeckung wieder.
Achtung: Die XTC-100 unterstützt Speicherkarten bis zu 32 GB
Aufnahme
1. Schieben Sie den Aufnahmeschalter REC nach vorn. Hiermit wird die Kamera eingeschaltet.
2. Die Batterieanzeige schaltet von rot auf grün um. Die SD-Kartenanzeige leuchtet grün. Die Aufnahmeanzeige
beginnt nach 8 Sekunden rot zu blinken. Hiermit wird angezeigt, dass die Kamera jetzt ein Video aufzeichnet.
3. Zur Beendigung der Aufnahme schieben Sie den Aufnahmeschalter REC wieder zurück.
Bitte beachten Sie: Die Kamera nimmt nach dem Ausschalten für weitere 3 Sekunden auf.
SD-Karte LED-Status Bedeutung
Grün 1 GB oder mehr verfügbar
Orange 512 MB bis 1 GB verfügbar
Rot Weniger als 512 MB verfügbar oder keine microSD-Karte eingesteckt
Blinkt rot Karte kann nicht gelesen werden
Blinkt grün Karte wurde neu formatiert.
Speichergröße Aufnahmedauer
512 MB 7,5 Minuten
1 GB 15 Minuten
2 GB 30 Minuten
4 GB 60 Minuten
8 GB 120 Minuten
16 GB 240 Minuten
32 GB 480 Minuten
Bitte beachten Sie: Die Kamera unterteilt das Video automatisch in Segmente von 2 GB.
Kamerahalterung
Montage auf Doppelschienensystem
Die XTC-100 hat ein innovatives Design mit identischen
Doppelschienenhalterungen auf beiden Seiten der
Kamera. Dies vereinfacht die Installation.
Zur Montage der Kamera auf der
Doppelschienenhalterung schieben Sie die Kamera
auf das Doppelschienensystem mit den beiden Kerben
auf der Halterung auf die Rückseite der Kamera
ausgerichtet.
Zum Abnehmen der Kamera von der
Doppelschienenhalterung halten Sie die Kamera mit
dem Objektiv von Ihnen weg gerichtet. Drücken Sie den
Entriegelungsschalter für die Halterung und ziehen Sie
die Halterung auf sich zu.
Die Doppelschienenhalterung ermöglicht eine einfache
Montage der Kamera auf der Helmhalterung und
der Brillenhalterung. Hierdurch wird ein ständiges
Ummontieren der Kamera vermieden.
Bei der Montage der Kamera auf der
Doppelschienenhalterung gehen Sie wie folgt vor:
1. Denken Sie zunächst darüber nach, was Sie
aufnehmen möchten und ob Sie die Helm- oder
Brillenhalterung benutzen.
2. Nach der Montage achten Sie darauf, dass die
Kamera gerade ausgerichtet ist und nicht den
Boden oder den Himmel aufnimmt.
Montage mit Schraubhalterung
Unter der XTC-100 bendet sich eine Standard-
Schraubhalterung zur Befestigung der Kamera an
einem Helmgurt oder einer Fahrradlenkerhalterung.
Zur Befestigung der Kamera setzen Sie die Schraube
der Halterung in das Kameragewinde ein und drehen
Sie die Kamera nach rechts.
Zur Befestigung der Kamera am Lenker oder mit dem
Helmgurt folgen Sie den nachstehenden Schritten:
1. Denken Sie zunächst darüber nach, was
Sie aufnehmen möchten und montieren Sie
entsprechend.
2. Nach der Montage achten Sie darauf, dass die
Kamera gerade ausgerichtet ist und nicht den
Boden oder den Himmel aufnimmt.
Kompatible Systeme
Die XTC-100 kann sowohl mit Windows wie auch MAC benutzt werden.
Die Kamera nimmt im AVI-Format auf.
Videos herunterladen
Für die XTC-100 muss keine zusätzliche Software geladen werden. Dies ist ein Plug-and-play-Gerät.
Achten Sie darauf, dass die Batterien frisch oder der Akku voll geladen ist, bevor Sie ein Video herunterladen.
Schließen Sie die Kamera am USB-Port über das mitgelieferte Kabel an.
Die Kamera wird automatisch als externes Laufwerk erkannt. Videos können ausschließlich von der Kamera auf den PC
geladen werden. Es ist nicht möglich Dateien vom PC auf die SD-Karte in der Kamera zu kopieren.
Ihre Videos werden im Ordner DCIM gespeichert.
microSD-Karte neu formatieren
Die microSD-Karte kann in der Kamera neu formatiert werden. Hiermit können Sie alle Videos gleichzeitig löschen. Bitte
folgen Sie den nachstehenden Schritten:
1. Schieben Sie den Aufnahmeschalter REC nach vorn.
2. Sobald die Batterieanzeige grün leuchtet, halten Sie die Taste zur Formatierung der microSD-Karte gedrückt.
3. Halten Sie die Taste zur Formatierung der microSD-Karte gedrückt, bis die Aufnahmeanzeige erlischt und die SD-
Kartenanzeige grün blinkt.
4. Schieben Sie den Aufnahmeschalter REC wieder zurück.
Bitte beachten Sie: Die Kamera kann die microSD-Karte nicht neu formatieren, wenn die Anzeige für geringe
Batteriekapazität leuchtet. Setzen Sie vor der Formatierung frische Batterien in die Kamera ein.
Problembehebung
Problem Lösungsvorschlag
Batterien
Kamera schaltet sich nicht ein. Achten Sie darauf, dass die Batterien mit korrekter Polarität eingesetzt sind.
Achten Sie darauf, dass die Batterien frisch sind oder der Akku geladen ist.
Aufnahme
Kamera zeichnet nicht auf. Achten Sie darauf, dass der Schalter bis ganz nach vorn geschoben ist. Leuchtet
die Aufnahme-LED nicht auf, so schalten Sie das Gerät aus und setzen Sie frische
Batterien ein.
Überprüfen Sie die verfügbare Speicherkapazität.
microSD-Karte
microSD-Karte wird nicht gelesen. Achten Sie darauf, dass die microSD-Karte korrekt eingesetzt ist.
Schließen Sie die Kamera am Computer an, um die Speicherkapazität zu
überprüfen.
Formatieren Sie neu.
Videowiedergabe
Langsames oder abgehacktes
Video.
Achten Sie darauf, dass die Kamera an einem USB 2.0 Gerät angeschlossen ist.
Trennen Sie andere, nicht genutzte USB-Geräte ab.
Übertragen Sie das Video vor dem Betrachten auf den Computer.
Video-Download
Langsame Datenübertragung. Achten Sie darauf, dass die Kamera an einem USB 2.0 Gerät angeschlossen ist.
Wird sie als Version 1.1 registriert, abtrennen und neu anschließen.
Trennen Sie andere, nicht genutzte USB-Geräte ab.
Computer erkennt die Kamera
nicht.
Achten Sie darauf, dass der Schalter beim Anschluss am Computer bis ganz nach
vorn geschoben ist.
Achten Sie darauf, dass die microSD-Karte korrekt eingesetzt ist.
Die microSD-Karte ist möglicherweise beschädigt. Formatieren Sie neu.
Ton
Übermäßige Windgeräusche. Decken Sie die Öffnung des Mikrofons mit einem Klebestreifen ab.
Eingeschränkte Garantie
Midland repariert oder ersetzt nach eigenem Ermessen jede Midland XTC-100 Actionkamera, die aufgrund Material-
oder Fertigungsfehler innerhalb von ZWEI Jahren nach Erwerb durch den ursprünglichen Käufer ausfällt.
Im Falle eines Defekts wenden Sie sich an Ihren Fachhändler, bei dem Sie das Gerät erworben haben, bzw. an die mit
dem Händler vereinbarte Serviceanschrift. Im Falle einer zusätzlichen Herstellergarantie können Sie Ihr Gerät auch
direkt an den autorisierten Servicepartner senden. Senden Sie bitte folgendes ein:
› das beanstandete Gerät (möglichst mit Zubehör) und Fehlerangaben
› einen gültigen Kaufbeleg (z.B. der Kassenzettel, aus dem das Kaufdatum, sowie Name + Anschrift der Verkaufs-
stelle hervorgehen muss).
Die Garantie deckt keine Unfälle irgendwelcher Art, Druck auf das Gerät, extreme Temperaturen (unterhalb -10 °C,
oberhalb 45 °C) sowie Eintauchen in Wasser (das Gerät ist wassergeschützt, aber nicht wasserdicht), ausgelaufene
Batteriesäure oder unsachgemäße Behandlung ab.
Diese Garantie schließt keine Lohnkosten für den Ausbau oder die erneute Montage des Geräts in Fahrzeugen oder
auf anderen Halterungen ein.
CTE International erklärt, dass XTC-100 den grundlegenden Anforderungen sowie weiteren relevanten Bestimmungen
der Richtlinie zur elektromagnetischen Verträglichkeit 2004/108/CE entspricht.
140-Grad-Objektiv
Mikrofon
Doppelschienenhalterungssystem
Aufnahmeschalter
vorn:
Ein/Aufnahme
Aufnahme-LED
blinkt grün bei
Aufnahme mit Kamera
Batterie-LED
Aufnahmeschalter
hinten:
Aus/Aufnahme beenden
SD-Karten-LED
Mini-USB-Port
SD-Karte
Formatierungstaste
miniSD-Kartenleser
Doppelschienen-
systemhalterung
Entsperrtaste
Helm-Klebehalterung Brillenhalterung
Kameragewinde Befestigungsschraube
Helm-Befestigungsgurt Fahrradlenkerhalterung
E
XTC-100 Action Camera
Gracias por haber adquirido la XTC-100 Action Camera. Nos complace ofrecerte la última herramienta para grabar
tus aventuras. Sistema patentado de accionamiento con un solo mando, lente gran angular de 140 grados y 2
horas de autonomía, nunca te perderás un segundo de acción. Solo grabar, conectar a tu ordenador y descargar
los videos para compartir con tus amigos y familiares. ¡Es así de simple, Disfrútalo!
Que hay en la caja
› Midland XTC-100 Action camera
› Cable USB
› Soporte para gafas esquí
› Soporte adhesivo casco
› Soporte cinta para casco de bici
› Soporte manillar
XTC-100 Características y Controles
Características:
› Resolución 640x480 (4:3)Grabación formato AVI
› 30 frames por segundo
› Lente gran angular 140 grados
Guía Rápida
1. Abra el compartimento de baterías e instale las pilas suministradas observando la polaridad. .
2. Aparte el protector de goma. Inserte la tarjeta Micro SD observando la indicación marcada. Coloque de nuevo
el protector.
3. Deslice hacia adelante el mando REC, la grabación se iniciará en 8 segundos.
4. Para detener la grabación, devuelva el mando a la posición Off.
5. Conecte la cámara al ordenador y descargue el video.
Conozca la XTC-100
Baterías
1. Para insertar las baterías, presione la lengüeta liberadora y tire hacia ade-
lante la tapa (marcada Midland XTC-100, en el lado derecho de la cámara).
La tapa se abrirá.
2. Instale 2 pilas AAA observando la polaridad.
3. Coloque la tapa y deslícela hasta que oiga click.
Indicador Estado Baterías Signica
Verde jo Batería totalmente cargada
Rojo jo Batería a media carga
Rojo intermitente* Batería baja
Sin luz Batería agotada
Nota: Cuando el LED rojo comience a parpadear, prepárese para cambiar las baterías porque la cámara detendrá
la grabación inmediatamente.
Trajeta Micro SD
1. Aparte el protector de goma.
2. Inserte la tarjeta Micro SD observando la dirección marcada.
3. Vuelva a colocar el protector de goma en su lugar.
Nota: XTC-100 soporta tarjetas de hasta 32 GB.
Grabando
1. Deslice hacia delante el mando REC. Así encnederá la cámara.
2. El indicador de batería cambiará de rojo a verde. El indicador de trajeta SD se iluminará verde. Pasados 8 segundos,
el indicador de grabación empezará a parpadear rojo. Esto indica que la cámara está grabando.
3. Para parar la grabación, deslice el mando REC a la posición “off”.
Nota: La cámara continuará grabando durante 3 segundos después de haber efectuado el paso 3.
LED estatus tarjeta SD Signica
Verde 1 GB o más disponible
Naranja 512 MB-1 GB disponible
Rojo Menos de 512 MB disponibles o tarjeta MicroSD no instalada.
Rojo intermitente No puede leer la tarjeta
Verde intermitente Tarjeta formateada.
Memoria Tiempo Grabación
512 MB 7,5 minutos
1 GB 15 minutos
2 GB 30 minutos
4 GB 1 hora
8 GB 2 horas
16 GB 4 horas
32 GB 8 horas
Nota: La cámara divide automáticamente el video en segmentos de 2 GB.
Instalación de la Cámara
Soporte deslizante
XTC-100 tiene un innovador diseño con un doble si-
stema de montaje mediante soporte deslizante, uno en
cada lado de la cámara. Esto permite que se adapte a
cualquier tipo de instalación.
Para montar la cámara en el soporte, colóquela en la
guia y deslícela.
Para quitar la cámara del soporte, sujete la cámara con
la parte trasera mirando hacia Ud. pulse hacia arriba
la pestaña aseguradora situada en la guía y deslice la
cámara.
Este soporte deslizante se puede unir tanto al soporte
biadhesivo de casco como al soporte para gafas de
esquí, evitando asì tener que montar la cámara cada vez.
Una vez montada la cámara al soporte deslizante podrá:
1. Montar la cámara al soporte intercambiable que se
adapte mejor a lo que desea lmar.
2. Ajustar el encuadre de la cámara.
Soporte a tornillo
XTC-100 se puede montar en casco de bicicleta o en el
manillar usando este soporte. En la parte inferior de la
XTC-100 hay una rosca hembra de acero que permite
montar la cámara en estos soportes, con solo introducir
el tornillo de jación en la hembra de la cámara y
girándola en sentido horario.
Si quiere jar la cámara al manillar o montarla en el
casco mediante el soporte con cinta, deberá:
1. Montar la cámara en el soporte a tornillo escogido.
2. Asegurarse de que el encuadre sea correcto para no
lmar el cielo o la tierra.
Sistemas compatibles
XTC-100 es compatible tanto con sistemas Windows como Mac.
El formato video es AVI.
Descarga de los videos
No es necesario instalar ningún tipo de software para conectar la XTC-100.
Antes de descargar el video, asegúrese de que las baterías sean nuevas o estén completamente descargadas.
En caso contrario, si se interrumpe la descarga por un fallo de alimentación en la cámara, el video se puede dañar
irremediablemente.
Conecte la XTC-100 al puerto USB usando el cable en dotación. Enciéndala.
La cámara será vista por el PC como una memoria externa (llave USB) pero sólo podrá descargar videos, nunca podrá
cargar nada en la Micro SD .
Encontrará sus videos grabados en la carpeta “DC IM”.
Formateado de la tarjeta SD
El formateo de la Micro SD permite borrar instantaneamente todos los videos guardados en ella. Para esto la Micro SD
debe estar correctamente instalada en la cámara.
1. Encienda la cámara deslizando hacia delante el mando REC.
2. Cuando el indicador de batería se ilumine verde, mantenga pulsado el botón de formateo de la Micro SD.
3. Mantenga pulsado este botón hasta que se apague el indicador de grabación y el indicador de la Micro SD parpadee
verde.
4. Deslice el mando REC a la posición “off”.
Nota: la tarjeta Micro SD no puede formatearse si el indicador de batería descargada se enciende (rojo intermitente).
Asegúrese de las baterías estén completamente cargadas antes de iniziar el proceso de formateo.
Problemas & Soluciones
Problemas Soluciones
Baterías
La XTC-100 no se enciende Asegúrese de que las baterías estén correctamente instaladas (polaridad)
Verique que sean nuevas o que estén cargadas.
Grabaciones
La cámara no graba Asegúrese de haber deslizado correctamente el mando REC (totalmente hacia de-
lante). Si el indicador de grabación no se enciende, apague la cámara y re-instale
las baterías.
Verique que haya suciente memoria en la Micro SD.
Tarjeta Micro SD
La Micro SD no e puede leer Asegúrese de que esté correctamente instalada (vea el dibujo).
Conecte la cámara al ordenador para vericar que hay suciente espacio en me-
moria
Espere a que concluya el proceso de formateo
Visualización del Video
El video es lento y se interrumpe Verique que el cable USB esté correctamente conectado a la cámara
Quite dispositivos USB que no utilice
Trasera el chero al ordenador antes de visualizarlo
Descraga del Video
Transferencia datos lenta Verique que el cable USB esté correctamente conectado a la cámara. Desconéc-
telo y vuelva a conectarlo
Quite dispositivos USB que no esté usando
El ordenador no reconoce la cá-
mara
Asegúrese de que la cámara esté encnedida
Verique la correcta instalación de la Micro SD
La tarjeta Micro SD card podría estar corrompida. Espere a que concluya el proceso
de formateo
Audio
Ruidos causados por el viento Coloque cinta adhesiva en el agujero del micrófono
Garantía
Esta garantía no limita los derechos del usuario reconocidos en la normativa estatal aplicable en materia de venta de
bienes de consumo. Durante el periodo de garantía, ALAN COMMUNICATIONS, reparará en un periodo razonable de
tiempo eventuales averías, libre de cargos por mano de obra y materiales. Esta garantía limitada solamente es válida
en el país donde se ha adquirido el producto.
Periodo de garantía
El periodo de garantía comienza en el momento de la compra por parte del primer usuario nal y es valida por 2 años.
Para mayor información sobre este y otros asuntos relativos al servicio de garantía, diríjase a nuestra página web
www.midland.es
Como acceder al servicio de Garantía
En caso de que el producto tenga un defecto, envie el artículo a la dirección que gura a pie de página, bien protegido
y con una nota explicativa de la anomalía detectada.
Cualquier reclamación por el producto afectado, debe de comunicarse dentro de un tiempo razonable desde que se
apreció el defecto y, en ningún caso, después de que expire el periodo de garantía.
Para tener acceso a esta garantía, es necesario adjuntar:
› El producto afectado (equipo o accesorio) con una nota explicativa de la anomalía detectada
› La factura original de compra, con el nombre y la dirección del distribuidor y la fecha y el lugar de compra
Lo que NO cubre la Garantía
Esta Garantía Limitada no cubre:
Esta garantía limitada no cubre el deterioro del producto debido a su uso habitual, defectos o daños causados al pro-
ducto por un uso, o conexión con cualquier producto, accesorio, software y/o servicios no fabricados o suministrados
por el fabricante o por el uso del producto para cualquier otra función diferente de la que ha sido fabricado.
Esta garantía limitada no será válida si el producto ha sido abierto, modicado o reparado por cualquier otro que no
sea un servicio autorizado por ALAN Communications o si el número de serie del producto ha sido retirado, borrado,
alterado o son ilegibles de alguna manera, quedando a la única discreción de ALAN COMMUNICATIONS.
Esta garantía limitada no será válida si el producto se ha expuesto a humedad, a condiciones ambientales o de
temperatura extrema, corrosión, oxidación, derrames de comida o líquidos o a la inuencia de productos químicos.
CTE International declara que el producto Midland XTC-100 es conforme a los requisitos esenciales y a las disposi-
ciones de la Directiva de Compatibilidad Electromagnética 2004/108/CE.
© ALAN COMMUNICATIONS, SA - Cobalt, 48 - 08940 Cornellà de Llobregat - www. midland.es
Lente vidrio140°
Micrófono
Guia para soporte deslizante
Mando REC
delante:
encendido/grabar
Led Grabación
rojo intermitente cuando la
cámara graba
Led Batería
Mando REC
detrás:
Apagado/Paro grabación
Led tarjeta Micro SD
Conector Mini USB
Pulsador formateo
Tarjeta SD
Slot tarjeta Micro SD
soporte deslizante
ajustable
Pestaña aseguradora
Soporte adhesivo para casco Soporte para gafas de esquí
Rosca cámara Tornillo montaje
Soporte cinta para casco Soporte manillar
F
XTC-100 Caméra d’Action
Merci d’avoir acheté la caméra d’action MIDLAND XTC-100. Comme quelqu’un qui cherche l’aventure, nous som-
mes ers de vous offrir l’outil ultime de capture et d’enregistrement de vos aventures. Avec son simple bouton de
contrôle, sa lentille de 140 degrés et son autonomie batterie de 2 heures vous ne raterez aucunes minutes de
votre action. Une fois capturé, connecté là simplement à votre ordinateur et télécharger les vidéos pour pouvoir les
partager avec vos amis! C’est si simple!
Ce qu’il y a dans la boite
› Caméra d’action Midland XTC-100
› Câble USB
› Support lunette
› Support casque
› Bande pour casque
› Support de guidon
Caractéristiques et controls de l’XTC-100
Caractéristiques:
› Résolution 640x480 (Rapport d’aspect 4:3)
› Enregistrement au format AVI
› 30 images par secondes
› Lentille de 140°
Guide de démarrage rapide
1. Ouvrez le couvercle batterie et installez les batteries en observant la polarité. Refermez le couvercle.
2. Ouvrez et baissez le capuchon en caoutchouc. Inserez la carte micro SD en respectant le sens. Fermez le
capuchon.
3. Déplacez l’interrupteur d’enregistrement vers l’avant, l’enregistrement débute après 8 secondes.
4. Pour terminer l’enregistrement, déplacez l’interrupteur vers l’arrière en position OFF.
5. Connectez la caméra à l’ordinateur et téléchargez la vidéo.
Apprendre à connaitre l’XTC-100
Batteries
1. Pour inserez les piles, appuyez sur l’ergot du couvercle batteries sur le coté
droit de la caméra. Le couvercle se libère, poussez vers l’avant pour l’en-
lever.
2. Installez 2 piles AAA en respectant la polarité.
3. Replacez le couvercle et verrouillez le en place.
Voyant d’état Batterie Signication
Vert xe Les piles sont pleines
Rouge xe Les piles sont à moitié vides
Rouge clignotant* Les piles sont faibles
Eteint Les piles sont totalements vides
Note: Quand le voyant commence à clignoter rouge, préparé vous a replacer les piles car l’enregistrement cesse
à partir de cet instant.
Carte Micro SD
1. Ouvrez et baissez le capuchon en caoutchouc à l’arrière.
2. Inserez la carte Micro SD dans la fente en respectant le sens (comme montré ici).
3. Replacez le capuchon.
NOTE: L’ XTC-100 supporte des cartes mémoires jusqu’à 32GB.
Enregistrement
1. Déplacez l’interrupteur d’enregistrement vers l’avant. Cela allume la caméra.
2. Le voyant batterie passe du rouge au vert. Le voyant de la carte SD passe au vert. Le voyant d’enregistrement
commence à clignoter rouge après 8 secondes. Cela signie que la caméra capture une vidéo.
3. Pour terminer l’enregistrement, déplacez l’interrupteur vers l’arrière en position OFF.
Note: La caméra continue d’enregistrer pendant 3 secondes après avoir basculé l’interrupteur en position OFF.
Voyant d’état carte SD Signication
Vert 1 GB ou plus disponible
Orange 512 MB à 1 GB disponible
Rouge Moin de 512 MB disponible ou pas de carte MicroSD installée.
Rouge clignotant Carte illisible
Vert clignotant Signie que la carte a été reformaté.
Taille mémoire Record Time
512 MB 7.5 Minutes
1 GB 15 Minutes
2 GB 30 Minutes
4 GB 60 Minutes
8 GB 120 Minutes
16 GB 240 Minutes
32 GB 480 Minutes
Note: La caméra sépare automatiquement la vidéo en segments de 2 GB.
Montage de la caméra
Montage sur un système double glissière
L’XTC-100 a été conçu de manière innovante avec un
système double glissières sur les deux cotés de la ca-
méra. Ce qui permet une installation facile.
Pour monter la caméra sur le système double glissière,
clipsez la caméra dans le système double glissière avec
les deux molettes orientées vers l’arrière de la caméra.
Pour détacher la caméra du système double glissère, te-
nez la caméra avec la lentille à l’opposé. Appuyez sur la
languette de déverrouillage et tirez vers vous le support.
Le double système de xation permet à la caméra d’être
facilement monté sur un casque ou des lunettes. Ceci
évite l’inconvenient de devoir à chaque fois remonter la
caméra.
Quand vous montez la caméra sur le système double
crochet, suivez les points ci-dessous :
1. En fonction de ce que vous souhaitez lmer choisis-
sez entre le support casque ou lunette.
2. Assurez vous qu’une fois attaché la caméra regarde
bien droit devant et non pas vers le sol ou le ciel.
Montage utilisant le letage
En dessous de l’XTC-100 il y a un pas de vis standard
qui permet de monter la caméra sur la bande pour ca-
sque ou sur le support de guidon.
Pour xer la caméra, inserrez la vis sur support dans le
pas de vis de la caméra et tournez la caméra dans le
sens horaire pour serrer fermement la vis.
Lors de l’installation de la caméra sur le guidon ou sur la
lanière d’un casque suivez les points suivants :
1. Prennez en compte ce que vous souhaitez lmé et
faite l’installation en conséquence.
2. Une fois montée, assurez vous que la caméra soit
orienté vers l’avant et non pas vers le ciel ou le sol.
Systèmes Compatibles
L’XTC-100 peut être utilisé avec les sytèmes d’exploitation Windows et MAC.
Les enregistrements de la caméra sont au format AVI.
Télécharger les Vidéos
Il n’est pas nécessaire d’installer un logiciel avec l’XTC-100. C’est un périphérique plug and play.
Assurez-vous que les batteries sont neuves et pleinement chargées avant de télécharger une vidéo.
Connectez la caméra à l’aide du câble USB fournit.
La caméra est automatiquement reconnue comme un disque externe (clef USB) mais les vidéos peuvent uniquement est
téléchargées. Il n’est pas possible d’enregistrer des données sur la carte SD.
Toutes vos vidéos seront sauvegardées dans le répertoire DCIM.
Reformater la carte Micro SD
La carte Micro SD peut être reformaté pendant qu’elle est dans la caméra. Ceci vous permez de supprimer toutes les
vidéos en une fois. Suivez ces étapes:
1. Placez l’interrupteur en position d’enregistrement.
2. Quand le voyant batterie passe au vert, maintenez appuyé le bouton de reformatage de carte Micro SD.
3. Restez appuyé sur le bouton de reformatage de carte Micro SD card jusqu’à ce que le voyant d’enregistrement s’étei-
gne et que celui de la carte SD clignote vert.
4. Placez l’interrupteur sur la position OFF.
Note: La caméra ne peut pas reformater la carte Micro SD si le voyant batterie faible est allumé. Assurez-vous que
des batteries sufsament chargé soit en place avant un reformatage.
Conseilles et asstuces
Probleme Solution
Batteries
La caméra ne s’allume pas Vériez que les batteries soient installés en respectant la polarité.
Vériez si les batteries sont neuves ou totalement chargées.
Enregistrement
La caméra n’enregistre pas Vériez que l’interrupteur est possé au maximum vers l’avant. Si la LED d’enregi-
strement ne s’allume pas, éteignez la caméra et réinstallé les batteries.
Vériez la mémoire disponible.
Carte Micro SD
Ne lit pas la carte Micro SD Vériez que la carte Micro SD card est correctement en place.
Branchez la caméra sur l’ordianteur et vériez qu’il reste de la place.
Essayez une procédure de formatage.
Lecture Video
Vidéo lente ou de mauvaise qualité Vériez que la caméra est connecté à port USB 2.0.
Retirez les autres périphériques USB non utilisés.
Transferez la vidéo sur l’ordinateur avant de la regarder.
Téléchargement Video
Transfert de données lent Vériez que la caméra est connecté à port USB 2.0. S’il est afché en tant que
version 1.1, débranchez et rebranchez la caméra.
Retirez les autres périphériques USB non utilisés.
L’ordinateur ne reconnait pas la
caméra
Vériez que l’nterrupteur est en position enregistrement pendant que la caméra est
connecté à l’ordinateur.
Vériez que la carte Micro SD card est correctement en place.
La carte Micro SD est corrompue. card may becorrupted. Essayez une procédure
de formatage.
Son
Vent excessif Placez un bout de sctoch par dessus le trou du micro
Limite de garantie
Midland réparera ou remplacera, à son gré, sans frais, tout Midland XTC-100 defectueux en raison d’un défaut de
matériel ou de fabrication dans les DEUX ANS suivant l’achat initial du consommateur.
Si un produit est défectueux, veuillez le renvoyer au service clientèle agréé ou au fabricant lui-même. Pour bénécier
de cette garantie, il faut renvoyer au centre d’assistance agréé:
› Le produit concerné (ou l’accessoire)
› La preuve d’achat originale, indiquant clairement le nom et l’adresse du vendeur ainsi que la date et le lieu de l’achat.
Cette garantie ne s’applique pas aux accidents de toute nature, l’exposition à la pression, aux températures extrê-
mes (à l’extérieur de -10 ° C à 45 ° C), et aux dégâts des eaux, de submersion bien que ce produit resiste projection
d’eau,fuite des piles ou abus.
Cette garantie ne couvre pas le coût de la main-d’œuvre pour l’enlèvement ou à l’installation du produit dans un véhi-
cule ou d’un autre montage.
Par la présente, CTE International déclare que l’XTC-100 est conforme aux exigences essentielles et autres disposi-
tions pertinentes de la directive 2004/108/CE sur la compatibilité électromagnétique. Une copie de la déclaration de
conformité peut être consultée à l’adresse: www.midlandradio.eu
Lentille de 140°
Microphone
Système double glissière
Interrupteur d’enregistrement
avant:
on/record
Voyant d’enregistrement
clignote rouge pendant
l’enregistrement
Voyant batterie
Interrupteur d’enregistrement
arrière:
Off/Stop recording
Voyant de la Carte SD
Connecteur Mini USB
Bouton de reformatage
de carte Micro SD
Fente pour Mini SD Card
Système double glissière
Languette de
déverrouillage
Support casque Lunette
Pas de vis de la
caméra
Vis de xation
Bande pour casque Support de guidon


Praat mee over dit product
Laat hier weten wat jij vindt van de Midland XTC-100 Xtreme Actiecamera. Als je een vraag hebt, lees dan eerst zorgvuldig de handleiding door. Een handleiding aanvragen kan via ons contactformulier.