
Sc
使用说明书
En
User’s Manual
Before using this product, please read these instructions carefully. You will also need to
consult the camera manual.
• This lens is intended exclusively for use with mirrorless cameras featuring a Nikon Z
mount.
For Your Safety
To prevent damage to property or injury to yourself or to others, read “For Your Safety”
in its entirety before using this product.
Keep these safety instructions where all those who use this product will read them.
A WARNING: Failure to observe the precautions marked with this icon could
result in death or severe injury.
A CAUTION: Failure to observe the precautions marked with this icon could
result in injury or property damage.
A WARNING
• Donotdisassembleormodifythisproduct.
Donottouchinternalpartsthatbecomeexposedastheresultofafallor
otheraccident.
Failure to observe these precautions could result in electric shock or other injury.
• Shouldyounoticeanyabnormalitiessuchastheproductproducingsmoke,heat,or
unusualodors,immediatelydisconnectthecamerapowersource.
Continued operation could result in fire, burns or other injury.
• Keepdry.
Donothandlewithwethands.
Failure to observe these precautions could result in fire or electric shock.
• Donotusethisproductinthepresenceofammabledustorgassuchas
propane,gasolineoraerosols.
Failure to observe this precaution could result in explosion or fire.
• Donotdirectlyviewthesunorotherbrightlightsourcethroughthelens.
Failure to observe this precaution could result in visual impairment.
• Keepthisproductoutofreachofchildren.
Failure to observe this precaution could result in injury or product malfunction. In
addition, note that small parts constitute a choking hazard. Should a child swallow any
part of this product, seek immediate medical attention.
• Donothandlewithbarehandsinlocationsexposedtoextremelyhighor
lowtemperatures.
Failure to observe this precaution could result in burns or frostbite.
A CAUTION
• Donotleavethelenspointedatthesunorotherstronglightsources.
Light focused by the lens could cause fire or damage to product’s internal parts.
When shooting backlit subjects, keep the sun well out of the frame.
Sunlight focused into the camera when the sun is close to the frame could cause
fire.
• Do not leave the product where it will be exposed to extremely high
temperatures,foran extendedperiodsuchasinanenclosedautomobile
orindirectsunlight.
Failure to observe this precaution could result in fire or product malfunction.
• Do not transport cameras or lenses with tripods or similar accessories
attached.
Failure to observe this precaution could result in injury or product malfunction.
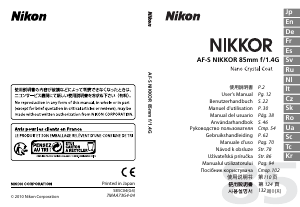
Using the Lens
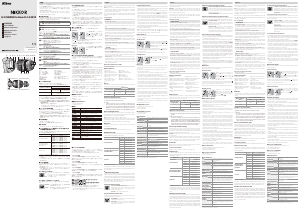
Parts of the Lens: Names and Functions
Refer to the diagram on the left edge of this sheet.
q
Lens hood mounting
mark
Use when attaching the lens hood.
See
B
w
Control ring
Autofocus mode selected: In autofocus mode, ro-
tate the ring to adjust a setting such as Focus
(M/A) or Aperture assigned using the camera.
For more information, see the description of
Custom controls/Custom control assignment/Cus-
tom controls (shooting) in the camera manual.
—
Manual focus mode selected: Rotate the ring to
focus.
—
e
Lens mounting mark
Use when mounting the lens on the camera.
See
A
r
Rubber lens-mount
gasket
— —
t
CPU contacts
Used to transfer data to and from the camera. —
y
Focus-mode switch
Choose A for autofocus, M for manual focus.
Note that regardless of the setting chosen, fo-
cus must be adjusted manually when manual
focus mode is selected using camera controls.
—
u
Lens hood
Lens hoods block stray light that would other-
wise cause flare or ghosting. They also serve to
protect the lens.
See
B
i
Lens hood lock mark
Use when attaching the lens hood.
o
Lens hood alignment
mark
!0
Lens cap (front cap)
— —
!1
Lens cap (rear cap)
— —
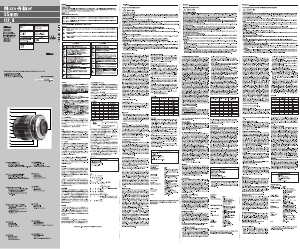
A
Attachment and Removal
Attaching the Lens
z
Turn the camera o, remove the body cap, and detach the rear lens
cap.
x
Position the lens on the camera body, keeping the mounting mark
on the lens aligned with the mounting mark on the camera body,
and then rotate the lens counterclockwise until it clicks into place.
Removing the Lens
z
Turn the camera o.
x
Press and hold the lens release button while turning the lens clock-
wise.
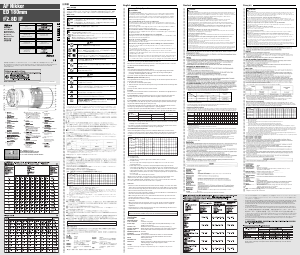
B
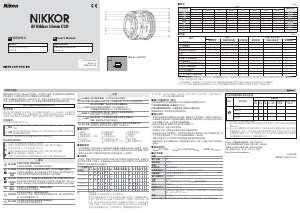
Attaching and Removing the Lens Hood
Align the lens hood mounting mark with the lens hood alignment mark (
q
)
and then rotate the hood (
w
) until the mounting mark is aligned with the lens
hood lock mark (
e
).
To remove the hood, reverse the above steps.
Lens hood alignment mark
Lens hood mounting mark Lens hood lock mark
When attaching or removing the hood, hold it near the lens hood alignment mark
(
●) and avoid gripping the front of the hood too tightly. The hood can be reversed
and mounted on the lens when not in use.
When Shooting Using Cameras with Built-in Flash
Shadows will be visible in images when using the camera’s built-in flash because the
light emitted from the flash may be obstructed by the lens.
When the Lens Is Attached
The focus position may change if you turn the camera off and then on again after fo-
cusing. If you have focused on a pre-selected location while waiting for your subject to
appear, we recommend that you do not turn the camera off until the picture is taken.
Precautions for Use
• Do not pick up or hold the lens or camera using only the lens hood.
• Keep the CPU contacts clean.
• Should the rubber lens-mount gasket be damaged, cease use immediately and take
the lens to a Nikon-authorized service center for repair.
• Replace the lens caps when the lens is not in use.
• To protect the interior of the lens, store it out of direct sunlight.
• Do not leave the lens in humid locations or in locations in which it may be exposed to
moisture. Rusting of the internal mechanism can cause irreparable damage.
• Do not leave the lens next to open flames or in other extremely hot locations. Ex-
treme heat could damage or warp exterior parts made from reinforced plastic.
• Rapid changes in temperature may cause damaging condensation inside and outside
the lens. Before taking the lens from a warm to a cold environment or vice versa, place
it in a bag or plastic case to slow the change in temperature.
• We recommend that you place the lens in its case to protect it from scratches during
transport.
Lens Care
• Removing dust is normally sufficient to clean the glass surfaces of the lens.
• Smudges, fingerprints, and other oily stains can be removed from the lens surface
using a soft, clean cotton cloth or lens cleaning tissue lightly dampened with a small
amount of ethanol or lens cleaner. Wipe gently from the center outwards in a circular
motion, taking care not to leave smears or touch the lens with your fingers.
• Never use organic solvents such as paint thinner or benzene to clean the lens.
• Neutral Color (NC) filters (available separately) and the like can be used to protect the
front lens element.
• If the lens will not be used for an extended period, store it in a cool, dry location to
prevent mold and rust. Do not store in direct sunlight or with naphtha or camphor
moth balls.
Accessories
Supplied Accessories
• LC-77B Lens Cap (front cap)
• LF-N1 Lens Cap (rear cap)
• HB-95 Lens Hood
• CL-C1 Lens Case
D
Using the Lens Case
• Thecaseisintendedtoprotectthelensfromscratches,notfromfallsorotherphysicalshocks.
• Thecaseisnotwaterresistant.
• Thematerialusedinthecasemayfade,bleed,stretch,shrink,orchangecolorwhenrubbedorwet.
• Removedustwithasoftbrush.
• Waterandstainscanberemovedfromthesurfacewithasoft,drycloth.Donotusealcohol,benzene,thinner,
orothervolatilechemicals.
• Donotstoreinlocationsexposedtodirectsunlightorhightemperaturesorhumidity.
• Donotusethecasetocleanthemonitororlenselements.
• Becarefulthatthelensdoesnotfallfromthecaseduringtransport.
Material:Polyester
Compatible Accessories
77 mm screw-on filters
D
Filters
• Useonlyonelteratatime.
• Removethelenshoodbeforeattachingltersorrotatingcircularpolarizinglters.
Specications
Mount Nikon Z mount
Focal length 20 mm
Maximum
aperture
f/1.8
Lens construction 14 elements in 11 groups (including3EDelements,3asphericalelements,and
elementswithNanoCrystalCoat)
Angle of view • FX format: 94°
• DX format: 70°
Focusing system Internal focusing system
Minimum focus
distance
0.2 m (0.66ft) from focal plane
Maximum repro-
duction ratio
0.19×
Diaphragm blades 9 (roundeddiaphragmopening)
Aperture range f/1.8 – 16
Filter-attachment
size
77 mm (P=0.75mm)
Dimensions Approx. 84.5 mm (3.4in.) maximum diameter × 108.5 mm (4.3in.)
(distancefromcameralensmountange)
Weight Approx. 505 g (1lb1.9oz)
Nikon reserves the right to change the appearance, specications, and performance of this
product at any time and without prior notice.
Fr
Manuel d’utilisation
Avant d’utiliser ce produit, veuillez lire ces instructions attentivement. Vous devrez
également consulter le manuel de l’appareil photo.
• Cet objectif est destiné exclusivement aux appareils photo hybrides dotés d’une
monture Nikon Z.
Pour votre sécurité
Afin d’éviter de provoquer des dommages matériels ou de vous blesser ou de blesser un
tiers, lisez intégralement «Pour votre sécurité» avant d’utiliser ce produit.
Conservez ces consignes de sécurité dans un endroit facilement accessible à tous
ceux qui pourraient se servir de ce produit.
A AVERTISSEMENT: le non-respect des consignes indiquées par cette icône peut
vous exposer à un danger de mort ou à de graves blessures.
A ATTENTION: le non-respect des consignes indiquées par cette icône peut vous
exposer à des blessures ou provoquer des dommages matériels.
A AVERTISSEMENT
• Nedémontezpasounemodiezpasceproduit.
Netouchezpaslescomposantsinternesquisontexposéssuiteàunechute
ouàunautreaccident.
Le non-respect de ces consignes peut provoquer un choc électrique ou d’autres
blessures.
• Sivousobservezdesanomaliesprovenantduproduitcommedelafumée,
delachaleuroudesodeursinhabituelles,débranchezimmédiatementla
sourced’alimentationdel’appareilphoto.
Continuer d’utiliser le matériel risque de provoquer un incendie, des brûlures ou
d’autres blessures.
• Gardezvotrematérielausec.
Nelemanipulezpasaveclesmainsmouillées.
Le non-respect de ces consignes de sécurité peut provoquer un incendie ou un
choc électrique.
• N’utilisezpasceproduitenprésencedepoussièresoudegazinammables
commedupropane,del’essenceoudesaérosols.
Le non-respect de cette consigne peut provoquer une explosion ou un incendie.
• N’observez pas directement le soleil ou toute autre source lumineuse
puissanteàtraversl’objectif.
Le non-respect de cette consigne peut provoquer des troubles visuels.
• Conservezceproduithorsdeportéedesenfants.
Le non-respect de cette consigne peut provoquer des blessures ou le
dysfonctionnement du produit. En outre, notez que les petites pièces présentent un
risque d’étouffement. Si jamais un enfant avalait une pièce de ce produit, consultez
immédiatement un médecin.
• Ne manipulez pas le matériel à mains nues dans des lieux exposés à des
températuresextrêmementbassesouélevées.
Le non-respect de cette consigne peut provoquer des brûlures ou des engelures.
A ATTENTION
• Nepointezpasl’objectifendirectiondusoleiloud’autressourcestrèslumineuses.
La lumière focalisée par l’objectif peut provoquer un incendie ou endommager
les composants internes du produit. Lorsque vous photographiez un sujet à
contre-jour, veillez à garder toujours le soleil à l’extérieur du cadre.
Lorsque le soleil se trouve près du cadre, sa lumière risque de se concentrer dans
l’appareil photo et de provoquer un incendie.
• Ne laissez pas le produit exposé à des températures excessivement chaudes
pendantunepériodeprolongée,commedansunevoitureferméeouenpleinsoleil.
Le non-respect de cette consigne peut provoquer un incendie ou le dysfonctionnement
du produit.
• Netransportezpaslesappareilsphotooulesobjectifs si des trépiedsou
accessoiressimilairessontxés.
Le non-respect de cette consigne peut provoquer des blessures ou le dysfonctionnement
du produit.
Utilisation de l’objectif
Descriptif de l’objectif : noms et fonctions
Reportez-vous aux figures situées à gauche.
q
Repère de montage
du parasoleil
Référez-vous à ce repère lorsque vous fixez le
parasoleil.
Voir
B
w
Bague de contrôle
Mode autofocus sélectionné : en mode autofocus,
tournez cette bague pour modifier le réglage
d’une fonction sélectionnée avec l’appareil
photo, telle que Mise au point (M/A) ou Ouverture.
Pour en savoir plus, reportez-vous à la description
des fonctions Commandes personnalisées/
Dénition réglages perso./Commandes perso (prise
de vue) dans le manuel de l’appareil photo.
—
Mode de mise au point manuelle sélectionné :
tournez cette bague pour effectuer la mise au
point.
—
e
Repère de montage
de l’objectif
Référez-vous à ce repère lorsque vous fixez
l’objectif sur l’appareil photo.
Voir
A
r
Joint en caoutchouc
de la monture
d’objectif
— —
t
Contacts du
microprocesseur
Utilisés pour transférer les données depuis ou
vers l’appareil photo.
—
y
Commutateur du
mode de mise au
point
Choisissez A pour l’autofocus, M pour la mise au
point manuelle. Notez qu’indépendamment
du réglage choisi, vous devez modifier la mise
au point manuellement lorsque le mode de
mise au point manuelle est sélectionné à l’aide
des commandes de l’appareil photo.
—
u
Parasoleil
Le parasoleil bloque la lumière diffuse pouvant
provoquer de la lumière parasite ou une image
fantôme. Il permet aussi de protéger l’objectif.
Voir
B
i
Repère de verrouillage
du parasoleil
Référez-vous à ce repère lorsque vous fixez le
parasoleil.
o
Repère d’alignement
du parasoleil
!0
Bouchon d’objectif
(bouchon avant)
— —
!1
Bouchon d’objectif
(bouchon arrière)
— —
A
Fixation et retrait
Fixation de l’objectif
z
Mettez l’appareil photo hors tension, retirez le bouchon du boîtier et
détachez le bouchon arrière d’objectif.
x
Placez l’objectif sur le boîtier de l’appareil photo, en maintenant le
repère de montage de l’objectif aligné sur le repère de montage du
boîtier de l’appareil photo, puis faites pivoter l’objectif dans le sens
inverse des aiguilles d’une montre jusqu’au déclic.
Retrait de l’objectif
z
Mettez l’appareil photo hors tension.
x
Maintenez appuyée la commande de déverrouillage de l’objectif tout
en faisant pivoter ce dernier dans le sens des aiguilles d’une montre.
B
Fixation et retrait du parasoleil
Alignez le repère de montage du parasoleil sur le repère d’alignement du parasoleil
(
q
), puis tournez ce dernier (
w
) jusqu’à ce que le repère de montage s’aligne sur le
repère de verrouillage du parasoleil (
e
).
Pour retirer le parasoleil, eectuez les étapes ci-dessus dans le sens inverse.
Repère d’alignement du parasoleil
Repère de montage du parasoleil
Repère de verrouillage
du parasoleil
Lorsque vous fixez ou retirez le parasoleil, tenez-le à proximité du repère d’alignement
(
●
) et évitez de le saisir trop fermement à l’avant. Le parasoleil peut être retourné et
monté sur l’objectif lorsqu’il n’est pas utilisé.
Lors de prises de vue avec un appareil photo équipé d’un ash intégré
Lors de l’utilisation d’un flash intégré à l’appareil photo, l’objectif peut faire obstacle à la
lumière émise par le flash et générer une zone d’ombre visible sur les photos.
Lorsque l’objectif est xé
Le réglage de mise au point risque de changer si vous mettez l’appareil photo hors
tension puis à nouveau sous tension après avoir fait le point. Si vous avez fait le point
sur un emplacement sélectionné au préalable en attendant que votre sujet apparaisse,
nous vous recommandons de ne pas mettre l’appareil photo hors tension tant que
vous n’avez pas pris la photo.
Précautions d’utilisation
• Ne prenez pas ou ne tenez pas l’objectif ou l’appareil photo en saisissant uniquement
le parasoleil.
• Maintenez les contacts du microprocesseur propres.
• Si le joint en caoutchouc de la monture d’objectif est endommagé, cessez
immédiatement l’utilisation et confiez l’objectif à un centre Nikon agréé pour le faire
réparer.
• Remettez les bouchons d’objectif en place lorsque vous n’utilisez pas l’objectif.
• Pour protéger l’intérieur de l’objectif, rangez-le à l’abri du soleil.
• Ne laissez pas l’objectif dans des endroits humides ou dans des lieux où il risque d’être
exposé à l’humidité. La formation de rouille sur le mécanisme interne peut causer des
dégâts irréparables.
• Ne laissez pas l’objectif à proximité d’un feu ou dans d’autres endroits extrêmement
chauds. La chaleur extrême pourrait endommager ou déformer les pièces extérieures
composées de plastique renforcé.
• Les changements brusques de température peuvent être à l’origine d’une condensation
préjudiciable à l’intérieur et à l’extérieur de l’objectif. Avant de faire passer l’objectif d’un
environnement chaud à froid ou vice versa, rangez-le dans un sac ou dans une boîte en
plastique pour ralentir le changement de température.
• Nous vous recommandons de ranger l’objectif dans son étui afin de le protéger des
rayures lors du transport.
Entretien de l’objectif
• Normalement, enlever la poussière suffit pour nettoyer les surfaces en verre de
l’objectif.
• Les taches, les traces de doigts et autres traces de gras peuvent être éliminées de
la surface de l’objectif à l’aide d’un tissu propre et doux en coton ou d’un chiffon
optique légèrement imbibé d’une petite quantité d’éthanol ou de nettoyant pour
objectif. Essuyez délicatement avec un mouvement circulaire à partir du centre vers
l’extérieur, en prenant soin de ne pas laisser de traces, ni de toucher le verre avec les
doigts.
• N’utilisez jamais de solvants organiques comme un diluant à peinture ou du benzène
pour nettoyer l’objectif.
• Les filtres neutres (NC, disponibles séparément) et autres accessoires similaires
permettent de protéger la lentille avant.
• Si vous n’avez pas l’intention d’utiliser l’objectif pendant une période prolongée,
rangez-le dans un endroit frais et sec pour éviter la moisissure et la rouille. Ne le
rangez pas à la lumière directe du soleil ou avec des boules antimites de naphtaline
ou de camphre.
Accessoires
Accessoires fournis
• Bouchon d’objectif LC-77B (bouchon avant)
• Bouchon d’objectif LF-N1 (bouchon arrière)
• Pare-soleil HB-95
• Pochette pour objectif CL-C1
D
Utilisation de la pochette pour objectif
• Lapochetteestdestinéeàprotégerl’objectifdesrayuresetnondeschutesouautreschocsphysiques.
• Lapochetten’estpasrésistanteàl’eau.
• Lamatièreutiliséedanscettepochettepeutsedécolorer,déteindre,s’étirer,rétrécirouchangerdecouleuren
casdefrottementoud’humidité.
• Retirezlapoussièreavecunpinceaudoux.
• L’eauetlestachespeuventêtreretiréesdelasurfaceavecunchiondouxetsec.N’utilisezpasd’alcool,de
benzène,dediluantoud’autressubstanceschimiquesvolatiles.
• Nerangezpaslapochettedansdeslieuxexposésàlalumièredirectedusoleil,àdestempératuresélevées
ouàl’humidité.
• N’utilisezpaslapochettepournettoyerlemoniteurouleslentilles.
• Veillezàcequel’objectifnetombepasdelapochettelorsquevousletransportez.
Matière:polyester
Accessoires compatibles
Filtres à visser 77 mm
D
Filtres
• N’utilisezqu’unseulltreàlafois.
• Retirezleparasoleilavantdexerunltreoudefairepivoterunltrepolarisantcirculaire.
Caractéristiques
Monture Monture Nikon Z
Focale 20 mm
Ouverture maximale f/1.8
Construction optique 14 lentilles en 11 groupes (dont3lentillesenverreED,3lentilles
asphériquesetdeslentillesbénéciantd’untraitementnanocristal)
Angle de champ • Format FX : 94°
• Format DX : 70°
Système de mise au
point
Système de mise au point interne
Distance minimale de
mise au point
0,2 m depuis le plan focal
Rapport de
reproduction maximal
0,19×
Lamelles de
diaphragme
9 (diaphragmecirculaire)
Plage des ouvertures f/1.8 – 16
Diamètre de xation
pour ltre
77 mm (P=0,75mm)
Dimensions Environ 84,5 mm de diamètre maximum × 108,5 mm
(distanceàpartirdupland’appuidelamontured’objectifdel’appareilphoto)
Poids Environ 505 g
Nikon se réserve le droit de modier à tout moment l’apparence, les caractéristiques et les
performances de ce produit sans avis préalable.
使用产品前请仔细阅读本使用说明书,并请妥善保管。
在使用本产品前,请仔细阅读本使用说明书。您还需要查阅照相
机说明书。
•
本镜头专供带有尼康
Z
卡口的微型单电相机使用。
安全须知
为预防对您或他人造成人身伤害或财产损失,请在使用前仔细阅
读“安全须知”,并以正确的方法使用。
请在阅读之后妥善保管本说明书,以便随时查阅。
A
警告
表示“有可能造成人员死亡或负重伤的内容”。
A
注意
表示“有可能造成人员负轻伤或财产损失的内容”。
本节使用以下图示和符号对必须遵守的内容作以分类。
F
表示不允许进行的行为
。
C
表示必须进行的行为
。
A
警告
E
禁止
拆解
切勿自行拆解、修理或改装。当产品由于跌落等原因
而破损使得内部外露时,切勿触碰外露部分。
否则将导致触电或受伤。
C
执行
当发现产品变热、冒烟或发出焦味等异常时,请立刻
切断照相机电源。
若 放任不管, 将 导致 起 火 或 烫伤。
F
禁止
切勿使产品被水淋湿。切勿用湿手触碰产品。
否则将导致触电或起火。
F
禁止
切勿在有可能起火、爆炸的场所使用。
若在有丙烷气、汽油、可燃性喷雾剂等易燃性气体、
粉尘的场所使用产品,将导致爆炸或火灾。
F
禁止
切勿透过镜头直接观看太阳或其他强光。
否则将导致失明或视觉损伤。
F
禁止
切勿在婴幼儿伸手可及之处进行保管。
否则将导致故障或受伤。若误吞细小部件,将会对身
体造成伤害。万一意外吞入口中,请立即接受医生诊疗。
G
禁止
在高温环境或低温环境中,切勿直接接触产品。
否则将可能导致烫伤、低温烫伤或冻伤。
A
注意
F
禁止
切勿将镜头对着太阳或强光。
否则将有可能聚光,使内部零件破损或导致起火。进
行 背光 拍 摄时, 请 使 太阳充分 偏离 视角。
若仅使太阳稍微偏离视角,也可能导致起火。
F
禁止
切勿放置于夏天封闭的车内或直射阳光下等高温环境中。
否则将导致故障或起火。
F
禁止
切勿移动安装有照相机或镜头的三脚架。
否则将导致故障或受伤。
使用镜头
镜头部件:名称和功能
请参阅本页面左边的图表。
q
镜头遮光罩安装
标记
安装镜头遮光罩时使用。
参阅
B
w
控制环
选择了自动对焦模式时 :在自动
对焦模式中,旋转此环可调整使
用照相机所分配的设定(如,对
焦
(M/A)
或光圈)。有关详细信
息,请参阅照相机说明书中关于
自定义控制
/
自定义控制功能
/
自定义控制
(
拍摄
)
的说明。
—
选择了手动对焦模式时 :旋转此
环可进行对焦。
—
e
镜头安装标记 将镜头安装至照相机时使用。
参阅
A
r
镜头卡口橡胶垫
圈
— —
t
CPU
接点
用于将数据传送至照相机或从照
相机中传送数据。
—
y
对焦模式切换器
选择
A
可进行自动对焦,选择
M
则可进行手动对焦。请注意,无
论选择了何种设定,当使用照相
机控制选择了手动对焦模式时,
对焦都必须手动进行调整。
—
u
镜头遮光罩
镜头遮光罩可阻挡可能导致杂光
或鬼影的散射光线。它们还可用
于保护镜头。
参阅
B
i
镜头遮光罩锁定
标记
安装镜头遮光罩时使用。
o
镜头遮光罩对齐
标记
!0
镜头盖(前盖) — —
!1
镜头盖(后盖) — —
A
安装与取下
安装镜头
z
关闭照相机,取下机身盖,然后取下镜头后盖。
x
将镜头上的安装标记与照相机机身上的安装标记对齐,同
时将镜头置于照相机机身上,然后逆时针旋转镜头直至其
卡入正确位置发出咔嗒声。
取下镜头
z
关闭照相机。
x
按住镜头释放按钮并同时顺时针旋转镜头。
B
安装和取下镜头遮光罩
将镜头遮光罩安装标记与镜头遮光罩对齐标记(
q
)对齐,
然后旋转遮光罩(
w
)直至安装标记与镜头遮光罩锁定标记
(
e
)对齐。
若要取下遮光罩,请以相反顺序执行以上步骤。
镜头遮光罩对齐标记
镜头遮光罩安装标记
镜头遮光罩锁定标记
安装或取下遮光罩时,请在镜头遮光罩对齐标记(
●
)附近将
其握住,并避免将遮光罩的前部握得太紧。不使用时,可将
遮光罩反转并固定在镜头上。
使用带内置闪光灯的照相机拍摄时
使用照相机的内置闪光灯时,由于闪光灯发出的光可能会受到镜
头的遮挡,因此图像中将出现阴影。
安装镜头后
若您在对焦后关闭照相机并重新开启,对焦位置可能会发生改
变。若您在等待拍摄对象出现期间已对焦于预选位置,我们建议
您在照片拍摄前不要关闭照相机。
使用注意事项
•
拿起或持握镜头或照相机时,切勿仅持拿镜头遮光罩。
•
保持
CPU
接点清洁。
•
若镜头卡口橡胶垫圈损坏,请立即停止使用并将镜头送至尼康
售后服务中心或尼康特约维修店进行维修。
•
不使用镜头时,请装回镜头盖。
•
为保护镜头内部,请将其存放在没有阳光照射的地方。
•
切勿将镜头置于潮湿的地方或可能沾染湿气的场所。内部构造
生锈将导致无法挽回的损坏。
•
切勿将镜头靠近明火或置于其他过热的场所。过热可能会使强
化塑料表面部件受损或变形。
•
温度的突变可能导致镜头内外部结露以致损坏。将镜头从温暖
的环境带入寒冷的环境或从寒冷的环境带入温暖的环境之前,
请先将其置于包内或塑料盒中以缓和温度的变化。
•
运输产品时,请在包装箱内装入足够多的缓冲材料,以减少
(避
免)
由于冲击导致产品损坏。
镜头保养
•
一般情况下,清洁镜头的玻璃表面时去除灰尘即可。
•
您可使用一块干净的软棉布或镜头清洁纸稍微沾上少许乙醇或镜
头清洁剂来清除镜头表面的污点、指纹和其他油渍。请以圆周运
动方式从里向外轻轻擦拭,注意不要留下污渍,也不要用手指触
碰镜片。
•
切勿使用涂料稀释剂或苯等有机溶剂清洁镜头。
•
中性色彩(
NC
)滤镜(另购)等可用于保护前部镜片。
•
若您将在较长时间内不使用镜头,请将其存放在阴凉干燥的地
方以防止发霉和生锈。切不可存放在直射阳光下,也不可与石
脑油或樟脑丸一起存放。
配件
随附配件
•
镜头盖(前盖)
LC-
77
B
•
镜头盖(后盖)
LF-N
1
•
镜头遮光罩
HB-
95
•
镜头包布
CL-C
1
D
使用镜头包布
•
镜头包布旨在保护镜头免受刮伤,而不是保护其免受因跌落
或其他强烈碰撞所造成的影响。
•
镜头包布不防水。
•
镜头包布所采用的材质在被摩擦或弄湿时可能会褪色、掉色、
拉长、皱缩或变色。
•
请使用软刷去除灰尘。
•
表面附着的水和污渍可使用一块干的软布进行清除。切勿使
用酒精、苯、稀释剂或其他挥发性化学物质。
•
切勿将其存放在阳光直射、高温或高湿度的环境中。
•
切勿使用镜头包布清洁镜片和照相机显示屏。
•
在运输过程中,请注意不要让镜头从镜头包布中掉出。
材质 :聚酯纤维
兼容的配件
77
mm
旋入式滤镜
D
滤镜
•
一次仅可使用一个滤镜。
•
安装滤镜或旋转圆形偏振滤镜前,请先取下镜头遮光罩。
技术规格
卡口 尼康
Z
卡口
焦距
20
mm
最大光圈
f/
1
.
8
镜头结构
11
组
14
片(包括
3
枚低色散
ED
镜片、
3
枚非球
面镜片以及带纳米结晶涂层的镜片)
视角
•
FX
格式 :
94
°
•
DX
格式 :
70
°
对焦系统 内对焦系统
最近对焦距离 约
0
.
2
m
(至焦平面)
最大复制比率 约
0
.
19
倍
光圈叶片
9
片(圆形光圈孔)
光圈范围
f/
1
.
8
–
16
滤镜附件尺寸
77
mm
(
P=
0
.
75
mm
)
尺寸 约
84
.
5
mm
(最大直径)×
108
.
5
mm
(从照相
机镜头卡口边缘开始的距离)
重量 约
505
g
尼康公司保留可随时更改本产品的外观、技术规格和性能的权利。
En
User’s Manual
Fr
Manuel d’utilisation
Sc
使用说明书
Pt
Manual do Utilizador
Tc
使用說明書
Id
Manual bagi Pengguna
Ar
NIKKOR Z 20mm f/1.8 S
Printed in China
CT1B02(7K)
7MMA317K-02


Praat mee over dit product
Laat hier weten wat jij vindt van de Nikon Nikkor Z 20mm f/1.8 S Objectief. Als je een vraag hebt, lees dan eerst zorgvuldig de handleiding door. Een handleiding aanvragen kan via ons contactformulier.