
METAL FRAMED LCD ALARM
CLOCK
MODEL: TA200
3 4 5 6
7
8
9
2
1
FLIP TO
OPEN
TA
BLE
STAND
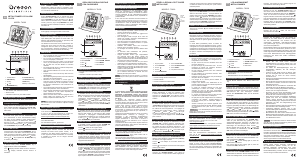
1. Foldable Stand
2. SNOOZE Key
3. “ ” Key
4. “ ” Key
5. ALARM SET Key
6. CLOCK SET Key
7. ALARM ON/OFF Key
8. RESET Key
9. Battery Compartment
FEATURE
• Time function with 12/24 hours format.
• Alarm function.
• Calendar function from year 2000 to 2099.
FEATURENORMAL TIME READING
Hour, Minute, Second, Year, Month, Date and Day.
TO START THE CLOCK
Gently remove the insulating slip at the back of the
clock andstart time/date setting.Press “CLOCK SET
”
key to show Year.Press “ALARM SET” key to show
Alarm Time.
TIME/CALENDAR SETTINGS
In Normal mode, press and hold “CLOCK SET” key
for a fewseconds to enter Time/Calendar setting,
the digits of Hour willstart to blink simultaneously.
The setting sequence is as follows:Hour Minute
Second Year Month Date,and the Day
will match automatically. Press “ ” or “ ” keyto update
and “CLOCK SET” key to confirm your setting.
ALARM TIME SETTING
In Normal mode, press and hold “ALARM SET” key for
a fewseconds to enter Alarm Time Setting mode, the
digits of AlarmHour will start to blinks simultaneously.
The setting sequenceis as follows: Hour
Minute.
Press “ ” or “ ” key toupdate and “ALARM SET” key
to confirm your setting.
ALARM AND SNOOZE
In Normal mode, press “ALARM ON/OFF” key to
toggle theAlarm and Snooze ON/OFF.
Icon “ ” display indicates alarm function is activated.
Icon “ ” display indicates Snooze function is
activated.
ALARM SOUND OFF
Press “ALARM ON/OFF” key to activate the
alarmfunction. While the alarm is activated, press
anykeys to stop the alarm sound immediately or leaveit
on 1 minute for automatic off.
SNOOZE FUNCTION
Press “ALARM ON/OFF” key to activate the alarm
andsnooze function. While the alarm is activated,
press “
SNOOZE”key to stop the alarm, icon “ ” will
start to blink and snoozein every 5 minutes. To stop
snooze, press any keys except“SNOOZE” key while
the alarm sound is activated or leave iton 1 minute for
automatic off.
12/24 HOURS FORMAT
Press “ ” key to change the 12/24 hours format.
CHANGE THE BATTERY
Replace the battery if the display is too dim to see.
Open Batterydoor and replace the used button cell
batteries (LR1130/LR1131/V10GA or equivalent) with
two new batteries in correct polarity.
The Reset hole at the back of the unit allows the user
toreset the clock. Press the hole with a needle or
sharppencil when the device is not working property
due toelectrostatic discharge disturbance or after
batterychanged, the unit will reset automatically.
PRECAUTIONS
• Do not subject the unit to excessive force, shock,
dust, temperature or humidity.
• Do not cover the ventilation holes with any items
such as newspapers, curtains etc.
• Do not immerse the unit in water. If you spill liquid
over it, dry it immediately with a soft, lint-free cloth.
• Do not clean the unit with abrasive or corrosive
materials.
• Do not tamper with the unit ’s internal components.
This invalidates the warranty.
• Only use fresh batteries. Do not mix new and old
batteries.
• Images shown in this manual may differ from the
actual display.
• When disposing of this product, ensure it is collected
separately for special treatment.
• Placement of this product on certain types of
wood may result in damage to its finish for which
Oregon Scientific will not be responsible. Consult
the furniture manufacturer’s care instructions for
information.
• The contents of this manual may not be reproduced
without the permission of the manufacturer.
• Do not dispose old batteries as unsorted municipal
waste. Collection of such waste separately for
special treatment is necessary.
• Please note that some units are equipped with a
battery safety strip. Remove the strip from the
battery compartment before first use.
NOTE The technical specifications for this product and
the contents of the user manual are subject to change
without notice.
ABOUT OREGON SCIENTIFIC
Visit our website (www.oregonscientific.com) to learn
more about Oregon Scientific products.
If you’re in the US and would like to contact our
Customer Care department directly, please visit:
www2.oregonscientific.com/service/support.asp
OR
Call 1-800-853-8883.
For international inquiries, please visit:
www2.oregonscientific.com/about/international.asp
.
EU-DECLARATION OF CONFORMITY
Hereby, Oregon Scientific, declares that this Metal
Framed LCD Alarm Clock (model: TA200) is in
compliance with EMC directive 89/336/CE. A copy
of the signed and dated Declaration of Conformity
is available on request via our Oregon Scientific
Customer Service.
OROLOGIO SVEGLIA DIGITALE
CON CALENDARIO
MODELLO: TA200
3 4 5 6
7
8
9
2
1
SUPPORTO
DA TAVOLO
CON APERTURA
A SCATTO
1. Supporto pieghevole
2. Tasto SNOOZE
3. Tasto “ ”
4. Tasto “ ”
5. Tasto ALARM SET
6. Tasto CLOCK SET
7. Tasto ALARM ON/OFF
8. Tasto RESET
9. Vano batterie
CARATTERISTICHE
• Formato orario selezionabile (12/24 ore).
• Sveglia.
• Calendario automatico (tra 2000 e 2099).
FORMATO ORARIO E CALENDARIO
Ora, minuti, secondi, anno, mese, data e giorno.
FUNZIONAMENTO DELL’OROLOGIO
Togliere delicatamente la striscia protettiva sul retro
dell’orologio e impostare ora e data. Premere il tasto
“CLOCK SET” per visualizzare l’anno. Premere il tasto
“ALARM SET” per visualizzare l’ora della sveglia.
IMPOSTAZIONI DI ORA E CALENDARIO
In modalità normale, tenere premuto il tasto “CLOCK
SET” per alcuni secondi per accedere alle impostazioni
di ora e calendario; le cifre dell’ora cominciano a
lampeggiare contemporaneamente.
L’ordine delle
impostazioni è: Ora Minuti Secondi
Anno Mese Data il giorno della settimana si
regola automaticamente.
Premere il tasto “ ” o “ ” per
aggiornare le impostazioni e il tasto “CLOCK SET” per
confermarle.
IMPOSTAZIONE DELL’ORA DELLA SVEGLIA
In modalità normale, tenere premuto il tasto “ALARM
SET” per alcuni secondi per accedere alle impostazioni
dell’ora della sveglia; le cifre dell’ora della sveglia
cominciano a lampeggiare contemporaneamente.
L’ordine delle impostazioni
è: Ora Minuto. Premere
il tasto “
” o “ ” per aggiornare le impostazioni e il
tasto “ALARM SET” per confermarle.
SVEGLIA E SNOOZE
In modalità normale, premere il tasto “ALARM ON/
OFF” per attivare o disattivare sveglia e snooze.
L’icona “
” indica che la sveglia è attiva.
L’icona “
” indica che lo snooze è attivo.
DISATTIVAZIONE DELLA SUONERIA DELLA SVEGLIA
Premere il tasto “ALARM ON/OFF” per attivare la
sveglia. Mentre la sveglia è attiva, premere un tasto
qualsiasi per interrompere immediatamente la suoneria
oppure lasciarla suonare per 1 minuto, dopo il quale si
spegnerà automaticamente.
FUNZIONE SNOOZE
Premere il tasto “ALARM ON/OFF” per attivare la
sveglia e lo snooze.
Mentre la sveglia è attiva, premere
il tasto “
SNOOZE” per interromperne la suoneria,
l’icona “
” comincerà a lampeggiare e lo snooze si
attiverà ogni 5 minuti. Mentre la suoneria della sveglia
è attiva, premere un tasto qualsiasi per interrompere lo
snooze eccetto “
SNOOZE”, oppure aspettare 1 minuto,
dopo il quale si disattiverà automaticamente.
FORMATO ORARIO 12 / 24 ORE
Premere il tasto “ ” per modificare il formato dell’ora.
SOSTITUZIONE DELLE BATTERIE
Sostituire la batteria se la luce del display è troppo
fievole per permetterne la visualizzazione.
Aprire
la copertura del vano batterie e sostituire le batterie
scariche ultrapiatte (di tipo LR1130/LR1131/V10GA
o equivalenti) con due batterie nuove, rispettando la
polarità indicata.
Il foro reset sul retro dell’unit
à consente all’utente di
azzerare l’orologio.
Premere il foro con un ago o con
una matita appuntita quando il dispositivo non funziona
correttamente a causa di disturbi dovuti a scariche
elettrostatiche o dopo la sostituzione delle batterie;
l’unità si azzererà automaticamente.
PRECAUZIONI
• Non sottoporre il prodotto a forza eccessiva, urti,
polvere, temperatura o a umidità.
• Non otturare i fori di aerazione con oggetti come
giornali, tende, etc.
• Non immergere l’unità in acqua. Se si versa del
liquido sul prodotto, asciugarlo immediatamente
con un panno morbido e liscio.
• Non pulire l’unità con materiali abrasivi o corrosivi.
• Non manomettere i componenti interni. In questo
modo si invalida la garanzia.
• Utilizzare solo batterie nuove. Non mescolare
batterie nuove con batterie vecchie.
• Le immagini del manuale possono differire dalla
realtà.
• Al momento dello smaltimento del prodotto,
utilizzare la raccolta differenziata.
• Oregon Scientific declina ogni responsabilità
per eventuali danni alle finiture causati dal
posizionamento del prodotto su determinati tipi di
legno. Consultare le istruzioni fornite dal fabbricante
del mobile per ulteriori informazioni.
• Il contenuto di questo manuale non può essere
ristampato senza l’autorizzazione del fabbricante.
• Non smaltire le batterie vecchie come rifiuto non
differenziato. È necessario che questo rifiuto venga
smaltito mediante raccolta differenziata per essere
trattato in modo particolare.
• Alcune unità sono dotate di una striscia di sicurezza
per le batterie. Rimuovere la striscia dal vano
batterie prima del primo utilizzo.
NOTA Le specifiche tecniche del prodotto e il contenuto
del manuale per l’utente possono essere modificati senza
preavviso.
INFORMAZIONI AGLI UTENTI DEI PRODOTTI DI
TIPO “DOMESTICO”
INFORMAZIONE AGLI UTENTI
ai sensi dell’art. 13 del Decreto Legislativo 25 luglio
2005, n. 151”Attuazione delle Direttive 2002/95/CE,
2002/96/CE e 2003/108/CE, relative alla riduzione
dell’uso di sostanze pericolose nelle apparecchiature
elettriche ed elettroniche, nonché allo smaltimento
dei rifiuti”
Il simbolo del cassonetto barrato riportato
sull’apparecchiatura o sulla sua confezione indica che
il prodotto alla fine della propria vita utile deve essere
raccolto separatamente dagli altri rifiuti.
L’utente dovrà, pertanto, conferire l’apparecchiatura
giunta a fine vita agli idonei centri di raccolta
differenziata dei rifiuti elettronici ed elettrotecnici, oppure
riconsegnarla al rivenditore al momento dell’acquisto
di una nuova apparecchiatura di tipo equivalente, in
ragione di uno a uno.
L’adeguata raccolta differenziata per l’avvio successivo
dell’apparecchiatura dismessa al riciclaggio, al
trattamento e allo smaltimento ambientalmente
compatibile contribuisce ad evitare possibili effetti
negativi sull’ambiente e sulla salute e favorisce il
reimpiego e/o riciclo dei materiali di cui è composta
l’apparecchiatura.
Lo smaltimento abusivo del prodotto da parte dell’utente
comporta l’applicazione delle sanzioni amministrative
previste dalla normativa vigente.
INFORMAZIONI SU OREGON SCIENTIFIC
Per avere maggiori informazioni sui nuovi prodotti
Oregon Scientific visita il nostro sito internet
www.oregonscientific
.it, dove potrai trovare tutte le
informazioni di cui hai bisogno.
Per ricerche di tipo internazionale puoi visitare invece il
sito
www2.oregonscientific.com/about/international.asp.
DICHIARAZIONE DI CONFORMITA’ UE
Con la presente Oregon Scientific dichiara che questo
prodotto (Modello TA200) è conforme alla direttiva
EMC 89/336/CE. Una copia firmata e datata della
Dichiarazione di Conformità è disponibile, su richiesta,
tramite il servizio clienti della Oregon Scientific.
REVEIL A ECRAN LCD ET CADRE
METALLIQUE
MODELE : TA200
3 4 5 6
7
8
9
2
1
DEPLIER
POUR
INSTALLER
LE
SUPPORT
DE TABLE
1. Support pliable
2. Touche
SNOOZE
3. Touche “
”
4. Touche “
”
5. Touche
ALARM SET
6. Touche
CLOCK SET
7. Touche
ALARM ON/OFF
8. Touche
RESET
9. Compartiment des piles
CARACTERISTIQUES
• Fonction horloge format 12/24 heures.
• Fonction alarme.
• Fonction calendrier de 2000 à 2099.
LECTURE NORMALE DE L’HEURE
Heure, minute, seconde, année, mois, date et jour.
ACTIVER L’HORLOGE
Retirez délicatement le ruban de protection situé
à l’arrière de l’horloge et réglez la date et l’heure.
Appuyez sur “CLOCK SET” pour afficher l’année.
Appuyez sur “ALARM SET” pour afficher l’heure de
l’alarme.
REGLAGE DE L’HEURE / DU CALENDRIER
En mode normal, appuyez et maintenez la touche
“CLOCK SET” pendant quelques secondes pour entrer
dans le mode de réglage de l’heure / du calendrier,
les chiffres de l’heure clignoteront. Les réglages se
présentent dans l’ordre suivant : Heure
Minute
Seconde Année Mois Jour, et le jour
se réglera automatiquement. Appuyez sur “
” ou “
” pour mettre à jour le réglage et sur “CLOCK SET”
pour confirmer.
REGLAGE DE L’HEURE DE L’ALARME
En mode normal, appuyez et maintenez la touche
“ALARM SET” pendant quelques secondes pour
entrer dans le mode de réglage de l’heure de l’alarme,
les chiffres de l’heure de l’alarme clignoteront. Les
réglages se présentent dans l’ordre suivant : Heure
Minute. Appuyez sur “ ” ou “ ” pour mettre à jour
le réglage et sur “ALARM SET” pour confirmer.
ALARME ET RAPPEL D’ALARME (SNOOZE)
En mode normal, appuyez sur “ALARM ON/OFF” pour
alterner entre l’activation et la désactivation (
ON/OFF)
de l’alarme et du rappel d’alarme.
L’icône “ ” vous indique si la fonction alarme est
activée.
L’icône “ ” vous indique si la fonction Snooze (rappel
d’alarme) est activée.
ARRETER L’ALARME
Appuyez sur “ALARM ON/OFF” pour activer la
fonction alarme. Lorsque l’alarme retentit, appuyez sur
n’importe qu’elle touche pour l’arrêter immédiatement
ou laissez-la activée une minute pour qu’elle s’arrête
automatiquement.
FONCTION SNOOZE (RAPPEL D’ALARME)
Appuyez sur “ALARM ON/OFF” pour activer la fonction
alarme et la fonction Snooze. Lorsque l’alarme est
activée, appuyez sur la touche“
SNOOZE” pour arrêter
l’alarme. L’icône “
” clignotera, et le rappel d’alarme
s’activera toutes les 5 minutes. Pour arrêter le rappel
d’alarme lorsque l’alarme retentit, appuyez sur n’importe
qu’elle touche sauf “SNOOZE” ou laissez-le activé une
minute pour qu’il s’arrête automatiquement.
FORMAT 12 OU 24 HEURES
Appuyez sur la touche “ ” pour modifier le format 12
ou 24 heures.
CHANGER LES PILES
Remplacez les piles si l’affichage est faible. Ouvrez le
compartiment des piles et remplacez les piles usagées
de type (LR1130/LR1131/V10GA ou équivalent) par
deux piles neuves en prenant garde de respecter les
polarités.
La fente Reset (réinitialiser) située à l’arrière de
l’appareil vous permet de réinitialiser l’horloge. Insérer
une aiguille ou un crayon taillé dans la fente et appuyez
si l’appareil ne fonctionne pas correctement en raison
d’interférences électrostatiques ou après avoir changé
les piles, il reviendra automatiquement aux réglages
par défaut.
PRECAUTIONS
• Ne pas soumettre le produit à une force excessive,
au choc, à la poussière, aux changements de
température ou à l’humidité.
• Ne pas couvrir les trous de ventilation avec des
journaux, rideaux etc…
• Ne pas immerger le produit dans l’eau. Si vous
renversez du liquide sur l’appareil, séchez-le
immédiatement avec un tissu doux.
• Ne pas nettoyer l’appareil avec des matériaux
corrosifs ou abrasifs.
• Ne pas trafiquer les composants internes. Cela
invalidera votre garantie.
• N’utilisez que des piles neuves. Ne pas mélanger
des piles neuves et usagées.
• Les images de ce manuel peuvent différer de
l’aspect réel du produit.
• Lorsque vous désirez vous débarrasser de ce
produit, assurez-vous qu’il soit collecté séparément
pour un traitement adapté.
• Le poser sur certaines surfaces en bois peut
endommager la finition du meuble, et Oregon
Scientific ne peut en être tenu responsable.
Consultez les mises en garde du fabricant du meuble
pour de plus amples informations.
• Le contenu du présent manuel ne peut pas être
reproduit sans la permission du fabriquant.
• Ne pas jeter les piles usagées dans les containers
municipaux non adaptés Veuillez effectuer le
tri de ces ordures pour un traitement adapté si
nécessaire.
• Veuillez remarquer que certains appareils sont
équipés d’une bande de sécurité. Retirez la bande
du compartiment des piles avant la première
utilisation.
REMARQUE Les caractéristiques techniques de ce
produit et le contenu de ce manuel peut être soumis à
modifications sans préavis.
À PROPOS D’OREGON SCIENTIFIC
Pour plus d‘informations sur les produits Oregon
Scientific France, rendez-vous sur notre site:
www.oregonscientific.fr
.
Si vous êtes aux Etats-Unis, vous pouvez contacter
notre support consommateur directement sur le site:
www2.oregonscientific.com/service/support.asp
OU
par téléphone au: 1-800-853-8883
Pour des renseignements internationaux, rendez
vous sur le site: www2.oregonscientific
.com/about/
international.asp.
EUROPE - DECLARATION DE CONFORMITE
Par la présente Oregon Scientific déclare que l’appareil
Reveil à Ecran LCD et Cadre Metallique(Modèle:
TA200) est conforme à la directive européenne 89/336/
CE. Une copie signée et datée de la déclaration de
conformité est disponible sur demande auprès de notre
Service Client.
LCD-ALARMUHR MIT
METALLRAHMEN
MODELL: TA200
3 4 5 6
7
8
9
2
1
AUFKLAPPEN,
UM
TISCHSTÄNDER
ZU ÖFFNEN
1. Klappbarer Ständer
2. SNOOZE-Taste
3. “ ”-Taste
4. “ ”-Taste
5. ALARM SET-Taste
6. CLOCK SET-Taste
7. ALARM ON/OFF-Taste
8. RESET-Taste
9. Batteriefach
EIGENSCHAFTEN
• Uhrzeitfunktion mit 12-/24-Stundenformat.
• Alarmfunktion.
• Kalenderfunktion vom Jahr 2000 bis 2099.
ABLESUNG DER NORMALZEIT
Stunde, Minute, Sekunde, Jahr, Monat, Datum und
Tag.
DIE UHR STARTEN
Entfernen Sie vorsichtig den Isolierstreifen auf der
Rückseite der Uhr und beginnen Sie mit der Eintellung
von Uhrzeit und Datum. Drücken Sie auf die “
CLOCK
SET”-Taste,um das Jahr anzuzeigen. Drücken
Sie auf die “ALARM SET”-Taste, um die Alarmzeit
anzuzeigen.
UHRZEIT-/KALENDEREINSTELLUNG
Halten Sie im Normalmodus die “CLOCK SET”-Taste
ein paar Sekunden lang gedrückt, um die Uhrzeit-/
Kalendereinstellung aufzurufen; die Ziffern der Stunde
beginnen gleichzeitig zu blinken. Die Reihenfolge der
Einstellungen lautet: Stunde
Minute Sekunde
Jahr Monat Tag, der Tag wird automatisch
angepasst. Drücken Sie auf die “
”- oder “ ”-Taste,
um Ihre Einstellung zu aktualisieren, und die “CLOCK
SET”-Taste, um diese zu bestätigen.
EINSTELLUNG DER ALARMZEIT
Halten Sie im Normalmodus die “ALARM SET”-
Taste ein paar Sekunden lang gedrückt, um den
Alarmeinstellungsmodus aufzurufen, die Ziffern der
Alarmstunde beginnen gleichzeitig zu blinken. Die
Reihenfolge der Einstellungen lautet: Stunde
Minute. Drücken Sie auf die “ ”- oder “ ”-Taste, um
Ihre Einstellung zu aktualisieren, und die “
ALARM
SET”-Taste, um diese zu bestätigen.
ALARM UND SCHLUMMERFUNKTION (SNOOZE)
Drücken Sie im Normalmodus auf die “ALARM ON/
OFF”-Taste, um Alarm und Schlummerfunktion ein-
oder auszuschalten (ON/OFF).
Das Symbol “
” auf der Anzeige gibt an, dass die
Alarmfunktion aktiviert ist.
Das Symbol “
” auf der Anzeige gibt an, dass die
Schlummerfunktion aktiviert ist.
ALARMTON AUSSCHALTEN
Drücken Sie auf die “ALARM ON/OFF”-Taste, um die
Alarmfunktion zu aktivieren. Drücken Sie bei aktiviertem
Alarm eine beliebige Taste, um den Alarmton sofort zu
beenden, oder lassen Sie ihn 1 Minute lang bis zur
automatischen Abschaltung aktiviert.
SCHLUMMERFUNKTION (SNOOZE)
Drücken Sie auf die “ALARM ON/OFF”-Taste, um
den Alarm und die Schlummerfunktion zu aktivieren.
Drücken Sie bei aktiviertem Alarm auf die “
SNOOZE”-
Taste, um den Alarm zu beenden; das Symbol “
”
beginnt zu blinken und der Alarm wird jeweils 5 Minuten
lang stummgeschaltet. Um die Schlummerfunktion zu
beenden, drücken Sie bei aktiviertem Alarmton eine
beliebige Taste, mit Ausnahme der “
SNOOZE”-Taste,
oder lassen Sie ihn 1 Minute lang bis zur automatischen
Abschaltung aktiviert.
12-/24-STUNDENFORMAT
Drücken Sie auf die “ ”-Taste, um das 12-/24-
Stundenformat zu ändern.
DIE BATTERIE WECHSELN
Ersetzen Sie die Batterie, wenn die Anzeige zu
dunkel ist, um etwas darauf zu erkennen. Öffnen
Sie den Batteriedeckel und ersetzen Sie die
verbrauchten Knopfzellen (LR1130/LR1131/V10GA
oder gleichwertiger Typ) mit der korrekten Polarität
durch zwei neue Batterien.
Mit der RESET-Öffnung auf der Rückseite des Geräts
können Sie die Uhr zurücksetzen. Drücken Sie eine
Nadel oder einen spitzen Stift in die Öffnung, wenn das
Gerät aufgrund einer elektrostatischen Entladung oder
nach einem Batteriewechsel nicht ordnungsgemäß
funktioniert; das Gerät wird sodann automatisch
zurückgesetzt.
VORSICHTSMASSNAHMEN
• Setzen Sie das Gerät keiner extremen
Gewalteinwirkung und keinen Stößen aus, und
halten Sie es von übermäßigem Staub, Hitze oder
Feuchtigkeit fern.
• Sie dürfen die Belüftungsöffnungen nicht mit
Gegenständen abdecken, wie z.B. Zeitungen,
Vorhänge, usw.
• Tauchen Sie das Gerät niemals in Wasser. Falls
Sie eine Flüssigkeit über das Gerät verschütten,
trocknen Sie es sofort mit einem weichen,
fusselfreien Tuch.
• Reinigen Sie das Gerät keinesfalls mit scheuernden
oder ätzenden Mitteln.
• Machen Sie sich nicht an den internen Komponenten
des Geräts zu schaffen, da dies
zum Verlust der
Garantie führen kann.
• Verwenden Sie nur neue Batterien. Verwenden Sie
keinesfalls neue und alte Batterien gemeinsam.
• Die in dieser Anleitung dargestellten Abbildungen
können sich vom Original abweichen.
• Entsorgen Sie das Gerät ausschließlich in den
dafür vorgesehenen, kommunalen Sammelstellen,
die Sie bei Ihrer Gemeinde erfragen können.
• Wenn dieses Produkt auf bestimmte Holzflächen
gestellt wird, kann die Oberfläche beschädigt
werden. Oregon Scientific ist nicht haftbar für
solche Beschädigungen. Entsprechende Hinweise
entnehmen Sie bitte der Pflegeanleitung Ihres
Möbelherstellers.
• Der Inhalt dieser Anleitung darf ohne Genehmigung
des Herstellers nicht vervielfältigt werden.
• Verbrauchte Batterien gehören nicht in den
Hausmüll. Bitte geben Sie sie bei einer Sammelstelle
für Altbatterien bzw. Sondermüll ab.
• Bitte beachten Sie, dass manche Geräte mit einem
Batterieunterbrechungsstreifen bestückt sind. Vor
dem ersten Gebrauch müssen Sie den Streifen aus
dem Batteriefach ziehen.
HINWEIS Die technischen Daten für dieses Produkt
und der Inhalt der Bedienungsanleitung können ohne
Benachrichtigung geändert werden.
ÜBER OREGON SCIENTIFIC
Besuchen Sie unsere Website www.oregonscientific.de
und erfahren Sie mehr über unsere Oregon Scientific-
Produkte. Auf der Website finden Sie auch Informationen,
wie Sie im Bedarfsfall unseren Kundendienst erreichen
und Daten herunterladen können. Für internationale
Anfragen besuchen Sie bitte unsere Website:
www2.oregonscientific.com/about/international.
EU-KONFORMITÄTSERKLÄRUNG
Hiermit erklärt Oregon Scientific, LCD-Alarmuhr
mit Metallrahmen (Modell: TA200) mit der EU
Richtlinie 89/336/CE übereinstimmt. Eine
Kopie
der unterschriebenen und mit Datum versehenen
Konformitätserklärung erhalten Sie auf Anfrage über
unseren Oregon Scientific Kundendienst.
EN
IT FR
DE

Praat mee over dit product
Laat hier weten wat jij vindt van de Oregon TA200 Wekker. Als je een vraag hebt, lees dan eerst zorgvuldig de handleiding door. Een handleiding aanvragen kan via ons contactformulier.