Handleiding Phoenix DS2503K Kluis

Handleiding voor je Phoenix DS2503K Kluis nodig? Hieronder kun je de handleiding gratis bekijken en downloaden als PDF in het Nederlands en/of Engels. Dit product heeft 3 veelgestelde vragen, 0 comments en heeft 0 stemmen. Is dit niet de handleiding die je zoekt, neem dan contact met ons op.

Is je product kapot en biedt de handleiding geen oplossing meer? Dan kun je voor reparatie gratis terecht bij Repair Café.

Handleiding

Loading…

Ph Sf Cpny r eac n s gurte
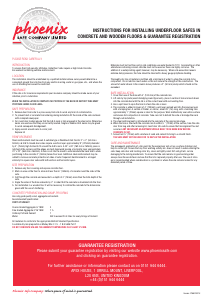
Thank you for purchasing a Phoenix Safe.
OPENING SAFE
Please insert one of the two keys supplied into the key hole and turn
clockwise. Push handle down then pull the door to open.
Your safe is ready prepared for base xing. To base x your safe, follow
the instructions below.
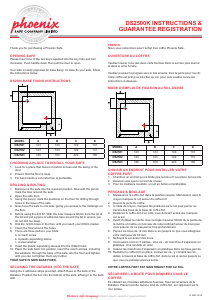
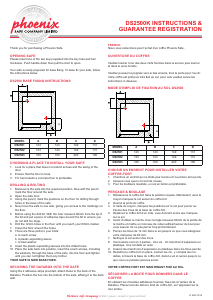
DS2500 BASE FIXING INSTRUCTIONS
MODEL A B C D
DS2501 123 143 149 131
DS2502 123 143 149 131
DS2503 180 180 220 180
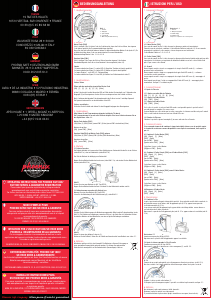
CHOOSING A PLACE TO INSTALL YOUR SAFE
1. Look for a place that does not restrict access and the swing of the
door.
2. Ensure that the oor is level.
3. For best results a concrete oor is preferable.
DRILLING & BOLTING
1. Manoeuvre the safe into the required position. Now with the pencil
mark the oor around the safe.
2. Open the safe door.
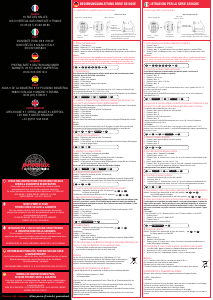
3. Using the pencil, mark the positions on the oor for drilling through
holes in the base of the safe.
4. Now move the safe to one side, giving you access to the markings on
the oor.
5. Before using the drill bit. With the ruler measure 60mm from the tip of
the bit and put a piece of adhesive tape around the bit to ensure you
do not drill too deep.
6. Drill the 12mm holes in the oor until you reach your 60mm marker.
7. Clean the oor around the holes.
8. There are three parts to your bolts:
a. A coach screw
b. A plastic expanding sleeve
c. A steel washer
9. Insert the plastic expanding sleeves into the drilled holes.
10. Place the safe back into position, insert the coach screws, including
the washers, through the base of the safe, into the oor and tighten
until you can not tighten them any further.
YOUR SAFE IS NOW BASE FIXED.
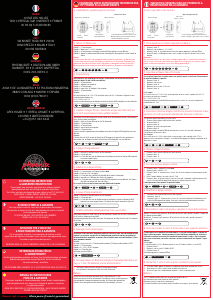
SECURING THE DATABOX INTO THE SAFE
Using the 2 adhesive strips provided, attach these to the back of the
Databox. Position the box into the bottom of the safe, axing it to the back
wall.
Nous vous remercions pour l’achat d’un core Phoenix Safe.
OUVERTURE DU COFFRE
Veuillez insérer l’une des deux clefs fournies dans la serrure puis tourner
la dans le sens horaire.
Veuillez pousser la poignée vers le bas ensuite, tirez la porte pour l’ouvrir.
Votre core est prêt pour être xé au sol, pour cela veuillez suivre les
instructions ci-dessous.
MODE D’EMPLOI DE FIXATION AU SOL DS2500
MODEL A B C D
DS2501 123 143 149 131
DS2502 123 143 149 131
DS2503 180 180 220 180
CHOISIR UN ENDROIT POUR INSTALLER VOTRE
COFFRE-FORT
1. Cherchez un endroit qui ne limite pas l’accès et l’ouverture de la porte.
2. Assurez-vous que le sol soit de niveau.
3. Pour de meilleurs résultats, un sol en béton est préférable.
PERÇAGE & BOULAGE
1. Manœuvrez le core-fort dans la position requise. Maintenant, avec le
crayon marquez le sol autour du core-fort
2. Ouvrez la porte du core.
3. À l’aide du crayon, marquez les positions sur le sol pour percer au
travers des trous de la base du core-fort.
4. Déplacez le core-fort d’un côté, vous donnant accès aux marques
sur le sol.
5. Avant d’utiliser le mèche. Avec la règle mesurez 60mm de la pointe de
la mèche et mettre un morceau de ruban adhésif autour du bout pour
vous assurer de ne pas percer trop profondément.
6. Percez les trous de 12 mm dans le sol jusqu’à ce que vous atteigniez
votre marqueur de 60 mm.
7. Nettoyez le sol autour des trous.
8. Vos boulons sont en 3 parties . Une vis . Un manchon d’expansion en
plastique. Une rondelle en acier .
9. Insérez les manchons d’expansion en plastique dans les trous percés.
10. Remettre le core-fort en place, insérez les vis , y compris les ron-
delles, à travers la base du core-fort, dans le sol et serrez jusqu’à ce
que vous ne puissiez plus les serrer.
VOTRE COFFRE-FORT EST MAINTENANT FIXE AU SOL.
SÉCURISER LA BOITE POUR DONNEES DANS LE
COFFRE
En utilisant les 2 bandes adhésives fournies, xez-les à l’arrière de la
Databox. Placez la boîte dans le fond du core-fort, en l’apposant sur le
mur arrière.
V1 MAY 2018
FRENCH
DS2500K INSTRUCTIONS &
GUARANTEE REGISTRATION
Download de handleiding in het Nederlands en/of Engels (PDF, 0.24 MB)
(Denk aan het milieu en print deze handleiding alleen als dat echt noodzakelijk is)

Loading…

Beoordeling

Laat ons weten wat je van de Phoenix DS2503K Kluis vindt door een beoordeling achter te laten. Wil je je ervaringen met dit product delen of een vraag stellen? Laat dan een bericht achter onderaan de pagina.
Bent u tevreden over de Phoenix DS2503K Kluis?
Ja Nee
Beoordeel dit product als eerste
0 stemmen

Praat mee over dit product

Laat hier weten wat jij vindt van de Phoenix DS2503K Kluis. Als je een vraag hebt, lees dan eerst zorgvuldig de handleiding door. Een handleiding aanvragen kan via ons contactformulier.

Meer over deze handleiding

We begrijpen dat het prettig is om een papieren handleiding te hebben voor je Phoenix DS2503K Kluis. Je kunt de handleiding bij ons altijd downloaden en daarna zelf printen. Indien je graag een originele handleiding wilt hebben, raden we je aan contact op te nemen met Phoenix. Zij kunnen wellicht nog voorzien in een originele handleiding. Zoek je de handleiding van Phoenix DS2503K Kluis in een andere taal? Kies op de homepage je taal naar keuze en zoek daarna op het modelnummer om te zien of we deze beschikbaar hebben.

Specificaties

Merk Phoenix
Model DS2503K
Categorie Kluizen
Bestandstype PDF
Bestandsgrootte 0.24 MB

Alle handleidingen voor Phoenix Kluizen
Meer handleidingen voor Kluizen

Veelgestelde vragen over Phoenix DS2503K Kluis

Ons supportteam zoekt dagelijks naar nuttige productinformatie en antwoorden op veelgestelde vragen. Als er onverhoopt toch een onjuistheid tussen onze veelgestelde vragen staat, laat het ons dan weten via het contactformulier.

Het slot van mijn elektronische kluis opent niet, terwijl ik zeker weet dat mijn code juist is, wat kan ik doen? Geverifieerd

Dit kan komen doordat de batterijspanning te laag is. Dit komt voor bij goedkope batterijen of batterijen die bijna leeg zijn. Vervang de batterijen en probeer het opnieuw. Als dit het probleem niet oplost, neem dan contact op met de fabrikant.

Ik vind dit nuttig (1309) Lees meer

Ik ben de code van mijn kluis kwijt, wat kan ik doen? Geverifieerd

In het geval van een kluis met een elektronisch slot is er vaak een meegeleverde noodsleutel waarmee de kluis alsnog geopend kan worden. Als er geen noodsleutel of andere oplossing voorhanden is, dan zijn er gespecialiseerde bedrijven die kunnen helpen. In het geval een kleine kluis kunnen de kosten van een specialist echter hoger zijn dan die van een nieuwe kluis. In dat geval is de laatste optie om de kluis zelf open te breken.

Ik vind dit nuttig (610) Lees meer

Wanneer is het nuttig om mijn kluis te verankeren? Geverifieerd

Over het algemeen is het aan te raden een kluis van minder dan 1000 kilo te verankeren. Dit voorkomt dat een dief de kluis in zijn geheel meeneemt. Ook kan het zijn dat een verzekeraar eist dat een kluis verankerd is. Laat het verankeren altijd uitvoeren door een specialist.

Ik vind dit nuttig (178) Lees meer
Handleiding Phoenix DS2503K Kluis

Gerelateerde producten

Gerelateerde categorieën