840197102 6/12
Read before use.
Lire avant utilisation.
Lea antes de usar.
H
e
l
p
H
a
m
i
l
t
o
n
B
e
a
c
h
M
a
k
e
a
D
i
f
f
e
r
e
n
c
e
!
In an effort to reduce paper waste, Hamilton Beach Brands,
Inc., has reduced the size of this Use and Care guide and
made it available online. We believe strongly in doing our
part to help care for the environment. To view Use and
Care guides, recipes, and tips, please visit:
proctorsilex.com
USA: 1.800.851.8900
Aidez-nous à protéger l’environnement !
Dans le but de réduire la consommation de papier,
Hamilton Beach Brands, Inc., a réduit le format des
manuels d’utilisation et d’entretien et offre maintenant la
version complète en ligne. Nous croyons fermement que
nous contribuons à sauvegarder l’environnement. Pour voir
les manuels d’utilisation et d’entretien, les recettes et les
conseils, veuillez consulter le site :
proctorsilex.ca
Canada: 1.800.267.2826
¡Ayude a Hamilton Beach a Hacer la Diferencia!
En un esfuerzo por reducir el papel de desecho, Hamilton
Beach Brands, Inc., ha reducido el tamaño de este Uso
y Cuidado y lo puso disponible en línea. Creemos
fuertemente en hacer nuestra parte para ayudar a cuidar
el medioambiente. Para ver guías de Uso y Cuidado,
recetas y consejos, por favor visite:
proctorsilex.com.mx
México: 01.800.71.16.100
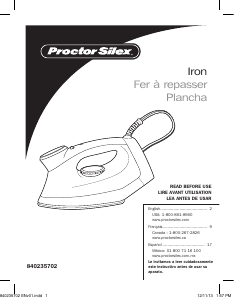
Iron
Fer à repasser
Plancha
Le invitamos a leer cuidadosamente este instructivo antes
de usar su aparato.
When using an iron, basic precautions should always be
followed, including the following:
READ ALL INSTRUCTIONS BEFORE USING
1. Only use an iron for its intended use.
2. To avoid the risk of electric shock, do not immerse the
iron in water or other liquids.
3. Always turn the iron to OFF before plugging or
unplugging the iron from the electrical outlet. Never pull
on the cord to disconnect the iron from the electrical
outlet; instead, grasp the plug and pull on the plug to
disconnect the iron.
4. Do not let the cord touch hot surfaces. Let the iron cool
completely before putting the iron away. Coil the cord
loosely around the iron when storing.
5. Always disconnect the iron from the electrical outlet
before filling the iron with water, emptying the water
from the iron, and when the iron is not in use.
6. Do not operate the iron with a damaged cord or in the
event the iron has been dropped or damaged or there
are visible signs of damage or it is leaking. To avoid the
risk of electric shock, do not disassemble the iron. Take
it to a qualified serviceman for examination and repair.
Incorrect assembly might result in a risk of electric
shock when the iron is used after reassembly.
7. The iron must be used and rested on a stable surface.
8. When placing the iron on its stand, ensure that the
surface on which the stand is placed is stable.
9. Close supervision is required for any appliance used by
or near children. Do not leave the iron unattended while
the iron is connected or on an ironing board.
10. Burns can occur from touching hot metal parts, hot
water, or steam. Use caution when you turn a steam
iron upside down—there might be hot water in the
reservoir.
11. To avoid a circuit overload, do not operate an iron on
the same circuit with another high-wattage appliance.
12. If an extension cord is absolutely necessary, a cord
with an ampere rating equal to or greater than the
maximum rating of the iron shall be used. A cord
rated for less amperage can result in a risk of fire or
electric shock due to overheating. Care shall be taken
to arrange the cord so that it cannot be pulled or be
tripped over.
SAVE THESE INSTRUCTIONS
Other Consumer Safety
Information
This appliance is intended for household use only.
WARNING! Shock Hazard: This appliance has a polarized plug
(one wide blade) that reduces the risk of electric shock. The
plug fits only one way into a polarized outlet. Do not defeat
the safety purpose of the plug by modifying the plug in any way
or by using an adapter. If the plug does not fit, reverse the
plug. If it still does not fit, have an electrician replace the outlet.
Please read before first use:
• During first use of the iron, it may appear to smoke. This will
stop and does not indicate a defect or hazard.
• Many irons spit or sputter during the first few uses with
tap water. This happens as the steam chamber becomes
conditioned. This will stop after a few uses.
• Steam vents should be cleared before first use. Prepare
iron for steam ironing; then iron over an old cloth for a few
minutes while letting iron steam.
Lors de l’utilisation d’un fer, des précautions élémentaires
doivent toujours être observées, y compris ce qui suit :
LIRE TOUTES LES INSTRUCTIONS
AVANT L’UTILISATION
1. Utiliser exclusivement le fer pour son usage prévu.
2. Pour éviter le risque de choc électrique, ne pas plonger
le fer dans l’eau ou d’autres liquides.
3. Toujours mettre le fer sur arrêt (OFF) avant de le
brancher ou débrancher de la prise électrique. Ne
jamais tirer sur le cordon pour déconnecter le fer de la
prise électrique ; au lieu de cela, saisir la fiche et tirer
dessus pour débrancher le fer.
4.
Ne pas laisser le cordon toucher les surfaces chaudes.
Laisser refroidir le fer complètement avant de le
remiser.
Entourer le cordon autour du fer sans le serrer
pour le ranger.
5. Toujours débrancher le fer de la prise électrique avant
de remplir le fer d’eau et de vider l’eau du fer, et
lorsque le fer ne sert pas.
6. Ne pas utiliser le fer avec un cordon endommagé, si
le fer est tombé ou endommagé, s’il y a des signes
visibles de dommage ou s’il fuit. Pour éviter le risque
de choc électrique, ne pas démonter le fer. Le faire
examiner et réparer par un dépanneur qualifié. Un
assemblage incorrect risque d’entraîner un risque
de choc électrique lorsque le fer est utilisé après
réassemblage.
7. Le fer doit être utilisé et reposé sur une surface stable.
8. En plaçant le fer sur son support, assurez-vous que la
surface sur laquelle le support est placé est stable.
9. Une surveillance étroite est requise pour tout appareil
utilisé par ou près d’enfants.
Ne pas laisser le fer sans
surveillance pendant qu’il est branché ou pendant qu’il
est sur une planche à repasser.
10.
Des brûlures peuvent survenir lorsqu’on touche des
pièces chaudes en métal, de l’eau chaude ou de la
vapeur. Adopter des précautions lorsqu’on tourne un fer
à vapeur à l’envers, car il peut rester de l’eau chaude
dans le réservoir.
11. Pour éviter une surcharge du circuit, ne pas utiliser le
fer sur le même circuit qu’un autre appareil de haute
puissance.
12. Si une rallonge électrique est absolument nécessaire,
un cordon d’intensité nominale égale ou supérieure à
l’intensité nominale maximale du fer doit être utilisé.
Un cordon d’une
intensité nominale moindre peut
entraîner un risque d’incendie
ou de choc électrique en
raison d’une surchauffe.
Il faut prendre soin de placer le
cordon de rallonge pour qu’il ne puisse pas être tiré par
des enfants ou faire trébucher.
CONSERVEZ CES
INSTRUCTIONS
Autres renseignements de sécurité au
consommateur
Cet appareil est conçu pour une utilisation domestique
seulement.
AVERTISSEMENT ! Risque d’électrocution : Cet appareil est
doté d’une fiche polarisée (lame large) qui réduit le risque
d’électrocution. Cette fiche s’insère d’une seule manière
dans une prise polarisée. Ne pas transformer le dispositif
de sécurité de la fiche en modifiant celle-ci de quelconque
façon ou en utilisant un adaptateur. Si la fiche refuse de
s’insérer, inversez-la. Si elle refuse toujours de s’insérer,
faites remplacer la prise par un électricien.
À lire avant la première utilisation :
• Lors de la première utilisation du fer à repasser, il peut
sembler émettre de la fumée. Ceci cessera et n’indique
pas un défaut ou un danger.
• Lors des premières utilisations avec de l’eau du robinet,
de nombreux fers crachent. Ceci se produit durant
le conditionnement de la chambre de vapeur. Ce
phénomène cesse après quelques utilisations.
• Les orifices de vapeur doivent être nettoyés avant la
première utilisation. Préparer le fer pour le repassage
à vapeur, ensuite repasser sur un vieux tissu pendant
quelques minutes en laissant le fer dégager la vapeur.
IMPORTANT SAFETY
INSTRUCTIONS
MESURES DE SÉCURITÉ
IMPORTANTES
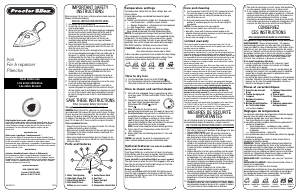
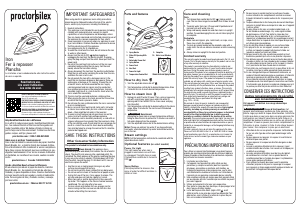
Parts and features
1. Water Fill Door
2. Adjustable Steam
Control
3. Spray/Steam Buttons
(Blast and Fine-Mist
spray also available)
4. Auto Shutoff Reset
Button or Power On
Light
5. Swivel Power Cord
6. Heel Rest
7. Nonstick Soleplate
8. Temperature Control
Dial
How to dry iron
1. Set the Adjustable Steam Switch to NO STEAM .
2. Turn Temperature Control Dial to desired temperature.
Allow two minutes for iron to reach desired temperature.
Temperature settings
The Temperature Control Dial has fabric settings, dots, and
steam symbols.
a) Some fabric settings are indicated from lowest to highest
temperature.
b) The dots are International symbols for 3 temperature
ranges:
• Low Temperature – synthetics (nylon, acetate)
•• Medium Temperature – silk/wool/acrylic/rayon/
polyester
••• High Temperature – cotton/linen
c) The steam symbols are used for selecting steam settings.
Steam should only be used at the high temperature setting.
NOTICE: To avoid garment damage, check garment label
for fabric composition, ironing instructions, and suggested
ironing temperature. The chart below is to be used only
as a guide. If ironing a fabric not listed, first refer to your
garment label’s guidelines; then set the temperature control
dial accordingly.
DRY IRON: Synthetics, Silk/Wool (reverse side of fabric)
STEAM IRON:
Cotton (while damp; use steam or spray)
Linen (while damp on reverse side of fabric)
Iron
High Temp
Setting
Med
Temp
Setting
Low Temp
Setting
Fabric care labels on garments have symbols that show
ironing instructions and recommended temperature settings.
These symbols are shown below along with their meaning.
Do not
iron
Do not
use steam
How to steam and vertical steam
1. Start with iron unplugged. Using a measuring cup with
a small pour spout, fill water tank to MAX fill line. Plug
iron into outlet.
2. Choose the level of steam that
best suits your fabric. Adjust the
Adjustable Steam Switch between
NO STEAM and full steam .
3. To avoid water dripping from
soleplate, set the Temperature Control Dial to the high
temperature setting. Allow 2 minutes for the iron to
reach desired temperature before use; then begin to
steam iron.
4. To vertical steam: Hang garment in a location that is
not susceptible to damage from heat or moisture. Do
not hang in front of wallpaper, a window, or mirror.
Hold iron about 6 inches away from garment; then
press and release Steam Button to steam out wrinkles.
Do not press steam button more than once every
5 seconds.
NOTE: Do not allow soleplate to touch delicate
garments.
5. To turn iron off, turn Temperature Control Dial to OFF.
Unplug iron.
6. Empty water from iron following directions in “Care
and cleaning.”
WATER: Use ordinary tap water. If using extremely hard
water, alternate between tap water and distilled water.
Optional features (on select models)
Spray and steam buttons
Push Steam Button for an extra blast of steam. Do not
press Steam Button more than every 5 seconds. Push
Spray Button to release a fine spray
of water for difficult
wrinkles.
Auto shutoff reset button/light
(on select models)
The light comes on when the iron is first plugged in. After
one hour, the iron will shut off and the light will go out.
Push the Reset Button to turn the iron back on.
Power on light
On units not provided with Auto Shutoff, this light comes
on when the iron is plugged in and remains on until
the iron is unplugged. The light stays on even if the
Temperature Control Dial is turned to OFF.
Care and cleaning
1. Turn Temperature Control Dial to OFF. Unplug and let
cool. The iron takes longer to cool down than it does to
heat up.
2. To empty water from iron, slowly tilt pointed end of iron
over sink until water runs out.
3. Wrap cord loosely around iron and store iron in an up-
right position. To avoid damaging the iron, do not store
laying flat on soleplate.
NOTICE: To avoid damage to the iron soleplate:
• Never iron over zippers, pins, metal rivets, or snaps.
• Wipe with a soapy cloth to clean occasional buildup on
the soleplate. Never use abrasive cleansers or metal
scouring pads, as they may scratch the surface.
• Always store iron upright on the heel rest.
Limited warranty
This warranty applies to products purchased and used in the
U.S. and Canada. This is the only express warranty for this
product and is in lieu of any other warranty or condition.
This product is warranted to be free from defects in material
and workmanship for a period of one (1) year from the date of
original purchase. During this period, your exclusive remedy is
repair or replacement of this product or any component found
to be defective, at our option; however, you are responsible
for all costs associated with returning the product to us and
our returning a product or component under this warranty to
you. If the product or component is no longer available, we will
replace with a similar one of equal or greater value.
This warranty does not cover glass, filters, wear from normal
use, use not in conformity with the printed directions, or
damage to the product resulting from accident, alteration,
abuse, or misuse. This warranty extends only to the original
consumer purchaser or gift recipient. Keep the original sales
receipt, as proof of purchase is required to make a warranty
claim. This warranty is void if the product is used for other than
single-family household use or subjected to any voltage and
waveform other than as specified on the rating label (e.g.,
120V ~ 60 Hz).
We exclude all claims for special, incidental, and consequential
damages caused by breach of express or implied warranty.
All liability is limited to the amount of the purchase price.
Every implied warranty, including any statutory warranty
or condition of merchantability or fitness for a particular
purpose, is disclaimed except to the extent prohibited by
law, in which case such warranty or condition is limited
to the duration of this written warranty. This warranty
gives you specific legal rights. You may have other legal
rights that vary depending on where you live. Some states or
provinces do not allow limitations on implied warranties or
special, incidental, or consequential damages, so the foregoing
limitations may not apply to you.
To make a warranty claim, do not return this appliance
to the store. Please call 1.800.851.8900 in the U.S. or
1.800.267.2826 in Canada or visit proctorsilex.com in the
U.S. or proctorsilex.ca in Canada. For faster service, locate
the model, type, and series numbers on your appliance.
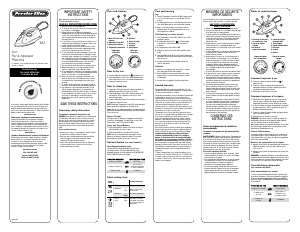
Pièces et caractéristiques
1. Accès pour
remplissage du
réservoir
2. Commande de réglage
de la vapeur
3. Contrôle de
vaporisation/vapeur
(Vaporisations par jet et
brume fine également
offertes)
4. Bouton de réinitialisation
de l’arrêt automatique
ou témoin d’alimentation
5. Cordon d’alimentation
pivotant
6. Talon d’appui
7.
Semelle antiadhésive
8. Cadran de commande
de température
Réglages de température
Le cadran de commandes de température est doté de
réglages pour les tissus, de points et de symboles.
a) Quelques réglages pour tissus sont indiqués de la
température la plus basse vers la plus élevée.
b) Les points sont des symboles internationaux représentant
3 niveaux de température :
• Basse température – synthétiques (nylon, acétate)
•• Température moyenne – soie, laine, acrylique,
rayonne et polyester
••• Température élevée – coton et lin
c) Les symboles de vapeur sont utilisés pour choisir les
réglages d’intensité de vapeur.
La vapeur ne doit pas être utilisée à moins d’avoir choisi
le réglage de température élevée.
REMARQUE : Vérifier l’étiquette du vêtement pour
obtenir les informations de composition des tissus et les
instructions de repassage pour éviter les dommages aux
vêtements. Le tableau ci-dessous n’est utilisé qu’à des
fins de guide. Pour le repassage des tissus non indiqués
au tableau, suivre les instructions inscrites sur l’étiquette
du vêtement puis régler le cadran de commandes de
température selon ces instructions.
REPASSAGE À SEC : Synthétiques, soie, laine (sur l’envers
du tissu)
REPASSAGE À LA VAPEUR : Coton (encore humide; utiliser
la vapeur ou la vaporisation)
Lin (repasser sur l’envers du tissu humide)
Les étiquettes d’entretien des tissus des vêtements
comportent des pictogrammes indiquant les instructions de
repassage et les réglages de températures recommandés.
Ces symboles sont illustrés ci-dessous avec leur explication.
Ne pas
repasser
Ne pas
utiliser la
vapeur
Fer à
repasser
Réglage à
température
élevée
Réglage à
température
moyenne
Réglage
à basse
température
Repassage à sec
1. Positionner le commutateur de commandes de
température à la position NO STEAM (pas de vapeur) .
2. Tourner le cadran de commandes de températures
au degré désiré. Laisser chauffer le fer pendant deux
minutes pour qu’il atteigne la température désirée.
Repassage horizontal et vertical
à la vapeur
1. Commencer par débrancher le fer à repasser. Remplir
le réservoir jusqu’au niveau MAX à l’aide d’une tasse à
mesurer dotée d’un petit bec verseur. Brancher la fiche
du fer dans la prise murale.
2. Sélectionner le niveau de vapeur
de manière à obtenir des résultats
de repassage optimaux. Positionner
le commatateur de commandes de
réglages de température entre NO
STEAM (pas de vapeur) et vapeur maximale .
3. Pour éviter les égouttements par la semelle, régler le
cadran de commande de température au réglage de
température le plus élevé. Attendre 2 minutes pour
que le fer atteigne la température désirée avant de
commencer le repassage.
4. Repassage vertical à la vapeur : Suspendre le
vêtement et éloignez-le de tout ce qui pourrait
l’endommager à cause de la chaleur ou de l’humidité.
Ne pas suspendre près d’un mur tapissé, une fenêtre
ou un miroir. Tenir le fer à environ 15 cm du vêtement
puis appuyer et relâcher le bouton de vapeur pour
éliminer les plis. Attendre environ 5 secondes avant
d’appuyer à nouveau sur le bouton de vapeur.
REMARQUE : La semelle ne doit pas toucher les
vêtements délicats.
5. Positionner le cadran de commandes de température à
arrêt (OFF) pour mettre le fer hors tension. Débrancher
le fer.
6. Vider l’eau du réservoir du fer en respectant les
instructions au chapitre « Entretien et nettoyage ».
EAU : Utiliser de l’eau du robinet. Si l’eau renferme
beaucoup de calcaire, alterner l’eau du robinet avec de
l’eau distillée.
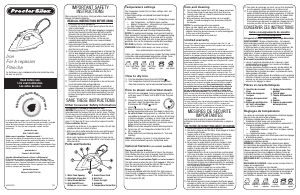
Fabric setting chart
Ironing Instructions
OFF
Dry iron using spray
if necessary.
Iron silk on wrong side.
For cotton, iron while
still damp or use spray.
For linen, iron fabric on
wrong side.
Dry
Iron
Steam
Range
Steam
Setting
•
Low
••
Medium
•••
High
OFF
Synthetics
Silk, Wool
Cotton,
Linen


Praat mee over dit product
Laat hier weten wat jij vindt van de Proctor Silex 17200 Strijkijzer. Als je een vraag hebt, lees dan eerst zorgvuldig de handleiding door. Een handleiding aanvragen kan via ons contactformulier.