
Date of Purchase
Retailers Stamp if required or full name and address
Attach Receipt or Proof of Purchase;
failure to attach may invalidate guarantee.
This guarantee does not affect your
statutory rights.
IS01/10-10
Instruction Guide
and
2 Year Guarantee
IS01
Contents
1 Service and Repairs/
Setting the Time – AM/PM
2 Water Resistancy
3–12 Operation and Adjustment
Important Note
It is important to identify your watch correctly.
If, after reading this Instruction Guide, you have any
further questions regarding the use, operation or ad-
justment of your watch, please call us during office
hours on 0116 288 2500
For free bracelet adjusting service, return the watch
to the address below.
T.P. (UK) Ltd, Alexander House, Chartwell Drive,
W
igston, Leicester LE18 2EZ
For maximum protection, please keep your watch
in its presentation box when not in use.
Guarantee
Block Capitals
Name
Address
Post Code
Day time Phone
T.P. (UK) Ltd, Alexander House, Chartwell Drive,
Wigston, Leicester LE18 2EZ
Important
This guarantee should be retained by the owner of
the watch and should be sent to Sekonda together
with the watch and £4.00 to cover handling and
postage when service under guarantee is required.
Please refer to page 1 of the i
nstruction guide for
further information on service under guarantee.
This guarantee does not affect your statutory rights.
✁
SERVICE AND REPAIRS
Your SEKONDA watch is guaranteed against defects in materials
and workmanship for a period of 2 years from the date of
purchase. During this period, we will exchange or repair,
at our discretion, any defective components.
IMPORTANT – Not covered by Guarantee
1. Batteries, straps and bracelets.
2. Damage caused by accident, misuse or lack of care.
3. Water penetration except in watches marked
as “Water Resistant”. (see page 2).
SERVICING AND REPAIRS UNDER GUARANTEE
Please post your watch, together with the Retailer’s Sales Re-
ceipt or Proof of Purchase, the completed Guarantee slip on the
back cover of this booklet, and a brief note to explain the nature
of the fault, by Registered Post or Recorded Delivery to the ad-
dress shown. Do not send the presentation box as this will not be
returned.
SERVICING AND REPAIRS OUTSIDE OF GUARANTEE
Available at a reasonable charge after an estimate has been
sent by SEKONDA. Send your watch to us by Registered Post
or Recorded Delivery to the address shown on the inside front
cover.
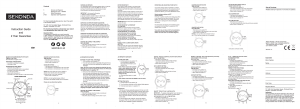
SETTING THE CORRECT TIME (AM/PM) –
DATE WATCHES
• If the DATE changes when the hands are turned past
12 o’clock, the time shown is “am”.
• If the DATE does not change, the time shown is “pm”.
1
12
A
B
MULTIPLE CLASPS
Some of our bracelet models are
now fitted with a multiple clasp
system which is designed to make
bracelet adjustment easier for you.
To reduce the size of the bracelet
simply open and remove one or
both of the adjustable clasps
indicated as (A) and (B) on the
diagram.
Should you feel that your bracelet
is in need of further adjustment,
please follow the procedures in In-
struction 3 of the bracelet gauge in-
cludued in this leaflet.
QUARTZ DATE WATCH
DATE SETTING:
• P
ull button out to position “B”.
• Turn clockwise or anti-clockwise to set correct date.
• Return button to position “A”.
NOTE: Do not use this function between 8.30 pm
and 1.30 am as date change cycle is in progress.
QUARTZ NON-DATE WATCH
TIME SETTING:
• Pull button out to position “B”.
• Advance hands to correct time.
• Return button to position “A”.
4
QUARTZ “TWO-EYE” (DAY & DATE) WATCH (continued)
DATE IN RIGHT EYE (continued)
DATE SETTING:
• Pull button out to position “B”.
• Turn button clockwise until date changes.
• Repeat until correct date is shown.
• Return button to position “A”.
DATE IN LEFT EYE
TIME SETTING:
• Pull button out to position “C”.
• Turn button to advance hands.
• Return button to position “A”.
DAY/DATE SETTING:
• Pull button out to position “B”.
• Turn button anti-clockwise to set correct DAY.
• Turn button clockwise to set correct DATE.
• Return button to position “A”.
9
QUARTZ “TWO-EYE” (MONTH & DAY) WITH DATE WATCH
DAY & TIME SETTING:
• Pull button out to position “C”.
• Turn button to advance hands until day changes;
repeat until correct day and time is shown.
• Return button to position “A”.
DATE & MONTH SETTING:
• Pull button out to position “B”.
• Turn button clockwise until month changes
(every 31 days).
• Repeat until correct month and date are shown.
• Return button to position “A”.
QUARTZ “TWO-EYE” (DAY & DATE) WATCH
IMPORTANT – The position of the day/date “eyes” referred to in
these instructions MAY BE REVERSED on certain Models.
DATE IN RIGHT EYE – DAY & TIME SETTING:
• Pull button out to position “C”.
• Turn button to advance hands until day changes;
repeat until correct day and time is shown.
• Return button to position “A”.
8
DAY/DATE MOON PHASE WATCH
MOON PHASE SETTING:
• Pull button out to position “B”.
• Turn button clockwise to set correct moonphase
(see enclosed leaflet for dates of moonphase).
• Return button to position “A”.
DATE CORRECTION:
• Pull button out to position “B”.
• Turn button anti-clockwise to set date.
• Return button to position “A”.
DAY/TIME SETTING:
• Pull button out to position “C”.
• Turn hands forwards until correct day and time are reached.
• Return button to position “A”.
5
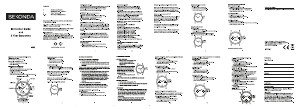
QUARTZ 3 EYE CHRONOGRAPH WITH DATE
TIME/DATE SETTING:
See instructions on pages 4 and 5.
OPERATING CHRONOGRAPH:
• Push PB1 to start/stop chronograph.
• Push PB2 to reset.
CHRONOGRAPH ZERO RESET:
• Pull button out to position ‘C’
(Chrono second hands return to zero position).
• Push PB1 to set Chrono second hand
to 12.00 (zero) position.
• Return button to position ‘A’.
• Push PB2 to set Chrono minute to 12.00 (zero) position.
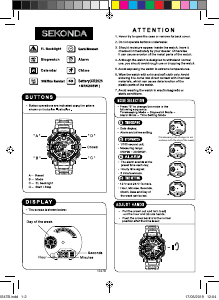
HAND DISPLAYS
PB1
PB2
CHRONO SECONDS
NOTE: This hand should be at
zero (12 o’clock position)
when chrono is not in use.
CHRONO HOUR
MINUTE HAND
CHRONO MINUTE
HOUR HAND
CONSTANT
6
QUARTZ DAY/DATE WATCHES
TIME SETTING:
• Pull button out to position “C”.
• Advance hands to correct time.
• Return button to position “A”.
DAY/DATE SETTING:
• Pull button out to position “B”.
• Turn clockwise or anti-clockwise to set correct date.
• Turn clockwise or anti-clockwise to set correct day.
NOTE: D
ays of the week can be set in English or
Spanish. Once set the watch will automatically
indicate the day in the chosen language.
• Return button to position “A”.
NOTE: Do not set day/date between 8.30 pm
and 5.00 am as day/date change cycle is in progress.
7
PB1
PB1
10
OPERATING AND ADJUSTING YOUR WATCH
Your quartz analogue watch is powered by a battery
which was inserted at the time of manufacture and will
require periodic replacement. New batteries can be
supplied and fitted by your nearest SEKONDA stockist.
Quartz analogue watches do NOT
require winding.
The button is used for hand/function setting only. When
in use, ensure that the button is pushed FULLY IN to
position “A”. Failure to do so can result in excessive
battery drain or damage to the hand setting/date
mechanism.
The instructions and diagrams on the following pages
are designed to demonstrate the adjustment of all
models within our range.
Your watch may not have all of the characteristics
shown and may have other buttons and dials in ad-
dition to those shown on individual diagrams.
3
MODELS WITH ELECTRO LUMINESCENT
DISPLAY (E.L.D.) FACILITY
NON-DATE MODELS
TIME SETTING:
• See instructions on page 4.
DATE MODELS
TIME/DATE SETTING:
• See instructions on pages 4 and 5.
E.L.D. DISPLAY
• Press PB1 to activate display
(Display only visible in subdued light).
Note: Display should only be activated for
short periods, e.g. 1 or 2 seconds as excessive
use will greatly reduce the life of the battery.
WATER RESISTANCY
If your watch is water resistant, it will clearly state
“Water Resistant” or have a static water pressure
indication (eg “30/50/100 metres”) on the dial and/or
case back.
If it is NOT marked as water resistant, it should not be
allowed to come into contact with water or be worn in
conditions that could expose it to moisture (eg washing,
heavy rain etc). Certain chemicals in water may
damage the watch seals. To maintain its water
resistance, we recommend that your watch is serviced
and re-sealed at least every 12 months by SEKONDA.
IMPORTANT Buttons must not be operated while in
contact with water.
WATER RESISTANT or RESISTANT
TO 30 METRES
Suitable for normal everyday use and will resist
exposure to splashes and rain; it is NOT designed
to be used while bathing or swimming.
WATER RESISTANT TO 50 METRES
As 30 metres plus bathing or swimming.
WATER RESISTANT TO 100 METRES
As 50 metres plus poolside diving and snorkelling,
but NOT highboard or scuba diving.
WATER RESISTANT TO 200 METRES
As 100 metres plus scuba diving, but NOT high board
diving.
MODELS WITH A SCREW-DOWN CROWN
(BUTTON)
Unlock the crown by turning it anti-clockwise until free.
Lock it by pressing in while turning clockwise. WATER
RESISTANCE is lost when the crown is in the UN-
LOCKED position.
2
E.L.D. – THREE EYE WITH DAY-DATE-
24 HOUR FUNCTIONS
DAY SETTING:
• Pull button out to position “C”.
• Turn button clockwise to advance hands.
• Continue until correct day is shown.
• Return button to position “A”.
NOTE: Date change takes place between approximately
midnight and 5.30 am.
TIME/24 HR FUNCTION SETTING:
• Pull button out to position “C”.
• Turn button clockwise to s
et the hour, minute and 24
hour hands to the correct time. *When setting the hour
hand, be sure to check that the 24 hour hand is set
properly. (E.G. 12 midnight = 24.00 hrs)
• Return button to position “A”.
NOTE: When setting the minute hand first advance it 4 to
5 minutes ahead of the desired time and then turn it back
to the exact minute.
DATE (QUICK CHANGE FUNCTION) SETTING:
• Pull button out to position “B”.
• Turn button anti-clockwise to advance date hand
to correct date.
• Return button to position “A”.
E.L.D. DISPLAY:
See instructions on page 10.
DAY
DATE24 HR
11
PB1


Praat mee over dit product
Laat hier weten wat jij vindt van de Sekonda 1370 Classic Horloge. Als je een vraag hebt, lees dan eerst zorgvuldig de handleiding door. Een handleiding aanvragen kan via ons contactformulier.