Thank you for purchasing
this Sentry product.
For safes with key lock only
Your Sentry safe is equipped with a high security, 8 lever key lock, two (2) keys
are provided.
For safes with electronic lock
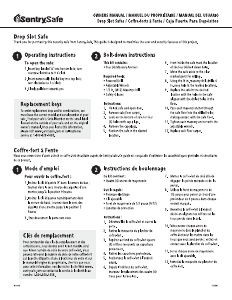
Battery Installation
To power the lock, four alkaline AA batteries (not included) are required.
NOTE: Non-alkaline and rechargeable batteries ARE NOT RECOMMENDED.
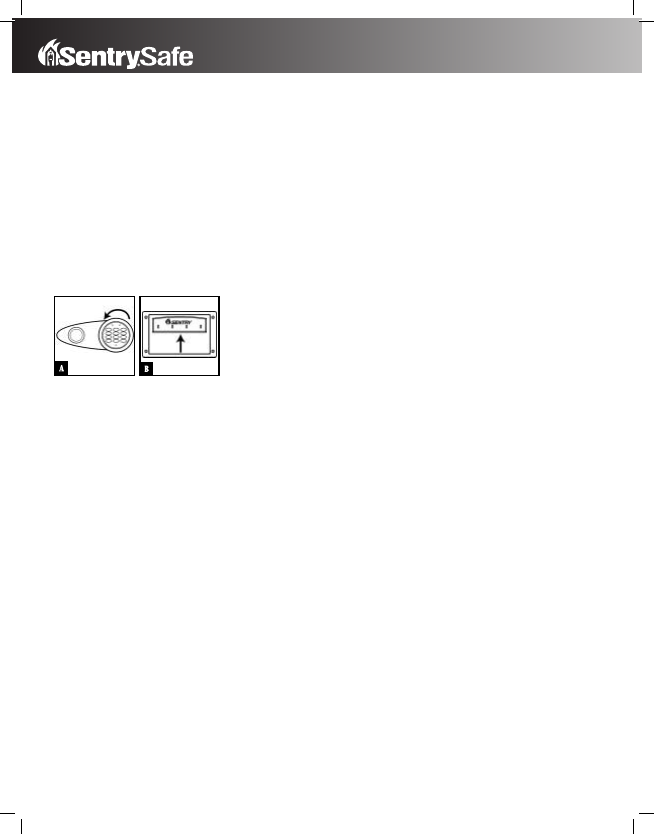
To install batteries, remove keypad by rotating the cover counterclockwise, then
pulling toward you. (Fig. A) Unlock door with the override key provided in the plastic
bag attached to the owner’s manual, and open the door using the lever handle.
Remove key hook plate located on the inside back of the door by sliding the plate
upward, then pulling toward you. (Fig. B) Insert the four batteries as indicated.
Replace the key hook plate and keypad.
Test first with door open!
(See back cover of this manual for your factory code.)
Test your combination several times with the door open.
NOTE: All electronic lock units have been provided with an override key
(skeleton key). Some electronic units are equipped with a handle
OR electronic lock and key.
1. Insert the four-bitted key into the lock to the left of the key pad. (Be sure key
lock is turned as far left as possible.)
2. Press the five-digit factory code. The green light will come on.
3. For units with key, turn the key to the right.
4. Open the door.
Using the keypad
Only a light touch is needed. A green PROCEED light and a single beep indicate that
the keypad “felt” your touch. The lock allows 5 seconds for each key press. If you
pause longer, an error signal will occur (blinking red light and three beeps),
indicating you should start over.
Access Codes
There are three possible ways to unlock and access the safe—by entering its pre-
set Factory Code, your own User Code or a Passcode.
You can always open the safe by entering the 5-digit Factory Code. But if you prefer
to use your own code, you can program the safe to open to the 5-digit User Code of
your choice. If you wish to give someone else temporary access to the safe, you can
program a passcode that can later be erased.
Programming a user code
There are two ways to program a user code.
A 1. Press the Program key.
2. Enter the Factory Code. The green LED remains ON while you enter the
5-digit user code of your choice. After 5 digits are entered the green LED
turns OFF.
(To enter a new User Code, repeat these steps.)
B 1. Press the red button inside the safe. The lock will “beep” and the green
LED will come on.
2. Enter a 5-digit user code.
(To enter a new User Code, repeat these steps.)
Programming a passcode
1. Press the Program key twice.
2. Enter your 5-digit User Code. The green LED remains ON.
3. Enter the 5-digit passcode of your choice (any combination except 00000.) After 5
digits are entered, the green LED turns OFF.
(To enter a new passcode, repeat these steps. To erase the passcode, press
Program twice, enter your User Code and then enter 00000.)
Unlocking
To unlock the safe, you must enter a valid Factory Code, User Code or Passcode.
Once you have done this, you have 4 seconds to open the safe by turning the
handle or 4-bitted key to the unlock position. If you fail to do so in time, the lock
will reactivate.
(If you realize you have made an error while entering your code, press the CLEAR
button and start over.)
Key override
If your electronic lock fails or you do not have any codes available, you may use a key
override to access this unit. Remove the keypad by rotating the cover counterclock-
wise, then pull toward you. Unlock the door by inserting the key provided into the
hole and turning clockwise. Open the door. Do not lock override key inside of unit.
Signals
Your electronic-lock safe communicates by means of several audio/visual signals.
Red (Error) LED + three beeps indicates one of the following:
1. You have pressed Program key out of sequence
2. You have entered an invalid code or passcode.
3. You have let 5 seconds or more elapse between key entries.
Green (Proceed) LED + single beep occurs
1. After entering each digit of Factory or User Code, or Passcode
2. After pressing Clear key
3. After pressing Program key
Green LED only
1. Comes ON after you enter a valid code/passcode and remains lit during the 4-sec-
ond period in which the safe can be opened.
2. Comes ON in the Program User Code mode after you enter the Factory Code and
remains lit until you have finished entering a 5-digit User Code.
3. Comes ON in the Program Passcode mode after you have entered your User Code
and remains ON until you have entered a 5-digit passcode. Indicates “low battery”
and will typically not turn OFF until new alkaline batteries are installed.
Your electronic lock automatically performs a low battery test during each lock use.
If a “low battery” condition is detected, the Yellow LED will come ON and remain
ON during each subsequent lock operation. (The lock will continue to function in
a Low Battery state, until battery failure.) The Yellow LED will turn OFF only after
three consecutive “Good Battery” readings or after the low batteries are replaced.
(Note: When the new batteries are installed, the Yellow LED may come ON and stay
ON during the first lock operation before it returns to OFF.)
NOTE: When changing the batteries, you must use the factory code to open.
(See back cover.) Passcode will have to be re-programmed.
Delay Mode
The lock automatically enters a two-minute Delay Mode after an invalid code has
been entered three consecutive times. In this mode, the lock cannot be activated
and any key entry will generate an ERROR signal.
Bolt-down Instructions
1. Select a suitable and convenient location for your safe. Set the safe in place and
use the holes provided in the bottom or back of the safe to mark the location of
the holes to be drilled in the floor or wall. It is not recommended to attempt to
bolt to both floor and wall. If bolting to a wall, please ensure that the safe is rest-
ing on a supporting surface, i.e. floor, table or shelf.
2. Move the safe away and drill holes of the appropriate diameter and depth for the
type of hardware being used and the mounting surface.
3. Place the safe back over the holes and install the fasteners as required.
4. NOTE: For maximum security on models which have feet, remove feet before
bolting to floor.
1


Praat mee over dit product
Laat hier weten wat jij vindt van de SentrySafe T8-331 Kluis. Als je een vraag hebt, lees dan eerst zorgvuldig de handleiding door. Een handleiding aanvragen kan via ons contactformulier.