
Operating Instructions
Mode d'emploi
Инструкция по эксплуатации
M-950
3-858-734-33 (1)
Continued to the back c
Sony Corporation ©1997 Printed in Japan
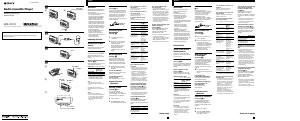
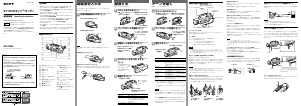
A
a
B
HOLD
C
a
2
1
b
D
OPEN
a
b
c
d
e
f
E
p STOP
REW/REVIEW
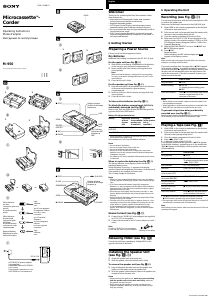
z Operating the Unit
Recording (see Fig. D-a)
You can record right away with the built-in microphone, with
or without the speaker unit.
Make sure that nothing is connected to the EAR/MIC jack.
1 Slide OPEN on the cassette compartment in the direction
of the arrow and open the lid.
2 Take out any slack in the tape and insert the cassette with
the side to start recording facing the lid.
3 Close the cassette compartment lid until it clicks.
4 Make sure that VOR L or VOR H is not displayed in the
display window. For normal recording, if VOR L or VOR
H is displayed, make it disappear. Refer to “VOR (Voice
Operated Recording)”.
5 Slide the RECORD PROTECT cover so that r REC and
P PAUSE buttons appear.
6 Press r REC.
Recording starts.
While recording, the REC indicator lights and
appears in the display window.
Note
Make sure the tab on the upper (forward) side is not removed;
otherwise, recording cannot be made.
If you start recording from the upper side (9 FWD appears
in the display window), recording automatically goes on to
the reverse side (REV ( appears in the display window) and
the unit turns off automatically when the tape comes to the
end of the reverse side. If the tab is removed, however, you
cannot record on that side.
To Press or slide
Stop recording p STOP
Pause recording P PAUSE
To release pause recording, press
r REC.
Take out a cassette Press p STOP and slide OPEN on the
cassette compartment lid in the
direction of the arrow.
Notes
• Before taking out the cassette, make sure that the sound of the
unit operating has stopped.
• When earphones or an external microphone is connected to the
EAR/MIC jack, the built-in microphone does not work.
To prevent a tape from being accidentally
recorded over (see Fig. D-b)
Break out and remove the cassette tabs. To reuse the cassette
for recording, cover the tab hole with adhesive tape.
Playing a Tape (see Fig. E)
1 Slide OPEN on the cassette compartment in the direction
of the arrow and open the lid.
2 Take out any slack in the tape and insert the cassette with
the side to start playing facing the lid.
3 Close the cassette compartment lid until it clicks.
4 Press 9( PLAY/DIR.
5 Adjust the volume using VOLUME.
If the playback starts from the upper side (9 FWD appears
in the display window), playback goes on to the reverse side
(REV ( appears in the display window) and the unit turns
off automatically.
To Press or slide
Stop playback p STOP
Pause playback P PAUSE
To release pause playback, press
9( PLAY/DIR*.
Fast forward** FF/CUE during stop
Rewind** REW/REVIEW during stop
Fast forward while listening FF/CUE during Playback
to the sound (CUE)
Rewind while listening to REW/REVIEW during playback
the sound (REVIEW)
Play the other side 9( PLAY/DIR
during playback
Play the other side p STOP for more than 2 seconds
during stop
Take out a cassette Press p STOP and slide OPEN
in the direction of the arrow.
* The P PAUSE button is released automatically when the
p STOP button is pressed (stop-pause-release function).
**The tape stops at the end of the tape and the power is turned off
automatically (automatic shut-off mechanism).
Note
Before taking out the cassette, make sure that the sound of the unit
operating has stopped.
//
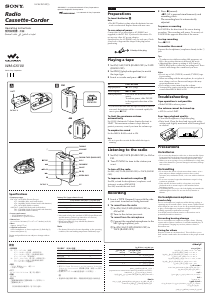
Welcome!
Thank you for purchasing the Sony Microcassette-Corder.
Some features are:
• Super-mini size Microcassette-Corder with automatic
reverse function and feather-touch buttons.
• Supplied detachable speaker.
• LCD (Liquid Crystal Display) that shows tape counter,
remaining battery power and tape transport direction.
•Zero stop counter that stops the tape automatically at 000 in
rewind and review mode.
• VOR (Voice Operated Recording) system that starts and
stops recording automatically in response to the sound, to
save tapes and batteries.
z Getting Started
Preparing a Power Source
Choose one of the following power sources.
Dry Batteries
Make sure that nothing is connected to the DC IN 1.5V jack.
For the main unit (see Fig. A-a)
1 Slide OPEN on the battery compartment in the direction
of the arrow to open the battery compartment lid.
2 Insert one R03 (size AAA) battery (not supplied) with
correct polarity.
Note
Make sure that the battery is inserted with correct polarity.
You may not be able to distinguish between ‘ and ’ with
some batteries.
3 Close the lid until it clicks.
For the speaker unit (see Fig. A-b)
1 Push and slide OPEN on the speaker unit in the direction
of the arrow as illustrated to open the battery
compartment lid.
2 Insert two R03 (size AAA) batteries (not supplied) with
correct polarity.
3 Close the lid until it clicks.
To take out the batteries (see Fig. A-c)
To attach the battery compartment lid if it is
accidentally detached (see Fig. A-d)
Insert a wire, push the OPEN button-side and then push the
opposite side of the OPEN button.
Battery life (Approximate hours)
Battery Recording Recording Playback
without (when speaker (when speaker
speaker speaker unit unit is
unit is installed*) installed*)
Sony alkaline 5.5 22 24
LR03 (SG)
Sony R03 (SB) 1.5 10 11.5
* When one battery is installed in the main unit and two batteries
are installed in the speaker unit
We recommend to use long-life alkaline batteries.
Notes
• Do not charge a dry battery.
• Do not use a new battery with an old one.
• Do not use different types of batteries.
• When you do not use the unit for a long time, remove the
batteries to avoid any damage caused by battery leakage and
subsequent corrosion.
• Dry batteries will not be expended when another power source
is connected.
When to replace the batteries (see Fig. A-e)
The battery indicator in the display window shows the
remaining battery power.
When the battery is used up, i appears in the display
window. Replace all the batteries (one battery in the main unit
if the speaker is not installed) with new ones.
The i lamp changes as illustrated:
Notes
• When you have changed the batteries to new ones, the battery
indicator appears in the display window after running the tape
once.
• If you insert exhausted batteries (especially manganese
batteries), i may not appear even though the other indicators
appear properly. If the unit does not operate properly, replace
the batteries with new ones.
• While the tape runs rapidly (fast forward or rewind), i may
appear. Replace the batteries only when the tape does not run
properly.
• During playback, the battery indicator may temporarily flicker
when you turn up the volume.
• The tape will run for a while after i appears; however, a big
noise may be heard from the speaker or recording may not be
made. When i appears, replace all the batteries at once.
• At the beginning or end of the tape i may momentarily
appear. If the indicator disappears, you do not need to replace
the batteries.
House Current (see Fig. A-f)
1 Connect the AC-E15HG AC power adaptor (not supplied)
to DC IN 1.5V of the speaker.
2 Connect the other end of the AC power adaptor to a wall
outlet.
Note
Use the AC-E15HG AC power adaptor.
Do not use any other AC power adaptor.
Releasing HOLD (see Fig. B)
Unlock the unit before operating by sliding HOLD in the
opposite direction of the arrow.
Installing the Speaker Unit
(see Fig. C-a)
1 Attach the speaker unit to the main unit.
2 Slide the speaker unit as illustrated until it clicks.
To remove the speaker unit (see Fig. C-b)
1
Keep holding both the main unit and the speaker unit
with your both hands, release the speaker lock.
2 With the speaker locked released, remove the speaker unit
straight out from the main unit.
Notes
• When removing the speaker unit, make sure you are holding
both the speaker unit and the main unit firmly; otherwise,
the speaker unit may drop out.
• Before removing the speaker unit, make sure the tape has
stopped completely; otherwise, noise may be heard or a tape
may stop running.
Polarity of the plug
9( PLAY/DIR
VOLUME
1
2
2
1
DC IN 1.5V
AC-E15HG AC power adaptor
(not supplied)
Adaptateur secteur AC-E15HG
(non fourni)
Переходник переменного тока
AC-E15HG (не поставляется)
Display window
Fenêtre d’affichage
Индикатор
p STOP
RECORD
PROTECT
VOR
r REC
P PAUSE
Display window
Fenêtre d’affichage
Индикатор
REC indicator
Indicateur REC
Индикатор
REC
P PAUSE
FF/CUE
OPEN
b
REC
EAR/
MIC
light
s’allume
свет
light
s’allume
свет
go off one segment
un segment s’éteint
исчезает одна
пластина
go off another
segment
un autre segment
s’éteint
исчезает другая
пластина
When batteries
are new
Lorsque les piles sont
neuves
Когда батарейки
новые
When batteries
become weak
Lorsque les piles
faiblissent
Когда батарейки
становятся слабо
заряженными
Replace batteries
Remplacez les piles
Замена батареек
Microcassette
TM
-
Corder
English

Praat mee over dit product
Laat hier weten wat jij vindt van de Sony M-950 Cassetterecorder. Als je een vraag hebt, lees dan eerst zorgvuldig de handleiding door. Een handleiding aanvragen kan via ons contactformulier.