
Operation on the Control-Pad (see Fig.
D)
Push toward
œ
(play)
during playback
Press down pOFF (stop)
Push toward FF during stop
Push toward REW during stop
Push toward FF during playback
Push toward REW during playback
WM-FS595/FS593
Sony Corporation 1998 Printed in China
Operating Instructions
3-861-495-11(1)
Radio Cassette Player
Owner’s Record
The model number is located at the bottom and the serial number is
located inside the cassette holder. Record the model and serial
numbers in the spaces provided below. Refer to these numbers
whenever you call upon your Sony dealer regarding this product.
Model No.
Serial No.
For customers in the United States
WALKMAN is a registered trademark of Sony Corporation.
z Getting Started
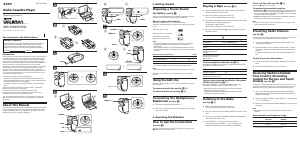
Preparing a Power Source
Dry Battery (see Fig. A)
Open the cassette holder and open the battery compartment lid, and
insert two size AA (R6) dry batteries with correct polarity.
When to replace the batteries
Replace the batteries when “n” flashes in the display.
The battery remainder mark has 3 steps to show the remaining battery
power.
The battery power is full.
The battery power is decreasing.
The batteries are exhausted.
Replace them with new ones.
Notes
• The battery remainder mark may temporarily show a lower level
during fast forwarding or rewinding or use in extremely low
temperatures.
• When replacing batteries, replace both batteries within 30 seconds;
otherwise all the memories including the preset radio stations will be
canceled.
Battery life (Approximate hours) (EIAJ*)
Tape playback Radio reception
Sony alkaline LR6 (SG) 24 38
Sony R6P (SR) 7.5 14
* Measured value by the standard of EIAJ (Electronic Industries
Association of Japan). (Using a Sony HF series cassette tape)
Note
• The battery life may shorten depending on the operation of the unit.
For maximum performance we recommend that you use alkaline
batteries.
Using the belt clip
With the supplied belt clip, you can wear your Walkman on a belt for
convenient use.
To remove the belt clip (see Fig. B-a)
To attach the belt clip (see Fig. B-b)
Connecting the Headphones/
Earphones
(see Fig. C)
1 Connect the headphones/earphones to 2.
2 Wear the “L” marked side to the left ear and the “R” marked
side to the right ear.
z Operating the Walkman
How to Use the Control-Pad
(see Fig. D)
Push the Control-Pad in any of the four directions or press down the
pOFF button for various operations.
Playing a Tape (see Fig. E-a)
1 Open the cassette holder and insert a cassette. Then close the
cassette holder and lock the buckle.
2 Make sure the HOLD function is turned off.
If it is on, slide the HOLD switch to turn it off.
3 Press MENU repeatedly to set the cursor to TAPE in the display.
Then press SET to select the tape type.
No message: normal (TYPE I)
METAL: CrO2 (TYPE II) or metal (TYPE IV)
4 Push the Control-Pad toward œ (play) to start playing. Then
adjust the volume.
To
play the other side
stop playback
fast forward
rewind
play the other side from the
beginning (Skip Reverse
function)
play the same side from the
beginning (Rewind Auto
Play function)
To select playback mode (see Fig. E-b)
Press MENU repeatedly to set the cursor to MODE in the display. Then
press SET to select the desired mode.
To play Select
both sides repeatedly a
both sides once from the Å
side facing the cassette holder
To play a tape recorded with Dolby* NR system
(FS595 only) (see Fig. E-c)
Press MENU repeatedly to set the cursor to a NR (Dolby noise
reduction) in the display. Then press SET to show “ON”.
* Dolby noise reduction manufactured under license from Dolby
Laboratories Licensing Corporation.
“DOLBY”and the double-D symbol a are trademarks of Dolby
Laboratories Licensing Corporation.
Listening to the Radio
(see Fig. F-a)
1 Make sure the HOLD function is turned off.
If it is on, slide the HOLD switch to turn it off.
2 Push the Control-Pad toward BAND/RADIO ON to turn on the
radio.
3 Push the Control-Pad toward BAND/RADIO ON repeatedly to
select FM1, FM2, FM3, or AM.
4 Press TUNING+/– to tune in to the desired station.
If you keep pressing TUNING+/– for a few seconds, the
Walkman will start tuning to the stations automatically.
To turn off the radio (see Fig. F-b)
Press down pOFF of the Control-Pad.
To improve the broadcast reception
• For FM (see Fig. F-c): Extend the headphones/earphones cord, the
aerial. If the reception is still not good, press MENU repeatedly to set
the cursor to FM MODE or FM SENS in the display. Then press SET to
choose the mode for best reception.
• For AM: The Walkman has a built-in antenna. Reorient the Walkman
horizontally to obtain optimum AM reception.
Note
• Do not remove the power sources while listening to the radio, or the
received stations may not be stored.
Presetting Radio Stations
(see Fig. G)
You can store radio stations into the unit’s memory. You can preset up to
20 radio stations, 5 for each FM1, FM2, FM3 or AM bands.
1 Tune in to the station you wish to store. (Follow steps 1-4 in
“Listening to the Radio”)
2 Press and hold one of the 1-5 buttons for more than 2 seconds.
The display flashes twice with a beep sound, and the station is
preset.
If a station is already stored, the new station replaces the old
one.
To play the preset radio stations
1 Push the Control-Pad toward BAND/RADIO ON to select the
band.
2 Press the corresponding button (1-5) on the unit.
Receiving Stations Outside
Your Country (Excluding
models for Europe and Saudi
Arabia)
(see Fig. H)
The frequency range differs depending on the area (see the chart “Area
indication and frequency range”). If you listen to the radio in an area of
different frequency range, change the area indication in the display.
1 Turn on the radio and push the Control-Pad toward BAND/
RADIO ON for more than 10 seconds until the area indication
flashes in the display.
2 While the display is flashing, press TUNING +/– to select either
“U” or “E” indication.
3 Push the Control-Pad toward BAND/RADIO ON to set the area
indication.
Note
• If you change the frequency range, all the preset stations will be
canceled.
Area indication and frequency range
Area* Frequency range
FM (MHz) AM(kHz)
E 87.5–108 531–1,602
U 87.5–108 530–1,710
* E: European and other countries
U: USA, Canada, and Central and South America
E
1
2
5
4
3
a
VOLUME
HOLD
SET
MENU
TAPE
R
E
W
F
F
PRESET
PRESET
OFF
BAND
RADIO ON
A
1
2
a
B
1
2
b
∫
C
D
or
R
E
W
F
F
PRESET
PRESET
OFF
BAND
RADIO ON
R
E
W
F
F
PRESET
PRESET
OFF
BAND
RADIO ON
F
G
SET
MENU
LOCAL DX
FM SENS
bc
MODE
SET
MENU
aNR
SET
MENU
a
b
c
or
TUNING +/–
VOLUME
HOLD
R
EW
FF
P
RESE
T
P
R
ES
ET
OFF
BAND
RADIO ON
R
E
W
FF
PRESET
PRESET
OFF
BAND
RADIO ON
1~5
R
E
W
FF
PRESET
PRESET
OFF
BAND
RADIO ON
H
TUNING +/–
R
E
W
FF
PRESET
PRESET
OFF
BAND
RADIO ON
INFORMATION
This equipment has been tested and found to comply with the limits for
a Class B digital device, pursuant to Part 15 of the FCC Rules. These
limits are designed to provide reasonable protection against harmful
interference in a residential installation. This equipment generates,
uses, and can radiate radio frequency energy and, if not installed and
used in accordance with the instructions, may cause harmful
interference to radio communications. However, there is no guarantee
that interference will not occur in a particular installation. If this
equipment does cause harmful interference to radio or television
reception, which can be determined by turning the equipment off and
on, the user is encouraged to try to correct the interference by one or
more of the following measures:
– Reorient or relocate the receiving antenna.
– Increase the separation between the equipment and receiver.
– Connect the equipment into an outlet on a circuit different from
that to which the receiver is connected.
– Consult the dealer or an experienced radio/TV technician for
help.
This device complies with Part 15 of the FCC Rules. Operation is
subject to the following two conditions:
(1) This device may not cause harmful interference, and
(2) this device must accept any interference received, including
interference that may cause undesired operation.
You are cautioned that any changes or modifications not expressly
approved in this manual could void your authority to operate this
equipment.
About This Manual
The instructions in this manual are for WM-FS595 and WM-FS593. Before
you start reading, check your model number. WM-FS595 is the model
used for illustration purposes. Any differences in operation are clearly
indicated in the text, for example, “FS595 only”.

Praat mee over dit product
Laat hier weten wat jij vindt van de Sony WM-FS595 Walkman Cassetterecorder. Als je een vraag hebt, lees dan eerst zorgvuldig de handleiding door. Een handleiding aanvragen kan via ons contactformulier.