
Pila ricaricabile
(vedere la fig. A-c)
1 Inserire la pila ricaricabile (NC-
6WM) nel caricapile con la
corretta polarità.
2 Collegare il caricapile alla presa
di corrente.
Modello per il Regno Unito e
l’Australia: La carica completa
richiede circa 3,5 ore.
Modelli per il continente
europeo, la Russia e l’Arabia:
La carica completa richiede
circa 2,5 ore.
Modello per la Corea: Il tempo
per la carica completa dipende
dalla tensione della rete di
alimentazione.
110 V: 10 ore
220 V: 2,5 ore
Altri modelli: Il tempo di carica
completa dipende dalla
tensione della rete elettrica.
120 V: 10 ore
220-240 V: 2,5 ore
Se la spina del caricatore non
corrisponde alla presa di
corrente, usare l’adattatore per
spina CA in dotazione.
3 Inserire la pila completamente
carica nel comparto pila
ricaricabile (vedere la fig. A-
d).
Quando caricare la pila
(vedere la fig. A-b)
Caricare la pila quando la spia
BATT si affievolisce. È possibile
caricare la pila circa 300 volte.
Note
• Non rimuovere la pellicola di
plastica della pila ricaricabile.
• Usare la pila ricaricabile Sony NC-
6WM solo con il caricapile in
dotazione o con il caricapile in
vendita separatamente per la Sony
NC-6WM.
• Rimuovere il caricapile dalla presa
di corrente il prima possibile dopo
che la pila ricaricabile è stata
caricata. Una carica eccessiva può
danneggiare la pila ricaricabile.
• Il caricapile e la pila ricaricabile
possono riscaldarsi durante la carica
ma questo non è indice di problemi.
• Assicurarsi di non cortocircuitare la
pila. Quando la si porta con sè,
inserirla nella custodia di trasporto
in dotazione. Se non si usa la
custodia di trasporto, non tenere la
pila insieme ad altri oggetti metallici
come le chiavi in tasca.
ϥ
REPEAT
pREW•AMS
FF•AMS
VOLUME
ϥREPEAT
To Press (see
Fig. D-b)
play the other side œ
•REPEAT
during playback
stop playback p (stop)
fast forward FF•AMS
during stop
rewind REW•AMS
during stop
repeat the track ϥREPEAT
you are listening to for two seconds
(Repeat Single or more during
Track function) playback
To stop a
single repeat,
press it again.
find the beginning FF•AMS once/
of the next track/ repeatedly
succeeding 3 tracks during
(AMS*) playback
find the beginning REW•AMS
of the current track/ once/
previous 2 tracks repeatedly
(AMS) during
playback
play the same side REW•AMS
from the beginning for two
(Rewind Auto seconds or
Play function) more during
stop
play the other side FF•AMS for two
from the beginning seconds or
(Skip Reverse more during
function) stop
* Automatic Music Sensor
Note on Beeps during AMS
operations
• The beeps differ in relation to the
track number being searched. When
finding the beginning of the next 3
tracks during AMS operations,
beeps “• – – –” (beep followed by
three long beeps) are emitted
repeatedly. Likewise, when finding
the beginning of the previous 2
tracks, beeps “•• – – –” are emitted
repeatedly. While the remaining
tracks are reduced, the number of
long beeps are reduced accordingly.
To skip a long blank space
between musics. (BL SKIP*
function) (see Fig. D-c)
Press MENU repeatedly to set the
cursor to BL SKIP in the display.
Then press SET to show “ON”.
* The Walkman fast forwards the tape
to the next track if there is a blank
space longer than 12 seconds.
To select playback mode
(see Fig. D-c)
Press MENU repeatedly to set the
cursor to MODE in the display.
Then press SET to select the desired
mode.
To play Select
Both sides repeatedly a
Both sides once Å
from the side facing
the cassette holder
Note on AMS, REPEAT Single
Track and BL SKIP
• To operate the AMS and the
REPEAT Single Track functions, you
need a blank of 4 seconds or longer
between the tracks. For the BL SKIP
function, you need a blank of 12
seconds or longer. Therefore, if there
is noise between the tracks, these
functions will not detect the blank
and will not operate. Likewise, if the
recording level is moderately low
within a track, these functions may
inaccurately operate.
B
C
D
FX655
WARNING
To prevent fire or shock hazard, do not
expose the unit to rain or moisture.
ATTENZIONE
Per evitare incendi o scosse elettriche, non
esporre l’apparecchio alla pioggia o
all’umidità.
Welcome !
Thank you for purchasing the Sony
WM-FX655/FX653/FX651 Radio
Cassette Player.
Some features are:
•You can enjoy low bass sounds by
the powerful headphone.
•You can choose from 2 different
emphasizing tones: MB (MEGA
BASS) and GRV (GROOVE) to
adjust to your favorite sound.
•LCD Menu function that lets you
select and switch functions in the
display window of the main unit.
•Auto Memory Scanning function
that lets you store and recall up to
16 stations for FM and 8 stations
for AM automatically.
•AMS (Automatic Music Sensor)
function that searches the
beginning of the current and 2
previous tracks, and succeeding 3
tracks at high speed.
•Useful remote control (FX655/
FX653 only).
zGetting Started
Preparing a Power
Source
Choose one of the three power
sources below; dry battery,
rechargeable battery, and mains.
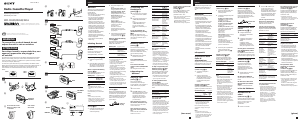
Dry Battery (see Fig. A-a)
1 Attach the supplied battery
case.
2 Open the battery compartment
lid, and insert an R6 (size AA)
dry battery (not supplied) like
the illustration in this manual.
When to replace the battery
(see Fig. A-b)
Replace the battery with a new one
when the BATT lamp dims.
Battery life (Approx. hours)
Sony Sony
alkaline R6P
LR6 (SG) (SR)
Tape playback 29 8
Radio reception 30 8
Note
• The battery life may shorten
depending on the operation for the
unit.
For maximum performance we
recommend that you use an alkaline
battery.
Notes
• Do not charge a dry battery.
• When you are not going to use your
Walkman for a long time, remove
the battery to prevent damage from
battery leakage and corrosion.
Rechargeable Battery
(see Fig. A-c)
1
Insert the rechargeable battery
(NC-6WM) into the charger
with correct polarity.
(turn over)
d
2 Plug in the charger to the
mains.
UK and Australia model: Full
charging takes about 3.5 hours.
European Continent, Russia,
and Arabian models : Full
charging takes about 2.5 hours.
Korean model : The full
charging time depends on the
voltage of your mains.
110 V: 10 hours
220 V: 2.5 hours
Other models: The full
charging time depends on the
voltage of your mains.
120 V: 10 hours
220–240 V: 2.5 hours
If the plug does not fit your
mains, attach the supplied AC
plug adaptor.
3 Insert the fully charged battery
into the rechargeable battery
compartment (see Fig. A-d).
When to charge the battery
(see Fig. A-b)
Charge the battery when the BATT
lamp dims. You can charge the
battery about 300 times.
Battery life (Approx. hours)
Rechargeable battery (NC-6WM)
Tape playback 8
36 (with Sony
alkaline LR6 (SG))
Radio reception 9
37 (with Sony
alkaline LR6 (SG))
Notes
• Do not tear off the film on the
rechargeable battery.
• Use the Sony NC-6WM rechargeable
battery only with the supplied
battery charger or with the
separately sold battery charger for
Sony NC-6WM.
• Remove the charger unit from the
wall outlet as soon as possible after
the rechargeable battery has been
charged.
Overcharging may damage
the rechargeable battery.
• The battery charger and the
rechargeable battery may become
warm during charging, but it is not a
problem.
• Be sure not to short-circuit the
battery. When you carry it with you,
use the supplied carrying case. If
you do not use the carrying case, do
not carry with other metallic objects
such as keys in your pocket.
House Current (mains)
(see Fig. A-e)
Remove the rechargeable battery if
inserted and attach the battery case.
Connect the AC power adaptor AC-
E15HG (not supplied) to the DC IN
1.5 V of the battery case and to the
mains. Do not use any other AC
power adaptor.
Polarity of
the plug
Connecting the
Headphones
(see Fig. B-a)
1 Connect the micro plug firmly
to the remote control. (FX655
only)
2 Connect the remote control to
2REMOTE (FX655/FX653
only).
Connect the headphones to
2REMOTE (FX651 only).
You can put the longer
headphone cord behind your
neck.
To use the supplied clip
(FX655/FX653 only) (see Fig.
B-b)
Position the headphones cord
through the guides on the supplied
clip as shown. Fasten the clip to
your clothes.
Releasing HOLD
(see Fig. C)
The HOLD function locks the
Walkman to prevent from operating
when you accidentally press a
button. If the Walkman is locked,
unlock it before operating.
1 Slide HOLD to the opposite
direction of the arrow.
To lock the Walkman
Slide HOLD in the direction of the
arrow.
To lock and unlock the
remote control (FX655/FX653
only)
See “Using the remote control”.
zOperating the
Walkman
Playing a Tape
(see Fig. D-a)
The Auto Tape Selector
automatically selects the tape
(normal (TYPE I), CrO2 (TYPE II) or
metal (TYPE IV) ) for playback.
1 Insert a cassette.
2 Press ϥREPEAT to start
playing then adjust the volume.
If the headphones do not fit to
your ears or the sound is
unbalanced, turn round the
headphones a little to fit to
your ears firmly.
When adjusting the volume on
the Walkman (FX655/FX653 only)
Set the VOL control on the remote
control at maximum.
When adjusting the volume on
the remote control (FX655/FX653
only)
Set the VOLUME control on the
Walkman to around 6.
English
The instructions in this manual are for WM-FX655, WM-FX653 and WM-FX651.
Before you start reading, check your model number. WM-FX655 is the model
used for illustration purposes. Any differences in operation are clearly indicated
in the text, for example, “FX655 only”.
Le istruzioni in questo manuale sono per il WM-FX655, il WM-FX653 e il WM-
FX651. Prima di iniziare la lettura controllare il numero del modello acquistato. Il
WM-FX655 è il modello usato per le illustrazioni. Eventuali differenze nel
funzionamento sono indicate chiaramente nel testo, ad esempio con “solo
FX655”.
b
a
a
FX653
FX651
FX655
WM-FX655/FX653/FX651
DC IN 1.5 V
2 REMOTE
2 REMOTE
2 REMOTE
HOLD
OPEN
BL
SKIP
NR
SOUND
MODE
FM
MODE
AVLS
MENU SETBATT
SETMENU
ON ON
FWD
Si dichiara che l‘apparecchio è stato
fabbricato in conformità all‘art. 2
Comma 1 de D.M. 28. 08. 1995 n.
548.
Benvenuti!
Grazie per avere acquistato il lettore
di nastri con radio Sony
WM-FX655/FX653/FX651.
Alcune caratteristiche sono:
•Possibilità di ascoltare i suoni dei
bassi profondi grazie alle cuffie
potenti.
•È possibile scegliere tra 2 diversi
toni di enfatizzazione: MB (MEGA
BASS) e GRV (GROOVE), per
regolare il suono come preferito.
•Funzione di menu LCD che
permette di selezionare e
commutare funzioni sul display
dell’apparecchio.
•Funzione di scorrimento
automatico memoria che permette
di memorizzare e richiamare fino
a 16 stazioni FM e 8 stazioni AM
automaticamente.
•Funzione AMS (sensore musicale
automatico) che cerca l’inizio del
brano attuale e di 2 precedenti o
dei 3 brani successivi ad alta
velocità.
•Utile telecomando (solo FX655/
FX653).
zPreparativi
Preparazione della
fonte di
alimentazione
Scegliere una delle tre seguenti fonti
di alimentazione: pila a secco, pila
ricaricabile e corrente domestica.
Pila a secco
(vedere la fig. A-a)
1 Applicare il portapila in
dotazione.
2 Aprire il coperchio del
comparto pila e inserire una
pila tipo R6 (formato AA) (non
in dotazione) come mostrato
nell’illustrazione di questo
manuale.
Quando sostituire la pila
(vedere la fig. A-b)
Sostituire la pila con un’altra nuova
quando la spia BATT si affievolisce.
Durata della pila (ore circa)
Nota
• La durata delle pile può essere
minore a seconda del modo di
impiego dell’apparecchio.
Per il massimo delle prestazioni
consigliamo l’impiego di una pila
alcalina.
Note
• Non caricare la pila a secco.
• Quando non si usa il Walkman per
un lungo periodo estrarre la pila per
evitare danni causati da perdite di
fluido della pila e la risultante
corrosione.
Corrente domestica
(vedere la fig. A-e)
Estrarre la pila ricaricabile se
inserita e applicare il portapila.
Collegare il trasformatore CA AC-
E15HG (non in dotazione) alla presa
DC IN 1.5V del portapila e alla
presa di corrente. Non usare alcun
altro trasformatore CA.
Polarità della
spina
Collegamento delle
cuffie
(vedere la fig. B-a)
1 Collegare saldamente la
microspina al telecomando.
(solo FX655)
2 Collegare il telecomando a
2REMOTE. (solo FX655/
FX653)
Collegare le cuffie a
2REMOTE. (solo FX651)
È possibile far passare il filo
cuffie più lungo dietro il collo.
Uso del gancio in dotazione
(solo FX655/FX653) (vedere
la fig. B-b)
Far passare il filo delle cuffie nelle
guide sul gancio in dotazione come
illustrato. Fissare il gancio agli abiti.
Rilascio di HOLD
(vedere la fig. C)
La funzione HOLD blocca il
Walkman per evitare che sia
attivato quando si preme
accidentalmente un tasto. Se il
Walkman è bloccato, sbloccarlo
prima di farne uso.
1 Spostare HOLD in direzione
opposta alla freccia.
Per bloccare il Walkman
Spostare HOLD in direzione della
freccia.
Per bloccare e sbloccare il
telecomando (solo FX655/
FX653)
Vedere “Uso del telecomando”.
z Uso del Walkman
Riproduzione di
nastri
(vedere la fig. D-a)
Il selettore del tipo di nastro sceglie
automaticamente il nastro (normale
(tipo I), al cromo (tipo II) o al
metallo (tipo IV) ) per la
riproduzione.
1 Inserire una cassetta.
2 Premere œ •REPEAT per
avviare la riproduzione e
quindi regolare il volume.
Se gli auricolari delle cuffie non
si adattano bene alle orecchie o
se il suono è sbilanciato, girare
leggermente gli auricolari in
modo che entrino bene nelle
orecchie.
Quando si regola il volume sul
Walkman (solo FX655/FX653)
Regolare il comando VOLU del
telecomando sul massimo.
Quando si regola il volume sul
telecomando (solo FX655/FX653)
Regolare il comando VOLUME del
Walkman su circa 6.
Selezione del modo di
riproduzione
(vedere la fig. D-c)
Premere ripetutamente MENU per
spostare il cursore su MODE sul
display. Quindi premere SET per
selezionare il modo desiderato.
Nota sull’AMS, la ripetizione di un
singolo brano e BL SKIP
•Per usare le funzioni AMS e di
ripetizione di un singolo brano,
sono necessari spazi vuoti di 4
secondi o più tra i brani. Per la
funzione BL SKIP sono necessari
spazi vuoti di 12 secondi o più. Se
quindi c’è rumore nello spazio tra
i brani queste funzioni non
individuano lo spazio vuoto e non
si attivano. In modo analogo, se il
livello di registrazione è
relativamente basso all’interno di
un brano, queste funzioni possono
attivarsi erroneamente.
Per riprodurre nastri
registrati con il sistema
Dolby* NR
(vedere la fig. D-c)
Premere ripetutamente MENU per
spostare il cursore su a NR
(riduzione del rumore Dolby) sul
display. Quindi premere SET per
visualizzare “ON”.
* Dispositivo Dolby di riduzione del
rumore fabbricato su licenza della
Dolby Laboratories Licensing
Corporation.
DOLBY e il simbolo della doppia D
a sono marchi della Dolby
Laboratories Licensing Corporation.
(girare)
Sony Corporation © 1997 Printed in Japan
FX655/FX653
Riproduzione di
nastri
Ricezione radio
Alcalina
Sony
LR6 (SG)
29
30
Sony
R6P
(SR)
8
8
Per riprodurre
Entrambe le facciate
ripetutamente
Entrambe le facciate una
volta a partire dalla
facciata rivolta verso il
comparto cassetta
Selezionare
a
Å
Italiano
3-859-782-12 (1)
Operating Instructions
Istruzioni per l’uso
Radio Cassette Player
WALKMAN is a registered trademark of Sony Corporation.
WALKMAN é un marchio registrato della Sony Corporation.
A
a
c
b
FX653
FX651
e
UK and Australia models
Modelli per il Regno Unito
e l’Australia
Other models
Altri modelli
c
b
To play a tape recorded with
Dolby* NR system
(see Fig. D-c)
Press MENU repeatedly to set the
cursor to a NR (Dolby noise
reduction) in the display. Then
press SET to show “ON”.
* Dolby noise reduction manufactured
under license from Dolby
Laboratories Licensing Corporation.
“DOLBY”and the double-D symbol
a are trademarks of Dolby
Laboratories Licensing Corporation.
BATT lamp
Spia BATT
(ore circa)
8
36 (con pila
alcalina Sony
LR6 (SG))
9
37 (con pila
alcalina Sony
LR6 (SG))
Durata della pila
Pila ricaricabile (NC-6WM)
Riproduzione di
nastri
Ricezione radio
Per
riprodurre l’altra
facciata
interrompere la
riproduzione
avanzare
rapidamente
riavvolgere
ripetere il brano
che si sta
ascoltando
(funzione di
ripetizione
singolo brano)
trovare l’inizio
del brano
successivo/3
brani successivi
(AMS*)
trovare l’inizio
del brano attuale/
2 brani precedenti
(AMS)
riprodurre la stessa
facciata dall’inizio
(funzione di
riproduzione
automatica con
riavvolgimento)
riprodurre l’altra
facciata dall’inizio
(funzione di salto
con inversione)
Premere (vedere
la fig. D-b)
œ
•
REPEAT
durante la
riproduzione
p (arresto)
FF•AMS durante
il modo di arresto
REW•AMS
durante il modo di
arresto
œ
•
REPEAT per
due secondi o più
durante la
riproduzione
Per interrompere la
ripetizione di un
singolo brano,
premere di nuovo il
tasto.
FF•AMS una
volta/
ripetutamente
durante la
riproduzione
REW•AMS una
volta/
ripetutamente
durante la
riproduzione
REW•AMS per
due secondi o più
in modo di arresto
FF•AMS per due
secondi o più in
modo di arresto
* Sensore musicale automatico
Nota sui segnali acustici durante
le operazioni AMS
• I segnali acustici differiscono a
seconda del numero di brani cercato.
Mentre viene localizzato l’inizio dei
3 brani successivi con le operazioni
AMS, sono emessi ripetutamente
segnali acustici “• – – –” (un biip
seguito da tre biip lunghi). In modo
analogo, mentre viene localizzato
l’inizio dei 2 brani precedenti sono
emessi ripetutamente segnali
acustici “•• – – –”. Via via che il
numero di brani rimanenti cala, il
numero di biip lunghi cala in modo
corrispondente.
Per saltare gli spazi vuoti tra
i brani (funzione BL SKIP*)
(vedere la fig. D-c)
Premere ripetutamente MENU per
spostare il cursore su BL SKIP sul
display e quindi premere SET per
visualizzare “ON”.
* Il Walkman fa avanzare
rapidamente il nastro fino al brano
successivo se c’è uno spazio vuoto di
durata superiore a 12 secondi.
(This mark is valid for Russian version of WM-FX655 only.)
(Questo marchio è valido solo per la versione russa del WM-FX655.)

Praat mee over dit product
Laat hier weten wat jij vindt van de Sony WM-FX655 Walkman Cassetterecorder. Als je een vraag hebt, lees dan eerst zorgvuldig de handleiding door. Een handleiding aanvragen kan via ons contactformulier.