
QUICK INSTALL GUIDE STRIKE NX – GAMEPAD WIRELESS
EN
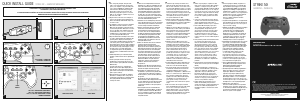
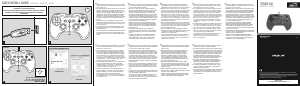
1. First, charge the gamepad. Using the USB
cable, connect the gamepad to any free USB
port on your computer or any other USB power
source (at least 500mA). The gamepad’s LED
status indicators will flash during charging
which takes around 3 hours; be aware, the
initial charge may take longer. As soon as the
LEDs go out, charging is complete and you can
disconnect the cable.
2. Plug the USB receiver into a free USB port on
your PC. The operating system will detect the
device automatically and it will be ready to use
in a few seconds.
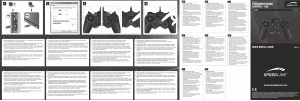
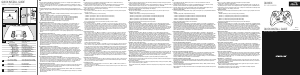
3. To establish a connection, press the gamepad’s
Mode button and wait around five seconds.
Make sure the gamepad is positioned near the
receiver during this time. During the connection
process, the LEDs on the gamepad and on the
receiver will flash; as soon as a connection is
established, the receiver LED as well as at least
one of the gamepad LEDs will stay lit.
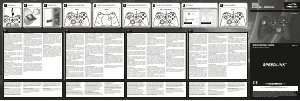
4. Keep the Mode button held depressed for three
seconds to switch between the gamepad’s two
operating modes: XInput (for the majority of
current games) and DirectInput (for all older and
some newer games). Set the gamepad to the
desired mode before starting a game. Switching
during gameplay may stop the game identifying
the controller correctly; if this happens, restart
the game. Please consult the manual that
accompanied the game, ask the publisher or
try both modes to establish which mode works
the best.
5. In DirectInput mode, press the Mode button
quickly to switch between the two digital D-pad
modes.
6. Test the gamepad’s functions by opening
the Windows* Control Panel and going to the
Game Controllers option (Windows* 8/7/Vista*/
Windows XP*).
You’ll also find options for configuring the
vibration function there (DirectInput). Please
note, vibrations only work if supported by the
game and the relevant option is enabled in the
game’s options settings.
7. After five minutes of inactivity, the gamepad
will switch to standby mode to save power; to
reactivate the gamepad, press the Mode button.
If the gamepad LEDs start flashing rapidly,
recharge the device.
DE
1. Laden Sie das Gamepad bitte zunächst auf:
Verbinden Sie es über das USB-Kabel mit einer
freien USB-Schnittstelle Ihres Computers oder
einer beliebigen anderen USB-Stromquelle
(mindestens 500 mA). Die LED-Anzeige am
Gamepad blinkt während des Ladevorgangs,
der ungefähr 3 Stunden benötigt. Beachten
Sie bitte, dass der erste Ladevorgang etwas
mehr Zeit beanspruchen kann. Sobald die LEDs
erlöschen, ist das Aufladen beendet und Sie
können die Kabelverbindung trennen.
2. Verbinden Sie den USB-Empfänger mit einem
freien USB-Anschluss Ihres PCs. Das Gerät wird
vom Betriebssystem automatisch erkannt und
ist nach wenigen Sekunden einsatzbereit.
3. Drücken Sie die Mode-Taste des Gamepads
und warten Sie etwa fünf Sekunden, um
eine Verbindung herzustellen. Bitte stellen
Sie sicher, dass sich das Gamepad dabei in
der Nähe des Empfängers befindet. Während
des Verbindungsvorgangs blinken die LEDs
am Gamepad und am Empfänger; sobald
die Verbindung hergestellt ist, leuchten die
Empfänger-LED sowie mindestens eine der
Gamepad-LEDs konstant.
4. Halten Sie die Mode-Taste für drei Sekunden
gedrückt, um zwischen den beiden
Betriebsmodi des Gamepads zu wechseln:
XInput (für die meisten aktuellen Spiele) und
DirectInput (für alle älteren und einige neuere
Spiele). Bitte versetzen Sie das Gamepad in
den gewünschten Modus, bevor Sie ein Spiel
starten. Das Umschalten im laufenden Spiel
kann dazu führen, dass der Controller von
diesem nicht mehr korrekt erkannt wird; in
diesem Fall starten Sie bitte das Spiel neu.
Mit welchem Modus ein Spiel am besten
funktioniert, erfahren Sie im zugehörigen
Handbuch, beim Hersteller oder durch
Ausprobieren.
5. Betätigen Sie die Mode-Taste im DirectInput-
Modus nur kurz, wechseln Sie zwischen zwei
Modi für das digitale Steuerkreuz (D-Pad).
6. Die Funktion des Gamepads können Sie in
der Windows*-Systemsteuerung im Abschnitt
„Geräte und Drucker“ (Windows* 8/7/Vista*)
beziehungsweise „Gamecontroller“ (Windows
XP*) prüfen.
Dort finden Sie auch die Optionen für die
Vibrationsfunktion (DirectInput). Bitte beachten
Sie, dass Vibrationen nur dann wiedergegeben
werden, wenn ein Spiel diese nutzt und die
entsprechende Funktion in den Spieloptionen
aktiviert ist.
7. Das Gamepad wechselt nach fünf Minuten
Inaktivität in den Stand-by-Modus, um Energie
zu sparen. Drücken Sie dann die Mode-Taste,
um es zu reaktivieren. Beginnen die LEDs am
Gamepad schnell zu blinken, sollte es erneut
aufgeladen werden.
FR
1. Commencez par recharger la manette en la
reliant à l‘aide du câble USB à une prise USB
libre sur votre ordinateur ou à une autre source
de courant USB (500 mA au moins). Les voyants
sur la manette clignotent pendant toute la durée
de la recharge qui prend environ 3 heures. À
noter que la première recharge peut être un peu
plus longue. Dès que les voyants s‘éteignent,
cela signifie que la recharge est achevée et
vous pouvez débrancher le câble.
2. Reliez le récepteur USB à une prise USB libre
de votre ordinateur. Le périphérique est détecté
automatiquement par le système d‘exploitation
et prêt à l‘emploi en quelques secondes
seulement.
3. Appuyez sur la touche Mode de la manette et
attendez cinq secondes environ pour établir la
liaison (la manette doit se trouver à proximité
du récepteur). Les voyants clignotent sur la
manette et le récepteur durant l‘établissement
de la liaison ; dès que la liaison est établie,
les voyants du récepteur et l‘un au moins des
voyants de la manette restent allumés de
manière continue.
4. Maintenez la touche Mode enfoncée trois
secondes pour basculer entre les deux modes
d‘utilisation de la manette : XInput (convient
pour la plupart des jeux actuels) et DirectInput
(pour tous les jeux anciens et quelques jeux
plus récents). Réglez la manette dans le
mode souhaité avant de lancer un jeu. Si
vous changez de mode en cours de jeu, il est
possible que la manette ne soit plus reconnue
correctement ; dans ce cas, relancez le jeu.
Pour connaître le mode le mieux adapté
au jeu, veuillez consulter la notice du jeu,
demander conseil au fabricant ou bien essayer
alternativement les deux modes.
5. En mode DirectInput, appuyez brièvement sur
la touche Mode pour basculer entre les deux
modes de la croix directionnelle (D-pad).
6. Vous pouvez vérifier le bon fonctionnement
de la manette en allant dans le Panneau de
configuration Windows* dans la section «
Périphériques et imprimantes » (Windows* 8/7/
Vista*) ou « Contrôleurs de jeu » (Windows XP*).
Vous y trouverez également les options de
réglage de la fonction vibration (DirectInput).
Les vibrations ne sont restituées que si le
jeu les prend en charge et si la fonction
correspondante a été activée dans les options
du jeu.
7. Afin d‘économiser de l‘énergie, la manette
passe automatiquement en mode veille quand
vous ne vous en servez pas durant cinq
minutes. Appuyez dans ce cas sur la touche
Mode pour la réactiver. Quand les voyants se
mettent à clignoter rapidement sur la manette,
cela indique qu‘elle doit être rechargée.
ES
1. Primero carga el pad por completo: El cable
USB conecta el pad a un puerto libre USB de tu
ordenador o a cualquier otro puerto USB con
corriente (mínimo 500 mA). El indicador LED del
pad parpadea durante el proceso de carga que
necesita unas tres horas en total. Ten en cuenta
que la primera carga podría tardar más tiempo
de lo normal. En cuanto se apaguen los LEDs,
la carga está completa y puedes desenchufar
el cable.
2. Conecta el receptor USB a un puerto USB que
esté libre en tu ordenador. El sistema operativo
detecta automáticamente el dispositivo y
puedes utilizarlo sin más a los pocos segundos.
3. Pulsa el botón Mode del pad y espera unos
cinco segundos para establecer la conexión
de emparejamiento. Asegúrate de que en
esta operación el pad está cerca del receptor.
Durante el proceso de detección parpadean
los LEDs del pad y del receptor; cuando se
establece la conexión, se enciende el LED del
receptor y al menos uno de los LEDs del pad en
continuo.
4. Pulsa y mantén pulsado el botón Mode durante
tres segundos para alternar entre los dos
modos de funcionamiento del pad: XInput
(para la mayor parte de los juegos actuales)
y DirectInput (para los antiguos y algunos de
los juegos nuevos). Antes de iniciar cualquier
juego, pon el pad en el modo que vas a utilizar.
La conmutación de un modo a otro mientras
estás jugando podría tener como consecuencia
que no se detectase y no funcionase bien
el pad, en tal caso reinicia el juego. Cuál es
el modo con el que mejor funciona el pad lo
averiguarás en el manual correspondiente,
informándote en el fabricante o simplemente
probando.
5. Pulsa brevemente el botón Modeen DirectInput,
alterna entre dos modos para la cruceta digital
(D Pad).
6. La función del pad podrás controlarla en el
panel de control de Windows* „Ver dispositivos
e impresoras“ (Windows* 8/7/Vista*), o bien
„Dispositivos de juegos“ (Windows XP*).
Encontrarás ahí mismo las opciones para
la función de vibración (DirectInput). Ten en
cuenta que las vibraciones sólo se reproducen,
si vienen con un juego y están activadas las
opciones correspondientes del juego.
7. El pad cambia a modo stand by tras cinco
minutos de inactividad, para que ahorres
energía. Para volverlo a activar pulsa Mode una
vez más. Si los LEDs del pad parpadean con
intermitencia rápida, es el momento de volver
a cargarlo.
RU
1. Сначала зарядите геймпад: Соедините его
с помощью кабеля USB со свободным USB-
портом компьютера или другого источника
тока USB (минимум 500мА). Светодиодный
индикатор на геймпаде во время процесса
зарядки мигает, сам процесс продолжается
около 3 часов. Помните о том, что для первой
зарядки нужно несколько больше времени.
Как только светодиодный индикатор
погаснет, зарядка завершена и можно
отсоединить кабель.
2. Соедините USB-приемник со свободным USB-
портом компьютера. Система автоматически
распознает устройство и оно готово к работе
через несколько секунд.
3. Нажмите кнопку Mode геймпада и подождите
около пяти секунд, чтобы установилось
соединение. При этом геймпад должен
располагаться рядом с приемником. Во
время процесса соединения светодиоды на
геймпаде и приемнике мигают; как только
соединение будет установлено, светодиод
приемника и минимум один светодиод
геймпада начнут светиться непрерывно.
4. Удерживайте кнопку Mode нажатой в течение
трех секунд, чтобы переключаться между
рабочими режимами геймпада: XInput (для
большинства современных игр) и DirectInput
(для всех старых и некоторых более новых
игр). Переключите геймпад в нужный
режим до запуска игры. Переключение
во время игры может привести к тому,
что она больше не будет правильно
распознавать контроллер, в этом случае
игру нужно перезапустить. В каком режиме
игра функционирует лучше всего, можно
узнать из соответствующего руководства, у
изготовителя или методом пробы.
5. Если в режиме DirectInput коротко нажать
кнопку Mode, производится переключение
между двумя режимами цифровой
крестовины управления (D-Pad).
6. Функционирование геймпада под Windows*
можно проверить в разделе „Устройства
и принтеры“ (Windows* 8/7/Vista*) или
„Игровые контроллеры“ (Windows XP*).
Там также находятся опции виброфункции
(DirectInput). Помните о том, что вибрация
воспроизводится только в том случае, если
она используется в игре, а в настройках игры
активирована соответствующая функция.
7. Геймпад через пять минут его
неиспользования переключается в режим
ожидания, чтобы экономить энергию. Для
его активизации нажмите кнопку Mode. Если
светодиоды на геймпаде начинают быстро
мигать, его нужно снова зарядить.
1 2
6
DIRECTINPUT MODE XINPUT MODE
4
PRESS
PRESS
3
LED FLASHES = CONNECTING
LED GLOWS = CONNECTED
5
LED 1 ON = ANALOG MODE (DIRECTINPUT)
LED 1 OFF = DIGITAL MODE (DIRECTINPUT)
LED 1, 2, 3 OR 4 ON = XINPUT MODE / PLAYER
NUMBER ASSIGNMENT
D-PAD MODE
PRESS
BRIEFLY
1
2
3
4
PLEASE INSTALL THE LATEST DRIVER VERSION FOR YOUR STRIKE NX GAMEPAD AT FIRST.
TO DOWNLOAD IT, VISIT: WWW.SPEEDLINK.COM.
BITTE INSTALLIEREN SIE ZUNÄCHST DIE AKTUELLE VERSION DES TREIBERS FÜR IHR STRIKE NX GAMEPAD. DIESER STEHT ONLINE UNTER
WWW.SPEEDLINK.COM ZUM DOWNLOAD ZUR VERFÜGUNG.
V1.0
STRIKE NX
GAMEPAD – WIRELESS
© 2015 Jöllenbeck GmbH. All rights reserved. SPEEDLINK, the SPEEDLINK word mark and the SPEEDLINK
swoosh are registered trademarks of Jöllenbeck GmbH.
* Microsoft, Windows, Windows XP and Vista are registered trademarks of Microsoft Corporation in the United
States and other countries. All trademarks are the property of their respective owner. Jöllenbeck GmbH shall
not be made liable for any errors that may appear in this manual. Information contained herein is subject to
change without prior notice. Please keep this information for later reference.
JÖLLENBECK GmbH, Kreuzberg 2, 27404 Weertzen, GERMANY
TECHNICAL SUPPORT
Having technical problems with this product? Get in touch with our Support team –
the quickest way is via our website: www.speedlink.com
QUICK INSTALL GUIDE
SL-650100-BK
EN // DE // FR // ES // RU // IT // NL // PL // TR // HU


Praat mee over dit product
Laat hier weten wat jij vindt van de Speedlink SL-650100-BK STRIKE NX Gamecontroller. Als je een vraag hebt, lees dan eerst zorgvuldig de handleiding door. Een handleiding aanvragen kan via ons contactformulier.
beantwoord | Ik vind dit nuttig (0) (Vertaald door Google)