
W-451
102815
WARRANTY INFORMATION
This Westinghouse Lighting Fixture is warranted against defects in material and workmanship for a
period of Five Years from purchase date. This warranty is in lieu of all other warranties expressed or
implied.
This warranty does not cover acts of nature such as lightning damage, or corrosion and discoloration
of components, nor does it cover damages caused through abuse, improper installation, surges in
electric current, or acts of third parties.
This warranty does not cover costs of removing and re-installing the lighting fixture.
If this product fails for any reason covered by this warranty, contact us toll free at 1-888-417-6222.
ASSEMBLY INSTRUCTIONS FOR INDOOR LIGHTING FIXTURE
Congratulations on your Westinghouse purchase. This fixture has been designed to give you many
years of beauty and service. For questions and comments, please visit www.westinghouselighting.
com/contact-us.
NOTE: Carefully unpack fixture and parts. Make sure all parts are included before discarding any pack-
ing materials (see figure 1).
WARNING: ELECTRICAL SHOCK CAN RESULT IN SERIOUS INJURY.
Read and follow instructions exactly as shown. If instructions are unclear, do not proceed.
Contact a qualified electrician. Read all instructions before beginning. Proper wiring is
essential for safe operation of this fixture. When cutting or drilling into walls or ceilings, do not
damage electrical wiring, gas lines, or water lines. If any of the fixture or wiring components
are damaged, do not install fixture. Return to place of purchase.
For fixtures provided with 75° C or 90° C supply wire warning only. (These warnings are pro-
vided on the U.L. label and on the fixture carton.) Risk of fire. Most dwellings built before 1985
have supply wires rated 60° C. Consult a qualified electrician before installing.
NOTE: For fixture employing a grounded convenience outlet. This fixture employs a grounded
type receptacle and is not intended for connection to a two wire ungrounded source of supply.
Owner’s Manual
LED Indoor Lighting Fixture
Installation Instructions
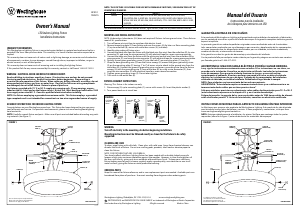
MOUNTING AND WIRING INSTRUCTIONS
NOTE: Underwriters Laboratories (UL) does not require all fixtures to have ground wires. These fixtures
meet all UL specifications.
1. Turn off power at circuit box to avoid possible electric shock.
2. Remove mounting plate (C) from fixture and save the screws (H) for late use. Raise mounting plate
(C) up to outlet box (B), secure with outlet box screws (A) (included).
3. Identify color coding of fixture wires.
4.
Connect the black wire from the fixture with the black wire (live wire) from the outlet box (B) by wire
connector (D), and wrap the wire connector (D) with electrical tape for a more secure connection.
5.
Connect the white wire from the fixture with the white wire (neutral wire) from the outlet box (B) by
wire connector (D), and wrap the wire connector (D) with electrical tape for a more secure connection
.
6. Partially thread green grounding screw (E) into side hole (F) on mounting plate (C) (see fig.1).
7. Wrap the bare grounding wire (J) from the fixture canopy (G) around the green grounding screw
(E) on the mounting plate (C) leaving 3” to 4” of excess wire to attach to the ground wire from the
outlet box (B). Connect the greenish grounding wires and excess grounding wire from the fixture
canopy (G) with the grounding wire (J) from outlet box (B) by using a wire connector (D), then
wrap the wire connector (D) with electrical tape for a more secure connection.
8. Tighten green grounding screw (E). Do not over tighten.
9. Tuck wires inside outlet box (B).
FIXTURE ASSEMBLY INSTRUCTIONS
Warning: This fixture is for indoor use only.
1. Raise canopy (G) up to mounting plate (C), secure with screws (H). Insert the plastic anchor (I).
2. Turn power back on at circuit box.
Westinghouse Lighting, Philadelphia, PA 19154-1029, U.S.A. www.westinghouselighting.com
, WESTINGHOUSE, and INNOVATION YOU CAN BE SURE OF are trademarks of Westinghouse Electric Corporation.
Used under license by Westinghouse Lighting. All rights reserved. Made in China
WARNING
Turn off electricity to the mounting site before beginning installation.
Mounting instructions must be followed exactly as shown for the fixture to be safely
supported.
CLEANING AND CARE
To clean, wipe fixture with soft cloth. Clean glass with mild soap. Spray from chemical cleaners can
discolor the finish of fixture. Do not use scouring pads, powders, steel wool or abrasive paper to
clean this fixture.
NOTE FOR FIXTURES THAT ARE SOLID BRASS:
Your hand-crafted, solid brass lighting fixture has been coated with a durable, baked-on acrylic
lacquer which gives maximum protection against the weather. However, in time the brightness of
the brass will tarnish, giving way to an authentic old-world brass finish. To keep your solid brass
fixture looking new for years to come, regularly apply a good quality, non-abrasive car wax to all
metal surfaces, giving the fixture an extra protective covering.
ORDERING PARTS
Keep this manual for future reference, and in case replacement parts are needed. Available parts can
be ordered from place of purchase. Use exact wording from diagrams when ordering parts.
FIGURE 2.
FIXTURE
WIRES:
Black
HOUSE
WIRES:
Black
(Hot)
HOUSE
WIRES:
White
(Neutral)
HOUSE
WIRES:
Bare
Copper
(Ground)
FIXTURE
WIRES:
Bare
Copper
(Ground)
FIXTURE
WIRES:
White
NOTE: THIS FIXTURE IS SUITABLE FOR USE WITH DIMMABLE SWITCHES, SEE BELOW FOR LIST OF
COMPATIBLE DIMMERS.
Brand Model #
Lutron LGCL-153PLH-WH, MACL-153PLH-WH, RRD-6NA-WH, DVCL-153P-WH,
AY-600PNL-WH, S-600P-WH, DV-600P-WH, LXELV-600PL-WH, MAELV-600-WH,
NTELV-300-WH, NT-600-WH, SEW-300P-WH, CTCL-153P-WH, MRF2-6ND-120-BI,
S-603PG
Leviton 601-6631-I, IP06-1LZ, AT106-1LA
Not recommended for use with motion sensors, light sensors, timers or any other external controls.
*OUTLET
BOX (B)
MOUNTING
PLATE (C)
CANOPY (G)
PLASTIC
ANCHOR (I)
GREEN
GROUNDING
SCREW (E)
WIRE
CONNECTORS (D)
GROUND
WIRE (J)
OUTLET BOX
SCREWS (A)
SCREW (H)
SIDE
HOLE (F)
*NOT SUPPLIED
Line art shown may not exactly match the
fixture enclosed. However, the installation
instructions do apply to this fixture.
FIGURE 1.
GARANTÍA LIMITADA DE CINCO AÑOS
Este producto de Westinghouse Lighting está garantizado contra defectos de materiales y fabricación
por un período de cinco años a partir de la fecha de compra. Esta garantía reemplaza toda otra garantía
expresa o implícita.
La presente garantía no cubre desperfectos originados como resultado de actos de la naturaleza
tales como daños producidos por un relámpago, o por corrosión y decoloración de los componentes,
así como tampoco cubre los desperfectos ocasionados por uso indebido, instalación inadecuada,
cambios de tensión, o intervención de terceros.
Esta garantía no cubre los gastos de desmontaje y reinstalación del artefacto.
Si este producto falla por cualquier razón cubierto por la garantía, póngase en contacto con nosotros
por llamada gratuita al:1-888-417-6222.
ADVERTENCIA: UNA DESCARGA ELÉCTRICA PODRÍA CAUSAR HERIDAS.
Lea y siga las instrucciones exactamente como se indica. Si las instrucciones no son claras, no
proceda con la instalación. Consulte a un electricista certificado. Lea todas las instrucciones
antes de comenzar. Para que este artefacto funcione sin riesgos, es esencial realizar
correctamente el cableado. Al cortar o perforar una pared o el techo, no dañe el cableado
eléctrico, las instalaciones de gas o de agua. Si alguno de los componentes del artefacto o
cableado está dañado, no instale el artefacto. Devuélvalo al lugar donde lo compró.
NOTA: Para artefactos con tomacorriente de tierra de conveniencia.
ADVERTENCIA: “Este artefacto emplea un tomacorriente de tierra y no se debe conectar a un
tomacorriente de dos cables que no tiene puesta a tierra.”
Sólo para artefactos provistos con advertencias sobre cables de alimentación para 75º C o 90º C
(estas advertencias aparecen en la etiqueta U.L. y en el cartón de embalaje).
Peligro de incendio. La mayoría de las casas construidas antes de 1985 tienen cables de aliment-
ación clasificados para 60° C. Antes de la instalación, consulte a un electricista certificado.
INSTRUCCIONES DE MONTAJE PARA EL ARTEFACTO DE ILUMINACIÓN PARA INTERIORES
Le felicitamos por comprar este producto de Westinghouse Lighting. Este producto ha sido diseñado
para brindarle muchos años de belleza y servicio. Si tiene preguntas y comentarios, visite por favor
www.westinghouselighting.com/contact-us.
NOTA: Extraiga cuidadosamente el artefacto y las piezas. Verifique que contenga todas las partes
requeridas (consulte la figura 1) antes de descartar los materiales de empaque.
Manual del Usuario
Instrucciones para la insalación
de la lámpara para interiores con LED
ANCLA
PLASTICA (I)
*CAJA DE
EMBUTIR (B)
PLACA DE
MONTAJE (C)
DOSEL (G)
TORNILLO
VERDE DE
TIERRA (E)
CONECTORES
DE ROSCA (D)
CABLE DE
TIERRA (j)
TORNILLOS CAJA
DE EMBUTIR (A)
LOS
TORNILLOS (H)
ORIFICIO
LATERAL (F)
*NO INCLUIDO
Los dibujos pueden no coincidir
exactamente con el artefacto incluido.
Sin embargo, las instrucciones de
instalación se aplican a este artefacto.
FIGURA 1.

Praat mee over dit product
Laat hier weten wat jij vindt van de Westinghouse 6204900 Lamp. Als je een vraag hebt, lees dan eerst zorgvuldig de handleiding door. Een handleiding aanvragen kan via ons contactformulier.