HOW TO USE
COMO USAR
Este artefacto es para uso doméstico y puede ser enchufado en un toma de corriente standard.
INSTRUCCIONES DE ENSAMBLAJE
1. Coloque las tapas de la base en ambos lados de las barras A y B.
2. Afloje y retire los cuatro tornillos de las barras A y B. Cruce las 2 barras como se muestra en Fig. 1 y alinee los cuatro
agujeros con aquellos en el reborde. Asegure el reborde a las barras con los cuatro tornillos. Deslice hacia abajo la
tapa de la base sobre lo ensamblado.
PRECAUCION: Nunca retire la perilla para fijar, la cual sostiene en su lugar el tubo que sirve de tope (ver Fig. 2).
3. Si es necesario, afloje ligeramente la perilla para fijar, dándole vuelta hacia la izquierda. Deslice el conectador de la
caja del ventilador hacia abajo sobre el tubo interior y ajuste la perilla para fijar. Asegúrese de que la perilla esté
fuertemente asegurada.
4. Afloje y retire el tornillo para el acoplamiento del cuello de la caja. Alinee la abertura en el cuello de la caja con la
ranura en el tubo para conectar y empuje hacia abajo para conectar las dos partes. Asegúrelas introduciendo el
tornillo del acoplamiento a través de los agujeros y ajústelos fuertemente.
5. Fije la parrilla trasera en la caja del motor concordando los 3 agujeros que se encuentran en la parrilla trasera con
las 3 clavijas en la parte delantera de la caja del motor. Empuje firmemente hasta que las 3 clavijas penetren en los
3 agujeros.
6. Fije la parrilla trasera a la caja del motor con el anillo de plástico en la clavija y dándole vuelta hacia la derecha
para ajustarlo.
7. Coloque la aspa en el eje de la caja del motor, concordando la ranura de la parte de atrás de la aspa con la clavija del
eje (Fig. 2). Asegure la aspa con la tapa, dándole vuelta hacia la izquierda para ajustarla.
8. Pruebe el funcionamiento de la aspa rotándola con su mano. No debe haber fricción con el anillo de plástico. Si la
aspa no rota libremente, repita los pasos 5 a 7.
9. Fije la parrilla delantera a la trasera posicionando el gancho en la parrilla delantera en la parte de arriba de la parrilla
trasera. Asegure las dos parrillas con los clips de la parrilla delantera (Fig. 2).
INSTRUCCIONES DE FUNCIONAMIENTO:
1. Coloque el ventilador en una superficie segura y plana donde no pueda caerse o ser halado por el cable.
2. Para ajustar la altura, afloje el anillo para ajuste de altura, adapte el ventilador a la altura deseada y ajústelo
fuertemente.
3. Controle la dirección de la corriente de aire sosteniendo firmemente el cuello de la caja del ventilador con una mano
y empujando la parrilla hacia atrás para subirlo o empujando hacia adelante para bajarlo.
4. Para hacer oscilar el ventilador, empuje hacia abajo la perilla para la oscilación ubicada en la parte de arriba del
motor. Para parar la oscilación del ventilador, tire hacia arriba la perilla para oscilación.
5. Enchúfelo en una toma de corriente electrica.
6. Coloque el control del interruptor a la velocidad deseada.
CARE AND CLEANING
Este artefacto requiere poco mantenimiento y no tiene piezas que puedan ser reparadas. No trate de repararlo usted mismo.
Si necesita reparación remítalo a personas calificadas.
Este ventilador está permanentemente lubricado y no necesitará lubricación adicional durante la vida del ventilador.
PARA LIMPIAR: Antes de limpiarlo, apague el ventilador y desenchúfelo. Sacuda el exceso de polvo con un paño libre de
pelusas. Para asegurar una adecuada circulación de aire al motor, mantenga los orificios ubicados en la parte de atrás del
motor libre de acumulación de polvo. Una aspiradora puede ser usada para limpiar estos orificios. No sumerja el ventilador en
agua o cualquier otro líquido. Desensamble las parrillas y la paleta (Fig. 2). Las parrillas y la paleta pueden ser limpiadas con
agua y jabón. Use un paño suave ligeramente humedecido para limpiar el resto de las partes del ventilador. No deje que agua o
ningún otro líquido entre en el motor o la base. Ensamble nuevamente el ventilador después de que las parrillas y la paleta
estén completamente secas. No lo enchufe hasta que se encuentre completamente ensamblado.
PARA GUARDAR: Asegúrese de desensamblar y limpiar el ventilador antes de guardarlo. Guarde la envoltura original para
guardar el ventilador. Siempre guárdelo en un lugar seco. Nunca lo guarde mientras esté enchufado. Nunca enrolle el cable
ajustadamente alrededor del ventilador y no ponga presión sobre el cable en la parte que entra alrededor del ventilador ya que
esto podría ocasionar que el cable se desgaste y se rompa.
CONSEJOS DE SEGURIDAD PARA EL CABLE ELECTRICO
1. Nunca hale ni tire del cable ni de la unidad.
2. Para conectar, sujete con firmeza el enchufe y guíelo dentro de la toma de corriente.
3. Para desconectar, sujete el enchufe y retírelo de la toma de corriente.
4. Antes de usar el aparato, verifique que el cable no tenga cortaduras ni abrasiones. De ser así, la unidad debe ser revisada
y el cable debe ser reemplazado. Por favor devuelva la unidad a nuestro departamento de servicio o a un representante
de servicio autorizado.
5. Nunca enrolle el cable de manera apretada en torno a la unidad, ya que el exceso de presión en las uniones del cable
con la unidad o con el enchufe pueden raerlo o romperlo.
NO OPERE LA UNIDAD SI EL CABLE PRESENTA CUALQUIER DAÑO, SI LA UNIDAD FUNCIONA DE MANERA INTERMITENTE O
SI DEJA DE FUNCIONAR POR COMPLETO.
IMPORTANTE:
Durante los primeros minutos de su uso inicial, usted notará un ligero olor. Esto es normal y desaparecerá rápidamente.
Si el cable estuviera dañado, deberá ser reemplazado por el fabricante o su agente de servicio o por una persona calificada
para evitar un peligro.
LINE CORD SAFETY TIPS
1. Never pull or yank on cord or the appliance.
2. To insert plug, grasp it firmly and guide it into outlet.
3. To disconnect appliance, grasp plug and remove it from outlet.
4. Before each use, inspect the line cord for cuts and/or abrasion marks. If any are found, this indicates that the appliance
should be serviced and the line cord replaced. Please return it to our Service Department or to an authorized service
representative.
5. Never wrap the cord tightly around the appliance, as this could place undue stress on the cord where it enters the
appliance and cause it to fray and break.
DO NOT OPERATE APPLIANCE IF THE LINE CORD SHOWS ANY DAMAGE, OR IF APPLIANCE WORKS INTERMITTENTLY OR
STOPS WORKING ENTIRELY.
IMPORTANT:
During the first few minutes of initial use, you may notice a slight odor. This is normal and will quickly disappear.
If the supply cord is damaged, it must be replaced by the manufacturer or its service agent or similarly qualified person in order
to avoid a hazard.
This appliance is for household use and may be plugged into a standard electrical outlet.
ASSEMBLY INSTRUCTIONS
1. Push the base end caps onto both ends of bar A and bar B.
2. Loosen and remove the four screws from bar A and bar B. Cross the 2 bars as shown in Fig. 1 and align the four holes
with those on the flange. Secure the flange to the bars with the four screws. Slide the base cap down over the assembly.
CAUTION: Never remove the set knob, which holds the pipe stopper in place (See Fig. 2).
3. If necessary, slightly loosen the set knob by turning it counterclockwise. Slide the fan housing connector down over the inner
pipe and tighten the set knob. Make sure the set knob is tightly secured.
4. Loosen and remove connector screw from the fan housing neck. Align notch on the fan housing neck with groove on the fan
housing connector and push down to connect the two parts. Secure by inserting the connector screw through the holes
and tightening.
5. Mount the rear grille to the motor housing by matching the 3 holes on the rear grille to the 3 round pins on the front of the motor
housing. Push in firmly until the 3 pins protrude through the 3 holes.
6. Secure the rear grille to the motor housing by inserting the plastic collar through the shaft pin and turning clockwise
to tighten.
7. Insert the blade onto the motor shaft, matching the slot on the back of the blade with the shaft pin (Fig. 2). Secure blade with
blade cap, turning counterclockwise to tighten.
8. Test blade operation by rotating it with your hand. There should be no friction with the plastic collar. If blade does not rotate
freely, repeat steps 5 through 7.
9. Mount the front grille to the rear grille by positioning the hook on the front grille over the top of the rear grille. Secure the two
grilles with the clips attached to the front grille (Fig. 2).
OPERATING INSTRUCTIONS
1. Place the fan on a safe, flat surface where it cannot fall or be pulled by the cord.
2. To adjust height, loosen the height adjustment collar, adjust fan to the desired height and retighten.
3. Control the direction of the airflow by firmly holding the fan housing neck in one hand and by pushing the fan grille back to tilt
up or by pushing it forward to tilt down.
4. To make the fan oscillate, push down on the oscillating knob located on the top of the motor housing. To stop the fan from
oscillating, pull up on the oscillating knob.
5. Plug into an electrical outlet.
6. Turn the control switch to the desired speed.
This appliance requires little maintenance and contains no user serviceable parts. Do not try to fix it yourself. Refer it to qualified
service personnel if servicing is needed.
This fan is permanently lubricated and will not require additional lubrication for the life of the fan.
TO CLEAN: Before cleaning, turn fan off and unplug from electrical outlet. Wipe off excess dust with a lint-free cloth. To ensure
adequate air circulation to the motor, keep vents located at the rear of the motor housing free from dust accumulation. A vacuum
cleaner hose can be used to clean these vents. Do not submerge your fan in water or any other liquid. Disassemble grilles and
blade (Fig. 2). Grilles and blade may be cleaned with mild soap and water. Use a soft, slightly damp cloth to wipe the remaining fan
parts. Do not allow water or any other liquid to get into the motor housing or base. Reassemble fan after grilles and blade have
dried completely. Do not plug fan into electrical outlet until it has been fully reassembled.
TO STORE: Make sure to disassemble and clean the fan before storing. Retain the original packaging for the purpose of storing
your fan. Always store fan in a dry place. Never store it while it is still plugged in. Never wrap the cord tightly around the fan, and
do not put any stress on the cord where it enters the fan, as it could cause the cord to fray and break.
CUIDADO Y LIMPIEZA
DICAS DE SEGURANÇA SOBRE O CABO CONDUTOR DE ELETRICIDADE
1. Nunca puxe pelo cabo ou pelo aparelho.
2. Para inserir o plugue, segure-o firmemente e guie-o na tomada.
3. Para desconectar o aparelho, segure o plugue e remova-o da tomada.
4. Antes de cada uso, verifique se o cabo apresenta cortes e/ou marcas de desgaste. Em caso afirmativo, isto indica que
o aparelho deve ser inspecionado e o cabo substituído. Envie o aparelho ao nosso Departamento de Assistência
Técnica ou a um represente técnico autorizado.
5. Nunca aperte o cabo condutor de eletricidade ao redor do aparelho. Não force o cabo no local onde ele penetra a base
do aparelho, pois o mesmo poderá ser desgastado e arrebentar posteriormente.
NÃO OPERE O APARELHO SE O CABO CONDUTOR DE ELETRICIDADE APRESENTAR QUALQUER SINAL DE DESGASTE, SE O
APARELHO FUNCIONAR APENAS INTERMITENTEMENTE OU SE PARAR COMPLETAMENTE DE FUNCIONAR.
IMPORTANTE:
Durante os primeiros minutos de uso um ligeiro odor poderá ser notado. Isso é normal e deverá desaparecer rapidamente.
Se o cabo condutor de eletricidade for danificado, ele deverá ser substituído pelo fabricante, seu agente autorizado ou pessoa
qualificada a fim de evitar um perigo.
Este aparelho destina-se somente para uso residencial e poderá ser conectado a uma tomada elétrica comum.
INSTRUÇÕES PARA MONTAGEM
1. Coloque as tampas das extremidades da base em ambos os extremos da barra A e barra B.
2. Afrouxe e remova os quarto parafusos da barra A e barra B. Cruze as duas barras, da forma mostrada na Figura 1 e alinhe
os quarto orifícios com os do flange. Prenda o flange às barras com os quatro parafusos. Deslize a tampa da base por cima
da montagem.
CUIDADO: Jamais remova o botão de ajuste, responsável por prender o detentor do cano no lugar (Veja a Figura 2).
3. Se necessário, afrouxe ligeiramente o botão de ajuste, girando-o no sentido anti-horário. Deslize o conector do invólucro do
ventilador para baixo por cima do cano interior e aperte o botão de ajuste. Certifique-se de que o botão de ajuste esteja bem
apertado.
4. Afrouxe e remova o parafuso de conexão do cabeçote do invólucro do ventilador. Alinhe a fenda no cabeçote do invólucro
do ventilador com o sulco no conector do invólucro do ventilador e empurre-o para baixo para conectar as duas peças.
Prenda-o, inserindo o parafuso de conexão através dos orifícios e aperte-o.
5. Prenda a grade traseira no invólucro, encaixando os 3 orifícios com os 3 pinos redondos na frente do invólucro do motor.
Empurre-a firmemente até que os 3 pinos passem pelos 3 orifícios.
6. Prenda a grade traseira ao invólucro do motor, inserindo o colarinho de plástico através do pino do eixo e girando-o no
sentido horário para apertar.
7. Insira a palheta no eixo do motor, encaixando a fenda no verso da palheta com o pino do eixo (Figura 2). Segure a palheta
com a tampa, girando-o no sentido anti-horário para apertar.
8. Teste a operação da palheta girando-a com a mão. Não deverá haver atrito com o colarinho de plástico. Se a palheta não
girar livremente, repita os passos 5 até 7.
9. Prenda a grade dianteira à traseira, posicionando o gancho na grade dianteira no topo da traseira. Segure as duas grades
com os grampos afixados à grade dianteira (Figura 2).
INSTRUÇÕES DE OPERAÇÃO
1. Coloque o ventilador numa superfície firme e plana, onde não possa cair ou ser puxado pelo cabo.
2. Para ajustar a altura, afrouxe o colarinho de ajuste de altura, coloque o ventilador na altura desejada e aperte novamente.
3. Ajuste a direção do fluxo de ar, segurando firmemente a base com a mão e empurrando a grade do ventilador para trás a fim
de incliná-lo para cima, ou empurrando-o para frente a fim de incliná-lo para baixo.
4. Para fazer o ventilador oscilar, pressione o botão de oscilação localizado ao topo do invólucro do motor. Para parar
a oscilação do ventilador, puxe para cima o botão de oscilação.
5. Ligue o ventilador à tomada elétrica.
6. Gire a chave de controle para a velocidade desejada.
Este aparelho requer pouca manutenção e não contém componentes que podem ser consertados pelo usuário. Não tente
consertá-lo, você mesmo. Consulte um técnico qualificado, quando necessário.
O ventilador é permanentemente lubrificado e não exige lubrificação adicional ao longo de sua vida útil.
PARA LIMPAR: Antes da limpeza, desligue o ventilador e retire o plugue da tomada elétrica. Tire o excesso de poeira com um
pano limpo. Para manter uma circulação adequada de ar no motor, mantenha as fendas da parte traseira do invólucro livres do
acúmulo de poeira. As fendas podem ser limpadas com um aspirador. Não mergulhe o ventilador em água ou outro líquido.
Desmonte as grades e paletas. Elas podem ser limpadas com sabão e água. Use um pano macio e ligeiramente úmido para
limpar as outras peças do ventilador. Não deixe que água ou outro líquido penetre o invólucro do motor ou a base. Monte
novamente o ventilador depois que as grades e paletas estiverem totalmente secas. Não ligue o ventilador à tomada elétrica
antes de estar completamente montado.
PARA GUARDAR: Desmonte e limpe o ventilador antes de guardá-lo. Guarde a embalagem original para este fim. Guarde o
ventilador sempre num local seco. Nunca o guarde ainda ligado à tomada. Nunca enrole o cabo ao redor do ventilador e não o
force no local onde ele penetra a base do aparelho, pois o mesmo poderá desgastar-se e arrebentar posteriormente.
COMO USAR
MANUTENÇÃO E LIMPEZA
INSTRUCCIONES DE FUNCIONAMIENTO/OPERATING INSTRUCTIONS/INSTRUÇÕES OPERACIONAIS
EL PRODUCTO PUEDE VARIAR LIGERAMENTE DE LAS ILUSTRACIONES/PRODUCT MAY VARY SLIGHTLY FROM ILLUSTRATIONS/O PRODUTO PODERÁ VARIAR LIGEIRAMENTE EM RELAÇÃO ÀS ILUSTRAÇÕES
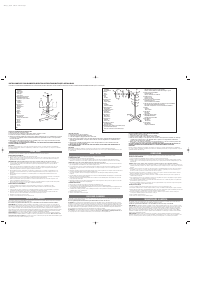
1. Tubo interior
Inner Pipe
Cano interior
2. Tubo exterior
Outer Pipe
Cano exterior
3. Anillo para ajuste de altura
Height Adjustment Collar
Colarinho de ajuste de altura
4. 4 tornillos
4 Screws
4 parafusos
5. Tapa de la base
Base Cap
Tampa da base
6. Reborde
Flange
Flange
7. Agujeros
Holes
Orificios
8. Tapa de la barra
Base End Cap
Tampas das extremidades
9. Barra A
Bar A
Barra A
10. Barra B
Bar B
Barra B
쐅
FIG. 1
1. Parrilla frontal
Front Grille
Grade dianteira
2. Gancho
Hook
Gancho
3. Clip
Clip
Presilha
4. Tapa de la aspa
Blade Cap
Capa da paleta
5. Paleta
Fan Blade
Paleta do ventilador
6. Anillo de plástico
Plastic Collar
Colarinho de plástico
7. Parrilla trasera
Rear Grille
Grade traseira
8. Eje del motor
Motor Shaft
Eixo do motor
9. Clavija del eje
Shaft Pin
Pino do eixo
10. Perilla para oscilación
Oscillating Knob
Botão de oscilação
11. Interruptor para control de 3 velocidades (0,3,2,1)
Speed Control Switch (0,3,2,1)
Chave de controles das 3 velocidades (0,3,2,1)
FIG. 2
쐅
쐈
쐉
씈
씉
쏹
씊
씋
씌
씍
씎
씏
12. Caja del motor; mantener libre de pelusas y polvo
Motor Housing; keep vents free of lint and dust.
Invólucro do motor, mantém as fendas livre de fiapos e poeira
13. Cuello de la caja del ventilador
Fan Housing Neck
Cabeçote do invólucro do ventilador
14. Tornillo Conector
Connector Screw
Parafuso de conexão
15. Conectador de la caja del ventilador
Fan Housing Connector
Conector do invólucro do ventilador
16. Tubo que sirve de tope (dentro del conectador de la caja del ventilador)
Pipe Stopper (Inside of Fan Housing Connector)
Detentor do cano (dentro do conector do invólucro do ventilador)
17. Perilla
Set Knob
Botão de ajuste
18. Tubo interior
Inner Pipe
Cano interior
19. Anillo para ajuste de altura
Height Adjustment Collar
Colarinho de ajuste de altura
20. Base (Barras)
Base (Bars)
Base (barras)
21. Tapa la barra
Base End Cap
Tampas das extremidad
21


Praat mee over dit product
Laat hier weten wat jij vindt van de Windmere FN500 Ventilator. Als je een vraag hebt, lees dan eerst zorgvuldig de handleiding door. Een handleiding aanvragen kan via ons contactformulier.