
© 2013 Sony Corporation Printed in Malaysia
Customer support
KLV-46R472A / 46R452A / 40R472A / 40R457A / 40R452A / 32R422A / 32R407A / 32R402A / 24R422A / 24R402A
Operating Instructions
LCD TV
4-466-324-13(1)
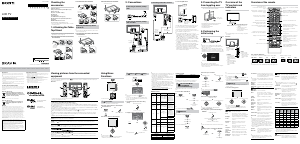
Checking the
accessories
Table-Top Stand (1)*
Fixing screws for Table-Top Stand (M5 × 16) (2)
Remote control (1)
AC power cord (mains lead) (1)
AC adapter (1)
Cable holders (3)
Size AAA batteries (R03 type) (2)
Operating Instructions (this manual) and other
documents
Wall-Mount Bracket accessories
(KLV-46/40R472A, KLV-32/24R422A only)
* Refer to the supplied Table-Top Stand leaflet to assemble
the Table-Top Stand.
1: Attaching the Table-
Top Stand
• If using an electric screwdriver, set the tightening torque at
approximately 1.5 N·m (15 kgf·cm).
x KLV-46/40R452A, KLV-40R457A, KLV-32R407A,
KLV-32/24R402A:
Thick and
soft cloth
x KLV-46/40R472A, KLV-32/24R422A:
Thick and
soft cloth
Detaching the Table-Top Stand
from the TV
~
• Do not remove the Table-Top Stand for any reason other
than to wall-mount the TV.
x KLV-46/40R452A, KLV-40R457A, KLV-32R407A,
KLV-32/24R402A:
Thick and soft cloth
x KLV-46/40R472A, KLV-32/24R422A:
Thick and soft cloth
2: Connections
Connecting an antenna (aerial)/
cable
Antenna (aerial) cable (not supplied)
Connecting an antenna (aerial)/
cable and VCR
AV cable
(not
supplied)
Antenna (aerial) cable
(not supplied)
VCR
Connecting audio/video devices
AV cable
(not supplied)
Antenna
(aerial)
cable (not
supplied)
DVD recorder
x Connecting MHL device
Use authorized
MHL2 cable with
MHL logo (not
supplied)
MHL device
The MHL (Mobile High-Definition Link) enables the TV
to communicate with a connected MHL-compatible
device. The TV can charge the connected MHL-
compatible device while playing photo/music/video
from it. You can use the TV remote control to control the
connected MHL-compatible device.
~
• If “Auto Input Change (MHL)” is set to “On”, the TV
automatically switches to “HDMI / MHL” or “HDMI 2 / MHL”
(depending on your TV model) from other input when
MHL-compatible device is connected to HDMI IN / MHL
or HDMI IN 2 / MHL jack. The availability of “Auto Input
Change (MHL)” depends on whether the MHL-compatible
device can support this feature.
• You can continue normal usage of the connected MHL-
compatible device (such as receiving calls) depending on
its capability.
• Some remote control functions may not be available
depending on features of the connected MHL-compatible
device. Please refer to the device manual for details.
• This product is officially MHL-certified for operation
with other MHL-certified devices. If you encounter any
problems when using the MHL function, please consult the
device manufacturer for support.
3: Preventing the TV
from toppling over
*Anchor bolts (M6 / M4) (not supplied)
Strong cord
(not supplied)
* KLV-46/40R472A, KLV-46/40R452A, KLV-40R457A,
KLV-32R422A, KLV-32R407A, KLV-32R402A:
Use M6 anchor bolts
* KLV-24R422A, KLV-24R402A:
Use M4 anchor bolts
4: Performing the
initial setup
1
*
* 12V may vary depending on country
~
• When the TV is in standby mode (the "/1 (standby)
indicator on the TV front panel is red), press "/1 on the
remote to turn on the TV.
• Make sure that the TV is completely turned off before
unplugging the AC power cord (mains lead) or DC cable.
Unplugging the AC power cord (mains lead) or DC cable
while the TV is turned on may cause the TV to malfunction.
2
Follow the instructions on the screen.
~
• You can also tune channels manually.
• Language options vary depending on model.
• Select “Home” from “Location” for the best TV settings to
use the TV in the home.
Overview of the
TV controls and
indicators
Front View
Remote sensor
Power/Standby indicator
• Lights up in red when in
standby.
• Lights up in green when
the TV is turned on.
• Flashes while the remote is
being operated.
~
• Do not put anything over the sensor, doing so may affect
its function.
Back View
Power
Turns the TV on or
switch to standby
mode.
CH/INPUT
• Press button until
“Rr Programme +/-”
appears and selects
channels with Volume
button.
• Press button until “Rr
Input select” appears
and selects input
source with Volume
button.
Volume
• Adjusts volume.
• Moves through
options up or down
when selecting
channels or input
source.
Overview of the remote
Turns the TV on or switch to standby
mode.
Displays the BRAVIA Sync Menu and
then select connected HDMI/MHL
equipment from “Device Selection”.
Selects the desired wide mode.
Displays information about the
programme/input or reveals hidden
information in Text mode.
Selects, adjusts or confirmed
selected items.
Displays a list of shortcuts to some
setting menus.
Returns to the previous channel or
input watched (for more than 15
seconds).
In TV mode: Selects the next or
previous channel.
In Text mode: Selects the next or
previous page.
Operates the BRAVIA Sync and
USB compatible equipment that is
connected to the TV.
Dual Sound.
Selects input source.
In Text mode: Holds the current
page.
Exit Text mode, or switches to a TV
display when displaying external
input.
In TV mode: Selects channels.
In Text mode: Selects pages.
Displays text information.
Available when operation guide
appears on the screen.
Returns to the previous screen.
In USB mode: Stops the playback.
Mute or restore sound.
Adjusts volume.
Displays or cancels the menu.
Sets the desired time frame to turn
off TV automatically.
x To change the Wide Mode
For TV, Video, Component or HDMI (except PC input)/ MHL HDMI PC Input (PC timing)
Wide Zoom* Normal Full Zoom* Normal Full 1 Full 2
* Parts of the top and bottom of the picture may be cut off.
~
• Some options may not be available depending on the signal source.
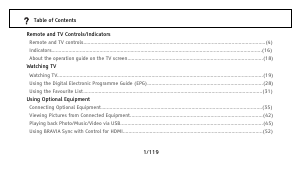
Introduction
Thank you for choosing this Sony product. Before operating the TV,
please read this manual thoroughly and retain it for future reference.
~
• The “x” that appears in the model name corresponds to a numeric
digit, related to design, colour or TV system.
• Instructions about “Installing Wall-Mount Bracket” are included within
this TV’s instructions manual.
• The illustrations used in this manual may differ depending on your
TV model.
• The illustrations of the remote control used in this manual are of the
RM-GA024 unless otherwise stated.
• Before operating the TV, please read Safety Information. Retain this
manual for future reference.
Location of the identification label
Labels for TV Model No. and Power Supply rating (in accordance with
applicable safety regulation) are located on the rear of the TV. Labels
for AC adapter Model No. and Serial No. are located at the bottom of
AC adapter.
Disposal of the TV set
Disposal of Old Electrical & Electronic
Equipment (Applicable in the European
Union and other European countries with
separate collection systems)
This symbol is on the remote control and AC adapter.
Disposal of the TV set
India only
Disposal of Old Electrical & Electronic
Equipment (Applicable in Republic of
India)
This symbol indicates that this product shall not be treated as
household waste and may not be dropped in garbage bins. Product
owners are advised to deposit their product at the nearest collection
point for the recycling of electrical and electronic equipment.Your
co-operation shall facilitate proper disposal & help prevent potential
negative consequences/hazards to the environment and human health,
which could otherwise be caused by inappropriate waste disposal
including improper handling, accidental breakage, damage and/ or
improper recycling of e-waste.The recycling of materials will help
to conserve natural resources. For more detailed information about
recycling of this product, please contact your local civic office, your
household waste disposal service provider or the store where you
made the purchase. You may contact our company’s toll free number in
India for assistance.
This product complies with the “India E-waste Rule 2011”. The
E-waste Rules, 2011 is an Indian directive aimed at reducing the
harmful environmental impact of waste electrical equipment by
restricting the use of known hazardous substances. As of 1st May
2012, new electrical and electronic equipment introduced into
the market may no longer contain the following chemicals or its
specified maximum concentration levels:
Lead, Mercury, Hexavalent Chromium, Polybrominated Biphenyls
(PBB) or Polybrominated Diphenylethers (PBDE) - in concentrations
exceeding 0.1 weight % and Cadmium - 0.01 weight %, except of
exemptions set in Schedule 2 of the aforesaid Rule.
Trademark information
• HDMI, the HDMI Logo, and High-Definition Multimedia Interface are
trademarks or registered trademarks of HDMI Licensing LLC in the
United States and other countries.
• Manufactured under license from Dolby Laboratories.
• “BRAVIA” and are trademarks of Sony Corporation.
• MHL, Mobile High-Definition Link and the MHL Logo are trademarks
or registered trademarks of MHL Licensing, LLC.
• Manufactured under license from DTS Licensing Limited. For U.S.
and worldwide patent and trademark information, see
www.dts.com/patents/legacy.aspx.
(c) DTS Licensing Limited and DTS, Inc. 2012.
(except KLV-40R457A,
KLV-32R407A)
(KLV-40R457A,
KLV-32R407A only)
Viewing pictures from the connected
equipment
Turn on the connected equipment, then press on the remote control or CH/INPUT on the TV to display the
connected equipment list.
Rear View
A
B
E
F
C D
*1
*1
*2
*
1
Terminals and labels may vary depending on TV model.
*
2
12V may vary depending on country.
A HDMI IN / MHL, HDMI IN 2 / MHL and HDMI IN 1 (Home Theatre systems, Camcorder, Blu-ray Disc player,
DVD player, PC with HDMI output and Mobile device).
Connect to the HDMI IN jack if the equipment has an HDMI jack.
If the equipment has a DVI jack, connect the DVI jack to the HDMI IN / MHL or HDMI IN 2 / MHL jack through a
DVI - HDMI adapter interface (not supplied), and connect audio out jack of the equipment to the HDMI AUDIO IN
or HDMI 2 AUDIO IN jack.
If the equipment is compatible with MHL, connect the MHL jack of the equipment to the HDMI IN / MHL or HDMI
IN 2 / MHL jack through a MHL - HDMI cable (not supplied).
If connecting a digital audio system that is compatible with Audio Return Channel (ARC) technology, use HDMI IN
1 (ARC). If not, an additional connection with AUDIO OUT (Refer D) is necessary.
~
• The HDMI jacks can support PC timing in HDMI PC mode. Refer PC input signal reference chart under “PC settings”.
• Be sure to use only an authorized HDMI cable bearing the HDMI logo, or an authorized MHL cable bearing the MHL
logo.
• HDMI IN 1 (ARC) is available depending on your TV model.
B (Digital still camera, Camcorder, USB storage media)
Access photo/music/video files stored on a USB device.
C
HDMI AUDIO IN or HDMI 2 AUDIO IN (PC and other audio devices )
Connect to the
HDMI AUDIO IN or HDMI 2 AUDIO IN. It is recommended to use an audio input (stereo
minijack).
D AUDIO OUT
/ (Stereo systems, Headphone)
Connect with an audio cable or headphones. You can listen to TV sound through your stereo system or
headphones. You can select “Variable” or “Fixed” in the “Audio Out” menu.
E
Connect AC adapter to the jack.
F VIDEO IN
/COMPONENT IN/AUDIO (DVD player, VCR, Video game equipment, S VHS/Hi8/DVC
camcorder, DVD player with component output)
Connect to the VIDEO IN
jack and the AUDIO jacks. If you connect mono equipment, connect to the L
(MONO) jack.
For better picture quality, component connection is recommended if your DVD player has a component video
output. Connect to the COMPONENT IN jacks.
Using Menu
Functions
1
4
5
3
2
Favourites
Photo
Music
Video
Photo Frame Mode
FM Radio
Settings
Exit
• To exit Home menu:
1 Favourites
Store up to 18 channels or external inputs.
x To add a current channel or external inputs
into Favourites list
1
“Favourites”
red
OR
2
“Add to Favourites”
x To watch a channel or external input
TV 9
Favourites
Select
Add Delete
Confirm Exit
~
• To exit Favourites List:
• When you run the “Auto Tuning”, only the programme
channels in your Favourites list will be cleared.
2 Photo/ Music/ Video
Playback photo/music/video files via USB devices.
Side View
“Photo”/“Music”/“Video”
z
• If more than one USB detected:
red
“Device
Selection”
• If you connect the USB device when “USB Auto Start”
is set to “On”, the thumbnail view of photo/music/video
appears automatically.
x To adjust the picture and sound setting
(Video)
When playing video
“Picture” / “Sound”
x To play a photo as slideshow (Photo)
green
OR
“Slideshow”
~
• To stop slideshow:
“Stop Slideshow”
~
• While the TV is accessing the data on the USB device, do
not turn off the TV or connected USB device, disconnect
the USB cable, or remove the USB device.
• Sony will not be held liable for any damage to, or loss of,
data on the recording media due to a malfunction of any
connected devices or the TV.
• The file name and folder name may not display correctly
in some cases.
• When you connect a Sony digital still camera, set the
camera’s USB connection mode to Auto or Mass Storage.
For more information about USB connection mode, refer to
the instructions supplied with your digital camera.
• Check the website below for updated information about
compatible USB devices.
http://www.sony-asia.com/bravia/flash.html
• Use a USB storage device that is compliant with USB
mass storage device class standards.
USB Video format
Extension Container Video Codec Audio Codec
.avi AVI
MPEG1, MPEG2,
XviD, MPEG4,
H.264, MJPEG
PCM, AC3,
MPEG1
Layer1/2,
MPEG2 AAC,
MPEG4 AAC,
MPEG4 HE-AAC,
WMA V8, MP3
.wmv, .asf ASF
WMV V9, Xvid,
MPEG4, VC-1
MP3, WMA V8
.mp4,
.mov, .3gp
MP4
MPEG4, H.264,
H.263, MJPEG
MPEG1
Layer1/2, MP3,
MPEG2 AAC,
MPEG4 AAC,
MPEG HE-AAC
.mkv MKV
WMV V9,
MPEG4, H.264,
VC-1
PCM, MP3,
MPEG1
Layer1/2,
MPEG2 AAC,
MPEG4 AAC,
MPEG4 HE-AAC,
AC3, WMA V8
DTS, DTS 2.0
VP8 VORBIS
.mpg,
.mpeg,
.vob, .vro
MPEG1 MPEG1
MPEG1
Layer1/2, MP3,
AC3
MPEG2PS MPEG1, MPEG2 DTS, DTS 2.0
.ts, .m2ts MPEG2TS
MPEG2, H.264,
VC-1
MPEG1Layer
1/2, MP3,
MPEG2 AAC
MPEG4 HE-AAC,
AC3, MPEG4
AAC
DTS, DTS 2.0
USB Music format
Extension Audio Codec
.mp3 MPEG1 Audio Layer 3
.wma WMA V8
.wav LPCM
USB Photo format
Extension Image Codec
.jpg, .jpe, .jpeg JPEG
DCF2.0 or EXIF2.21 supported.
~
• Playback of the above file formats is not guaranteed.
• The USB device supports FAT16 , FAT32 and NTFS.
3 Photo Frame Mode
(KLV-46/40R472A,
KLV-32/24R422A only)
Display Photo, Music and Clock calendar at the same
time.
x To enter Photo Frame Mode
1
“Photo Frame Mode”
OR
2
“Settings”
“Set-up”
“Photo Frame Settings”
“Image
Selection”/“Music
Selection”
~
• To exit Photo Frame mode: /
4 FM Radio
~
• For first time using FM Radio function:
“Settings”
“Channel Set-up”
“FM Radio Set-up”
“Auto Tuning”
• To access FM Radio mode:
“FM Radio”
x To listen to preset stations:
1
In FM Radio mode
“Settings”
“Channel Set-up”
“FM Radio Set-up”
“FM Radio Presets”
OR
2
In FM Radio mode
“FM Radio Presets”
~
• To exit “Channel Set-up” menu:
• To select desired preset FM Radio stations:
/
x To listen to non-preset stations:
In FM Radio mode
To search desired station
/
To tune FM frequency
~
• If “Please set-up FM Radio.” appears, perform
To listen to preset stations.
x To show photo or picture while listening to
FM Radio
In FM Radio mode
“Photo Frame Mode” (KLV-46/40R472A,
KLV-32/24R422A only)
OR
“Slideshow” / “Picture Frame”
~
• To exit “Photo Frame Mode”/“Slideshow”/”Picture Frame”:
x To reduce power consumption in FM Radio
1
“Power Saving”
OR
2
“Settings”
“Eco”
“Power Saving”
~
• To exit from “Picture Off”: Any key except
/
~
• To exit FM Radio mode:
• If the station has a noisy sound, press B/b to improve the
sound quality.
• If the FM stereo programme has static noise, press
until “Mono” appears to reduce noise.
5 Settings
You are able to change the settings of your TV from
“Settings” menu
x To select setting options
Settings
Picture
Sound
Screen
Channel Set-up
Parental Lock
Set-up
Eco
To select “Settings” category
/
To modify the setting
~
• To exit the setting mode:
• The options you can adjust vary depending on the
situation. Unavailable options are greyed out or not
displayed.
Picture
Picture Mode
Sets a picture mode.
Reset
Resets all the “Picture” settings to
factory settings, except “Picture Mode”
and “Intelligent Picture Plus Set-up”.
Backlight
Adjusts the brightness of the backlight.
Picture
Increases or decreases picture
contrast.
Brightness
Brightens or darkens the picture.
Colour
Increases or decreases colour
intensity.
Hue
Increases or decreases the green
tones and red tones.
Sharpness
Sharpens or softens the picture.
Colour
Temperature
Adjusts the whiteness of the picture.
Noise
Reduction
Reduces the picture noise (snowy
picture) in a weak broadcast signal.
MPEG Noise
Reduction
Reduces the picture noise in MPEG-
compressed video.
Cinema Drive
Provides improved picture movement
when playing BD (Blu-ray Disc), DVD
or VCR images taken on film, reducing
picture blur and graininess.
~
• If the image contains irregular signals or too much noise,
“Cinema Drive” is automatically turned off even if “Auto”
is selected.
Advanced
Settings
Set “Picture” settings in more detail.
Intelligent
Picture Plus
Set-up
Enhances picture quality according to
preferred settings, channel or video
input.
Sound
Sound Mode
Sets a sound mode.
Reset
Resets all the “Sound” settings to
factory settings, except “Sound Mode”,
“Dual Sound”, “Speakers” and “Audio
Out”.
7 Band
Equaliser
Adjusts sound frequency settings.
Sound
Booster
Produces a fuller sound for more
impact.
Clear Voice
Makes voice sound clearer.
Simulated
Stereo
Adds a surround-like effect to mono
programmes.
Intelligent
Volume
Minimizes the difference in volume
level between all programmes and
adverts.
Balance
Emphasises left or right speaker
balance.
Volume Offset
Adjusts the volume level of the current
input relative to other inputs.
Dual Sound
Sets the sound from speaker for a
stereo or bilingual broadcast.
~
• If the stereo sound is noisy when receiving a NICAM
programme, select “Mono”. The sound becomes
monaural, but the noise is reduced.
• If you select other equipment connected to the TV, set
“Dual Sound” to “Stereo”, “Main” or “Sub”. However,
when the external equipment connected to the HDMI jack
(except HDMI 1) is selected, this is fixed to “Stereo”.
• If you access to FM Radio mode, set “Dual Sound” to
“Stereo” or “Mono”.
Speakers
Selects sound output from TV speakers
or external audio equipment.
Audio Out
Selects whether to control external
audio system through TV remote
control.
~
• When the input source is set to “Headphone” in the
“Headphone/Audio Out” under the “AV Set-up” menu,
“Audio out” is not available in the list.
Screen
Wide Mode
Refer (To change the Wide Mode).
Auto Wide
Automatically changes the wide mode
according to the input signal from
an external equipment. To keep your
setting, select “Off”.
z
• Even if “Auto Wide” is set to “On” or “Off”, you can
always modify the format of the screen by pressing
repeatedly.
4:3 Default
Selects the default screen mode for
use with 4:3 broadcasts.
Auto Display
Area
Selects “On” to automatically adjusts
the display area based upon the
content or “Off” to choose from the
“Display Area” options.
Display Area
Adjusts the picture display area.
Horizontal
Shift
Adjusts the horizontal position of the
picture when “Wide Mode” is set to
“Wide Zoom” or “Zoom”.
Vertical Shift
Adjusts the vertical position of the
picture when “Wide Mode” is set to
“Wide Zoom” or “Zoom”.
PC Settings
Selects screen mode or adjusts the
display position of the picture when the
TV receives an input signal from the
connected PC.
PC input signal reference chart for HDMI IN 1, 2
Signals
Horizontal
(Pixel)
Vertical
(Line)
Horizontal
frequency
(kHz)
Vertical
frequency
(Hz)
Standard
VGA 640 480 31.5 60 VGA
SVGA 800 600 37.9 60
VESA
Guidelines
XGA 1024 768 48.4 60
VESA
Guidelines
WXGA 1280 768 47.4 60 VESA
WXGA 1280 768 47.8 60 VESA
WXGA 1360 768 47.7 60 VESA
SXGA* 1280 1024 64 60 VESA
HDTV* 1920 1080 67.5 60 EIA
* KLV-46/40R472A, KLV-46/40R452A, KLV-40R457A only
~
• This TV’s PC input does not support Sync on Green/
Composite Sync and interlaced signal.
• This TV’s PC input supports signals in the above chart
with a 60 Hz vertical frequency.
Channel Set-up
1 Digit Direct
When “1 Digit Direct” is set to “On”,
select a channel using one preset
number button (0 - 9) on the remote.


Praat mee over dit product
Laat hier weten wat jij vindt van de Sony Bravia KLV-46R472A LCD televisie. Als je een vraag hebt, lees dan eerst zorgvuldig de handleiding door. Een handleiding aanvragen kan via ons contactformulier.