Personal Trimmer Set
Instruction Manual
Model no.: RFC-1351
17 18
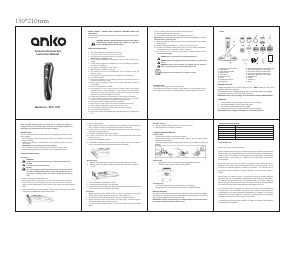
1. Blade height adjusting switch
2. On/Off switch
3. Power/ Charing indicator
4. Beard Trimmer
5. Hair Trimmer
6. Precision Trimmer
7. Shaver
8. Nose and Ear Trimmer
9. Storage base
10. Beard trimmer attachment: adjustable height
11. Hair trimmer attachment: 3mm length
12. Hair trimmer attachment: 6mm length
13. Hair trimmer attachment: 9mm length
14. Hair trimmer attachment: 12mm length
15. Cleaning brush
16. Charger
17. Lubricant oil
18. Pouch
4. Turn on the hair clipper.
5. Start by cutting hair in neck or on the sides and cut towards the centre of the head.
Then, cut the front section fo the hair towards the centre of the head.
6. Hold the device so the the comb attachment rests flat on the head. Move the
device evenly through the hair.
7. If possible, cut against direction of hair growth.
8. In order to catch a
ll the hair, move the device several times through the same
section of the hair.
9. Comb the hair repeatedly and well.
10. To withdraw the blade, hold the groomer with both hands and press the blades out
with your thumb and support the blades at back to avoid falling.
Beard Trimmer
1. Slide the beard comb into the guiding grooves on both sides of the handle.
2. Slide the comb to the desired setting. The beard comb cuts hair to a length of
5 – 8mm.
3. Comb the beard in the direction of growth.
4. Cut the beard from the ear to chin downward.
5. Use the beard trimmer attachment without the comb attachment will cut the beard
very short or to cut the moustache and hairline.
150*210mm
PARTS
SAFETY GUIDE - PLEASE READ CAREFULLY BEFORE USING THIS
APPLIANCE
Please follow all the precautions listed below for safety and to reduce the risk of injury
or electric shock.
WARNING: READ ALL INSTRUCTIONS; FAILURE TO FOLLOW ALL
INSTRUCTIONS LISTED BELOW MAY RESULT IN ELECTRIC
SHOCK, OR SERIOUS PERSONAL INJURY.
SAVE THIS INSTRUCTION
1. Only use the appliance as described in this manual.
2. This appliance contains baeries that are non-replaceable.
3. Do not immerse the appliance in water or any other liquid.
Warning: Keep the appliance dry.
4. Do not allow the appliance to be exposed to rain or moisture during use or
storage.
5. Always
check the appliance for damage prior to use. If any damage is observed,
DO NOT use the appliance.
6. The appliance is intended for indoor use only.
7. Always switch the appliance off after use.
8. This appliance has no user serviceable parts. Do not attempt to access the
appliance covers.
9. This appliance is for personal use only, not designed for commercial use.
10. Do not use it outdoors.
11. Do not use the appliance if it is not working properly, if it h
as been dropped or if it
has been immersed in any liquid.
12. Before using the appliance, ensure that the clipper head/ trimmer head are
securely fitted.
13. Do not use the appliance on children.
14. The appliance is not to be used by persons (including children) with reduced
physical, sensory or mental capabilities, or lack of experience and knowledge,
unless they have been given supervision or instructions concerning use of the
appliance by a person responsible
for their safety.
15. Children being supervised to ensure that they do not play with the appliance.
16. Do not operate the charger if it has a damaged cord or plug, if it is not working
properly, if it has been dropped or damaged or dropped into water.
17. Use only the original charger supplied with the appliance.
18. Check that your supply voltage is the same as that stated on the charger.
19. When charging the appliance, the power switch must be OFF.
20. It is normal for th
e charger to become warm to touch when charging.
21. Use only attachments provided.
22. This product contains sharp blades, please take the utmost care in handling and
use.
23. Do not stretch, twist and curl the cable around the appliance.
24. Keep the cable away from hot surfaces.
25. Do not replace the batteries with non-rechargeable batteries.
IMPORTANT! To avoid personal injury, do not use the groomer if it has a
damaged blade or trimming head.
26. Detach the attachment heads for clea
ning. Only the attachments can be washed
under tap water.
27. DO NOT submerge the appliance, nor make it flow under water-tap.
28. DO NOT use salt water or boiling water. Also, do not use cleaning products that
are designed for toilets, bathrooms or kitchen appliances
29. The groomer must be used only with the battery charger provided with the
product KH6-030060AU
WARNING: Do not recharge non-rechargeable batteries.
WARNING: Before charging the product, please make sure your hands
are dry.
WARNING: Please use the charger we supplied with the appliance.
Other chargers may cause electrical failure and/or fire.
This product is not suitable to use in a bath or shower
Note: The RED indicator light will remain ON to indicate the groomer is
charging while it is connected to power. Therefore, it is important to disconnect
the charger from the groomer within 24 hours of charging.
BATTERY CARE
To ensure maximum life from the batteries in your rechargeable grooming unit, follow
these guidelines:
.
Do not recharge the unit between sessions. Wait until the batteries are
exhausted
before recharging.
.
Discharge the batteries completely twice a year (switch ON and run until the
shaver stops).
.
IMPORTANT! Do not use the groomer while charging.
.
Do not charge the unit when the temperature is below 0°C or above 40°C
.
Avoid recharging the unit in direct sunlight or near a radiating heat source.
OPERATING INSTRUCTIONS
Hair Clipper
WARNING:
Switch off the device before replacing or changing the attachments
NOTES:
The hair to be dressed must be dry.
The cutting length may deviate depending on the cutting angle. Please
start with a comb attachment with a longer cutting length and then, in
the course of cutting process, use shorter cutting lengths step by
1. Select the desired hair clipper attachment.
2. Attach the hair trimmer to the main unit. Push on the attachment by inserting the
bottom bracket of the attachemnt into the slot of the main body then press the
upper part of the attachment onto the device until it audibly and firmly locks into
place.
3. Insert comb attachments, press carefully over the hair trimmer head to the bottom
end of the comb attachemnt until it locks into place.
Foil Shaver
1. Before using the shaver, always check it for wear and damage. If the shaver
shows signs of wear or damage, do not use or it may cause injury.
2. Pre-trim the contours desired with the hair trimmer or precision trimmer.
3. Gently press the shaver onto the skin and shave along contoured edges to
remove any stubbles. Do not press too hard.
4. Any areas that are harder to shave, such as chin, stretch the skin for a better
result.
Nose/Ear Trimmer
1. Slowly insert the metal tip into one of your nostrils or ears.
2. Move the device in circles to cut the hair.
CLEANING AND MAINTENANCE
Trimmer Head
. Always switch OFF the groomer before cleaning.
. Remove the accessory and the used blade. Clean it with the cleaning brush
supplied with the product.
. The cutting blades should be lightly oiled with the oil provided once every few
haircuts.
Shaver Head
. Separate the foil from cutting blade by pressing both side buttons.
. Carefully clean using the cleaning brush provided.
Grooming Unit
. Use a damp cloth to clean the main unit then dry it thoroughly.
. Storage the groomer and attachments in the pouch to prevent damage.
BATTERY DISPOSAL
The groomer must be disconnected from the mains power when removing the battery.
The battery is to be disposed safely. Used batteries should be taken to a recycling
station and not disposed of with household waste.
IMPORTANT: Always fully discharge the batteries before removal and ensure
the charg
er is disconnected from mains power.
TECHNICAL SPECIFICATIONS
12 Month Warranty
Thank you for your purchase from Kmart.
Kmart Australia Ltd warrants your new product to be free from defects in materials and
workmanship for the period stated above, from the date of purchase, provided that the
product is used in accordance with accompanying recommendations or instructions
where provided. This warranty is in addition to your rights under the Australian
Consumer Law.
Kmart will provide you with your
choice of a refund, repair or exchange (where
possible) for this product if it becomes defective within the warranty period. Kmart
will bear the reasonable expense of claiming the warranty. This warranty will no
longer apply where the defect is a result of alteration, accident, misuse, abuse or
neglect.
Please retain your receipt as proof of purchase and contact our Customer Service
Centre on 1800 124 125 (Australia) or 0800 945 995 (Ne
w Zealand) or alternatively,
via Customer Help at Kmart.com.au for any difficulties with your product. Warranty
claims and claims for expense incurred in returning this product can be addressed to
our Customer Service Centre at 690 Springvale Rd, Mulgrave Vic 3170.
Our goods come with guarantees that cannot be excluded under the Australian
Consumer Law. You are entitled to a replacement or refund for a major failure and
compensation for an
y other reasonably foreseeable loss or damage. You are also
entitled to have the goods repaired or replaced if the goods fail to be of acceptable
quality and the failure does not amount to a major failure.
For New Zealand customers, this warranty is in addition to statutory rights observed
under New Zealand legislation.
BEFORE FIRST USE
Charge the appliance for 8 hours before first use. RED indicator will turn ON to
indicate the product is charging.
T
his appliance can be charged directly or rest on the storage base when charging.
Please make sure the power is OFF before charging.
IMPORTANT! Use only the charger provided with the product KH6-030060AU.
CHARGING
1. Connect the DC plug of charger to the DC jack on the shaver.
2. Connect the charger to mains power (AC) outlet.
3. The charging indicator will illuminate in RED.
4. It will take 8 hours to fully charge the batteries in the groomer.
IMPORTANT! Never
charge the Groomer for more than 24 hours.
INTRODUCTION
This appliance is designed for household use only.
The appliance can be used at 100-240V voltage. Before you put the charger into the
outlet, make sure the voltage is compatible with the required voltage on the product.

Praat mee over dit product
Laat hier weten wat jij vindt van de Anko RFC-1351 Baardtrimmer. Als je een vraag hebt, lees dan eerst zorgvuldig de handleiding door. Een handleiding aanvragen kan via ons contactformulier.
beantwoord | Ik vind dit nuttig (4) (Vertaald door Google)
beantwoord | Ik vind dit nuttig (1) (Vertaald door Google)