1 2 3 4 5 6 7 8
IT
EN
AVVERTENZE
IMPORTANTI
LEGGERE QUESTE ISTRUZIONI PRIMA
DELL’USO.
Usando apparecchi elettrici è necessario
prendere le opportune precauzioni, tra le
quali:
Assicurarsi che il voltaggio elettrico 1.
dell’apparecchio corrisponda a quello
della vostra rete elettrica.
Non utilizzare l’apparecchio in prossi-2.
mità di pareti e tende.
Non lasciare l’apparecchio esposto 3.
ad agenti atmosferici (pioggia, sole,
ecc...)
Questo apparecchio può essere usato 4.
da ragazzi di età maggiore o uguale a
8 anni; le persone con capacità fisiche,
sensoriali o mentali ridotte o privi di
esperienza e conoscenza dell’apparec-
chio oppure ai quali non siano state date
istruzioni relative all’utilizzo dovranno
essere soggette alla supervisione da
parte di una persona responsabile
della loro sicurezza oppure dovranno
essere prima adeguatamente formati
su come usare tale apparecchio in
sicurezza e sui rischi connessi all'uso
dello stesso. I bambini non devono
giocare con l’apparecchio. La pulizia e
la manutenzione dell’apparecchio non
devono essere effettuate da bambini di
età inferiore ad 8 anni senza supervi-
sione di un adulto.
Tenere l’apparecchio e relativo cavo 5.
fuori dalla portata dei bambini di età
inferiore agli 8 anni.
Durante l’utilizzo, posizionare l’appa-6.
recchio su di un piano orizzontale.
Posizionare il prodotto su una super-7.
ficie stabile, resistente al calore e ben
illuminata.
Non usare questo apparecchio all'esterno.8.
Fare attenzione che il cavo elettrico 9.
non venga a contatto con superfici
calde.
La temperatura delle superfici accessi-10.
bili può essere elevata quando l'appa-
recchio è in funzione.
Spegnere l’apparecchio e togliere la 11.
spina dalla presa di corrente quando
non viene utilizzato e prima delle ope-
razioni di pulizia.
Non tirare il cavo di alimentazione per 12.
togliere la spina.
Non utilizzare detergenti abrasivi, cor-13.
rosivi o lavastoviglie per la pulizia
dell'apparecchio.
NON IMMERGERE MAI 14.
L'APPARECCHIO, LA SPINA ED IL
CAVO ELETTRICO IN ACQUA O
ALTRI LIQUIDI, USATE UN PANNO
UMIDO PER LA LORO PULIZIA.
Non usare l’apparecchio se il cavo elet-15.
trico o la spina risultano danneggiati, o
se l’apparecchio stesso risulta difetto-
so; in questo caso portatelo al più vici-
no Centro di Assistenza Autorizzato.
Se il cavo di alimentazione è danneg-16.
giato, esso deve essere sostituito dal
Costruttore o dal suo servizio assi-
stenza tecnica o comunque da una
persona con qualifica similare, in modo
da prevenire ogni rischio.
L’apparecchio è concepito per il SOLO 17.
USO DOMESTICO e non deve essere
adibito ad uso commerciale o indu-
striale.
Si consiglia l’uso di una ventola di 18.
aspirazione o un’adeguata aerazione
del locale durante l'uso.
Non collocare l’apparecchio sopra o in 19.
prossimità di fonti di calore, elementi
elettrici o in un forno riscaldato. Non
posizionarlo sopra altri apparecchi.
Sorvegliare attentamente l’apparecchio 20.
quando viene utilizzato in presenza di
bambini.
Allorchè si decida di smaltire come 21.
rifiuto questo apparecchio, si racco-
manda di renderlo inoperante taglian-
done il cavo di alimentazione. Si rac-
comanda inoltre di rendere innocue
quelle parti dell’apparecchio suscettibili
di costituire un pericolo, specialmente
per i bambini che potrebbero servirsi
dell’apparecchio per i propri giochi.
Gli elementi dell’imballaggio non devo-22.
no essere lasciati alla portata dei
bambini in quanto potenziali fonti di
pericolo.
Questo apparecchio è conforme alla 23.
direttiva 2014/35/EU e EMC 2014/30/
EU, ed al regolamento (EC) No.
1935/2004 del 27/10/2004 sui materiali
in contatto con alimenti.
Il prodotto non va alimentato attraverso 24.
timer esterni o con impianti separati
comandati a distanza.
25. Per il corretto smaltimento del pro-
dotto ai sensi della Direttiva Europea
2012/19/EU si prega leggere l’apposito
foglietto allegato al prodotto.
CONSERVARE SEMPRE
QUESTE ISTRUZIONI
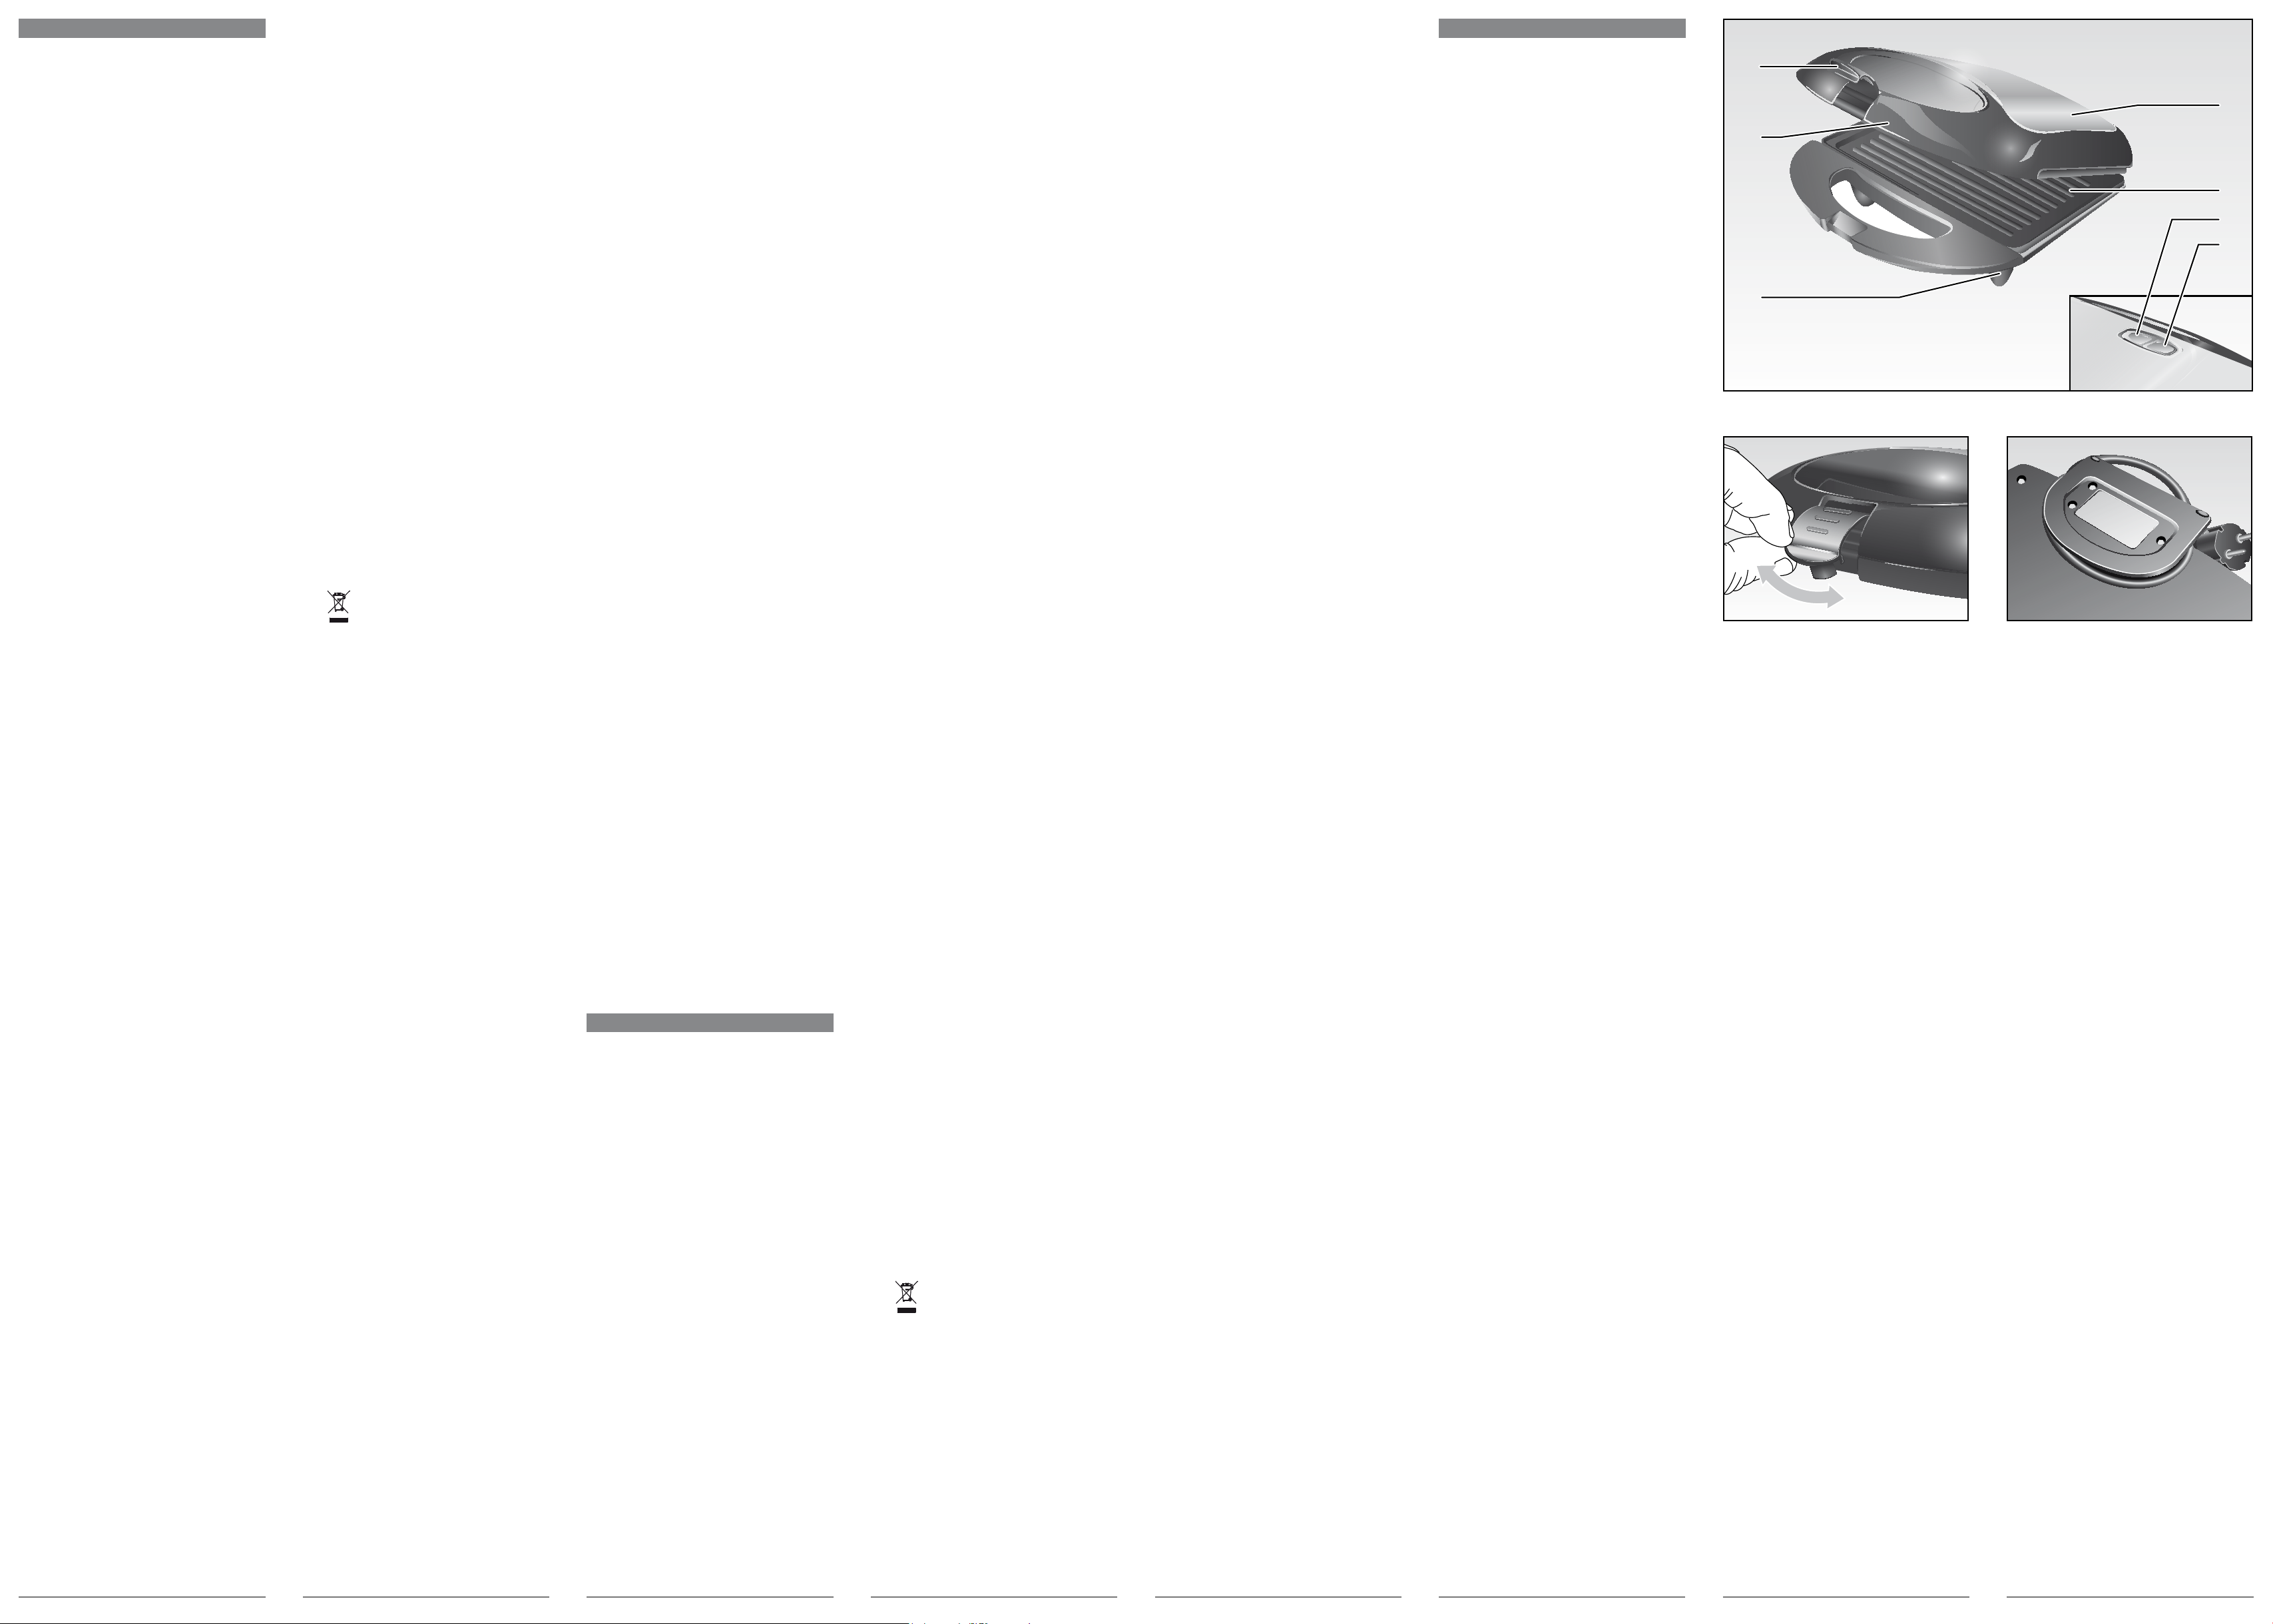
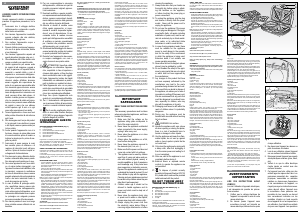
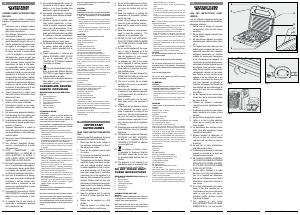
DESCRIZIONE DELL’APPARECCHIO (Fig. 1)
A Corpo dell'apparecchio
B Piastre antiaderenti
C Spia rossa di accensione
D Spia verde pronto temperatura
E Piedini antiscivolo
F Maniglia di apertura
G Levetta di chiusura
ISTRUZIONI D'USO
ATTENZIONE:
Prima dell’uso, togliere le eventuali etichette presenti
sulle piastre. Verificare che le piastre di cottura siano
pulite e senza tracce di polvere. Se necessario, pulire con
un panno umido.
Al primo utilizzo, si potrebbe notare la fuoriuscita di un
sottile filo di fumo. Ciò è dovuto solo al riscaldamento di
alcuni componenti.
- Posizionare l’apparecchio su una superficie piana.
Assicurarsi che la piastra sia chiusa durante la fase di preri-
scaldamento.
- Inserire la spina nella presa di corrente.
- Si accenderà la spia (C) che segnala l’inserimento della
spina nella presa di corrente e la spia (D) ad indicare che
l’apparecchio si sta riscaldando.
- Quando l’apparecchio avrà raggiunto la temperatura (dopo
circa 3 minuti) ed è pronto per l’uso, la spia (D) si spegne-
rà.
Nota: La spia (D) tornerà ad accendersi quando la temperatura
necessaria per la cottura si abbasserà.
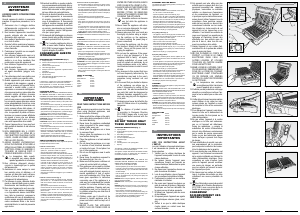
- Aprire completamente l’apparecchio attraverso la maniglia
(F), dopo aver sollevato l’apposita levetta (G) verso l’alto
(Fig. 2).
- Collocare l’alimento da cuocere sulla piastra di cottura
inferiore (B). Posizionare sempre l’alimento verso la parte
posteriore della piastra di cottura.
- Chiudere la piastra superiore su quella inferiore attraverso
la maniglia (F), e bloccarla premendo leggermente verso il
basso la levetta (G) fino ad udire lo scatto della di avvenuto
bloccaggio (Fig. 2).
- Per la cottura sono necessari circa 5-8 minuti. In ogni caso,
il tempo dipende dai gusti personali, dal tipo e dallo spessore
del cibo.
- Una volta terminata la cottura, spegnere l’apparecchio stac-
cando la spina dalla presa di corrente e sollevare la piastra
come descritto in precedenza. Togliere l’alimento usando
una spatola di plastica.
ATTENZIONE:
Non toccare l’involucro dell’apparecchio e le piastre calde
al fine di evitare ustioni.
Non forzare la levetta (G) al fine di evitarne la rottura.
Non usare la levetta (G) di chiusura per bloccare la
piastra superiore mentre l’alimento si trova all’interno
dell’apparecchio. Il peso stesso della piastra schiaccerà
gradualmente il cibo durante la fase di cottura.
Cuocere soltanto con le piastre chiuse.
Non usare oggetti appuntiti (es.: coltello) per evitare di
danneggiare le piastre.
PULIZIA
ATTENZIONE:
Pulite l’apparecchio solo con un panno umido dopo aver
disinserito la spina dalla presa di corrente e dopo che
l’apparecchio si sia completamente raffreddato.
- Per la pulizia delle piastre usare solo un panno umido.
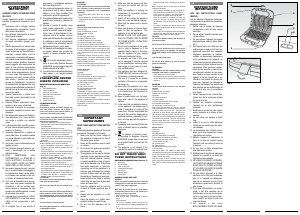
- Riporre l'apparecchio, bloccando la piastra superiore a quel-
la inferiore tramite lo scatto dell’apposita levetta (G) (Fig. 2)
e avvolgendo il cavo nell’apposita sede sotto l’apparecchio
(Fig. 3).
RICETTE
Panini ai funghi tostati e pomodori secchi
(Per 4 persone)
Tempo di preparazione: 10 minuti
Tempo di cottura: 15 minuti
Ingredienti:
300 g di funghi tagliati a fette
100 g di foglie tenere di spinaci
1/2 tazza di pomodori secchi sminuzzati
3/4 di tazza di formaggio magro grattugiato
200 g di pane turco, tagliato in quattro porzioni
Riscaldare una padella per frittura e cospargerla con un po’ di
olio. Aggiungere i funghi e cuocere per tre minuti o finché non
diventano morbidi, mescolando di tanto in tanto. Versare su
carta da cucina. Insaporire con sale e pepe.
Preriscaldare la piastra. Disporre gli spinaci, i funghi, i
pomodori secchi, il formaggio uniformemente sul pane turco.
Insaporire con sale e pepe. Coprire col pane restante e pre-
mere con forza.
Mettere i panini nella piastra e cuocere per cinque minuti o
finché non è tostato. Tagliare a metà e servire.
Focaccia al pesto e agnello
ingredienti
400 g di filetto d’agnello
pezzi di focaccia di 20cm quadrati
65 g di pesto al basilico
50 g di parmigiano a fettine
35 g di pomodori secchi fatti a fette
Cuocere l’agnello sulla griglia bollente precedentemente oliata
(griglia o barbecue) finché non è ben colorito e della cottura
desiderata. Lasciare riposare l’agnello, coperto, per 5 minuti
prima di affettarlo finemente.
Preriscaldare il piastra. Dividere in due la focaccia, poi tagliarla
a metà orizzontalmente. Spalmare del pesto sulle parti inferiori
della focaccia, mettervi sopra l’agnello, il formaggio, i pomodori
e la focaccia restante. Mettere la focaccia nella piastra per
circa 5 minuti o finché il formaggio non si fonde e la focaccia
non è completamente calda. Tagliare la focaccia in diagonale
e servire.
Panini con pancetta tostata, banana e formaggio
Ingredienti:
4 fette di pane
6 o 7 fette di pancetta pre-cotta
1 banana
2 fette di formaggio Cheddar
Un altro grande trucco da ristorante, consiste nel tostare leg-
germente il pane prima di unirlo nel formare il panino. Quindi
preriscaldare la piastra, disporre le quattro fette di pane nella
piastra inferiore e chiudere completamente; riscaldare per non
più di un minuto, (appena il tempo necessario per imbrunire il
pane). Rimuovere il toast e stendere le fette di pancetta, rico-
prendo la parte inferiore del toast. Affettare ora la banana nel
senso della lunghezza, facendo più o meno 6 fette, e stenderle
sopra la pancetta. Coprire il tutto con le fette di formaggio;
ricoprire e lasciar cuocere per 3-4 minuti.
Tortillas messicane
(Per 4-6 persone)
Ingredienti:
250g di salsa messicana
Mezza tazza di fagioli schiacciati (o fagioli rossi)
2 cucchiai di trito di aglio e erba cipollina
200 g di salsiccia tritata finemente
16 tortillas tonde (non fritte)
200 g di salsa Tatziki
200 g di succo di Avocado
250 g di mozzarella sminuzzata
1 tazza di crema acida
Preriscaldare la piastra; mettere insieme la salsa, i fagioli, il
trito di aglio e erba cipollina, la salsiccia e spalmare l’insieme
su 8 tortillas. Guarnire con strati alternati di Tatziki, Avocado
e formaggio.
Cuocere le tortillas finché non sono dorate, croccanti e ben
calde per circa 8 minuti.
Suggerimenti per servire: servire con crema acida e foglie di
insalata.
Fig. 1
FR
G
F
A
B
Fig. 2
Fig. 3
E
C
D
IMPORTANT
SAFEGUARDS
READ THESE INSTRUCTIONS BEFORE
USE.
When using electrical appliances, there are
precautions that need to be followed:
Make sure that the power voltage of 1.
the appliance corresponds to that of
the mains power system.
Never use the appliance near to walls 2.
or curtains.
Do not leave the appliance exposed to 3.
the elements (rain, sun, etc.).
This appliance can be used by children 4.
aged from 8 years and above and per-
sons with reduced physical, sensory
or mental capabilities or lack of experi-
ence and knowledge only if they have
been given supervision or instruction
concerning use of the appliance in a
safe way and understand the hazards
involved. Children shall not play with
the appliance. Cleaning and user main-
tenance shall not be made by children
unless they are aged from 8 years and
above and supervised.
Keep the appliance and its cord out 5.
of reach of children aged less than 8
years.
Always use the appliance on a flat 6.
surface.
Place the product on a stable, heat-7.
resistant surface in a well-lit area.
Do not use this appliance out of 8.
doors.
Make sure that the power cord does 9.
not come into contact with hot sur-
faces.
While the appliance is working the 10.
temperature of accessible surfaces
can be very high.
Switch off and unplug the appliance 11.
when not in use and before cleaning.
Never pull the power cord to remove 12.
the plug.
Never use abrasive or corrosive deter-13.
gents to clean the appliance. This
appliance is not dishwasher safe.
NEVER PLACE THE APPLIANCE, 14.
PLUG OR POWER CORD IN WATER
OR OTHER LIQUIDS. CLEAN WITH
A DAMP CLOTH.
Do not use the appliance if the power 15.
cord or plug is damaged or if the
appliance itself is faulty; in this case,
take the appliance to your nearest
Authorised Assistance Centre.
To eliminate any risks, if the power 16.
cord is damaged it must be replaced
by the manufacturer, technical assist-
ance centre or in any case, by a simi-
larly qualified person.
This appliance has been designed for 17.
HOME USE ONLY and may not be used
for business or industrial purposes.
The use of a suction fan or suitable 18.
ventilation of the room is recommend-
ed during use.
Never place the appliance on or near 19.
to sources of heat, electrical elements
or in a heated oven. Do not place it on
other appliances.
Keep a careful watch over the appli-20.
ance when used in the presence of
children.
In the event that you decide to dispose 21.
of the appliance, we advise you to
make it inoperative by cutting off the
power cord. We also recommend that
any parts that could be dangerous be
rendered harmless, especially for chil-
dren, who may play with the appliance
or its parts.
Packaging must never be left within the 22.
reach of children since it is potentially
dangerous.
This appliance conforms to the direc-23.
tives 2014/35/EU and EMC 2014/30/
EC, and to the regulations (EC) No.
1935/2004 of 27/10/2004 regarding
material in contact with foods.
The appliance is not intended to be 24.
operated by means of an external timer
or separate remote-control system.
25. To dispose of product correct-
ly according to European Directive
2012/19/EU, please refer to and read
the provided leaflet enclosed with the
product.
DO NOT THROW AWAY
THESE INSTRUCTIONS
APPLIANCE DESCRIPTION (Picture 1)
A Motor body
B Non-stick plates
C Power on light (red)
D Temperature light (green)
E Non-slip feet
F Opening handle
G Closing lever
INSTRUCTIONS FOR USE
WARNING:
Before use, remove any label from plates. Check the cook-
ing plates are clean and free of dust streaks. If need be,
clean using a damp cloth.
While using for the first time, a very small amount of
smoke may come out; this is just caused by the warming
up of some components.
- Place the appliance on a flat surface.
Make sure the plate is closed during pre-heating phase.
- Plug in appliance.
- The light (C), indicating insertion of plug into the socket, and
the light (D), signalling heating phase, will go on.
- The light (D) turns off when the appliance reaches the tem-
perature (after about 3 minutes) and is ready for use.
Note: The light (D) will go on again when the required tem-
perature decreases.
- Open appliance completely through the handle (F), after
having raised the related lever (G) - Picture 2.
- Place food to be cooked on the bottom plate (B). Always
place food towards the back of the plate.
- Close the top plate on the bottom one using the handle (F),
then lock it by slightly pushing the lever (G) downwards, until
the click of lock off (Picture 2) is heard.
- For cooking, 5-8 minutes are required. Anyhow, time
depends on personal tastes as well as on food type and
thickness.
- After cooking, turn the appliance off by unplugging the appli-
ance and raising the plate as described above. Remove food
by means of a plastic spatula.
WARNING:
Do not touch appliance housing and hot plates to prevent
burn hazard.
Do not force the lever (G) to avoid its breakage.
Do not use the locking lever (G) to close the top plate
when food is in the appliance. The appliance weight itself
gradually presses food during cooking phase.
Just cook with closed plates.
Do not use sharp objects (e.g. knife) to prevent plates
from damaging.
CLEANING
WARNING:
Clean appliance just with a damp cloth after having
unplugged it and when it is completely cold.
• Use a damp cloth to clean the plates.
- Store appliance by locking the top plate on the bottom one
until the click of the appropriate lever (G) is heard (Picture 2)
and wind the power cord in its seat in the lowest part of the
appliance (Picture 3).
RECIPES
Toasted panini with mushrooms and sun-dried tomatoes
(Serves 4)
Preparation time: 10 minutes
Cooking time: 15 minutes
Ingredients:
300 g sliced mushrooms
100 g baby spinach
1/2 cup sun-dried tomatoes, finely chopped
3/4 cup grated low-fat cheese
200 g pita bread, cut into four portions
Heat a frying pan and drizzle in a little oil. Add the mushrooms
and cook for 3 minutes or until they become soft, stirring
them from time to time. Then place the mushrooms on some
kitchen paper and season with salt and pepper. Heat the grill
plate. Place the spinach, mushrooms, sun-dried tomatoes and
cheese evenly on the one side of the pita bread. Cover with
the remaining bread and press down firmly. Place the panini
in the grill and cook for five minutes or until toasted. Cut into
halves and serve.
Focaccia with lamb and pesto sauce
Ingredients
400 g lamb fillets
Piece of focaccia bread (20 cm square)
65 g pesto sauce
50 g Parmesan cheese slices
35 g sun-dried tomatoes, sliced
Cook the lamb on the piping hot, lightly oiled grill (or barbecue)
until it is brown and cooked to the required amount. Leave it to
stand for 5 minutes before slicing it finely.
Heat the grill plate. Divide the focaccia into half and then slice
each half horizontally into two. Spread pesto sauce on the
bottom halves of the focaccia, then add the lamb, Parmesan
and tomatoes and top with the remaining focaccia. Place the
focaccia in the grill and cook for 5 minutes or until the cheese
has melted and the focaccia is heated through. Cut the focac-
cia into diagonal pieces and serve.
Panini with toasted pancetta, banana and cheese
Ingredients:
4 slices of bread
6 or 7 slices of pre-cooked pancetta or bacon
1 banana
2 slices of Cheddar cheese
Another great professional trick is to lightly toast the bread
for placing it together to make the panino. Then heat the grill
plate, place the four slices of bread on the bottom grill plate
and close the grill. Heat the slices for no more than one minute
(just the amount of time needed to toast the bread). Remove
the toasted bread and cover the bottom halves of the panino
with the slices of pancetta. Slice the banana, lengthways,
into 6 and place the slices over the pancetta. Cover with the
slices of cheese and the top halves of the panini and cook for
3-4 minutes.
Mexican Tortillas
(Serves 4-6)
Ingredients:
250 g Mexican salsa
Half a cup refried beans (or red beans)
2 spoons finely chopped garlic and chives
200 g sausage meat, finely minced
16 round tortillas (not fried)
200 g Tzatziki sauce
200 g Avocado juice
250 g Mozzarella cheese, finely chopped
1 cup sour cream
Heat the grill plates. Mix together the salsa, beans, chopped
garlic and chives, and the sausage and spread the mix onto
8 tortillas. Garnish with alternate layers of Tzatziki, Avocado
and cheese.
Cook the tortillas for about 8 minutes, until they are golden,
crispy and thoroughly heated. Serving suggestions: serve on a
bed of lettuce leaves with some sour cream.
INSTRUCTIONS
IMPORTANTES
LIRE CES INSTRUCTIONS AVANT
L’EMPLOI.
Lors de l’utilisation d’appareils électriques,
il est important de prendre des précautions
adéquates, telles que:
Vérifier que le voltage de l’appareil 1.
corresponde à celui de votre réseau
électrique.
Ne pas utiliser l’appareil près des murs 2.
ou des rideaux.
Ne pas exposer l’appareil aux agents 3.
atmosphériques externes (pluie, soleil,
etc...)
Cet appareil peut etre utilise par des 4.
enfants ages ou majeurs de 8 ans. Les
personnes presentant des capacites
physiques, sensorielles ou mentales
reduites ou depourvues d’experience
et de connaissance de l’appareil, ou
n’ayant pas reçu les instructions neces-
saires devront utiliser l’appareil sous la
surveillance d’une personne respon-
sable de leur securite ou devront etre
correctement instruites sur les moda-
lites d’emploi en toute securite de cet
appareil et sur les risques lies a son
utilisation. Les enfants ne doivent pas
jouer avec l’appareil. Le nettoyage et
l’entretien de l’appareil ne doivent pas
être effectués par des enfants âgés de
moins de 8 ans sans la surveillance
d’un adulte.
Garder l’appareil et ses cordons élec-5.
triques hors de la portée des enfants
de moins de 8 ans.
Pendant son utilisation, positionner 6.
l’appareil sur un plan parfaitement
horizontal.
Positionner le produit sur une surface 7.
stable, résistante à la chaleur et bien
éclairée.
Ne pas utiliser cet appareil à l’exté-8.
rieur.
Veiller à ce que le câble électrique 9.
n’entre pas en contact avec des surfa-
ces chaudes.
La température des surfaces acces-10.
sibles peut être augmentée lorsque
l’appareil est en fonction.
Eteindre l’appareil et débrancher la 11.
fiche de la prise de courant lorsque
l’appareil n’est pas utilisé et avant de
le nettoyer.
Ne pas tirer le câble d’alimentation 12.
pour débrancher la fiche.
N’utilisez pas de produits de nettoyage 13.
abrasifs ou corrosifs et ne lavez pas
l’appareil au lave-vaisselle.
NE JAMAIS PLONGER L’APPAREIL, 14.
LA FICHE ET LE CABLE ELECTRIQUE
DANS L’EAU OU AUTRES LIQUIDES,
ET UTILISER UN CHIFFON HUMIDE
POUR LES NETTOYER.
Ne pas utiliser l’appareil si le câble 15.
électrique ou la fiche sont endomma-
gés, ou si l’appareil est défectueux;
dans ce cas, adressez-vous au Centre
d’Assistance après-vente Autorisé le
plus proche.
Si le câble d’alimentation est endom-16.
magé, il doit être remplacé par le
Constructeur ou par son service après-
vente ou, quoi qu’il en soit, par un tech-
nicien qualifié, de façon à éviter tout
risque de danger.
Cet appareil a été conçu 17.
EXCLUSIVEMENT POUR UN USAGE


Praat mee over dit product
Laat hier weten wat jij vindt van de Ariete 1980 Contactgrill. Als je een vraag hebt, lees dan eerst zorgvuldig de handleiding door. Een handleiding aanvragen kan via ons contactformulier.