
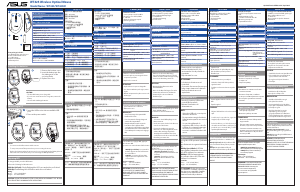
WT460 Wireless Optical Mouse
CE Mark Warning
This is a Class B product, in a domestic
environment, this product may cause
radio interference, in which case the
user may be required to take adequate
measures.
Declaration of Conformity (RT&TTE
directive 1999/5/CE)
The following items were completed and
are considered relevant and sufficient:
• Essential requirements as in [Article 3]
• Protection requirements for health and
safety as in [Article 3.1a]
• Testing for electric safety according to
[EN60950]
• Protection requirements for
electromagnetic compatibility in [Article
3.1b]
• Testing for electromagnetic
compatibility according to [Article 3.1b]
• Effective use of the radio spectrum as
in [Article 3.2].
• Radio test suites according to
[EN300440]
REACH
Complying with the REACH (Registration,
Evaluation, Authorisation, and Restriction
of Chemicals) regulatory framework, we
published the chemical substances in
our products at ASUS REACH website at
http://green.asus.com/
ASUS Recycling/Takeback
Services
ASUS recycling and takeback programs
come from our commitment to the highest
standards for protecting our environment.
We believe in providing solutions for you to
be able to responsibly recycle our products,
batteries, other components, as well as the
packaging materials.
Please go to http://csr.asus.com/english/
Takeback.htm for the detailed recycling
information in dierent regions.
Manufacturer
ASUSTeK Computer Inc.
Tel: +886-2-2894-3447
Address: No. 150, LI-TE RD., PEITOU,
TAIPEI 112, TAIWAN
Authorised representative
in Europe
ASUS Computer GmbH
Address: HARKORT STR. 21-23,
D-40880 RATINGEN,
DEUTSCHLAND
Authorised distributor in Turkey
PENTA TEKNOLOJI URUNLERI DAGITIM TICARET A.S.
Address: DUDULLU ORGANIZE SANAYI BOLGESI NATO YOLU 4.CAD.NO:1
DUDULLU UMRANIYE
34775 ISTANBUL, TURKEY
Tel: 0216 645 8200
EEE Yönetmeliğine Uygundur.
Q8220 / First Edition / March 2013
MAGYAR
A csomagja a következőket
tartalmazza
:
a. 2,4 GHz-es vezeték nélküli
optika egér
b. Nano USB 2,4 GHz-es vevő
c. 2 x AAA elem
d. Gyors üzembe helyezési
útmutató
Az elem beszerelése
1. Távolítsa el a burkolatot.
2. A megfelelő polaritás-
jelzés szerint helyezze be
az elemet a rekeszbe.
3. Helyezze vissza fedelet.
VIGYÁZAT
:
• A mellékelt elemek nem
újratölthetőek.
• Ha hosszabb ideig nem
használja az egeret,
távolítsa el az elemeket.
• Új, vagy hasonló típusú
elemeket használjon.
Podłączanie do
komputera
1. Illessze be az USB vevőt
egy rendelkezésre álló USB
portba.
2. Kapcsolja be a főkapcsolót.
.
MEGJEGYZÉSEK
:
•
Az USB vevőkészüléket
az egér belsejében lehet
tárolni
.
•
Az energiatakarékosság
érdekében kapcsolja ki a
tápellátást, amikor nem
használja az egeret.
Gombfunkciók
1 Bal gomb: Bal kattintás
2 Jobb gomb: Jobb kattintás
3
Kerék: Görgetés fel/le és
középső kattintás
4 Bal oldali felső gomb: Előre
(Internet)
5 Bal oldali alsó gomb: Vissza
(Internet)
6 DPI kapcsoló: a DPI szint
módosítására szolgál
(800/1200/1600)
POLSKI
Opakowanie zawiera:
a.
Bezprzewodowa mysz optyczna
2,4GHz
b.
Odbiornik Nano USB 2.4 GHz
c.
2 baterie AAA
d. Instrukcja szybkiego
uruchomienia
Montaż/wymiana baterii
1. Zdejmij pokrywę.
2. Włóż do gniazda baterie,
sprawdzając prawidłowy
kierunek biegunów.
3. Załóż z powrotem
pokrywę.
PRZESTROGA
:
• Dostarczonych baterii nie
można ładować.
• Jeśli mysz nie będzie
długo używana należy
wyjąć baterie.
• Należy użyć baterie nowe
i podobnego typu.
Podłączanie do
komputera
1. Włóż odbiornik USB do
wolnego portu USB.
2. Włącz włącznik zasilania.
UWAGI
:
•
Możesz przechowywać
odbiornik USB wewnątrz
myszy.
•
Aby zaoszczędzić energię,
wyłącz zasilanie, kiedy nie
korzystasz z myszy.
Funkcje przycisków
1 Lewy przycisk: Kliknięcie
lewym przyciskiem
2
Prawy przycisk: Kliknięcie
prawym przyciskiem
3 Kółko: Przewijanie do
góry/do dołu i kliknięcie
środkowym przyciskiem
4 Lewy, górny przycisk: Dalej
(Internet)
5 Lewy, dolny przycisk:
Wstecz (Internet)
6 Przełącznik DPI: Umożliwia
zmianę poziomu DPI
(800/1200/1600).
PORTUGUÊS
A embalagem inclui
:
a. Rato a óptico sem os 2,4GHz
b.
Receptor nano USB 2.4 GHz
c. 2 x pilha AAA
d. Guia de consulta rápida
Instalar a bateria
1. Remova a tampa.
2. Coloque as pilhas
no respectivo
compartimento
respeitando a polaridade
correcta.
3. Volte a colocar a tampa.
ATENÇÃO
:
• As pilhas fornecidas não
são recarregáveis.
• Se não pretender utilizar
o rato durante um longo
período de tempo,
remova as pilhas.
• Utilize pilhas novas e do
mesmo tipo.
Ligação ao PC
1. Introduza o receptor
USB numa porta USB
disponível.
2. Ligue o botão de energia.
NOTAS
:
•
Pode guardar o receptor
USB dentro do rato
.
•
ara poupar energia,
desligue o rato quando
não estiver a utilizá-lo.
Função dos botões
1 Botão esquerdo: Clique
esquerdo
2 Botão direito: Clique direito
3 Roda: Deslocamento para
cima/baixo e clique com o
botão do meio
4 Botão lateral superior:
Avançar (Internet)
5 Botão lateral inferior: Voltar
(Internet)
6 Interruptor de PPP: Permite
mudar o nível de PPP
(800/1200/1600).
ROMÂNĂ
Pachetul dvs include:
a. un mouse cu optic fără r de
2.4GHz
b. receptor Nano USB de 2.4 GHz
c. 2 x baterie AAA
d. Ghid de pornire rapidă
Instalarea bateriei
1. Scoateţi capacul.
2. Introduceţi bateriile
în compartiment,
respectând polaritate.
3. Repuneţi capacul.
ATENŢIE:
• Bateriile furnizate nu sunt
reîncărcabile.
• În cazul în care nu
veţi utiliza mouse-ul o
perioadă mai lungă de
timp, scoateţi bateriile.
• Utilizaţi baterii noi şi de
acelaşi tip.
Conectarea la PC
1. Inseraţi receptorul
USB într-un port USB
disponibil.
2. Porniţi întrerupătorul de
alimentare.
NOTE:
• Puteţi stoca receptorul
USB în interiorul mouse-
ului.
• Pentru a economisi
curent, opriţi curentul
când nu folosiţi mouse-ul.
Funcţia butonului
1 Buton stânga: Click stânga
2 Buton dreapta: Click dreapta
3
Rotiţă: Rulare în sus/jos şi
click mijloc
4 Buton stânga sus: Înainte
(Internet)
5 Buton stânga jos:
Înapoi (Internet)
6 Comutator DPI: Vă permite
să modicaţi nivelul DPI
(800/1200/1600).
SERBIAN
Vaš paket uključuje:
a. 2.4GHz bežični, optički miš
b. Nano USB 2.4 GHz risiver
c. 2 x AAA baterije
d. Vodič za brzo korišćenje
Instaliranje baterija.
1. Uklonite poklopac.
2. Ubacite baterije u
proreze, vodeći računa o
ispravnom polaritetu.
3. Gurnite napred i pritisnite
da zamenite poklopac.
OPREZ:
• Upakovane baterije nisu
punjive.
• Ukoliko duže vreme ne
koristite miša, uklonite
baterije.
• Koristite nove baterije ili
baterije sličnog tipa.
Povezivanje za PC.
1. Ubacitr USB risiver u
dostupan USB port.
2. Uključite napajanje.
BELEŠKE:
• Možete da čuvate USB
risiver unutar miša.
• Da štedite energiju,
isključite napajanje kada
ne koristite miša.
Funkcije tastera
1 Levi taster: Levi klik
2 Desni taster: Desni klik
3 Točak: Skrolovanje naviše/
naniže i srednji klik
4 Gornji taster sa leve strane:
Napred (Internet)
5 Donji taster sa leve strane:
Nazad (Internet)
6 DPI prekidač: Dozvoljava
vam da promenite DPI nivo
(800/1200/1600).
SLOVENSKY
Vaše balenie obsahuje:
a. 2,4 GHz bezdrôtovú optické
myš
b. 2,4 GHz Nano USB prijímač
c. 2 x AAA batéria
d. Stručný návod na
používanie
Namestitev baterije
1. Snímte kryt.
2. Do štrbiny vložte batérie;
dávajte pritom pozor na
polaritu.
3. Znovu nasaďte kryt.
UPOZORNENIE:
• Dodávané batérie nie sú
nabíjateľné.
• Pokiaľ nebudete myš
dlhodobo používať,
vyberte z nej batérie.
• Použite nové batérie
alebo batérie podobného
typu.
Povezovanje z računalnikom
1. USB prijímač zasuňte do
voľného USB portu.
2. Zapnite hlavný vypínač.
POZNÁMKY:
• USB prijímač môžete
uložiť do myši.
• Kvôli úspore energie
vypnite napájanie
počas doby, kedy myš
nepoužívate.
Funkcie tlačidiel
1 Ľavé tlačidlo: Kliknutie
ľavým tlačidlom
2
Pravé tlačidlo: Kliknutie
pravým tlačidlom
3
Koliesko: Rolovanie nahor/
nadol a kliknutie stredným
tlačidlom
4 Ľavé horné tlačidlo:
Dopredu (Internet)
5 Ľavé spodné tlačidlo:
Naspäť (Internet)
6 Prepínač DPI: Umožňuje
vám zmeniť úroveň DPI
(800/1200/1600).
SLOVENŠČINA
Vaš paket vsebuje:
a. 2,4 GHz brezžična optični
miška
b. Nano USB 2,4 GHz sprejemnik
c. 2 x baterija AAA
d. Vodilč za hitri začetek
Instalación de las baterías
1. Odstranite pokrov.
2. Vstavite bateriji v režo
in pazite na pravilno
polarnost.
3. Ponovno namestite
pokrov.
POZOR:
• Priložene baterije niso
polnilne.
• Če miške dalj časa
ne boste uporabljali,
odstranite baterije.
• Uporabite nove baterije
podobne vrste.
Conexión a un PC
1. Novi sprejemnik USB
vstavite v razpoložljiva
vrata USB.
2. Vključite napajalno
stikalo.
OPOMBE:
• Sprejemnik USB lahko
shranite tudi v miško.
• Za varčevanje energije
vedno izključite miško,
kadar je ne uporabljate.
Funkcija gumba
1 Levi gumb: Levi klik
2 Desni gumb: Desni klik
3
Kolesce: Podrsajte gor/dol in
sredinski klik
4 Levi zgornji gumb: Naprej
(Internet)
5 Levi spodnji gumb: Nazaj
(Internet)
6 Stikalo DPI: Omogoča
spreminjanje ravni DPI
(800/1200/1600).
ESPAÑOL
u paquete incluye
:
a. Ratón óptico inalámbrico de
2,4GHz
b.
Receptor Nano USB de 2,4 GHz
c. 2 x Batería AAA
d. Guía de inicio rápido
Instalación de las baterías
1. Retire la tapa.
2. Inserte las pilas en la
ranura teniendo en
cuenta la polaridad
correcta.
3. Vuelva a colocar la tapa.
PRECAUCIÓN
:
• Las pilas incluidas no son
recargables.
• Si no va a utilizar el ratón
durante un prolongado
período de tiempo, retire
las pilas.
• Utilice pilas nuevas y de
tipo similar.
Conexión a un PC
1. Inserte el receptor USB en
un puerto USB disponible.
2. Active el interruptor de
encendido.
NOTAS
:
•
Puede almacenar el
receptor USB dentro del
ratón.
• Para ahorrar energía,
desactive la alimentación
mientras no esté utilizando
el ratón.
Función de los botones
1 Botón izquierdo: Clic a la
izquierda
2
Botón derecho: Clic a la derecha
3
Rueda: Desplazamiento
hacia arriba/abajo y clic en
el centro
4 Botón superior lateral
izquierdo: Adelante
(Internet)
5 Botón inferior lateral
izquierdo: Atrás (Internet)
6 Conmutador de DPI:
Permite cambiar el nivel de
DPI (800/1200/1600).
TÜRKÇE
Ambalaj aşağıdakileri içerir
:
a. 2.4GHz kablosuz optik
mouse
b.
Nano USB 2.4 GHz alıcı
c. 2 x AAA pil
d. Hızlı Başlangıç Kılavuzu
Pili takma
1. Kapağı çıkarın.
2. Kutuplarına dikkat ederek
pilleri yuvaya yerleştirin.
3. Kapağı yerleştirin.
DİKKAT
:
• Verilen piller yeniden şarj
edilemez.
• Eğer fareyi uzun süre
kullanmayacaksanız,
pilleri çıkarın.
• Yeni olan ve aynı tipteki
pilleri kullanın.
PC’ye Bağlama
1. USB alıcısını boş bir USB
portuna takın.
2. Güç düğmesini açın.
NOTLAR
:
•
USB alıcıyı farenin içinde
saklayabilirsiniz.
•
Elektrik tasarrufu için,
mouseu kullanmadığınızda
lütfen gücü kapatın.
Düğme işlevi
1 Sol düğme: Sol tık
2 Sağ düğme: Sağ tık
3
Tekerlek: Yukarı/Aşağı
kaydırma ve orta tık
4 Sol taraf yukarı düğmesi:
İleri (İnternet)
5 Sol taraf aşağı düğmesi:
Geri (İnternet)
6 DPI Anahtarı: DPI seviyesini
değiştirmenize olanak sağlar
(800/1200/1600).
1 ปุ่มซ้าย: คลิกซ้าย
2 ปุ่มขวา: คลิกขวา
3
ล้อ: เลื่อนขึ้น/ลง
และคลิกกลาง
ไทย
แพคเกจของคุณประกอบด้วย:
ก. เมาส์ออฟติคัลไร้สาย 2.4GHz
ข. ตัวรับสัญญาณนาโน USB
2.4 GHz
ค. แบตเตอรี่ AAA x 2
ง.
การติดตั้งแบตเตอรี่
ข้อควรระวัง:
เชื่อมต่อกับคอมพิวเตอร์
• เพื่อประหยัดพลังงาน ให้
ปิดเครื่องเมื่อคุณจะไม่ใช้
เมาส์
УКРАЇНСЬКА
До комплекту входять:
a. Бездротова оптична миша
2,4 ГГц
b. приймач нано-USB 2,4 ГГц
c. 2 х батарея ААA
d. Керівництво для швидкого
початку експлуатації
Встановлення акумулятора
1. Зніміть кришку.
2. Вставте батареї до
отвору дотримуючись
полярності.
3. Поверніть кришку на
місце.
ОБЕРЕЖНО:
• Батареї з комплекту не
підлягають зарядженню.
• Якщо Ви протягом
тривалого часу не
користуєтеся мишею,
вийміть батареї.
• Використовуйте нові
батареї цього ж типу.
Підключення до ПК
1. Вставте приймач USB до
вільного порту USB.
2. Увімкніть перемикач
живлення.
ПРИМІТКИ:
• Приймач USB можна
зберігати всередині
миші.
• Щоб заощаджувати
електроенергію,
вимикайте живлення,
коли не користуєтеся
мишею.
Функція кнопки
1 Ліва кнопка: типові функції
лівої кнопки миші
2 Права кнопка: типові
функції правої кнопки миші
3 Коліщатко: Вертикальне
прокручення і функція
середньої кнопки
4 Верхня кнопка з лівого
боку: Вперед (Internet)
5 Нижня кнопка з лівого
боку: Назад (Internet)
6 Перемикач DPI: Надає
можливість змінити рівень
DPI (800/1200/1600).



Praat mee over dit product
Laat hier weten wat jij vindt van de Asus WT460 Muis. Als je een vraag hebt, lees dan eerst zorgvuldig de handleiding door. Een handleiding aanvragen kan via ons contactformulier.