7 6
Control Dials
Temperature Control Dial
• Select air frying temperatures from 175°F to 400°F. Temperatures can be adjusted at any time.
• The blue HEAT ON light will turn off once the set temperature is reached.
• The blue HEAT ON light and heating element cycle on and off to maintain the selected temperature.
60 Minute Countdown Timer Dial
• Once the timer dial is set, the red POWER light will illuminate to show the Air Fryer is powered on.
• To assure even cooking/browning, open the frying basket drawer halfway through the cooking time.
Check, turn or vigorously shake foods in the frying basket.
IMPORTANT: When you pull the drawer out from the Air Fryer body, the red POWER light and the
Air Fryer will turn OFF. The timer will continue to count down when the drawer is opened.
• Heating will resume when the drawer is replaced.
• One beep will sound when the set air frying time has reached 0. The Air Fryer will turn OFF
automatically. Both the red POWER light and the blue HEAT ON light will turn off.
IMPORTANT: When all air frying is nished, turn both the temperature control dial and the timer dial
to 0 (OFF). Unplug the Air Fryer when not in use.
Before Using for the First Time
1. Your Air Fryer is shipped with the frying basket locked into the drawer, inside the Air Fryer body.
Firmly grasp the frying basket handle to open frying basket drawer; then remove the drawer from
the machine and place on a at, clean work area.
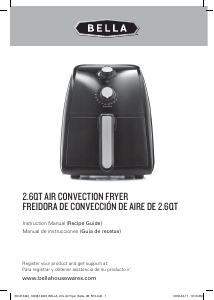
2. To unlock and remove the frying basket
fromthe drawer:
slide the clear basket lock forward to expose
the basket release button. Press the basket
release button with your thumb while pulling
the frying basket straight up and out of
thedrawer. Refer to Figure 2.
3. Remove all packing material and labels
from the inside and outside of the Air Fryer.
Checkthat there is no packaging underneath
and around the frying basket and drawer.
4. Wash frying basket and drawer in hot,
soapywater.
5. DO NOT IMMERSE THE AIR FRYER
BODYINWATER. Wipe Air Fryer body
withadampcloth.
Dry all parts thoroughly.
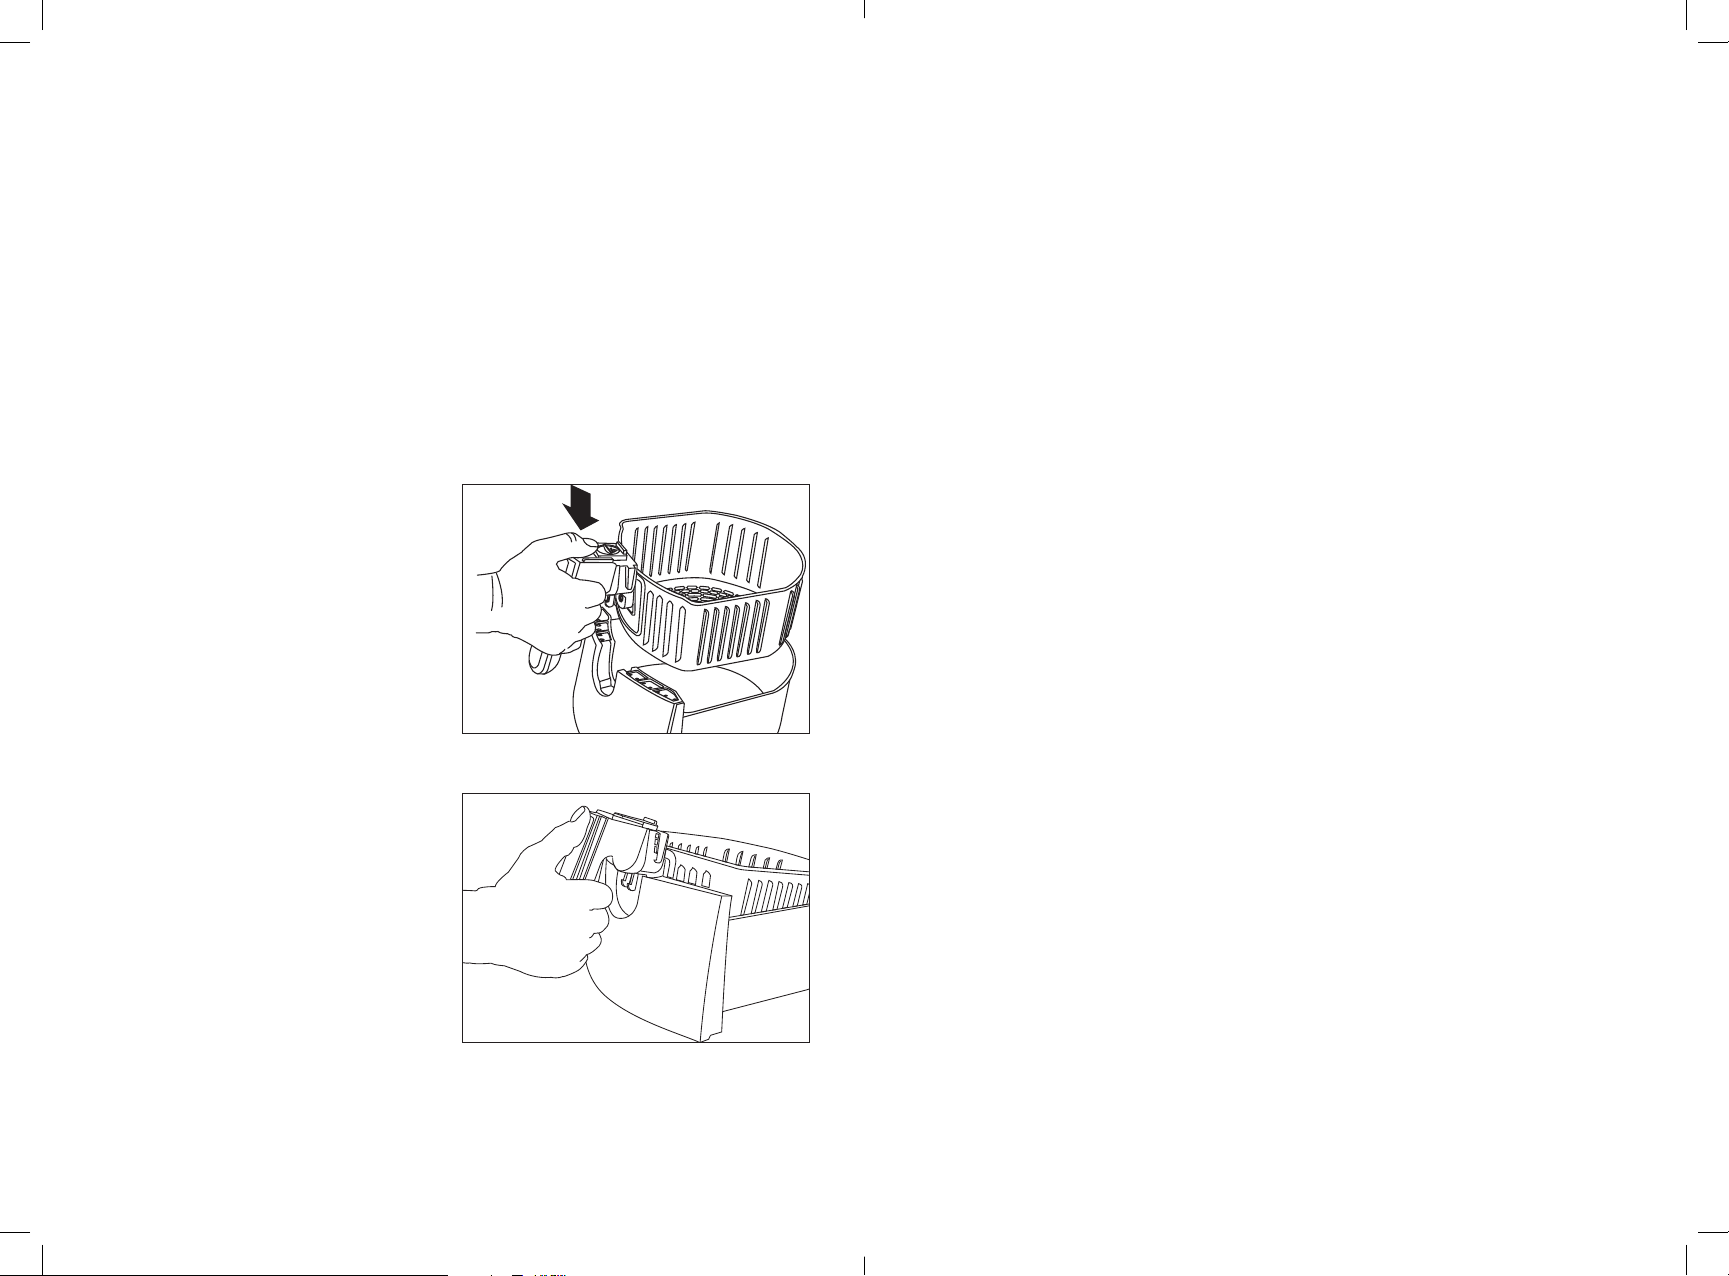
6. Lock the clean frying basket into the drawer.
There are 2 tabs on each side of the handle.
Slide the 2 handle tabs into the notches on
the top of the basket drawer. An audible click
can be heard as the frying basket handle locks
securely into place. Refer to Figure 3.
IMPORTANT: Slide the clear basket lock back
over the basket release button to prevent
accidental frying basket release.
Operating Instructions
WARNING! This unit should not be used to boil water.
NOTE: During rst use, the Air Fryer may emit a slight odor. This is normal.
1. Place the Air Fryer on a at, heat-resistant work area, close to an electrical outlet.
2. Firmly grasp the frying basket handle to open frying basket drawer; then remove the drawer from
the machine and place on a at, clean surface.
3. Place food into the frying basket. Do not overll frying basket with food. To ensure proper cooking
and air circulation, NEVER ll any frying basket more than 2/3 full. When air frying fresh vegetables,
we do not recommend adding more than 3 cups of food to the frying basket.
4. Insert the assembled frying basket drawer into the front of the Air Fryer. Always make sure frying
basket drawer is fully closed.
5. Plug cord in the wall outlet.
6. Select air frying temperature from 175°F to 400°F.
7. Turn timer dial to the desired air frying time plus 3 minutes for preheat if the Air Fryer is cold. The
blue HEAT ON light and the red POWER light will illuminate; the Air Fryer will begin heating.
IMPORTANT: The Air Fryer will not heat if the timer dial has not been set.
WARNING: Air Fryer will not heat -- the red POWER light will remain off, until frying basket drawer
is fully closed.
8. The blue HEAT ON light will turn off when set temperature is reached.
NOTE: During air frying, the blue HEAT ON light will cycle on and off as proper air frying
temperature is maintained.
9. To assure even cooking/browning, open the basket drawer halfway through the cooking time and
check. Lift frying basket from frying basket drawer in order to turn or shake foods in the frying
basket. Once complete, return the frying basket into frying basket drawer. Adjust temperature if
needed. The timer will continue to count down when the drawer is opened, but the Air Fryer will
stop heating until the drawer is replaced.
CAUTION: Make sure the clear basket lock is in the locked position when shaking foods for the
AirFryer. To avoid damage to persons or personal property, do not press the basket release
buttonwhile shaking the frying basket.
WARNING: Extreme caution must be used when handling the hot frying basket and drawer.
Avoidescaping steam from the frying basket and the food.
CAUTION: Always use oven mitts when handling the hot air fryer basket.
CAUTION: Hot oil can collect at the base of the drawer. To avoid risk of burns or personal injury,
orto avoid oil from contaminating air fried foods, always unlock and remove the frying basket from
the drawer before emptying. NEVER turn the drawer upside down with the frying basket attached.
NOTE: The Air Fryer can be turned OFF at any time by turning the timer dial to 0.
10. One beep will sound when the set air frying time has expired. The Air Fryer will turn OFF
automatically. Both the red POWER light and the blue HEAT ON light will turn off.
11. Shake the frying basket/drawer vigorously and check food for browning and doneness.
If additional air frying is needed, adjust temperature if desired, and set timer for 5 minute
increments until fully cooked.
12. Allow cooked food to rest for 5 to 10 seconds before removing basket drawer from Air Fryer
orfoodfrom frying basket.
13. When air frying is nished, remove the drawer from the machine and place on a at, heat resistant
surface. Then remove frying basket from the drawer.
14. Shake air fried foods out onto serving area. Promptly return the frying basket to the drawer and
lockinto place. Continue with subsequent batches, if any.
NOTE: When the next batch is ready, the Air Fryer’s 1500 watt heating system will quickly heat
andrecover.
15. When all air frying is completed, turn both the temperature control dial and the timer dial to 0 (OFF).
Both the red POWER light and the blue HEAT ON light will turn off.
16. Unplug the Air Fryer when not in use.
Figure 3
Figure 2
SO-313494_14538,14645_BELLA_2.5L Air Fryer_Belks_IM_R13.indd 6-7 2018-04-11 10:10 AM

Praat mee over dit product
Laat hier weten wat jij vindt van de Bella 14538 Friteuse. Als je een vraag hebt, lees dan eerst zorgvuldig de handleiding door. Een handleiding aanvragen kan via ons contactformulier.