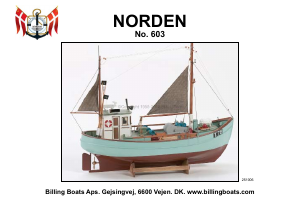
NORDEN
The Norden is a typical coasting vessel as can be seen
sailing the waters along the Western coast of Denmark.
This boat type was originally built in about 1930 by local
shipbuilders in the small Danish towns of Klitmøller and
Vorupør , and represented a considerable improvement
of the boats of the time. Since then, no appreciable
changes have been made, althrough the boats have
become a few feet longer and now have a wheel house
under cover.
The Norden is a stable and seaworthy vessel. Its rather
round design limits the speed to approx. 6 knots.
The vessels are still used for shing, although
emphasis is now on seine shing, with sh pots and
angling used only as occasional sources of extra
income.
Weather permitting, shing starts early in the morning
and continues all day. The boats are lowered and
raised be means of an electric winch, with wires
embedded in a block rmly anchored a good distance
from shore.
Before being hauled ashore, the boats are sailed as
far up on the beach as the waves can push them.
The winch hook is then attached to the bow irons for
hauling.
The boats are lowered aft rst, although with strong
onshore winds the boats are turned on lowering, so that
the bow faced the waves. This is a difcult and often
quite dangerous operation.
For futher information about this type of boat, consult
your library and books about sea-shing of the past.
FIG. 1: SLIP, KEEL AND FRAMES
Position slip A on a rm and even surface. Loosen keel
0 carefully and sand or cut off any notches left from
the punched plate. Afx one of the keels to the slip,
hammering the nails only partly in, as they are later
to be removed. Cut out the frames (no. 1 to 10), and
sand all edges smooth. Next glue the frames carefully
to the keel; they should extend exactly to the point of
attachment for the deck. Hold the frames in place while
they are drying by putting a pin in the lower part of the
frame. Glue keel pieces 0a and 0b on the front and
back respectively. Ensure that all parts are thoroughly
dry before continuing.
FIG. 2: PLANKING
This gure shows the hull with planking strip no. 13
in position. Before beginning the planking process it
is very important to sand and bevel the frames to t
the shape of the hull. Planking stip no. 13 should rest
evenly on the frames. This ensures as well a larger
gluing surface. Check the bevelling of the frames by
trying out the strips on the frames before gluing on.
Now afx the rst planking strip ush with the upper
edge of the deck, then position the bulkward no. 12.
Planking downwards can be more difcult, as the area
to be planked on frame no. 6 is larger than frame no. 1,
making it necessary to sand the strips conically for and
aft. A small balsa plane is useful for this purpose. Make
sure to use sufcient glue. Remember to sand all strips
to taper for and aft, so they can be positioned naturally
on the frames. This will prevent any stressing of the
planking. The strips must never be twisted into position.
It is a good idea to make a mark on both frame no. 6,
for example, and the corresponding strip, making it
easier to afx. Allow the glue to dry thoroughly before
removing the pins and mounting the next strip. When
the planking is nearing completion, remove the nails
which have held the model to the slip. Afx the last
strips, then repeat the process with the other half of the
strip. Glue on the stern blocks no. 1a.
FIG. 3: DECK
This gure shows the two hull halves ready to be glued
together, after both stern blocks no. 1a have been
positioned.
Sand both gluing surfaces completely even, and check
to ensure that the surfaces t snugly. Glue the two
hull halves together and hold in place with clamps,
clothespins or tape until dry. Sand the entire hull.
FIG. 4: PROPELLER, RUDDER AND SLIP
Glue the propeller to a piece of brass wire F410 and
glue to the hull at a distance of 17mm from the lowest
notch, then paint. The rudder is assembled as shown,
then lacquered and painted. Punch out slip no. 15 and
glue, using strip no. 16, at a distance of 12mm. Lacquer
and paint with no. 5.
Punch out and measure railing strips no. 17. Sand the
edges round, and stain before gluing. Cut the upper
part of the rail (no. 42) in lengths of 5cm, stain and glue
to the model. Now give the entire rail a coating of clear
lacquer.
FIG. 5, 5A AND 5B: CABINS, HATCHES, LOCKERS,
WINCHES, ETC.
The drawings in the building instructions show you
clearly how to assemble, paint and afx the various
parts which give the model an attractive nish.
3

Praat mee over dit product
Laat hier weten wat jij vindt van de Billing Boats set BB603 Boatkits Norden. Als je een vraag hebt, lees dan eerst zorgvuldig de handleiding door. Een handleiding aanvragen kan via ons contactformulier.