5
The gauge is intended as a guide only. Tyre pressures
should be regularly checked with a certified gauge.
Before use, check the power supply cord for signs of
damage, ageing and wear.
Do not use the appliance if the power supply cord or
mains plug is damaged or defective (where applicable).
Electrical safety
Electrical safety can be further improved by using a high
sensitivity (30mA / 30mS) Residual Current Device (RCD).
If the supply cord is damaged, it must be replaced by the
manufacturer or an authorised Black & Decker Service
Centre in order to avoid a hazard.
The following warning symbols are found on the tool/
appliance:
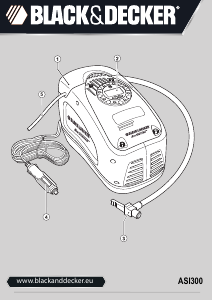
Features
1. Storage compartment cover
2. Pressure gauge
3. Air hose with universal valve adaptor
4. 12 Volt dc cord and adaptor
5. 230 Volt ac cord and plug
Residual risks
Additional residual risks may arise when using the tool which
may not be included in the enclosed safety warnings. These
risks can arise from misuse, prolonged use etc.
Even with the application of the relevant safety regulations
and the implementation of safety devices, certain residual
risks cannot be avoided. These include:
Injuries caused by touching any rotating/moving parts.
Injuries caused when changing any parts, blades or
accessories.
Injuries caused by prolonged use of a tool. When using
any tool for prolonged periods make sure you take
regular breaks.
Impairment of hearing.
Health hazards caused by breathing dust developed
when using your tool (example:- working with wood,
especially oak, beech and MDF).
Use
Air hose and cord storage
The air hose (3) and the ac cord (5) are stored in the storage
compartment (1) on top of the Inflator (fig. A). The holes in
both sides of the cover (1) allow for the hose and cord to exit
from the compartment so that the compartment cover can be
closed while the Inflator is in use. The dc cord (4) is stored in
the storage compartment (9) at the rear of the inflator.
Fitting the accessories (fig. B & D)
Your inflator is supplied with the standard tapered nozzles
and the needle inflator nozzle (6), these are located on the
base of the unit (fig. D).
To use the universal valve adaptor, make sure that the
lever is in the up position.
Place the valve adapter over the stem of the inflation
needle or tapered nozzle (fig. B).
Press the lever on the valve adapter down to lock it in
place.
Place the inflation needle or tapered nozzle into the item
to be inflated.
Note: Always make sure that the lever is in the up position
when not in use.
Operate your Inflator only with the universal valve adaptor or
with the included nozzles.
Note: Make sure that the universal valve adaptor is firmly
locked in place before turning the Inflator on.
Many inflatables have an internal flap that prevents air loss
during inflation. Unless this flap is displaced by the nozzle
the inflatable will not inflate. Push the nozzle firmly into the
valve to make sure that you push this flap out of the way.
Store the inflation needle inside one of the tapered nozzles
and snap the tapered nozzles into the storage slots located
on the bottom of the Inflator (fig. D).
Warning! Excessive air pressure may cause a hazardous
risk of bursting or personal injury. Check the manufacturer's
maximum pressure rating for the items being inflated.
Note: If the pressure rating for the item being inflated is
above 100 psi, note that the maximum run time is 10
minutes, leave to rest for 20 minutes before re-use.
This tool/appliance is double insulated; therefore no
earth wire is required. Always check that the power
supply corresponds to the voltage on the rating
plate.
Read the instruction manual before using the
inflator.
Do not expose the appliance to rain or high
humidity.
Before performing maintenance or cleaning
on the appliance, unplug the supply cord.
Do not leave the inflator unattended.


Praat mee over dit product
Laat hier weten wat jij vindt van de Black and Decker ASI300 Bandenpomp. Als je een vraag hebt, lees dan eerst zorgvuldig de handleiding door. Een handleiding aanvragen kan via ons contactformulier.