How to Use
Care and Cleaning
This appliance is for household use only.
Unpack unit and be sure you have all the parts before
assembly: Remote Control, Fan Housing, Front Column, Back
Column, 8 Phillips-head Screws, Stand Front Base, Stand
Back Base.
For Assembly:
1. Place fan on a flat surface.
2. Uncoil Electrical Cord.
3. Position Front Column and Back Column together with
Electrical Cord threaded through the center.
4. Snap Front and Back Columns together to form one
column.
5. Align the Back Column notch with the slot on bottom of
Fan Housing.
6. Using a Phillips screwdriver secure with screws provided.
7. Slide pegs on Front Base into holes of Back Base and
snap together to form a stand.
8. Thread Electrical Cord through center hole of the stand so
that it points toward the back of the fan.
9. Position cord channel (on underside of the stand) toward
the back of the fan.
10. Align holes in stand with holes in the column. Secure
stand to column with screws provided using a Phillips
screwdriver.
11. Thread Electrical Cord through cord channel with cord
exiting out the rear of the stand. (A)
To Use:
IMPORTANT: During the first few minutes of initial use, you
may notice a slight odor. This is normal and will quickly
disappear.
Note: with the exception of the OFF button, you will hear one
audible signal when you press the buttons to make
selections.
1. Place the fan on a safe, flat surface where it can’t fall or
be pulled by the cord.
2. Plug in the fan.
3. To make the fan oscillate, push the OSC button either on
the Manual Control Panel (B) or on the Remote Control (C).
Press OSC again to stop oscillating.
4. Press the ON/SPEED button on the Manual Control Panel
(B). Repeat until you attain desired speed. A small light will
come on over the speed you’ve selected-LOW, MEDIUM,
HIGH. Press the OFF button to shut off the fan. For the
Remote Control (C), repeatedly press the ON/SPEED button
to change from one speed to another, and press the OFF
button to turn the fan off.
5. The TIMER can be programmed in half-hour increments
to a maximum of 7.5 hours. Touch the TIMER button on the
Manual Control Panel (B) or the Remote Control (C) once
for each half-hour increment you want. A light or lights
will glow on the Control Panel to indicate the total time you
have selected. For example, if all four lights are lit, the
total programmed time is 7.5 hours, if the two-hour and the
half-hour lights are lit, the total programmed time is 2 1/2
hours. The lights will go out as time elapses. The fan will
automatically shut off once the selected time runs out.
6. Press the MODE button on the Manual Control Panel (B)
or on the Remote Control (C). A small light will come on
over the MODE you’ve selected NORMAL, BREEZE (red
light). SLEEP (green light). All 3 modes can be used at any
speed setting.
7. Press the MODE button to change from one mode to
another. NORMAL will keep the speed you’ve selected
constant. BREEZE will cycle through a variety of speeds
from LOW to HIGH simulating a natural outdoor breeze.
SLEEP will begin at the speed you’ve selected (HIGH, MED
or LOW) and go through a variety of cycles according to
the speed selected.
HIGH – The fan will run at high breeze speed level for
30 minutes, switch to medium breeze speed level for
another 30 minutes then drop to low breeze speed level
and stay at this speed until you manually stop it or Timer
goes off.
MED – The fan will run at medium breeze speed level
for 30 minutes then switch to low breeze speed level
and stay at this speed level until you manually stop it or
Timer goes off.
LOW – The fan will run at low breeze speed level until you
manually stop it or Timer goes off.
8. Remember to turn off and unplug the fan after using.
To Use with the Remote Control:
The Remote Control operates on 2 AAA batteries. Batteries
are not included. Slide the cover off the Battery Compartment
on the front of the Remote and install the batteries in the
orientation shown inside.
1. The Remote Control (C) lets you operate the fan from a
distance. When pushing buttons, be sure to direct the
Remote toward the Manual Control Panel. Make sure there
is nothing obstructing the path.
2. To keep the Remote handy after use, place it into the
Remote Control Storage Area on top of the fan.
DO NOT OPERATE APPLIANCE IF THE LINE CORD SHOWS
ANY DAMAGE, OR IF APPLIANCE WORKS INTERMITTENLY
OR STOPS WORKING ENTIRELY.
This appliance requires little maintenance and contains no
user serviceable parts. Do not try to fix it yourself. Refer it to
qualified service personnel if servicing is needed. This fan is
permanently lubricated and will not require additional
lubrication for the life of the fan.
CAUTION: This is an automatically operated device.
To reduce the risk of injury, disconnect the fan from the
power supply before cleaning or servicing.
1. Always turn off the fan and unplug before cleaning. Wipe
off excess dust with a lint-free cloth. To ensure adequate
air circulation to the motor, keep the vents at the back
of the motor housing free of dust accumulation. Use a
vacuum cleaner hose to clean these vents.
2. Do not submerge your fan in water or any other liquid.
Do not let water or any other liquid to get into the motor
housing.
3. Always store the fan in a dry place. Do not store it while
it is plugged in. Do not wrap the cord tightly around the
fan, and do not put any stress on the cord where it enters
the Fan Housing, as it could cause the cord to fray and
break.
Como usar
Este aparato es para uso doméstico solamente.
Desempaque el aparato y antes de ensamblarlo asegúrese que
incluya las siguientes piezas: un control remoto, un alojamiento
del ventilador, una columna frontal, una columna posterior,
ocho tornillos de cabeza Phillips, un soporte frontal de la base
y un soporte posterior de las base
Para ensamblar:
1. Coloque el ventilador sobre una superficie plana.
2. Desenrolle el cable eléctrico.
3. Junte la columna frontal con la columna posterior pasando
el cable eléctrico por el centro.
4. Presione las dos superficies hasta formar una sola columna.
5. Alinee la guía de la columna posterior con la ranura en el
inferior del alojamiento del ventilador.
6. Asegure con los tornillos provistos utilizando un
destornillador Phillips.
7. Deslice los pasadores de la base frontal adentro de los
agujeros de la base posterior de manera que enganchen y
formen un soporte.
8. Pase el cable eléctrico a través del agujero del centro del
soporte, guiándolo hacia la parte posterior del ventilador.
9. Oriente el canal del cable (en el inferior del soporte) hacia
la parte posterior del ventilador.
10. Alinee los agujeros del soporte con los agujeros de la
columna. Asegure el soporte a la columna con los tornillos
provistos utilizando un destornillador Phillips.
11. Guíe el cable eléctrico a través del canal de manera que el
cable salga por la parte posterior del soporte. (A)
Para usar:
IMPORTANTE: Durante los primeros minutos de funcionamiento
el aparato podría emitir un ligero olor. Esto es normal y el olor
desaparece en poco tiempo.
Nota: Con la excepción del botón de apagar (OFF), se
escuchará una señal audible al presionar cualquier otro botón.
1. Coloque el ventilador sobre una superficie plana y segura
donde no corra el riesgo de caerse ni de ser halado por el
cable.
2. Enchufe el ventilador a una toma de corriente.
3. Para hacer oscilar el ventilador, presione el botón (OSC) ya
sea en el panel de control manual (B) o en el control remoto
(C). Presione (OSC) nuevamente para interrumpir el
movimiento oscilante.
4. Presione el botón ON/SPEED en el panel de control manual
(B) hasta lograr la velocidad deseada. Brillará una luz
indicando la velocidad seleccionada sobre la palabra LOW
(baja), MEDIUM (media) o HIGH (alta). Para apagar el
ventilador, presione (OFF). Para hacer funcionar el aparato
por medio del control remoto (C), presione el botón
ON/SPEED varias veces a fin de cambiar de una velocidad a
otra y presione el botón OFF para apagar el ventilador.
5. El minutero (TIMER) se puede programar por un máximo de
7,5 horas en incrementos de media hora. Se debe tocar el
botón TIMER del panel de control manual (B) o el del control
remoto (C) para cada media hora que se quiera aumentar.
Una luz o luces brillarán en el panel de control para indicar
la cantidad de tiempo que uno ha seleccionado. Por ejemplo,
si se iluminan las cuatro luces, quiere decir que el total de
tiempo programado es de 7,5 horas. Si brilla la luz que indica
dos horas y la luz que indica media hora, entonces el tiempo
programado es de 2,5 horas. Las luces se apagan a medida
transcurre el tiempo. El ventilador se apagará
automáticamente una vez completo el ciclo programado.
6. Para seleccionar la función deseada, presione el botón
MODE del panel de control manual (B) o del control remoto
(C). Brillará una luz sobre la función que uno seleccione:
normal, brisa (luz roja) o silenciosa (luz verde). Las tres
funciones se pueden poner en marcha a cualquier
velocidad.
7. Presione el botón MODE para cambiar de una función a otra.
El modo NORMAL mantiene constante la velocidad del
ventilador. La función BREEZE (brisa) simula una brisa
natural a la intemperie con fluctuaciones de velocidad entre
baja y alta. La función SLEEP (ventilación silenciosa)
comienza a la velocidad que uno ha seleccionado (alta,
media o baja) y completa una variedad de ciclos de acuerdo
con la velocidad seleccionada.
HIGH (velocidad alta): El ventilador funciona con una brisa
alta durante 30 minutos, luego de lo cual cambia a una brisa
por otros 30 minutos. Por último, cambia a la brisa baja y se
mantiene en la misma hasta que se detiene manualmente
o el minutero se apaga.
MED (velocidad media): El ventilador funciona con una brisa
media durante 30 minutos, luego de lo cual cambia a una
brisa baja. Se mantiene en la misma hasta que se detiene
manualmente o el minutero se apaga.
LOW (velocidad baja): El ventilador funciona con una brisa
baja hasta que se detiene manualmente o el minutero se
apaga.
8. Recuerde que siempre se debe apagar y desconectar el
aparato después de utilizarlo.
Para utilizar con el control remoto:
El control remoto funciona con dos baterías AAA. Las baterías
no vienen incluidas con el aparato. Deslice y retire la cubierta
del compartimiento de las baterías del control remoto e instale
las baterías en el sentido indicado adentro del compartimiento.
1. El control remoto (C) permite activar el ventilador desde
cierta distancia. Cuando presione los botones, oriente el
control remoto hacia el panel de control del ventilador y
asegúrese que no haya nada interfiriendo el paso.
2. Para mantener el control remoto siempre a mano, después
de utilizarlo colóquelo en el compartimiento correspondiente
encima del ventilador.
NO HAGA FUNCIONAR EL APARATO SI EL CABLE ELECTRICO
PRESENTA CUALQUIER DAÑO, SI EL APARATO FUNCIONA DE
MANERA INTERMITENTE O SI NO FUNCIONA DEL TODO.
Este aparato requiere poco mantenimiento y no contiene piezas
reparables por el consumidor. No trate de reparar el ventilador
por si mismo. Si necesita ayuda, consulte con personal de
servicio calificado. Este ventilador trae lubricante permanente
de fábrica y no requiere lubricación adicional a lo largo de la
vida útil del aparato.
ADVERTENCIA: Este ventilador es un aparato de
funcionamiento automático. Para reducir el riesgo de lesiones,
desconecte el ventilador de la toma de corriente antes de
limpiarlo o repararlo.
1. Siempre apague y desconecte el ventilador antes de
limpiarlo. Limpie el exceso de polvo con un paño libre de
pelusa. Para garantizar una circulación de aire apropiada al
motor, mantenga los orificios de la parte trasera del
alojamiento del motor libres de polvo. Uno puede limpiar
estos orificios con la ayuda de la manguera de una
aspiradora.
2. No sumerja el ventilador en agua ni en ningún otro líquido.
No permita que penetre agua ni ningún otro líquido adentro
del alojamiento del motor.
3. Siempre almacene el ventilador en un lugar seco. Nunca
guarde el ventilador estando aún enchufado. Nunca enrolle
el cable de manera apretada en torno al ventilador y
asegúrese de no aplicar presión a la unión del cable con
el alojamiento del ventilador para no debilitar ni romper
el cable.
Cuidado y limpieza
Utilisation
L'appareil est conçu pour une utilisation domestique
seulement.
Déballer l'appareil et s'assurer que l'emballage comprend
avant l’assemblage : la télécommande, le corps du ventilateur,
la colonne avant, la colonne arrière, huit vis à tête Phillips, le
socle avant et le socle arrière.
Assemblage
1. Déposer le ventilateur sur une surface plane.
2. Dérouler le cordon d'alimentation.
3. Placer les colonnes avant et arrière ensemble après avoir
passé le cordon au centre.
4. Enclencher les colonnes avant et arrière ensemble pour
former une seule colonne.
5. Aligner l'encoche de la colonne arrière sur la fente au bas
du corps du ventilateur.
6. Fixer à l'aide des vis fournies en utilisant un tournevis
Phillips.
7. Faire glisser les chevilles du socle avant dans les trous
du socle arrière et les enclencher l'un dans l'autre pour
former un support.
8. Faire passer le cordon dans le trou au centre du support. de
sorte qu'il pointe vers l'arrière du ventilateur.
9. Placer la voie du cordon (sous le support) vers l'arrière du
ventilateur.
10. Aligner les trous du support sur ceux de la colonne. Fixer le
support à la colonne à l'aide des vis fournies en utilisant un
tournevis Phillips.
11. Passer le cordon dans la voie avec le cordon qui sort vers
l'arrière du support (A).
Utilisation
IMPORTANT : Pendant les premières minutes de la première
utilisation, l'appareil peut dégager une légère odeur. Il s'agit
d'une situation normale qui disparaît apidement.
Note : À l'exception du bouton de mise hors tension (OFF), on
entend un signal lorsqu'on appuie sur les boutons pour faire
une sélection.
1. Déposer le ventilateur sur une surface sûre et plane d'où il
ne pourra tomber et d'où on ne pourra le tirer par le cordon.
2. Brancher le ventilateur.
3. Pour faire osciller le ventilateur, enfoncer le bouton OSC du
panneau de commande manuel (B) ou de la télécommande
(C). Enfoncer de nouveau le bouton OSC pour arrêter
l'oscillation.
4. Enfoncer lebouton ON/SPEED de la commande manuelle (B).
Répéter jusqu'à l'obtention de la vitesse voulue. Un témoin
s'allume au-dessus de la vitesse choisie (LOW - faible,
MEDIUM - moyenne, HIGH - élevée). Enfoncer le bouton
OFF pour arrêter le ventilateur. Sur la télécommande (C),
enfoncer le bouton ON/SPEED à répétition pour passer d'une
vitesse à une autre et enfoncer le bouton OFF pour arrêter le
ventilateur.
5. On peut programmer la minuterie (TIMER) en multiples d’une
demi-heure avec un maximum de 7,5 heures. Appuyer sur le
bouton TIMER du panneau de commande manuel (B) ou de
la télécommande (C) une fois pour chaque demi-heure. Une
ou plusieurs lumières s’allumeront sur le panneau de
commande pour indiquer la durée totale choisie. Par
exemple, si les quatre lumières sont allumées, la durée
programmée totale est de 7,5 heures. Si les lumières deux
heures et demi-heure sont allumées, la durée totale
programmée est de 2,5 heures. Les lumières s’éteignent au
fur et à mesure. Le ventilateur s’arrêtera automatiquement
quand la durée choisie a été atteinte.
6. Enfoncer le bouton MODE du panneau de commande
manuel (B) ou de la télécommande (C). Un témoin s'allume
au-dessus du mode choisi (NORMAL, BREEZE - brise
(rouge), SLEEP - sommeil (vert)). Les trois modes
fonctionnent àtous les réglages de vitesse.
7. Enfoncer le bouton MODE pour passer d'un mode à un autre.
Le mode NORMAL maintient constante la vitesse choisie. Le
mode BREEZE génère différents cycles de vitesse de faible
à élevée de façon à reproduire une brise naturelle. Le mode
SLEEP débute à la vitesse choisie (élevée, moyenne ou
faible) puis procure différents cycles selon la vitesse choisie.
Vitesse élevée (HIGH) – Le ventilateur fonctionne à une brise
élevée pendant 30 minutes, il passe ensuite à une brise
moyenne pour une autre période de 30 minutes, puis il passé
à la faible brise pour y rester jusqu'à ce qu'on l'arrête
manuellement ou que la minuterie s'arrête.
Vitesse moyenne (MED) – Le ventilateur fonctionne à une
brise moyenne pendant 30 minutes, il passe ensuite à la
faible brise pour y rester jusqu'à ce qu'on l'arrête
manuellement ou que la minuterie s'arrête.
Faible vitesse (LOW) – Le ventilateur fonctionne à la brise
faible jusqu'à ce qu'on l'arrête manuellement ou que la
minuterie s'arrête.
8. Ne pas oublier de mettre l'appareil hors tension et de le
débrancher après l'utilisation.
Pour utiliser avec télécommande
La télécommande fonctionne au moyen de deux piles AAA. Les
piles sont vendues séparément. Faire glisser le couvercle de la
case des piles qui se trouve à l'avant de la télécommande et y
insérer les piles de la façon illustrée à l'intérieur.
1. La télécommande (C) permet d'activer le ventilateur
à distance. Lorsqu'on enfonce les boutons, s'assurer
de diriger la télécommande vers le panneau de commande
manuel. S'assurer qu'il n'y a aucune obstruction dans
le chemin.
2. Pour garder la télécommande à portée de la main,
la laisser dans la case de rangement qui se trouve sur
le dessus du ventilateur.
NE PAS UTILISER L'APPAREIL LORSQUE LE CORDON SEMBLE
ABÎMÉ, LORSQUE L'APPAREIL FONCTIONNE DE FAÇON
INTERMITTENTE OU LORSQU'IL S'ARRÊTE COMPLÈTEMENT.
Entretien et nettoyage
L'appareil nécessite peu d'entretien et il ne renferme aucune
pièce remplaçable par l'utilisateur. Ne pas tenter de le réparer
soi-même. En confier la réparation à du personnel qualifié.
L'appareil a été lubrifié en permanence et il ne nécessite
aucune lubrification pour sa durée utile.
MISE EN GARDE : Il s'agit d'un appareil à fonctionnement
automatique. Pour minimiser les risques de blessures, le
débrancher avant de le nettoyer ou d'en faire l'entretien.
1. Toujours mettre l'appareil hors tension et le débrancher
avant de le nettoyer. En essuyer la poussière avec un
chiffon qui ne laisse pas de charpie. Pour assurer un débit
d'air convenable au moteur, s'assurer que les évents à
l'arrière du moteur sont libres de toute accumulation de
poussière. Utiliser le boyau d'un aspirateur pour nettoyer
les évents.
2. Ne pas immerger le ventilateur. Ne pas laisser de l'eau ni
tout autre liquide s'infiltrer dans le carter du moteur.
3. Toujours ranger le ventilateur dans un endroit sec. Ne
jamais le ranger lorsqu'il est branché. Ne jamais enrouler
le cordon serré autour de l'appareil. Ne pas exercer de
contraintes au cordon où il entre dans le corps du
ventilateur au risque de l'abîmer.
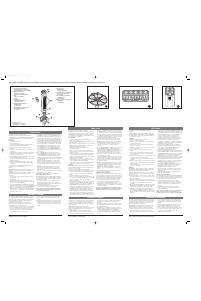
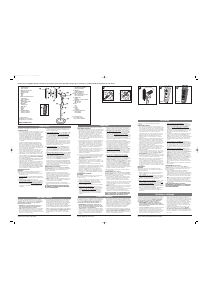
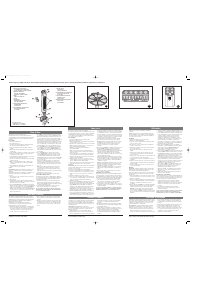
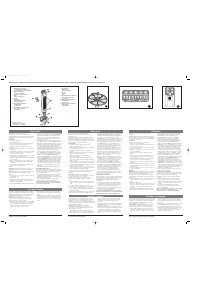
1. Remote Control Storage Area
Compartimiento del control remoto
Case de rangement de la télécommande
2. Manual Control Panel
Panel de control manual
Panneau de commande manuel
3. Vents
Orificios de ventilación
Évents
4. Fan Housing
Alojamiento del ventilador
Corps du ventilateur
†5. Front Column
(Part #1340990152)
Columna frontal
Colonne avant
†6. Stand Front Base
(Part #1350050327)
Base frontal del pedestal
Socle avant
B
A
C
Note: If the power supply cord is damaged, it must be replaced by the manufacturer or its service agent or a similarly
qualified person in order to avoid a hazard.
Note : Lorsque le cordon d'alimentation est endommagé, il faut en confier la réparation au fabricant, à son agent de service
autorisé ou une personne qualifiée afin d'éviter tout risque.
Product may vary slightly from what is illustrated./Este producto puede variar ligeramente del que aparece ilustrado./Le produit peut différer légèrement de celui illustré.
† Consumer replaceable
Reemplazable por el consumidor
Remplaçable par le consommateur
7. Electrical Cord
Cable eléctrico
Cordon d'alimentation
†8.Stand Back Base
(Part #1350050328)
Base posterior del pedestal
Socle arrière
†9. Back Column
(Part #1340990151)
Columna posterior
Colonne arrière
†10.Remote Control
(Part #1121300802)
Control remoto
Télécommande
Nota: Si el cordón de alimentación es dañado, éste debe ser reemplazado por el fabricante o su agente de servicio o por
personal calificado para evitar el riesgo.



Praat mee over dit product
Laat hier weten wat jij vindt van de Black and Decker BDTF1010 Ventilator. Als je een vraag hebt, lees dan eerst zorgvuldig de handleiding door. Een handleiding aanvragen kan via ons contactformulier.