How To Use – English
Care and Cleaning
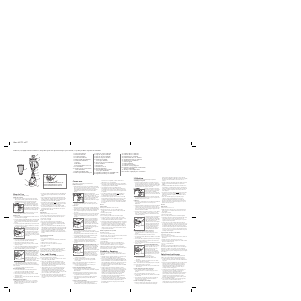
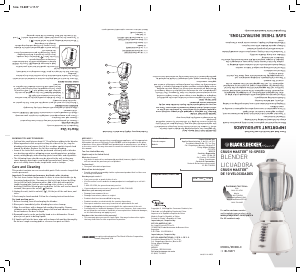
BLENDER JAR ASSEMBLY
1. Before first use, wash all parts except the Base. Put the Gasket on top of the Blade Assembly, place the Blade
Assembly into the Jar Base, and turn the Jar Base clockwise until tight. (A)
2. Place the Jar firmly onto the Unit Base (see Exploded View) and twist slightly in either direction to be sure the
Jar is properly "seated."
HOW TO USE
1. Be sure the unit is "off" (O) and plug the cord into a standard electrical outlet.
2. Place the food or liquid to be blended into the Jar.
3. Put the Lid on the Jar before beginning. Be sure that the Lid Cap is in place. When crushing ice or hard foods,
keep one hand on the Lid.
4. Select the desired speed setting:
• Use settings 1-2 for gentle blending, chopping, and mixing; setting 3-4 for
grindng, beating, and creaming; setting 5 for heavy-duty blending such as
liquefying or pureeing fruits.
• For quick blending tasks, turn the Control Dial to Pulse (P) for a few
seconds, then release. Use the Pulse for best results when crushing ice.
5. If you want to add ingredients while the Blender is on, remove the Lid Cap and place through the Lid opening.
(B)
6. When finished blending, turn to the "O" Off position.
7. To remove the Jar, lift it from the Unit Base. Remove the Lid before pouring.
8. For convenient storage, wind the cord around the tabs at the bottom of the Unit Base. (C)
BLENDING TIPS AND TECHNIQUES
• Cut food into small pieces (about 2 inches/50 mm) before adding to the Blender. To chop and grate, cut solid
foods into 3/4" (19 mm) pieces.
• When blending liquids and including ice cubes, limit the quantity to the 4-cup (1L) mark of the Jar. For warm or
hot foods, limit the amount to 2 cups (480 ml) with the Lid and Cap in place.
• For best circulation of foods that are to be blended with liquid, pour the liquid into the Jar first, then add solids.
• The following items should never be placed in the unit as they may cause damage: dried spices and herbs
(ground alone), bones, large pieces of solidly frozen foods, hard or tough foods.
1. Before cleaning, turn off (O) and unplug the Blender.
2. Rinse parts immediately after blending for easier cleanup.
3. Wipe the Base with a damp cloth and dry thoroughly. Remove stubborn spots by rubbing with a damp cloth and
a non-abrasive cleaner. Do not immerse the Base in liquid.
4. Removable parts can be washed by hand with soap and water or in a dishwasher. The Lid, Cap, and Blade
Assembly should be placed in the top rack only. The Jar is bottom rack dishwasher-safe. Do not place parts in
boiling liquids.
5. If liquids spill into the Base, wipe clean with a damp cloth and dry thoroughly. Do not use rough scouring pads
or cleansers on parts or finish.
RECIPES
MALIBU MELON MANIA
1 can (5.5 oz./163 ml) apricot nectar
6 small (1"/25 mm size) ice cubes
1 cup cubed (3/4"/19 mm size) cantaloupe
1 cup cubed (3/4"/19 mm size) honeydew
1. Combine apricot nectar and ice cubes in Blender Jar. Cover and blend at Speed 5.
2. Add cantaloupe and honeydew cubes. Blend again at Speed 3.
3. Serve over additional ice cubes, if desired.
Makes about 2 (10 oz./300 ml) servings.
MANGO TANGO PASSION
1 cup mango or other tropical juice
1 container (8 oz./240ml) strawberry-banana flavored yogurt
1 banana, quartered
4 small (1"/25 mm size) ice cubes
Combine ingredients in Blender Jar. Cover and blend at Speed 5.
Makes 2 (10 oz./300 ml) servings.
TAMPER-RESISTANT SCREW
This appliance is equipped with a tamper-resistant screw to prevent removal of the bottom cover. To reduce the
risk of fire or electric shock, do not attempt to remove the bottom cover. There are no user serviceable parts
inside. Repair should be done only by authorized service personnel.
NOTE: If the power supply cord is damaged, it must be replaced by the manufacturer or its service agent or a
similarly qualified person in order to avoid a hazard.
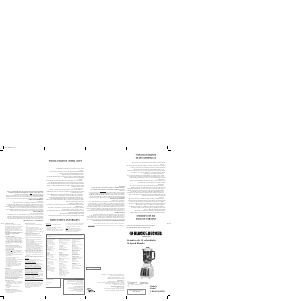
† 1.Cap
Tapa para medir
Bouchon doseur
† 2.Lid
Tapa
Couvercle
† 3.Jar
Jarra
Récipient
† 4.Gasket
Junta
Gasket
† Consumer replaceable
† Reemplazable por el consumidor
† Remplaçable par le consommateur
† 5.Blade Assembly
Montaje de las cuchillas
Ensemble couteaux
†6. Jar Base
Base de la jarra
7.Unit Base
Base de la unidad
Socle
8. Control Dial
Perilla de control
Panneau de commande
A
B
C
TORNILLO DE SEGURIDAD
Esta unidad viene equipada con un tornillo de seguridad para evitar la remoción de la cubierta inferior. Con el fin
de reducir el riesgo de incendio o choque eléctrico, no trate de retirar la cubierta inferior. La unidad no contiene
partes servibles al usuario. Cualquier reparación deberá ser efectuada únicamente por personal de servicio
autorizado.
NOTA: Si el cordón de alimentación es dañado, este debe ser reemplazado por el fabricante o su agente de
servicio o por personal calificado para evitar un riesgo.
Como usar - Español
INSTALACION DE LA JARRA DE LA LICUADORA
1. Antes de usar la licuadora por primera vez, lave todas las partes con excepción de la base. Coloque la junta por
encima de las cuchillas. Coloque las cuchillas adentro de la base de la jarra y gire la base de jarra hacia la
derecha hasta quedar apretada. (A)
2. Coloque la jarra firmemente sobre la base de la unidad (consulte la ilustración) y gírela con cuidado hacia un
lado u otro para asegurarse que haya quedado instalada apropiadamente.
COMO USAR
1. Asegúrese que la licuadora esté apagada en la posición (O) antes de enchufarla a una toma de corriente
normal.
2. Antes de licuar, introduzca los alimentos o bebidas en la jarra y tápela.
3. Para los modelos con tapón en la cubierta, asegúrese que el tapón esté bien colocado en su lugar. Cuando
triture hielo o alimentos duros, mantenga una mano sobre la tapa.
4. Seleccione la velocidad apropiada:
• Gire la perilla hacia 1 o 2 para licuar o picar de manera lenta; 3 o 4 para moler, batir o cremar; 5 para la tarea
pesada de licuar o deshacer fruta fresca.
• Para las tareas rápidas y delicadas, gire el control hacia (P) por unos segundos y luego suelte. Haga lo
mismo para triturar hielo con mejor resultado.
5. Si desea agregar ingredientes mientras la licuadora está en funcionamiento, retire el tapón de la cubierta e
introduzca los alimentos a través de la abertura. (B)
6. Una vez finalizado el licuado, apague la unidad girando la perilla hacia "O".
7. Para retirar la jarra, levántela de la base. Quite la tapa antes de servir.
8. Para almacenar de manera práctica, enrolle el cable alrededor de los soportes en el inferior de la base de la
unidad (C).
CONSEJOS Y TECNICAS PARA LICUAR
• Corte los alimentos en pedazos de aproximadamente 50 mm (2") antes de introducirlos en la licuadora. Para
picar o rallar, corte los alimentos sólidos en pedazos de 19 mm (3/4").
• Cuando los ingredientes se adhieran o salpiquen los costados de la jarra, pare la licuadora y quite la tapa. Use
una espátula de hule para empujar los ingredientes hacia el centro de las cuchillas. Coloque la tapa
nuevamente y continúe licuando.
• Cuando licúe líquido incluyendo cubos de hielo, no exceda el nivel indicado para 1L (4 tazas) en la jarra. Para
los alimentos tibios o calientes, mantenga la jarra cubierta y no exceda el nivel indicado para 480 ml (2 tazas).
• Para mejor circulación de alimentos secos combinados con líquido, vierta el líquido primero adentro de la jarra
y luego agregue los alimentos sólidos.
• Las siguientes funciones no pueden lograrse con éxito en una licuadora: batir claras de huevo a punto de
nieve, espumar crema, deshacer papas, moler carne, preparar masa, extraer jugo de fruta o vegetales.
• A fin de evitar daño a la unidad, nunca introduzca: especias secas y hierbas (para molerlas solas), huesos,
pedazos grandes de alimentos congelados, ni alimentos duros
Cuidado y limpieza
1. Apague y desconecte la licuadora antes de limpiarla.
2. Para mejor resultado, enjuague las partes lavables inmediatamente después de usar la licuadora.
3. Limpie la base de la unidad con un paño humedecido y séquela bien. Elimine las manchas persistentes
frotando un paño humedecido con un limpiador no abrasivo. No sumerja la base de la unidad en ningún líquido.
4. Todas las partes removibles son lavables a mano o pueden introducirse en la máquina lavaplatos. La tapa,
tapón y las cuchillas deben colocarse únicamente en la bandeja superior de la máquina lavaplatos. La jarra de
cristal debe colocarse en la bandeja inferior de la máquina lavaplatos. No sumerja las partes de la licuadora en
ningún líquido hirviendo.
5. Si se llega a derramarse líquido sobre la base de la unidad, límpiela con un paño humedecido y séquela bien.
No use almohadillas ni limpiadores abrasivos en ninguna parte ni acabado de la licuadora.
RECETAS
MANIA DE MELON MALIBU
1 lata de 5.5 oz (163 ml) de néctar de albaricoque
6 cubos de hielo pequeños de 25 mm (1")
1 taza de melón cortado en cubos de 19 mm (3/4")
1 taza de melón blanco cortado en cubos de 19 mm (3/4")
1. Combine el néctar de albaricoque y el hielo en la jarra de la licuadora. Tape la jarra y licúe a la velocidad 5.
2. Agregue los pedazos de melón. Licúe a la velocidad 3.
3. Si desea, sirva sobre más hielo.
Da aproximadamente 2 porciones de 300 ml (10 oz).
PASION MANGO TANGO
1 taza de jugo de mango u otra fruta tropical
1 envase de 240ml (8 oz) de yogur de fresa o banana
1 banana, cuarteada
4 cubos de hielo pequeños de 25 mm (1")
Combine los ingredientes en la jarra de la licuadora. Tape la jarra y licúe a la velocidad 5.
Makes 2 (10 oz./300 ml) servings.
Da 2 porciones de 300 ml (10 oz).
Utilisation - Français
VIS INDESSERRABLE
L’appareil est doté d’une vis indesserrable empêchant l’enlèvement du couvercle inférieur. Pour réduire les risques
d’incendie ou de secousses électriques, ne pas tenter de retirer le couvercle inférieur. L’utilisateur ne peut pas remplacer
les pièces de l’appareil. En confier la réparation seulement au personnel des centres de service autorisés.
NOTE : Lorsque le cordon d'alimentation est endommagé, il faut en confier la réparation au fabricant, à son agent de
service autorisé ou une personne qualifiée afin d'éviter tout risque.
Entretien et nettoyage


Praat mee over dit product
Laat hier weten wat jij vindt van de Black and Decker BLD100 Blender. Als je een vraag hebt, lees dan eerst zorgvuldig de handleiding door. Een handleiding aanvragen kan via ons contactformulier.