How To Use – English
Care and Cleaning
1. Your Blade Assembly has been
packed in a separate cardboard
insert. Attach it to the can opener
by lining up the key tabs with the
key slots, push in and turn (A)
until it locks into position.
2. Plug the cord into a standard,
120-volt electrical outlet.
3. Lift the Lever, tip the can so that
the rim is under the Locating Post,
then push down on the Lever,
making sure the blade is inside
the rim. (Figure B) Because of the
hands-free feature, it is not
necessary to hold the Lever down
or support the can during cutting.
However, you may have to hold
the Can Opener Body when
cutting very tall or heavy cans.
4. When the can is opened, the Can
Opener will stop automatically. To
remove the can, hold it with one
hand and raise the Lever with the
other. CAUTION: Avoid contact
with the cut edges of the can or
lids—they are sharp. Carefully
remove the lid from the magnet
and discard.
5. You may "stuff" excess cord back
into the bottom of the unit and
feed the cord through the notch
for convenient storage.
CAN OPENING TIPS
• This Can Opener should not be
used to open cans with a pull tab,
peel-off foil seal, or rolling key. It
will not open rimless cans or cans
with angled corners.
• If there is a dent in the rim of a
can, open the other end or start
the cutting action just beyond the
dent. Cans with heavy seams,
uneven rims, or odd shapes may
cause the Can Opener to stall. If
this occurs, turn the can slightly by
hand to aid the cutting action.
• Frozen juices or foods in
cardboard cans should be opened
as soon as they are removed from
the freezer. Aluminum lids will not
stick to the Magnet.
KNIFE SHARPENING TIPS
• Clean and dry knives before
sharpening.
• Do not attempt to sharpen serrated
blades, as this will smooth their
edges. Do not attempt to sharpen
scissors.
USING THE KNIFE SHARPENER
1. The slot in the Knife Sharpener is
slanted for left or right-handed
use.
2. For best results, sharpen the
entire blade length in one
continuous stroke carefully
pulling the blade through the slot
and slightly up towards you. (C)
Repeat until you achieve desired
sharpness. Wash and dry knives
after sharpening. Use caution
with blade after sharpening.
1. Before cleaning any part of the
Can Opener, unplug the cord.
2. To remove the Blade Assembly for
easy cleaning, lift the Lever up
and pull the Blade Assembly out
(see A). The Assembly can be
washed by hand in hot, sudsy
water, rinsed or wiped with a
sponge and dried thoroughly. It is
NOT dishwasher-safe. Reverse
the procedure to replace the
Blade Assembly.
3. Before replacing the Blade
Assembly, wipe the Can Opener
body, and area around the drive
wheel with a slightly damp cloth
or sponge. To remove stubborn
spots, wipe surfaces with a nylon
or mesh pad and sudsy water.
Follow with a clean, damp cloth.
Do not use abrasive cleaners on
any part of the Can Opener as
they can damage the finish.
Como usar - Español
Cuidado y limpieza
1. El montaje de las cuchillas viene
en un empaque de cartón aparte.
Instálelo en el abrelatas alineando
las guías con las ranuras. Empuje
hacia adentro y gire (A) hasta
quedar cerrado.
2. Enchufe el cable a una toma de
corriente de 120 voltios normal.
3. Alce la palanca, incline la lata de
manera que el borde quede
debajo de la guía y empuje la
palanca hacia abajo
asegurándose que la cuchilla de
perforación esté por adentro del
borde de la lata (Ilustración B).
Gracias a la característica de
operación de manos libres, no es
necesario sostener la palanca
hacia abajo ni sujetar las latas
mientras las abre. Sin embargo, a
veces es necesario sujetar las
latas cuando son demasiado altas
o pesadas.
4. Una vez abiertas las latas, el
abrelatas se detiene
automáticamente. Para retirar la
lata, sujétela con una mano y alce
la palanca con la otra.
PRECAUCION: Evite el contacto
con los bordes de las latas y las
tapas — tienen filo. Retire la tapa
del magneto con cuidado y
deséchela.
5. Guarde el cable en el inferior de la
unidad alimentándolo a través de
la ranura para almacenarlo con
mayor facilidad.
CONSEJOS PARA ABRIR LATAS
• Este abrelatas no es capaz de abrir
latas sin borde ni esquinadas. No
debe usarse para abrir latas con
tapa de papel de aluminio ni las
que requieren llave.
• Si el borde de la lata tiene un
golpe, inviértala y ábrala del otro
lado o comience a abrirla después
del área golpeada. El abrelatas se
demora más en abrir latas con
bordes gruesos, disparejos o las
que son de forma fuera de lo
común. En dicho caso, gire la lata
con la mano para abrirla con
mayor facilidad.
• Los jugos congelados y los
alimentos envasados en cartón
deben abrirse en cuanto se sacan
del congelador. Las tapas de
aluminio no se adhieren al
magneto.
CONSEJOS PARA AFILAR
CUCHILLOS
• Limpie y seque los cuchillos antes
de afilarlos.
• No afile cuchillos de sierra porque
les arruinará el acabado, como
tampoco trate de afilar tijeras.
COMO USAR EL AFILADOR DE
CUCHILLOS
1. La ranura del afilador de cuchillos
es sesgada para facilidad de uso
ambidiestro.
2. Para mejor resultado, afile la
cuchilla entera en un movimiento
continuo halándola con cuidado
en la ranura hacia usted (C).
Repita hasta lograr el filo
deseado. Lave y seque los
cuchillos después de afilarlos.
Maneje las cuchillas con cuidado
después de afilarlas.
Utilisation - Français
Entretien et nettoyage
A
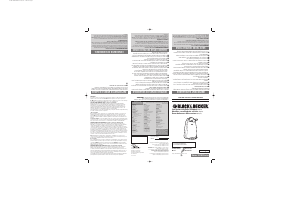
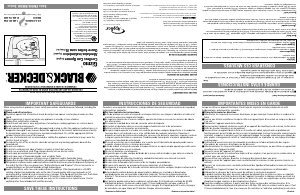
† 1. Blade Assembly (174777-00)
Montaje de las cuchillas
Couteau
2. Soft-Touch Control Lever
Palanca
3. Magnet
Magneto
4. Can Opener Body
Cuerpo del abrelatas
Corps de l’ouvre-boîtes
CORDON
La longueur du cordon de l'appareil a été choisie afin d'éviter les risques que présente
un long cordon. Tout cordon de rallonge muni d’une fiche polarisée d’au moins 10
ampères, 120 volts, certifié par l'organisme Underwriters Laboratories (UL) ou tout autre
organisme approprié, peut servir au besoin. Lorsqu'on utilise un cordon de rallonge,
s'assurer qu'il ne traverse pas la surface de travail ni qu'il pend de façon qu'on puisse
trébucher dessus. Manipuler le cordon avec soin afin d’en prolonger la durée; éviter de
tirer dessus et de le soumettre à des contraintes près des prises ou des connexions de
l’appareil.
Poignée à prise souple
Note: La prise caoutchoutée ne comporte aucun caoutchouc ni latex naturel. Elle est
donc súre pour les personnes qui sont allergiques ou sensibles à ces matériaux.
EL CABLE ELECTRICO
La longitud del cable de esta unidad se ha diseñado a fin de evitar el peligro que puede
ocurrir con uno más largo. Si es necesario usar un cable de extensión, asegúrese que
tenga un enchufe polarizado. Debe estar calificado para no menos de 10 amperios, 120
voltios o 6 amperios/220 voltios e inscrito por la agencia apropiada. Cuando use un cable
de extensión, no permita que cuelgue sobre el área de trabajo para evitar que alguien lo
hale o se tropiece. Maneje el cable con cuidado; no tire de él ni aplique presión a las
uniones con el enchufe y la unidad.
Partes suaves al tacto
Nota: La palanca y las partes de goma no contienen hule natural ni látex. Son seguras
para aquellas personas alérgicas o susceptibles a estos materiales.
1. Antes de limpiar el abrelatas
desconecte el cable de la toma de
corriente.
2. Para retirar el montaje de las
cuchillas, levante la palanca de
operación hacia arriba y retire el
montaje de las cuchillas hacia
afuera. (consulte A). Puede lavar
el montaje de las cuchillas en
agua caliente con jabón o puede
limpiarlo con una esponja y luego
secarlo bien. NO introduzca el
montaje de las cuchillas en la
máquina lavaplatos.
3. Antes de reemplazar el montaje de
las cuchillas, limpie el cuerpo del
abrelatas, el afilador de cuchillos
y el área de la rueda de propulsión
con un paño humedecido o con
una esponja. Para eliminar las
manchas persistentes, limpie las
superficies con una almohadilla
de fibra de nailon y agua
enjabonada, seguido por un paño
limpio humedecido. A fin de no
dañar el acabado de la unidad, no
use limpiadores abrasivos en
ninguna parte de este abrelatas.
B
C
ELECTRICAL CORD
The cord length of this appliance was selected to reduce safety hazards that may occur
with a longer cord. If more cord length is needed, an extension cord with a polarized
plug may be used. It should be rated not less than 10 amperes, 120 Volts, or 6
amperes/220 volts and have the appropriate agency listing. When using a longer cord,
be sure it does not drape over a working area or dangle where it could be pulled on or
tripped over. Handle cord carefully for longer life; avoid jerking or straining it at outlet
and appliance connections.
Soft-Touch Lever
NOTE: The rubberized lever is free of natural rubber and latex. It is safe for use by
individuals allergic or sensitive to these materials.
NOTE: If the power supply cord is damaged, it must be replaced by the
manufacturer or its service agent or a similarly qualified person in order to
avoid a hazard.
NOTE : Lorsque le cordon d'alimentation est endommagé, il faut en confier
la réparation au fabricant, à son agent de service autorisé ou une personne
qualifiée afin d'éviter tout risque.
NOTA: Si el cordón de alimentación es dañado, este debe ser reemplazado
por el fabricante o su agente de servicio o por personal calificado para evitar
un riesgo.
† Consumer replaceable/Reemplazable por el consumidor/Remplaçable par le consommateur
5. Cord Storage (Under Unit)
Almacenaje del cable
(Debajo de la unidad)
Espace de rangement du cordon
(sous l'appareil)
6. Locating Post
Guía
Guide de position
7. Knife Sharpener (in the back)
Afilador de cuchillos
Affûte-couteau


Praat mee over dit product
Laat hier weten wat jij vindt van de Black and Decker EC100 Blikopener. Als je een vraag hebt, lees dan eerst zorgvuldig de handleiding door. Een handleiding aanvragen kan via ons contactformulier.