Este producto puede variar ligeramente del que aparece ilustrado. / Product may vary slightly from what is illustrated.
Como usar
Ciertos modelos traen un dispositivo de seguridad conocido como ESP®
Electric Shock Protector™/ ALCI (interruptor de fuga de corriente).
El dispositivo es apropiado para uso doméstico y puede ser enchufado
a cualquier toma de corriente alterna (corriente doméstica común).
Importante: Para verificación de la garantía, por favor no retire la etiqueta
del cable eléctrico.
Como funciona el dispositivo de seguridad ESP
®
/ALCI
El dispositivo de seguridad ESP
®
/ALCI de esta unidad está incorporado en el
enchufe. Este dispositivo no permite que la unidad funcione bajo
condiciones anormales incluyendo la inmersión accidental en el agua. Si la
unidad llegase a caer adentro del agua, no trate de reajustar el dispositivo
de seguridad.
El dispositivo de seguridad ESP
®
/ALCI tiene un botón de prueba para
verificar si está funcionando apropiadamente (A).
Para usar
1. Oprima el botón de reinicio.
2. Enchufe el secador a una toma de corriente
alterna, luego oprima el botón de prueba (Test).
3. Asegúrese que el botón de reinicio salte hacia
afuera para verificar que esté funcionando
apropiadamente. Si el botón de reinicio no salta hacia afuera, por favor
no use la unidad.
Devuélvala de inmediato para que la revisen.
4. Oprima el botón de reinicio para reactivar el dispositivo de seguridad
ESP
®
/ALCI y poder usar el secador nuevamente.
Siempre que use el secador, oprima el botón de reinicio del dispositivo de
seguridad para reactivarlo y asegurarse que está funcionando
apropiadamente.
Guía de funcionamiento
• Esta unidad se apagará de inmediato si llegase a detectar cualquier
peligro de choque eléctrico. Oprima el botón de reinicio del dispositivo
de seguridad ESP
®
/ALCI para reactivar el circuito.
• Este aparato ha sido diseñado con un revestimiento de protección en
torno a los serpentines de calefacción. Cuando uno utiliza el aparato por
primera vez, se puede observar una ligera emisión de humo al apagarlo.
Esto no representa ningún riesgo al usuario ni desperfecto del aparato. El
humo desaparece en poco tiempo.
• Para evitar el sobrecalentamiento del aparato, jamás obstruya la rejilla de
admisión de aire. Si esto llegase a suceder, se activa un dispositivo de
seguridad incorporado en el aparato y el secador emite aire fresco.
– Apague el interruptor y limpie toda obstrucción de la rejilla
de admisión de aire.
– Espere 10 minutos antes de encender el aparato nuevamente.
Si el aparato aún no funciona, puede haber sufrido daño mayor.
No trate de repararlo por si mismo. Consulte las instrucciones
de la garantía.
• Jamás toque el cuerpo calefactor del aparato; éste podría estar caliente y
quemarle.
• No oriente el aparato en una sola dirección sino que manténgalo en
movimiento constante. Esto es importante particularmente al secar las
pelucas y los peluquines ya que éstos se pueden dañar con el calor
directo.
• Para aumentar la vida útil del secador, se recomienda ajustarlo a la
temperatura más fresca durante algunos segundos antes de apagarlo.
• Procure no retorcer el cable para que éste no se enrede.
Niveles de velocidad/temperatura
El secador cuenta con un interruptor de temperatura y uno de
velocidad; opción de dos velocidades y seis ajustes de
temperatura (B).
• Ajuste a la temperatura/velocidad alta para la mayoría de
procedimientos y tipos de cabello.
B
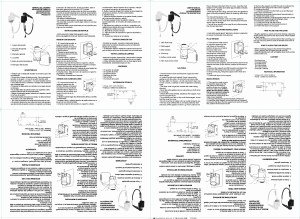
A
Botón de
prueba
Botón de reinicio
• Elija la temperatura/velocidad baja para dar acabado al peinado o para secar
el cabello delicado o el cabello tratado con permanentes o tintes.
Para lograr mejores resultados
Temperatura caliente: Al iniciar el secado del cabello y para secar el cabello
grueso, difícil de controlar.
Temperatura tibia: Para la mayoría de procedimientos de peinado/acabado y
tipos de cabello.
Temperatura fresca: Para dar acabado al peinado o para estilizar el cabello frágil,
marchito, tratado con permanentes o procesado excesivamente.
Nota: Para agregar volumen al cabello o cuerpo al peinado, cepille y seque el
cabello en dirección contraria al patrón natural de crecimiento.
Botón Cool Shot™: Utilice este dispositivo para fijar el peinado. Presione el
botón firmemente hasta lograr un flujo de aire fresco. Suelte el botón y el secador
reasume automáticamente la temperatura y la velocidad programada
anteriormente.
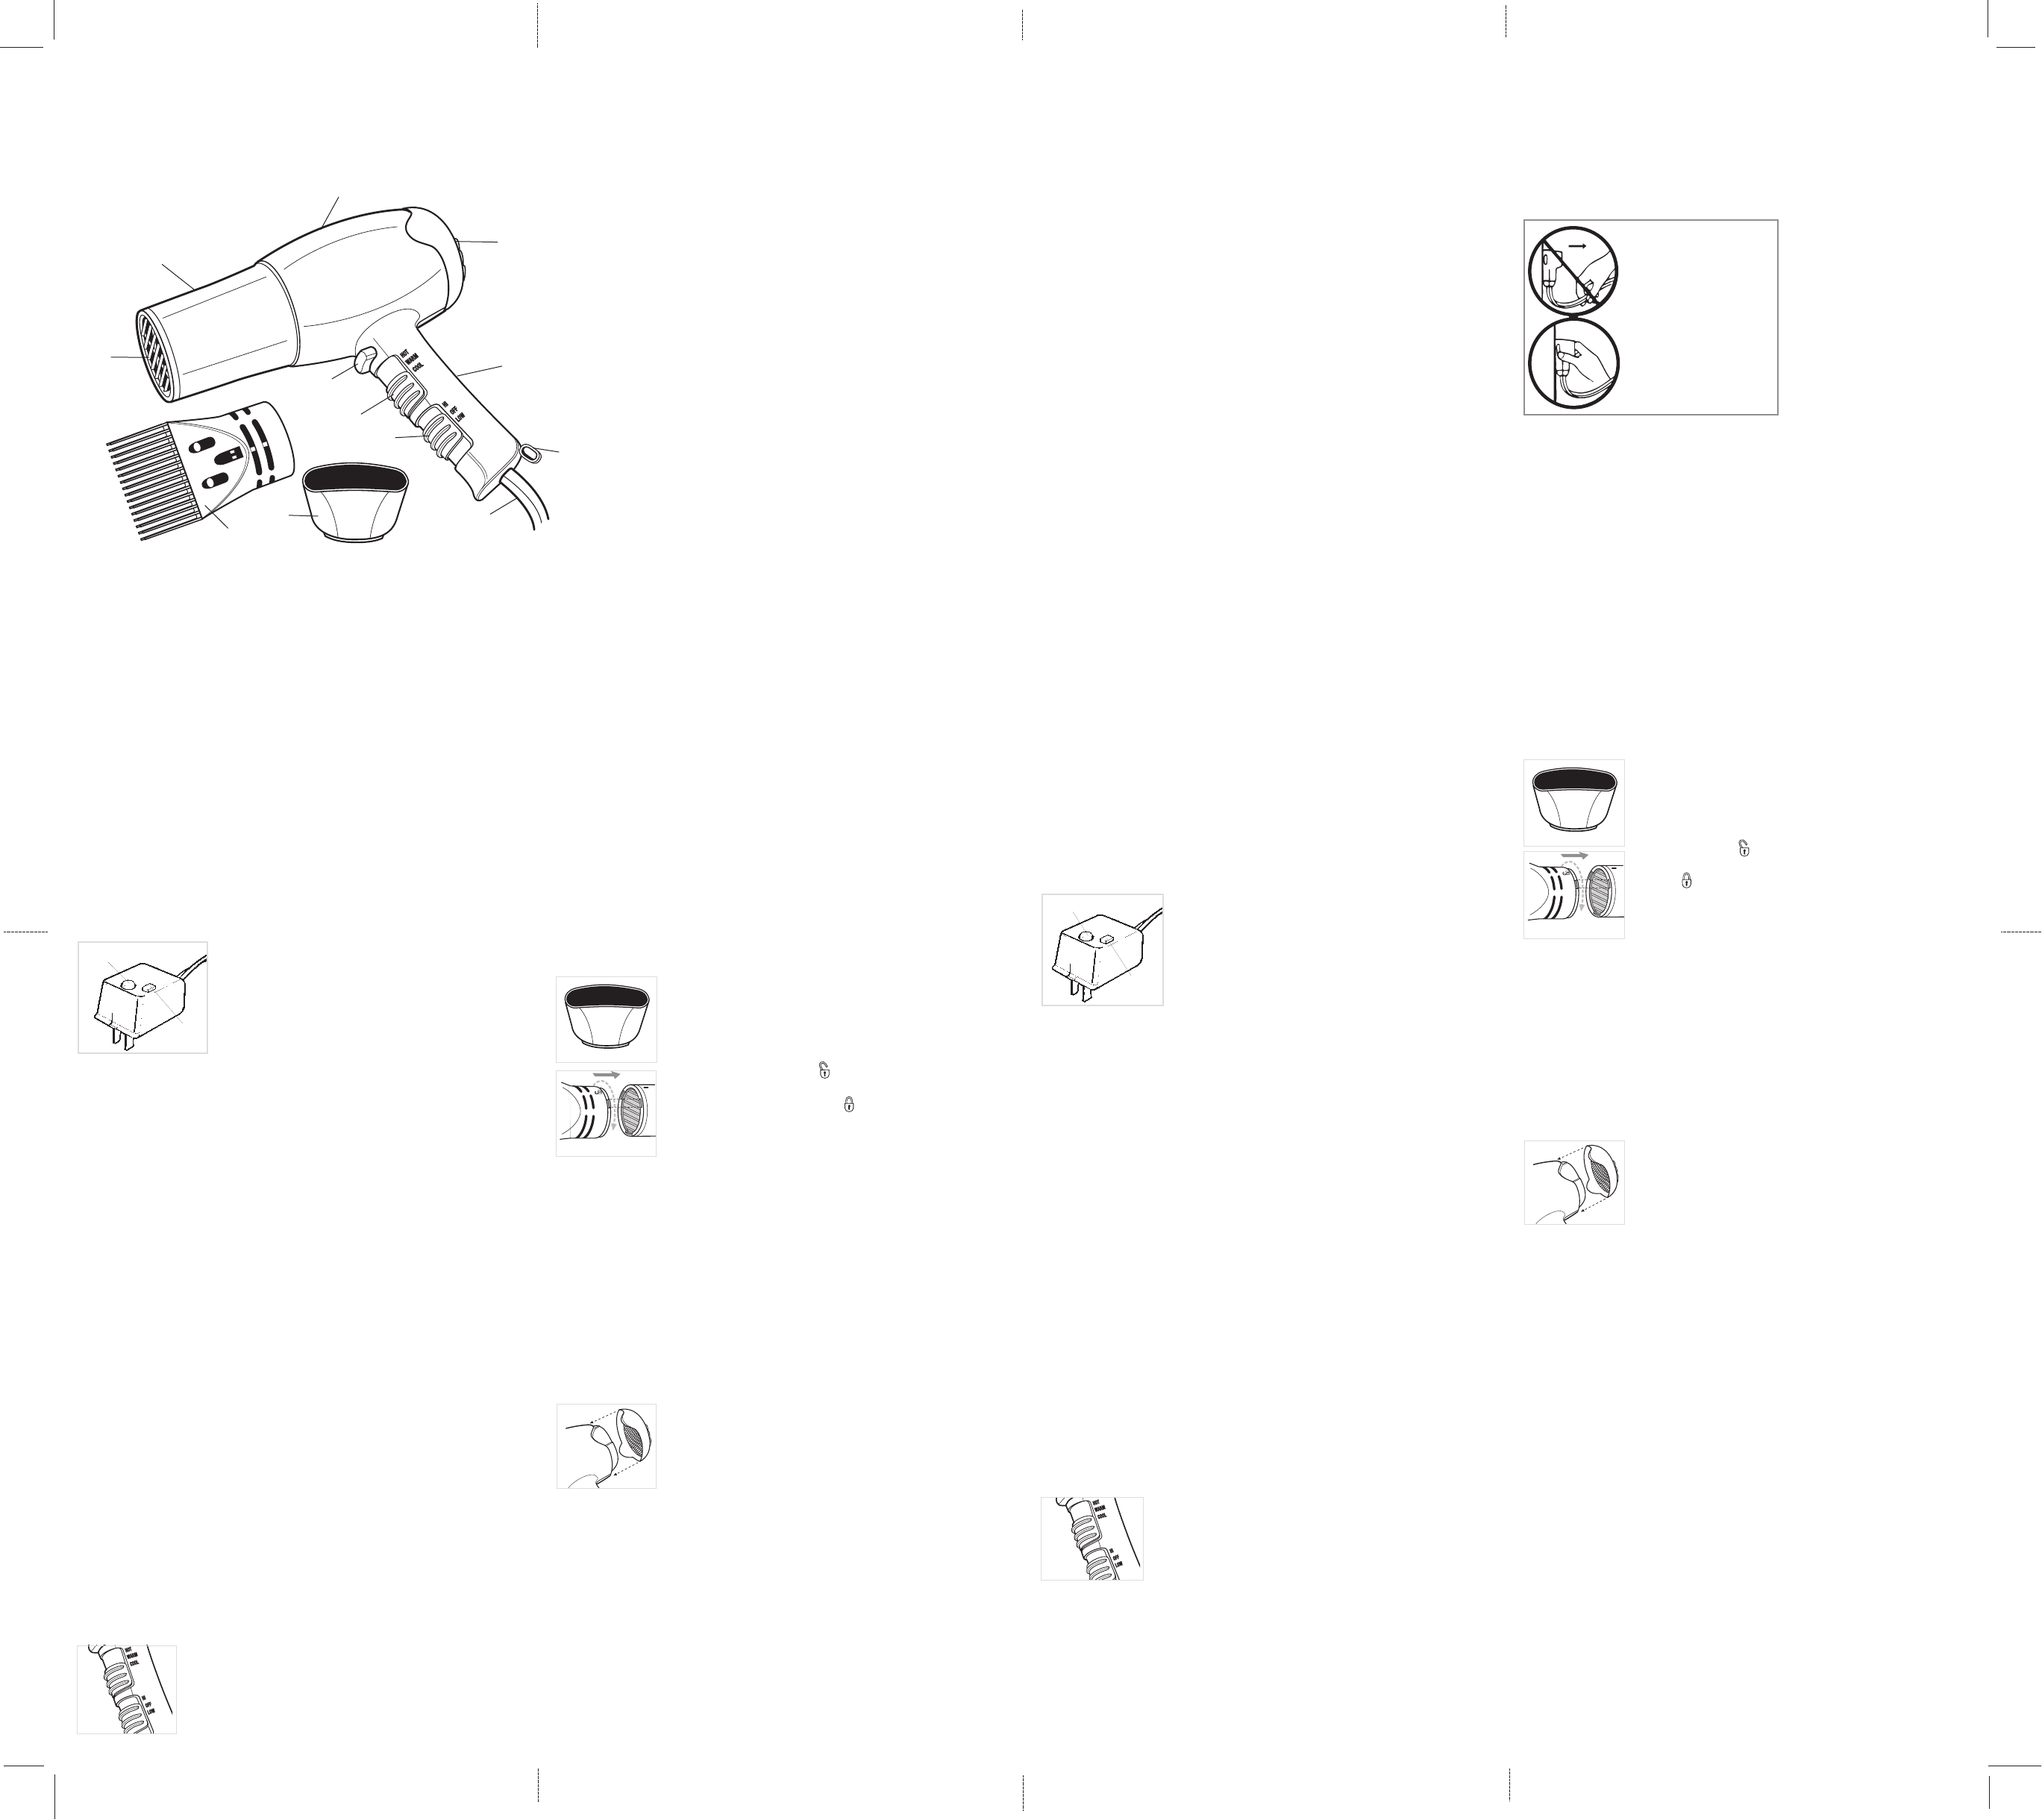
Accesorios del secador
Concentrador de aire (C)
Se utiliza para orientar el flujo de aire hacia una sección
pequeña de cabello a la vez.
Estilizador (D)
Se utiliza para alzar, suavizar o para agregar cuerpo al cabello
tratado con permanente, al cabello de rizo natural o para
suavizar el cabello demasiado crespo.
Para instalar: Haga coincidir en el estilizador con la línea
en el cilindro del secador, empuje el estilizador hacia adentro
y gire hacia la derecha hasta que coincida con la línea en el
cilindro del secador.
Para sacar: Gire el estilizador hacia la izquierda y hale para
retirarlo del secador.
ADVERTENCIA: Los accesorios se calientan cuando se utilizan. Permita que se
enfríen antes de manejarlos.
Cuidado y limpieza
Este secador trae lubricante permanente de fábrica y no requiere lubricación
suplementaria durante su vida útil. No contiene piezas de utilidad para el
consumidor.
Para limpiar
1.
Apague, desconecte y permita que el aparato se enfríe completamente antes
de limpiarlo.
2.
Limpie las superficies con un paño suave, ligeramente humedecido. No
permita la penetración de agua ni de ningún otro líquido adentro del aparato.
3.
Limpie la rejilla de admisión de aire con una escobilla o con el cepillo de la
aspiradora a fin de remover la acumulación de cabello o de pelusa.
Para sacar: Presione la rejilla por ambos costados con los dedos
y hale para retirar del secador (E).
Para instalar: Sujete la rejilla de admisión de aire por ambos
costados e inserte en su lugar.
Almacenaje
•
Almacene el secador en un lugar limpio y seco con el cable enrollado
holgadamente.
• A fin de evitar que el cable se debilite y se rompa, no aplique presión a la
unión del cable con el mango del aparato.
Antes de devolver el secador para cualquier servicio o revisión: Limpie el filtro y
la rejilla de admisión de aire con una escobilla pequeña o utilice el accesorio de
cepillo de la aspiradora para succionar cualquier obstrucción. Luego, encienda
el secador nuevamente para comprobar si está funcionando apropiadamente.
E
D
C
Cool Shot™ Button: Use this feature to set the style in place. Firmly press the
button until the airflow becomes cool. Release the button and the dryer
automatically resumes the temperature and speed previously chosen.
DRYER ATTACHMENTS
Air Concentrator (C)
Use it to direct air flow to a small section of hair at a time.
Styling Pik (D)
Use it to lift, smooth and build body into permed or
naturally curly hair or for softening overly curly hair.
To insert: Align the on the styling pik with the line on
the dryer barrel, push in styling pik and turn clockwise
until the aligns with the line on the dryer barrel.
To remove: Turn styling pik counterclockwise and pull pik
off the barrel.
CAUTION: Attachments will get hot during use. Allow to
cool before handling.
Care and Cleaning
This appliance is permanently lubricated and will not require any additional
lubrication. It contains no user serviceable parts.
CLEANING
1. Turn off unit, unplug and let it cool completely before cleaning.
2. Wipe the surfaces with a soft, slightly damp cloth. Do not let water or any
other liquid get into the appliance.
3. Clean air-intake grille with a small brush or a vacuum cleaner brush
attachment to remove lint or hair buildup.
To remove: Apply finger pressure on both sides of the air-
intake grille and pull grille off the dryer (E).
To replace: Hold both sides of air-intake grille and insert in
place.
STORAGE
• Store dryer in a clean, dry place with cord loosely coiled.
• Do not put any stress on cord where it enters the handle, as it could cause
cord to fray and possibly break.
Before returning unit for service: Clean air-intake grille with a small brush or
a vacuum cleaner brush attachment. Then try to operate unit again.
How to Use
Some models are equipped with an ESP
®
Electric Shock Protector™/ALCI
(appliance leakage current interrupter) safety device specifically engineered
for safety. It is for household use and may be plugged into a standard AC
electrical outlet (ordinary household current).
Important: For warranty verification, please do not remove line cord sticker.
HOW ESP
®
/ALCI SAFETY DEVICE WORKS
The ESP
®
/ALCI safety device in this unit is built into the plug. This device will
make it inoperable under some abnormal conditions, such as accidental
immersion in water. If the appliance is immersed in water, do not attempt to
reset the ESP
®
/ALCI safety device.
The ESP
®
/ALCI safety device is equipped with a test
button so that its operation can be checked (A).
TO USE
1. Press the Reset button.
2. Plug your hair dryer into an AC outlet then press the
Test button.
3. The Reset button will pop out. This verifies the
safety device is operating properly. If the Reset button does not pop out, do
not use the unit. Return it immediately for service.
4. Press the Reset button to reactivate the ESP®/ALCI safety device. Your hair
dryer is ready for use.
Repeat this procedure every time you use the hair dryer to confirm that the
safety device is operational.
OPERATING GUIDELINES
• If the unit detects an electrical shock hazard, it will immediately shut off.
To restore power, press the Reset button on the ESP
®
/ALCI safety device to
reactivate the circuit.
• This appliance is designed with a protective coating around the heating
coils. When operating the first few times, you may notice momentary
smoking when turning off the unit. This represents no danger to the user
and does not indicate a defect in the unit. The smoke should dissipate
within a short time.
• Never block air-intake grille as it will cause the unit to overheat. Should
this happen, a built-in safety system will operate and the unit will start
blowing cool air.
– Turn switch off and clear any obstruction from air-intake grille.
– Wait 10 minutes before operating the unit again. If the unit does not
work, it may have sustained extensive damage. Do not try to repair
it yourself. See warranty for instructions.
• Never touch heating section as it may be hot and can burn you.
• Do not keep appliance directed at one place; keep it in constant motion.
This is especially important if drying a wig, which could be damaged
by heat.
• To extend the life of the dryer, you should switch it to the coolest setting
for a few seconds before shutting it off.
• Untwist the cord from time to time to avoid tangling.
SPEED/HEAT SETTINGS
Your dryer features a heat switch and a speed switch with a
choice of two speeds and six heat settings (B).
• Use high heats/speed for most styling/setting procedures
and hair types.
• Select lower heats/low speed for finishing a hairstyle
or for drying and styling permed, color-treated or fragile hair.
FOR BEST RESULTS
Hot Setting: For initial hair drying and for thick, hard-to-control hair.
Warm Setting: For most hair styling/setting procedures and hair types.
Cool Setting: For finishing hairstyle, or for styling fragile, damaged,
over-processed or permed hair.
Note: To add bulk to hair and body to the style, brush hair and blow-dry it
partly against its natural growth pattern.
B
E
D
C
A
Reset button
Test
button
쐅
쐈
쐉
1. Air output
2. Barrel
3. Heating section
† 4. Removable air-intake grille; keep free of lint and hair
(Part # TU-19 P2-G1)
5. Handle
6. Hanging ring
7. Cord; keep loosely coiled
8. Hi/Off/Low (2/0/1) speed switch
9. Hot/Warm/Cool heat switch
10. Cool Shot™ button
† 11. Air concentrator
(Part # TU-19 P2-C1)
† 12. Styling pik (certain models only)
(Part # TU-19 P2-P1)
† Consumer replaceable
1. Salida de aire
2. Cilindro
3. Sección de calentamiento
† 4. Rejilla removible de admisión de aire ;
mantener libre de cabello y de pelusa
(N° de pieza TU-19 P2-G1)
5. Mango
6. Aro de colgar
7. Cable; mantener enrollado holgadamente
8. Interruptor de velocidad alta/apagado/velocidad baja (2/0/1)
9. Interruptor de temperatura caliente/tibia/fresca
10. Botón Cool Shot™
† 11. Concentrador de aire (N° de pieza TU-19 P2-C1)
† 12. Peine para estilizar (ciertos modelos solamente)
(N° de pieza TU-19 P2-P1)
† Reemplazable por el consumidor
NO HALE
EL ENCHUFE
POR EL CABLE
DO NOT PULL PLUG
BY THE CORD


Praat mee over dit product
Laat hier weten wat jij vindt van de Black and Decker HD500 Haardroger. Als je een vraag hebt, lees dan eerst zorgvuldig de handleiding door. Een handleiding aanvragen kan via ons contactformulier.