
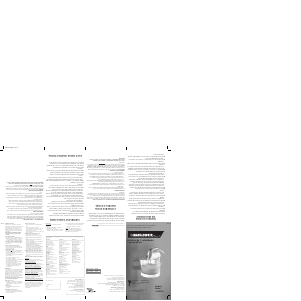
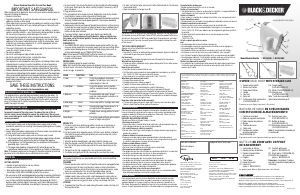
BLENDER JAR ASSEMBLY
This product is for household use only.
1. After unpacking, before first use, remove all stickers, packing material, and
literature. Wash all parts as instructed in the Care and Cleaning section.
2. Make sure speed switch is in the off (0) position and unplugged before inserting
or removing attachments.
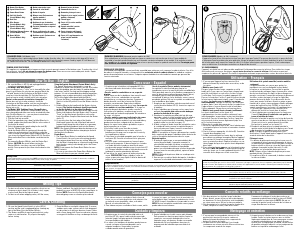
• To insert wire beaters: Match beater with the collar near
its stem end to the illustration located near the opening
(A). Push in beater, rotating slightly if necessary, until it
locks into place. Insert other beater into the second hole,
also rotating it if necessary, until it locks into place.
• To insert dough hook: Match dough hook into either
opening of the mixer. Gently push in each dough hook,
rotating it slightly if necessary, until it locks into place (B).
3. Place ingredients to be mixed in a bowl.
4. Plug cord into an outlet.
5. If mixing on stand, place mixer on the stand and click into
place (C). Place bowl in bowl rest beneath mixer.
6. If mixing by handheld method, remove mixer from stand
by pressing the release button (D) conveniently located on
the stand. Insert beaters or dough hooks into center of
food in bowl, holding the mixer by the handle.
7. Use the mixing guide below to select the correct speed (E)
for the food you are mixing. Generally, it is best to start on
the lowest speed (1), then increase speed with beaters or
dough hooks immersed in the food.
Note: The bowls cannot rotate 360 degrees because of the spout/handles.
Size: 19.685" x 17.5"
Como usar
Este producto es para uso doméstico únicamente.
1. Después de abrir retire cualquier etiqueta o calcomanía, material de empaque
y literatura. Lave todas las partes conforme a las instrucciones de la sección
“CUIDADO Y LIMPIEZA.”
2. Asegúrese de desconectar la batidora y de ajustar el interruptor de velocidad
a la posición de apagado (0) antes de instalar o de extraer los accesorios.
• Para introducir los batidores de alambre: ajuste el batidor
con el cuello cerca del extremo del tallo hasta la marca
ubicada cerca de la apertura (A). Empuje el batidor,
haciéndolo girar ligeramente si es necesario, hasta que
quede asegurado en su sitio. Introduzca el otro batidor
en el segundo orificio, también haciéndolo girar si es
necesario, hasta que quede asegurado en su sitio.
• Para introducir el gancho para masa: Instale el gancho
en cualquiera de los dos orificios de la batidora. Empuje
suavemente cada gancho, haciéndolo girar ligeramente si
es necesario, hasta que quede asegurado en su sitio (B).
3. Conecte el cable a una toma de corriente.
4. Coloque en el recipiente los ingredientes a mezclar.
5. Si va a batir sobre la base, coloque la batidora sobre ésta
y ajústela en su sitio (C). Coloque el tazón en la base del
mismo, debajo de la batidora.
6. Si va a batir de forma manual, retire la batidora de su base,
presionando el botón de liberación (RELEASE) (D), que
está ubicado en el soporte para su comodidad. Introduzca
los batidores o ganchos para masa en el centro de los
alimentos en el tazón, sosteniendo la batidora por
la manija.
7. Use la guía para batir, a continuación, con el fin de
seleccionar la velocidad correcta (E) para el alimento que
vaya a batir. En general, es mejor comenzar con la
velocidad más baja (1), y luego aumentar la velocidad con
los batidores o los ganchos para masa inmersos en los
alimentos.
8. De manera continua, oriente los batidores o ganchos para
masa a través de la mezcla, para obtener resultados
uniformes. Recomendamos usar una espátula para retirar los ingredientes
acumulados a los lados o en la parte inferior del tazón, con el fin de que todo se
mezcle. Asegúrese de poner el interruptor de velocidad en apagado (0). Coloque la
batidora sobre la base del apoyo, de manera que la masa escurra dentro del tazón.
Sostenga la batidora por su manija, con los batidores o ganchos para masa
orientados hacia abajo.
9. Para retirar los batidores, presione el botón expulsor (EJECT). Precaución: tenga
cuidado al expulsar los batidores o ganchos para masa, ya que se zafan con
rapidez de la batidora. Usted querrá expulsarlos dentro del tazón o en el
fregadero.
Nota: Los recipientes no pueden girar 360° debido a las boquillas y a las asas.
Este producto puede variar ligeramente del que aparece ilustrado.
Product may vary slightly from what is illustrated.
8. Guide beaters or dough hooks continuously through the mixture for uniform
mixing. We recommend using a spatula to scrape away buildup from sides or
bottom of the bowl and blend ingredients back into beaters. Be sure to turn
speed switch off (0). Place mixer on stand so that batter will drip back into bowl.
Hold mixer by handle with beaters or dough hooks facing forward.
9. To remove beaters, push eject button. Caution: Be careful when ejecting the
beaters or dough hooks since they come out of the mixer quickly. You may want
to eject them into bowl or into a sink.
Mixing Tips
For best results when whipping cream, chill the cream, beaters, and bowl. Start with
the lowest setting and gradually increase to whip (#5) as the cream begins to
thicken.
Note: For best volume when whipping cream, do not use a spatula.
Care and Cleaning
This product contains no user serviceable parts. Refer service to qualified service
personnel.
1. Make sure speed switch is in off (0) position and cord is unplugged before
cleaning any part of mixer. Press eject button to remove beaters or dough hooks.
2. The beaters and dough hooks may be washed in warm, sudsy water or in a
dishwasher. Dry all parts thoroughly before storing.
3. Clean the mixer, stand or cord with a damp cloth. To remove stubborn spots,
wipe surfaces with a cloth dampened in sudsy water or a mild, non-abrasive
cleaner. Follow with a clean, damp cloth. Do not use abrasive cleaners on any
part of mixer as they can damage the finish.
Storing the Mixer and Stand
• To prolong the life of the unit, avoid jerking the power cord or straining it at the
plug connection.
• To store, coil cord in loops and secure it with attached cord tie. Do not wrap
cord around mixer.
쎻
B
쎻
A
쎻
D
쎻
E
쎻
C
쎻
B
쎻
A
쎻
D
쎻
E
쎻
C
Mixing Guide
Use the following guide for speed selections. Note: Start mixing at the lowest
speed and gradually increase as needed. For best results, use wire beaters to whip
light, fluffy mixtures, heavy cream, or eggs, at speed #5.
SPEED FUNCTION USE
1 (Low) Blend To blend flour/dry ingredients, and liquids
for batters and cookie doughs.
To blend nuts, chips, raisins into cookie doughs.
2 (Low/Med) Stir To prepare sauces, puddings, muffins, and quick
breads.
To stir thin batters.
3 (Medium) Mix To prepare batters and cake mixes.
To cream butter and sugar or mix eggs into batters.
4 (Med/High) Beat To beat whole eggs, frozen desserts, frostings.
To mix light batters like popovers.
5 (High) Whip To whip fluffy mixtures, whipped cream,
egg whites, and mashed potatoes.
Guía para batir
Use la siguiente guía para seleccionar la velocidad. Nota: comience a batir a la
velocidad más baja y aumente gradualmente según se requiera. Para obtener
mejores resultados, use los batidores de alambre para mezclas ligeras y
esponjosas, crema de leche o huevos, a la velocidad Nº 5.
USO DE LA FUNCIÓN DE VELOCIDADES
1 (Bajo) Combinar Para combinar harina/ingredientes secos
y líquidos para masas y pastas de galletas.
Para combinar nueces, chips y uvas pasas
en masas de galletas.
2 (Bajo/Med) Revolver Para preparar salsas, budines, muffins y panes
rápidos.
Para revolver masa ligeras.
3 (Medio) Mezclar Para preparar masas y mezclas de pasteles.
Para batir la mantequilla con el azúcar
o mezclar huevos a las masas.
4 (Med/Alto) Batir Para batir huevos enteros, postres congelados
y glaseados.
Para combinar mezclas ligeras tipo popovers.
5 (Alto) Licuar Para licuar mezclas esponjosas, crema batida,
claras de huevo y puré de papas.
Consejos para batir
Para obtener mejores resultados al batir crema de leche, enfríe la crema, los
batidores y el recipiente. Comience a la velocidad más lenta y aumente
gradualmente hasta licuar (Nº 5), a medida que la crema se espesa.
Nota: Para obtener un mejor volumen al batir crema de leche, no use una espátula.
Cuidado y limpieza
Este producto no contiene partes que el consumidor pueda reparar. En caso de
requerir mantenimiento, envíela al personal de servicio calificado.
1. Antes de limpiar cualquier parte de la batidora, asegúrese de que el interruptor
de velocidad esté en la posición de apagado (0) y que el cable esté
desconectado. Presione el botón expulsor (EJECT) para sacar los batidores o los
ganchos para masa.
2. Los batidores y ganchos para masa se pueden lavar con agua tibia o espumosa,
o en un lavaplatos. Seque muy bien todas las partes antes de guardarlas.
3. Limpie la batidora, el soporte de la batidora o el cable con un paño húmedo.
Para eliminar manchas difíciles, limpie las superficies con un paño humedecido
en agua espumosa o con un limpiador suave no abrasivo. Posteriormente, limpie
con un paño limpio y húmedo. No use limpiadores abrasivos sobre cualquier
parte de la batidora, ya que pueden dañar el acabado.
Almacenamiento de la batidora y el soporte de la batidora
• Para prolongar la vida útil de la unidad, evite tirar del cable o doblarlo en
la parte del enchufe.
• Para almacenar, envuelva el cable en las argollas y asegúrelo con el sujetador
de cable adjunto. No enrolle el cable alrededor de la batidora.
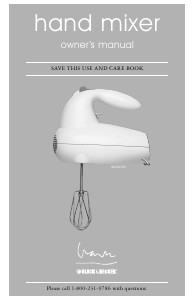
1. 3.5L glass bowl with spout-shaped handles
2. 3.5L plastic bowl with spout-shaped handles
3. 5-speed switch
4. Eject (expulsor) button
5. Handle
6. Release (de liberación) button
7. Stand
8. Wire beaters (2)
9. Dough hooks (2)
1. Recipiente de vidrio de 3.5L con asas en forma de boquilla
2. Recipiente plástico de 3.5L con asas en forma de boquilla
3. Interruptor de 5 velocidades
4. Botón expulsor (EJECT)
5. Mango
6. Botón de liberación (RELEASE)
7. Soporte
8. Batidores de alambre (2)
9. Ganchos para masa (2)
햳
햴
햵
햶
햷
햲
햸
햺
햹
햳
햴
햵
햶
햷
햲
햸
햺
햹


Praat mee over dit product
Laat hier weten wat jij vindt van de Black and Decker MX900 Handmixer. Als je een vraag hebt, lees dan eerst zorgvuldig de handleiding door. Een handleiding aanvragen kan via ons contactformulier.