
the wiring junction box. Fix the connec-
tion cable of the motor onto the terminal
board C. Reassemble the cable clamp A
and the cover B of the junction box. The
other end of the cable must be fixed onto
the terminal board of the external motor.
Move the hood close to the bottom of the
wall unit and then connect the two units
by means of the 4 self-tapping screws
supplied together with the appliance.
Fixation with brackets as in Fig. 7 (optio-
nal):
Take the two brackets (S) out of the
accessory bag together with the 8 screws
provided. Fit the brackets to the wall unit
being careful to position these correctly;
for this operation use the 4 longer screws.
At this point, secure the appliance to the
brackets using the 4 shorter screws.
Ducting version and version with an External
motor: connect the flange of the hood with the
air venting hole made previously in the wall/
ceiling by means of an adequate tube. Make
the electrical connection of the hood by means
of the power supply cable. Reassemble the
anti-grease filters.
Filtering version: connect a proper pipe to the
flange of the hood so that the air is sent
outside the pensile and sent back into the
room. Make the electrical connection of the
hood by means of the power supply cable.
Assemble the charcoal filter minding that it
restains properly against edge A (Fig. 12).
Reassemble the anti-grease filters.
OPERATION
--------------------------------------------------------
Controls of Fig. 9:
Switch C: position A (automatic), the motor
and the light are automatically regulated
ON or OFF by the opening/closing of the
truck. Position M (manual), the light is on.
Position 0, the light is off.
Switch B: it select the speed of the motor.
Opening the truck, the motor works automati-
cally at the last working speed.
Controls of Fig. 10:
Switch C: position M (motor): the motor
switches ON/OFF by opening/closing the
truck; the lights are always OFF.
Position T (total): the motor and the lights
switch ON/OFF by opening/closing the
truck.
Position L: the lights switch ON and the
motor switch OFF either if the truck is
open or closed; the motor is always OFF.
Switch B: it select the speed of the motor.
When the switch is in M or T position, opening
the truck, the motor starts working automati-
cally at the selected speed.
Controls of Fig. 11:
Switch D: position A (automatic), the motor
and the light are automatically regulated
ON or OFF by the opening/closing of the
truck. Position M (manual), the light is on.
Position 0, the light is off.
Opening slightly the truck, the motor works at
the I speed; opening a bit more, the motor
works at the II speed; opening totally the
truck, the motor works at the III speed.
In case the hood is a filtering version one, it
is necessary to change the charcoal filters
according to utilization about every six month.
To remove the charcoal filter:
– open the truck pulling it frontwards.
– take off the anti-grease filter: where the
handle is, pull the stop inwards and pull
the filter downwards (Fig. 4);
– grasp the tongue of the charcoal filter
pulling it towards the rear of the apparatus
and, at the same time, downwards (Fig.
12-13). Attention: to take off the charcoal
filter, this one must restain properly against
edge A (Fig. 12).
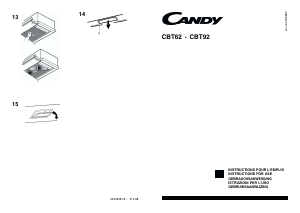
Light bulb
If the fluorescent light need changing,
slacken the light cover by disconnecting the
screw and remove the bulb itself (Fig. 14).
Replace with a bulb of the same type.
To change the rectangular halogen bulbs
open the cover and remove the bulb without
touching it with bare hands (Fig.15). Replace
with a bulb of the same type.
MONTAGE UND
GEBRAUCHSANWEISUNG
--------------------------------------------------------
Das Gerät ist so zu montieren, daß der
Abstand zwischen den Kochplatten und
dem unteren Rand der Dunstabzugshaube
mindestens 65 cm beträgt.
Ein Anschluss der Abluftleitungen an
Verbrennungsabgaskamine (zum Beispiel
Zentralheizung, Heizgeräte, Badezimmer-
öfen usw.) ist nicht gestattet.
In jedem Fall sind bei der Ableitung der
Abluft die behördlichen Vorschriften zu
beachten. Desweiteren darf die Abluft nur
dann durch ein Loch in der Wand geleitet
werden, wenn dieses für diesen Zweck
bestimmt ist.
Achtung! Bei gleichzeitigem Betrieb einer
Abluft-Dunstabzugshaube und einer ra-
umluftabhängigen Feuerstätte (wie z. B.
gas-, öl- oder kohlebetriebene Heizgeräte,
Durchlauferhitzer, Warmwasserbereiter) ist
Vorsicht geboten, da beim Absaugen der
Luft durch die Dunstabzugshaube dem
Aufstellraum die Luft entnommen wird, die
die Feuerstätte zur Verbrennung benötigt.
Ein gefahrloser Betrieb ist möglich, wenn
bei gleichzeitigem Betrieb von Haube und
raumluftabhängiger Feuerstätte im Aufstell-
raum der Feuerstätte ein Unterdruck von
höchstens 0,04 mbar erreicht wird und
damit ein Rücksaugen der Feuerstätten-
abgase vermieden wird. Daher den Raum
mit Lüftungsanschlüssen versehen, die
einen konstanten Zustrom von Frischluft
gewährleisten.
Das Typenschild im Innern des Geräts
kontrollieren: Den folgenden Anwei-
sungen folgen, falls das Symbol ( )
erscheint; dieses Gerät weist kons-
truktive technische Details auf, die
unter die Isolierungsklasse II fallen und
deshalb muss es nicht geerdet werden.
Das Typenschild im Innern des Geräts
kontrollieren: den folgenden Anwei-
sungen folgen, falls das Symbol ( )
erscheint; ACHTUNG: dieses Gerät
muss geerdet werden. Beim elektrischen
Anschluss sicherstellen, dass die Steckdose
Deutsch
eine Erdung aufweist.
Beim elektrischen Anschluss muss überprüft
werden, ob die Spannungswerte des
Stromnetzes mit den Werten auf dem im
Innern des Gerätes angebrachten Typens-
childs übereinstimmen. Falls Ihr Gerät nicht
mit einem fest angeschlossenem Kabel mit
Stecker oder einer sonstigen Vorrichtung,
die eine allpolige Unterbrechung mit einer
Kontaktöffnung von mindestens 3 mm
versehen ist, so müssen die entsprechen-
den Trennvorrichtungen bei der festen
Installation vorgesehen werden
Vor jeder Reinigungs- oder Wartungsarbeit
muss das Gerät vom Stromnetz getrennt
werden.
GEBRAUCH
--------------------------------------------------------
In der unmittelbaren Nähe des Geräts die
Benutzung von flammenerzeugenden
Materialien (Flambieren) vermeiden.
Beim Frittieren besonders auf die Brand-
gefahr achten, die durch Öl und Fette
verursacht wird. Besonders gefährlich ist
die Entflammbarkeit von bereits benutztem
Öl. Keine offenen Elektrogrills verwenden.
Zur Vermeidung einer möglichen Brandge-
fahr die Anweisungen zur Reinigung der
Fettfilter und zur Entfernung eventueller
Fettablagerungen auf dem Gerät beachten.
WARTUNG
--------------------------------------------------------
Nur eine sorgfältige Pflege garantiert auf
Dauer eine gute Leistung und Funktion
des Geräts.
Besonders wichtig ist die Reinigung der
Fettfilter. Hierzu sind die Metallfilter
abzunehmen. Die Reinigung wird von Hand,
mit biologisch abbaubarem
Reinigungsmittel, oder in der Spülmaschine
empfohlen. Die Reinigungshäufigkeit hängt
ab von der Benutzungsdauer und der Art
der abzusaugenden Wrasen. Zum
Enfgernen der Entfettungsfilter: in
Überreinstimmung mit dem Handgriff den
Feststeller nach innen stossen und den
Filter nach unten ziehen (Abb. 3);
Schiebegestell öffnen und den zweiten Filter
auf die gleiche Weise herausnehmen.
Die Entfernung eventueller
Fettablagerungen vom Gerät erfolgt in
regelmäßigen Abständen in Abhängigkeit



Praat mee over dit product
Laat hier weten wat jij vindt van de Candy CBT 92 X Afzuigkap. Als je een vraag hebt, lees dan eerst zorgvuldig de handleiding door. Een handleiding aanvragen kan via ons contactformulier.