
USAGE TIPS / CONSEJOS DE USO
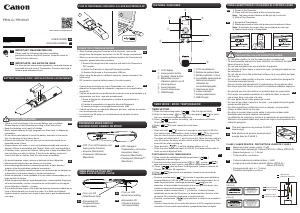
TIMER SETTING
1) Press the timer setting button [ ]. (The first digit will blink)
2) Enter the value using [ ] or [ ] keys and press [ ] to select
the hour, minute and seconds respectively.
3) Press [ ] to confirm the setting. (up to a maximum of 9 hours,
59 minutes, 59 seconds.)
4) Press [ ] to start / pause the count down.
TIPS
•
Press and hold [ ] button for 2 seconds to reset timer to 0:00:00 in
timer setting mode. In presentation mode, holding [ ] for 2 seconds,
timer will reset to previous setting (when timer is running or pausing).
• The alarm will vibrate with 5, 1 and 0 minutes left. When the timer setting is
over 30 minutes, the alarm will also vibrate at half of the setting time. The
timer will then start counting up.
• Press and hold [ ] to set the vibration pattern on / off.
• When the count down timer reach to 0:00:00, it will automatically start at
count up and all digits will blink.
TIMER MODE / MODO TEMPORIZADOR
E-IM-2993
PR10-G / PR100-R
www.canon.com/lppmanual
- Do not allow children to use the laser product unsupervised.
- To avoid possible exposure to laser radiation, do not direct the laser
beam at eyes or faces.
- Do not use sunglasses as eye protection equipment.
- Do not stare at laser beam or point into eyes – prolonged exposure can
be hazardous.
- Do not use on mirror-like (reflective) surfaces as it may reflect the laser
into the eye.
- Do not shine a laser pointer at anyone. Laser pointers are designed to
illuminate inanimate objects.
- Use of controls and adjustments or performance of procedures other
than those specified herein may result in hazardous radiation exposure.
- No permita que los niños utilicen el producto láser sin supervisión.
- Para evitar una posible exposición a la radiación láser, no apunte
con el rayo láser a los ojos o la cara.
- No usar gafas de sol como protección ocular.
- No mire el rayo láser o apunte a los ojos – una exposición prolongada
puede resultar dañina.
- No utilice superficies (reflexivas) como un espejo, ya que podría
reflejar el láser dentro de los ojos.
- No dirija un puntero láser contra nadie. Los punteros láser están
diseñados para iluminar objetos inanimados.
- La utilización de controles y ajustes o la realización de procedimientos
distintos a los especificados aquí puede dar lugar a una exposición a la
radiación peligrosa.
CLASS 2 LASER DEVICES / DISPOSITIVOS LÁSER DE CLASE 2
- Maximum Laser power output: <1mW
- Emitted laser wavelength: 532nm (PR10-G) / 635nm (PR100-R)
- Beam divergence: α = 1.5mrad
- Pulse duration: continuous
- Potencia máxima de salida de láser: <1mW
- Longitud de onda de láser emitida: 532nm (PR10-G) /
635nm (PR100-R)
- Divergencia del rayo: α = 1.5mrad
- Duración del impulso: continuo
+
+
2
1
USER GUIDE
GUIA DE USARIO
EN
ES
IMPORTANT: READ BEFORE USE
Please read the following instructions and safety
precautions before using the Presenter. Keep this sheet on
hand for future reference.
IMPORTANTE: LEA ANTES DE USAR
Por favor lea las instrucciones siguientes y las precauciones de
seguridad antes de usar el Presentador. Conserve esta hoja a
la mano para referencia futura.
EN
ES
CAUTION / PRECAUCIÓN
• There is a risk of explosion if an incorrect battery type is installed.
Please dispose of used batteries according to their instructions.
• Keep the batteries out of reach of children.
• Never expose batteries to high temperatures, direct heat, or dispose by
incineration.
• Do not allow metal objects to touch the battery terminals on the device;
they can become hot and cause burns.
• Remove the batteries if they are worn out or have been stored for an
extended period of time.
• Always remove old, weak, or worn out batteries promptly and recycle or
dispose of them in accordance with Federal, State, and Local regulations.
• If a battery leaks, remove all batteries, taking care to keep the leaked fluid
from touching your skin or clothes. If fluid from the battery comes into
contact with skin or clothes, flush skin with water immediately.
• No mezcle baterías viejas y nuevas o baterías de tipos diferentes.
• Mantenga las baterías lejos de alcance de los niños.
• Nunca exponga las baterías a temperaturas altas, al calor directo y
tampoco trate de eliminarlas mediante incineración.
• No permita que objetos metálicos toquen las terminales de las baterías en
el dispositivo; se pueden calentar y causar quemaduras.
• Retire las baterías si están gastadas o si han estado almacenadas por un
largo período de tiempo.
• Retire siempre las baterías viejas desgastadas, o descargadas, haga esto
en forma inmediata y recicle o elimínelas de conformidad con las regula
ciones federales, estatales, y locales.
• Si una batería tiene fugas, retire todas las baterías, teniendo cuidado de no
tocar el fluido drenado con la piel o su ropa. Si el fluido de la batería
llegara a estar en contacto con la piel o ropa, lave la piel inmediatamente
con agua.
EN
ES
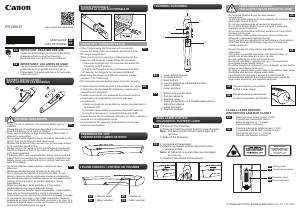
PLUG IN THE DONGLE / ENCHUFE LA LLAVE ELECTRÓNICA RF
2
1
• When finished using the Presenter with a computer, remove the
dongle from the computer and return it to the RF dongle compartment.
• When you encounter connection problems between the Presenter and
computer, please follow this procedure.
i) Remove the dongle from the computer and switch the Presenter to
OFF position
ii) Switch the Presenter to Keynote/Powerpoint position
iii) Reinsert the dongle to the computer's USB port
• When using the dongle on a different computer, please reconnect it for
initial setup.
• RF connection requires battery power to function properly.
• Cuando haya terminado de usar la Presentador con, retire el
dispositivo de seguridad del ordenador y regreso en el compartimiento
dongle RF.
• Cuando se encuentre con problemas de conexión entre el presentador y la
computadora, por favor, siga este procedimiento.
i) Retire el dongle del computadora y cambia el presentador a la
posición OFF
ii) Cambie el presentador a la posición Keynote/Powerpoint
iii) Inserte el dongle en el compartimiento puerto USB.
• Cuando se use con un ordenador diferente, por favor, vuélvalo a conectar
con la configuración inicial.
• La conexión de RF exige que la alimentación de las pilas funcione
correctamente.
BATTERY INSTALLATION / INSTALACIÓN DE LAS BATERÍAS
EN
ES
FEATURES / FUNCIONES
EN
① LCD display
② Laser pointer button
③ Forward / Back button
④ Blank/dark screen /
Vibration pattern on/off
⑤ Laser aperture
⑥ Laser indicator
⑦ Launch slide show
⑧ USB Dongle
ES
① LCD visualización
②
Botone de puntero láser
③ Botone
adelante / Volver
④ La pantalla aparecerá en
blanco/oscurecerá /
vibración de
encendido/apagado
⑤ Abertura de láser
⑥ Láser indicador
⑦Iniclar presentacion
⑧USB Dongle
①
②
③
④
⑤
⑥
⑦
⑧
USING LASER POINTER / UTILIZANDO EL PUNTERO LÁSER
1) Power on the Presenter.
2) Press and hold the pointer button to keep the laser.
Note: The laser pointer indicator will be light up in red color.
3) Slide off the Presenter.
1) Encienda el Presentador.
2) Mantenga pulsado el botón del puntero para mantener el láser.
Nota : El indicador de puntero láser se encenderá en color rojo
3) Deslice hacia afuera el Presentador.
EN
ES
LASER PRODUCT CAUTION /
PRECAUCIÓN CON LOS PRODUCTOS LÁSER
PRESENTER MODE SWITCH
PRESENTADOR CAMBIO DE MODO
▪ OFF (Turn off Presenter and
laser pointer function)
▪ Keynote (Macintosh)
▪ Powerpoint (Windows
®
/
Macintosh)
EN
ES
▪ OFF (Apaga el
Presentador y la función
de puntero láser)
▪ Keynote (Macintosh)
• Powerpoint (Windows
®
/
Macintosh)
TIMER MODE SETTING KEY
TIMER AJUSTE MODO CLAVE
▪ Turn on LCD
▪ Enter timer setting
▪ Encienda LCD
▪ Introduzca ajuste
del temporizador
ES
EN
▪ Turn on LCD
▪ Start/Pause timer
▪ Encienda LCD
▪ Empezar/Pausa
temporizador
EN
ES
EN
CONFIGURACIÓ N DEL TEMPORIZADOR
1) Pulsa e botón de establecimientodel coronómetro [ ].
(Parpadeará el primer dígito)
2) Introduzca el valor usando las teclas [ ] o [ ] y pulse [ ]
para seleccionar la hora, minuto y segundos, respectivamente.
3) Pulse [ ] para confirmar la configuración. (hasta un máximo de
9 horas, 59 minutos, 59 segundos.)
4) Pulse [ ] para hacer una empezar / pausa en la cuenta atrás.
CONSEJOS
• Presione y sosteniendo [ ] durante 2 segundos para restablecer
el temporizador en 0:00:00 en el modo de ajuste del temporizador. En el
modo de presentación, mantenga presionado [ ] por dos
segundos, el temporizador se reiniciará a la a configuración previa (aun
cuando el tiempo esté avanzando o en pausa)
• La alarma vibrará cuando falten 5, 1 y 0 minutos. Cuando el tiempo
establecido es de más de 30 minutos, la alarma también vibrará a mitad
de tiempo. El cronómetro comenzara a contar entonces.
• Presione y sosteniendo
[ ] para establecer la vibración de encendido /
apagado.
•
Cuando el temporizador de la cuenta atrás alcance 0:00:00, empezará de forma
automática el modo cuenta hacia adelante y parpadearán todos los dígitos.
ES
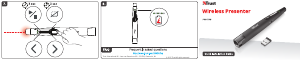
This point aperture can produce CLASS 2
laser energy.
Esta abertura del puntero puede producir
energía láser de CLASE 2.
EN
ES
EN
ES
RADIACIÓN LÁSER
NO MIRAR DIRECTAMENTE AL RAYO
PRODUCTO LÁSER DE CLASE 2
LONGITUD DE ONDA: 532nm
SALIDA MÁXIMA: <1mW
IEC 60825 – 1:2014
WAVELENGTH: 532nm
[PR10-G]
RADIACIÓN LÁSER
NO MIRAR DIRECTAMENTE AL RAYO
PRODUCTO LÁSER DE CLASE 2
LONGITUD DE ONDA: 635nm
SALIDA MÁXIMA: <1mW
IEC 60825 – 1:2014
WAVELENGTH: 635nm
[PR100-R]
IEC 60825-1:2014
IEC 60825-1:2014
EN
ES
Explanatory Label
Etiqueta explicativa
Warning Label
Etiqueta de advertencia
EN
ES
EN
ES
Certification Label
Etiqueta de certificación
EN
ES


Praat mee over dit product
Laat hier weten wat jij vindt van de Canon PR10-G Presenter. Als je een vraag hebt, lees dan eerst zorgvuldig de handleiding door. Een handleiding aanvragen kan via ons contactformulier.