English
ON/OFFCD
SET
R
CYCLE
1
3
5
6
8
7
9
2
4
OFF
22
ROOM
TEMP
c
5
SET
START
TEMP
18
c
0
SET
STOP
TEMP
24
c
0
AUTO
SET
START
TEMP
20
c
0
SET
STOP
TEMP
c
0
16
SET DELEY
Min
4
AUTO
SET
CD
Min
15
SET
Min
45
CYCLE ON
SET
Hr
4
CYCLE
OFF
Ver. 20230914
Plug-in thermostat
Art. no. 36-9325 Model TGE-32A
Please read the entire instruction manual before using the product and
then keep it for future reference. We accept no liability for any errors
in the text or images and we reserve the right to make any necessary
changes to technical data. If you have technical problems or other
queries, please contact our customer service team.
Safety
• This product is intended for indoor use only.
• Never expose the product to high temperatures, powerful vibration,
impacts or damp or wet conditions.
• Make sure that the wall socket is easily accessible in case
the product and any devices connected to it need to be
unplugged quickly from the mains.
• Do not connect several products of this type together.
• Do not cover the product.
• Never attempt to open, repair, dismantle
or repair the product in any way.
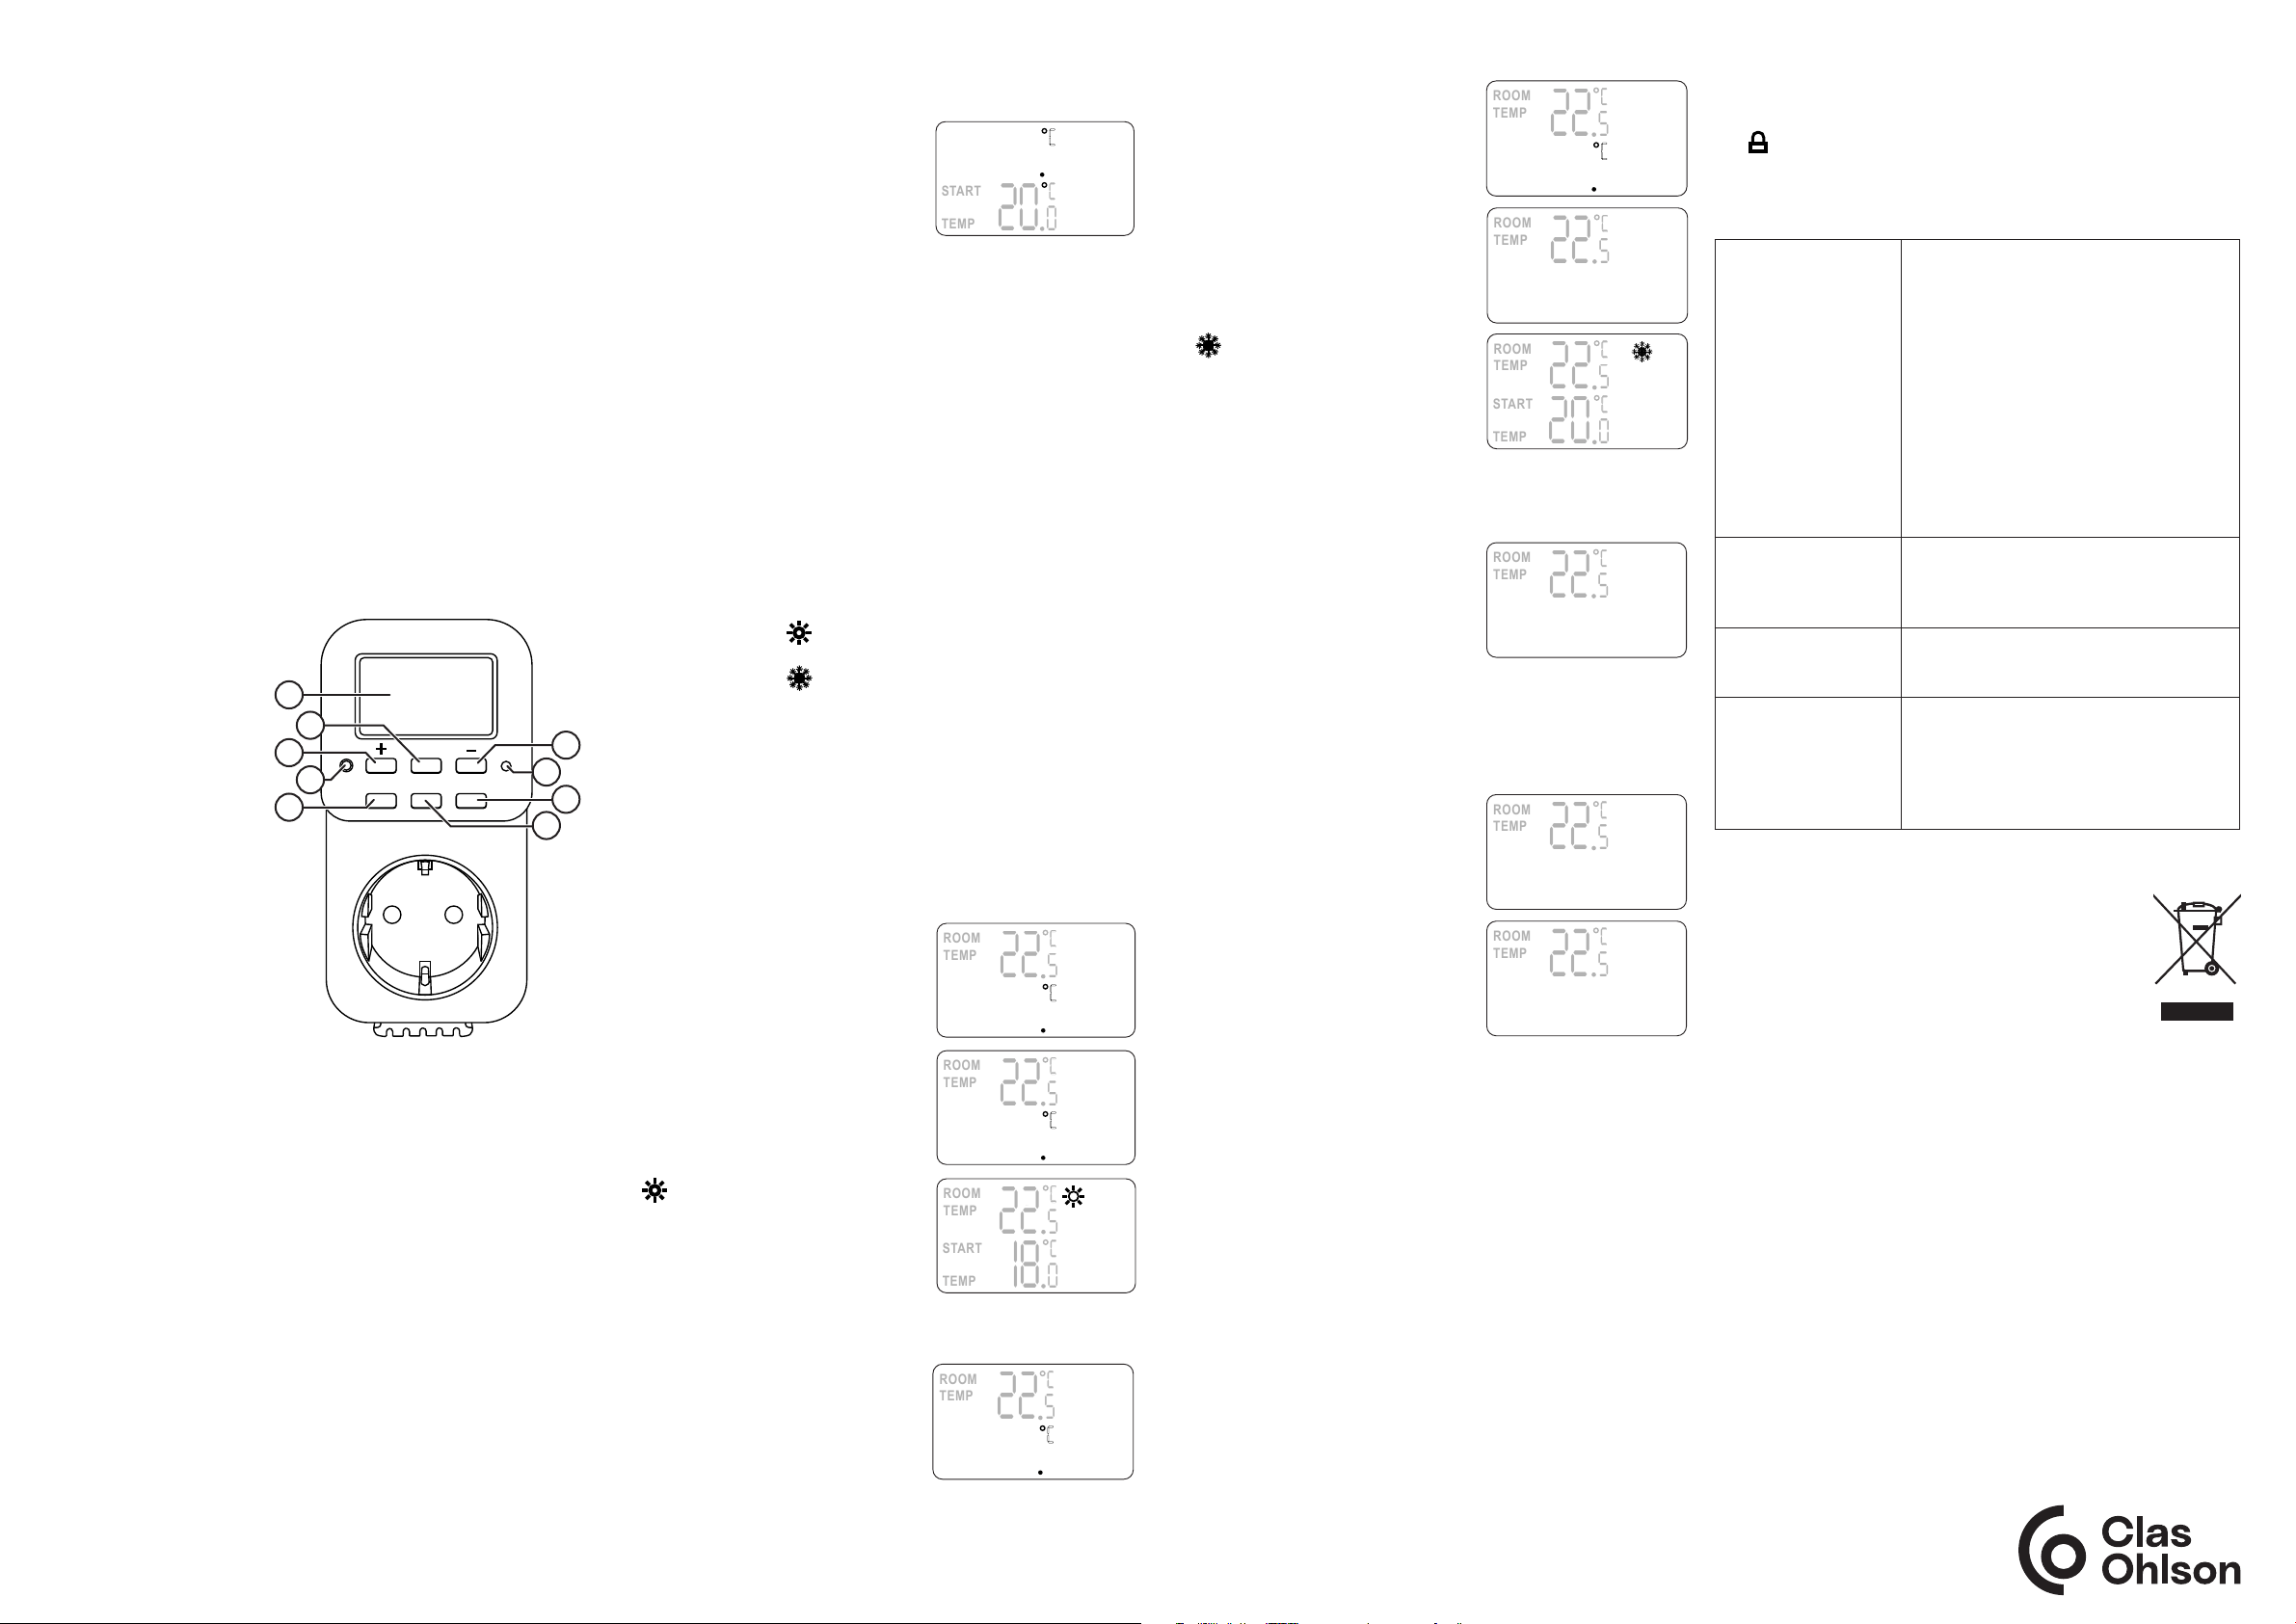
Buttons and functions
Returning to the factory settings (Reset)
2. Set the temperature for the fan to
switch off (Stop temp).
Button lock
1. Hold [ + ] and [ – ] simultaneously to lock the buttons.
“ ” appears on the display.
2. Press and hold both buttons to unlock all the buttons.
Troubleshooting guide
The connected heater/
air conditioner/fan
does not turn on.
• Is there a power supply to the wall
socket?
• Is the thermostat properly connected to
the wall socket?
• Check that the heater/air conditioner/
fan is switched on and functioning
correctly. Try plugging the heater/air
conditioner/fan into another wall socket
without the thermostat to make sure
that it works.
• Check that the mains lead of
the heater/air conditioner/fan is
undamaged and securely connected to
the thermostat.
The display is difficult
to read or blank.
• The built-in battery of the thermostat
needs to be charged. Plug the
thermostat into a wall socket for
2 hours to charge the battery.
The thermostat
operates abnormally in
some other way.
• Charge the battery and reset the
thermostat to its factory default settings
by carefully pressing the reset button (7).
The display shows
E1 or E2.
• The room temperature is outside
the measuring range of the sensor.
(-20°C to +60°C).
• Defective temperature sensor.
Contact the Clas Ohlson customer
service team.
Responsible disposal
This symbol indicates that the product should not be
disposed of with general household waste. This applies
throughout the entire EU. In order to prevent any harm to
the environment or health hazards caused by incorrect
waste disposal, the product must be handed in for
recycling so that the material can be disposed of in a
responsible manner. To recycle the product, take it to your
local recycling facility or contact the retailer. They will ensure that the
product is disposed of in a way that does not harm the environment.
Specifications
Rated voltage 230 V AC, 50 Hz
Temperature control range 0–40°C
Min. temperature adjustment ± 0.5°C
Maximum power supply
to connected devices 3600 W, 16(2) A
Built-in baery backup me >100 hours
1. Display
2. [ SET ] Hold to enter
programming mode.
Press to confirm
the settings.
3. [ + ] Increase value
4. LED indicator. Lights
when the device is in
on mode (ON).
5. [ CD ] Countdown
6. [ – ] Decrease value
7. [ R ] Reset button
8. [ CYCLE ] Recurring on
and off times.
9. [ ON/OFF ] Press
repeatedly to choose
between AUTO
(program), ON (always
on) or OFF (always off).
Using the product
The thermostat can be used either to switch on a heater when the
temperature in the room drops below a preset limit or to switch on an
air conditioner or a fan when the temperature exceeds a preset limit.
Charging the backup battery
Plug the thermostat into a wall socket and leave it for a couple of
hours to charge the built-in battery. When the battery is charged, the
thermostat can be disconnected from the wall socket to make it easier
to change the settings. The battery also ensures that the settings are
saved in the event of a power cut.
Use a pointed object like a pencil,
for example, to press the Reset
button (7) to clear the memory
and return to the factory settings.
The display will then show the
current room temperature
(“ROOM TEMP”) and that the
device is in off mode (“OFF”).
On/Off/Auto
Press [ ON/OFF ] repeatedly to switch between:
1. On: The device is always on.
2. O: The device is always off.
3. Auto: Depending on the program you have selected,
the device is switched on or off on the basis of:
- Preset start and stop temperatures
- The countdown setting (CD)
- Recurring on and off times (CYCLE)
Setting the start and stop temperatures
The thermostat goes into a different mode depending on how
the thresholds are set.
- Heang mode “ “ if the start temperature is set lower than
the stop temperature.
- Cooling mode “ “ if the start temperature is set higher than
the stop temperature.
(Depending on which mode the thermostat finishes in,
the settings may differ.)
• Hold [ SET ] for 2 seconds to go to programming mode.
(“SET” will start to flash).
• Press [ + ] or [ – ] to change the temperature/value.
• Confirm a set value by pressing [ SET ].
Example 1: Programming a heater to come on at 18°C and switch o
when the temperature reaches 24°C.
1. In programming mode, set the
temperature for the heater to
switch on. (Start temp)
2. Set the temperature for the heater to
switch off (Stop temp).
3. “ “ indicates that the thermostat
is in heating mode. “AUTO”
indicates that switching on and off
happens automatically.
Example 2: Programming a cooling fan to come on at 20°C and
switch o when the temperature reaches 16°C.
1. In programming mode, set
the temperature for the fan to
switch on. (Start temp)
3. If necessary, a countdown period
can be set for switching on. Select
between 0 and 10 minutes.
4. “ “ indicates that the thermostat
is in cooling mode. “AUTO”
indicates that switching on and off
happens automatically.
CD (Countdown):
Countdown. Set the period until the wall socket is switched off.
1. In Auto mode, press [ CD ] to go
to settings mode. “SET” will start
to flash.
2. Press [ + ] or [ – ] to set a time
between 1 minute and 24 hours.
Confirm by pressing [ CD ].
“CD” will flash on the display to indicate
that the countdown program is active.
CYCLE
Program for recurring on and off times.
1. In Auto mode, press [ CYCLE ] to go
to settings mode. “SET CYCLE ON”
will start to flash.
2. Press [ + ] or [ – ] and set how long
the device should be on (between
1 minute and 24 hours). Confirm by
pressing [ CD ]. “SET CYCLE OFF”
will start to flash.
3. Set how long the device should
be off (between 1 minute and 24
hours). Confirm by pressing [ CD ].
“CYCLE ON/OFF” will flash on the display to indicate that
the program is active.
Changing the temperature unit
Hold [ – ] for 3 seconds to switch between Celsius (°C) and Fahrenheit (°F).
Calibrating the temperature sensor
By comparing the temperature measured by the thermostat with a
thermometer you know is accurate, you can compensate for incorrect
readings by calibrating the sensor.
1. Hold [ + ] for 3 seconds until “CAL SET” appears on the display.
2. Press [ + ] or [ – ] to compensate for the error. Adjust the temperature
between -10.0 and +10.0°C. Press [ SET ] to confirm.


Praat mee over dit product
Laat hier weten wat jij vindt van de Clas Ohlson TGE-32A Thermostaat. Als je een vraag hebt, lees dan eerst zorgvuldig de handleiding door. Een handleiding aanvragen kan via ons contactformulier.