
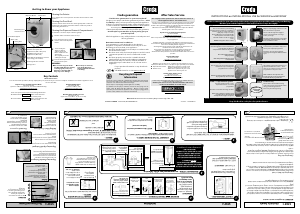
INSTRUCTIONS on INSTALLATION & USE for W200FW and W220VW
Creda recommends, for your own safety and to ensure you get the best possible results from your Washing
Machine, you read through this booklet and follow these steps thoroughly.
Choose a location for your washing
machine where possible on a solid floor,
with the electrical sockets and water
supply taps easily accessible.
Allow sufficient space: 600mm width,
600m depth and 900mm height.
DO NOT install in a bath or shower
room.
Dispose of packaging material in a safe
place and remove any labels.
Please read through thoroughly to
ensure you understand each stage
before you begin.
Read the rest of these instructions to get the best from your appliance, remember to fill in your guarantee registration.
Keep this Book in a safe place for quick reference.
STEP 1 STEP 2
A wash chart is provided to help you to
select your required programme.
Examples given for the maximum
washing load weight for different fabric
types.
STEP 4
WARNING: This appliance must be earthed.
Remember you will be charged for a service call if a
problem with your washing machine is caused by
incorrect installation or misuse.
Electrical Guide Installation Guide
Programme Selector Dial
Read through this section to familiarise
yourself with the different
compartments within the dispenser
drawer.
STEP 3
Dispenser Drawer
NOTE: Always follow manufacturer’s dosage
recommendations.
All available optional wash features are
explained within this section - These
allow you to adjust your selected wash
programme to suit your needs.
STEP 6
Options Guide
How to start your selected programme
and how to stop or change the
programme if so required.
STEP 5
Using your Machine
NOTE: Progress indicator lights show what stage in
the programme cycle has been reached.
We recommend the Persil range of
detergent products.
STEP 8
Troubleshooting
A picture guide provides a clear
explanation how to set a wash
programme.
DO NOT overload the washing machine.
STEP 7
A Typical Wash Programme
NOTE: Creda recommend, on completion of your
programme, that you switch off both the
electricity and water supply to the appliance.
Please refer to the Troubleshooting
section if you have any problems when
using your washing machine.
There may be nothing wrong!
NOTE: In addition to the temperature of the
incoming water, the selection of optional wash
features will affect the programme times.
READ BEFORE
CONTACTING
SERVICE!
Merloni Elettrodomestici UK Ltd, Morley Way, Peterborough, PE2 9JB.
PRINTED BY SIMLEX
.
FOUR ASHES,WOLVERHAMPTON. 09/2004 - 195046949.00
Creda guarantee
After Sales Service
“Satisfaction guaranteed or your money back”
We give you a unique ‘satisfaction guaranteed’ promise - valid
for 90 days - after you have purchased your Creda appliance.
If there is a technical problem simply call Creda Repair service
or visit our web-site at www.theservicecentre.co.uk and where
necessary, we will arrange for an engineer to call.
If the technical problem is not resolved under this guarantee,
we will replace your machine or, if you prefer, give you
your money back.
All Creda appliances carry a fully inclusive 12 month parts and
labour guarantee.
Guarantee terms and conditions
Your guarantee is only applicable in the United
Kingdom or Republic of Ireland and is subject to the
following provisions that your appliance:
● Has been installed and used correctly in accordance with
this instruction booklet.
● Has been used solely for domestic purposes and is located
on domestic premises (ie. not for commercial or trade
use).
● Has been properly connected to a suitable electrical
supply voltage as stated on the appliance rating plate.
● Has not been subject to misuse, accident, modified or
repaired by anyone other than one of our own service
engineers.
For pre purchase information on any other Creda
product,
call: 08701 54 64 74 or visit: www
.creda.co.uk
Recycling & Disposal
Information
As part of Creda’s continued commitment to helping the environment,
we reserve the right to use quality recycled components to keep down
customer costs and minimise material wastage.
Please dispose of packaging and old appliances carefully.
To minimise risk of injury to children, remove the door, plug and cut
mains cable off flush with the appliance. Dispose of these parts
separately to ensure that the appliance can no longer be plugged into
a mains socket, and the door cannot be locked shut.
“No company is better positioned to offer an after sales service on
a Creda appliance than us - the manufacturer”.
As part of our commitment to you, all Creda appliances have the added
benefit of a fully inclusive parts and labour guarantee for the first 12
months. All in-guarantee repairs are guaranteed for the remainder of your
original guarantee period.
When the 12 months parts and labour guarantee expires we offer the
following after sales service options:
Repair Service and Information Help Desk
UK: 08709 066066
www
.theservicecentre.co.uk
Republic of Ireland: 1850 302 200
Note: Our operators will require the Model number and the Serial number
of your appliance.
Available 364 days a year with a fast, effective and value for money
service.We have the largest white goods repair service in the UK with over
1200 of our own fully trained engineers.
All chargeable repairs include a parts and labour guarantee for 12
months from the date of the repair.
If you require any information or have any questions about your
appliance, our operators are on hand with help and advice.
All this ensures that you will receive the best available after sales service
possible.
Extended Warranties
UK: 08709 088 088
www.theservicecentre.co.uk
Republic of Ireland: 1850 502 200
Whether you have just one or a number of Creda appliances in your
kitchen, we offer two service cover plans to give you total peace of mind.
● Repair Protection Plan - FREE service repairs for a single Creda
appliance during the period of cover.
● Kitchen Cover - FREE service repairs for all your Creda
appliances less than 8 years old.
Genuine Parts and Accessories
UK: 08709 077 077
www
.theservicecentre.co.uk
Republic of Ireland: (01) 842 6836
A wide range of genuine parts and accessories are available from our
hotline or through our web site.
Genuine parts and accessories, extended warranties and service
repairs are all available on our web-site at:
www.theser
vicecentre.co.uk
Getting to Know your Appliance
Plumbing Indicator Line label
Hot Water inlet point and
supplied Hose (Red or Grey end)
Cold Water inlet point and
supplied Hose (Blue end)
Transit Bolts (both MUST be removed
before using your machine).
Control Panel
Interlocking door
and release lever
Rating Plate
Mains Cable
Drainage Hose
Hooked End Support
Dispenser Drawer
Model W220VW shows the maximum features available
Adjustable Feet
Wheels
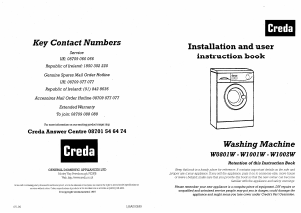
Key Contacts
After Sales Service
Over 1200 trained specialists, directly employed by us, ensure that you can have complete confidence in both the appliances and
services we offer.
Extended Warranties
UK: 08709 088 088
(Open 8 to 8 Mon - Sun)
www.theservicecentre.co.uk
Republic of Ireland: 1850 502 200
Genuine Parts and Accessories
UK: 08709 077 077
(Open 8-30 to 5-30 Mon - Fri & 9 to 12 Sat)
www
.theservicecentre.co.uk
Republic of Ireland: (01) 842 6836
Cleaning the Exterior:
Use a damp cloth or silicon polish to clean the exterior surfaces of the
appliance.
Cleaning the Door Bowl:
Clean the internal surface of the door bowl regularly with a soft cloth.
A build up of soap powder and water hardness residue may result in
water leaking from the door.
Repair Service and Information Desk
UK: 08709 066 066
(Open 8 to 8 Mon - Fri, 8 to 6 Sat, 10 to 4 Sun & Bank Holidays)
www.theservicecentre.co.uk
Republic of Ireland: 1850 302 200
Note: Our operators will require the following information:
The Model number (which can be found on
the control panel)
The Serial number (which can be found on the
inner door trim)
Cleaning the Dispenser Drawer & Compartments:
It is advisable to clean the dispenser drawer regularly:
1
Pull the drawer out until it reaches its stop.
2
Press the drawer release latch
down to remove the dispenser
drawer.
4
Relocate the dispenser drawer and push it
firmly back into place.
3
A
B
Clean and dry the
dispenser drawer,
syphons, grate and
fabric conditioner exit
channel (A).
Also,regularly clean the
outlet pipe area (B).
● Do not try to clean any
part of the dispenser
drawer while the machine
is working.
WARNINGS:
● Do not clean any part of the
machine with abrasive cleaners,
scouring agents, acids, any
bleaches or metal polish, as
they may cause damage.
3
CONNECT TO THE WATER
SUPPLY...
The Dispenser Drawer
STEP 3
Electricity Supply Installation
WARNING:
The appliance must be earthed.
CE marking certifies that this appliance conforms to the following
EEC directives:
Low Voltage Equipment - 72/23/EEC & 93/68/EEC
Electromagnetic Compatibility - 89/336/EEC, 92/31/EEC & 93/68/EEC
Fuses
Your appliance comes fitted with a plug and a 13 amp (13A) fuse.If
you need to replace the fuse, use only those rated at 13 amp (13A)
and ASTA approved to BS1362.To change the fuse lift the holder to
vertical position and lift the fuse out. To replace the fuse, insert the
fuse and push fuse holder down into the locked position. Correct
replacement is identified by colour coding or the marking on base of
plug.
WARNING: Do not use the plug unless the fuse holder is in the locked
position and the top cover firmly replaced.
Changing the Mains Lead
If you have damaged the existing lead and need a new one, contact
Creda Service UK on: 08709 066 066 or www.theservicecentre.co.uk
(or in the Republic of Ireland on: 1850 302 200). A charge will be
made.We strongly advised that fitting a new lead is carried out by a
qualified electrician.
Seek professional advice if you need to use an extension lead.
Changing the Plug
If you need to change your plug, if it does not fit your socket: isolate
the machine from the mains supply. Cut off the supplied plug and
safely dispose of the discarded plug. DO NOT plug into any other
socket.
NOTE: If you change the plug, the colour of wires in the mains lead
may not match the colour of the markings which show the different
terminals in the plug.You must wire it as shown below:
Green and yellow (Earth)
wire to terminal marked ‘E’,
symbol , or coloured
green and yellow.
Blue (Neutral) wire to
terminal marked ‘N’ or
coloured black.
13A ASTA approved fuse to
BS1362.
Brown (Live) wire to terminal
marked ‘L’ or coloured red.
Adding Fabric Conditioner
Dispensing Powder Detergent
Dispensing Liquid Detergent
ii
i
Index:
1. Drawer release latch
2. Pre-wash detergent compartment
Maximum 200ml powder or
100ml liquid
3. Main detergent compartment
Maximum 400ml powder or
200ml liquid
4. Grate
5. Fabric conditioner compartment
120ml maximum
1
2
3
4
5
To achieve the best wash results the
manufacturer’s recommended amount
of detergent should be measured and
added to the main detergent
compartment (II symbol) (max. 400ml).
Alternatively you can obtain a liquid
detergent flap, a barrier for the dispenser
drawer.
Contact Genuine Parts and Accessories
(see Key Contacts)
Pour the recommended
amount of fabric
conditioner into the
compartment
(flower symbol).
Do not exceed the
maximum fill line.
Pre-wash Programme A
When selecting programme A,
add detergent to both the
pre-wash compartment (I symbol)
and the main wash compartment
(II symbol).
DO NOT use in drum dosing
devices with the Pre-wash
programme, A.
4
DRAINAGE SYSTEM... we recommend one of the following:
1
POLYSTYRENE BLOCK...
5
LEVEL?...
NOTE: ALTHOUGH YOU MAY NEED TO
MOVE THE HOOKED END SUPPORT
ALONG THE GREY DRAINAGE HOSE,
DO NO
T REMOVE IT.
WHICHEVER DRAINAGE METHOD
YOU USE, MAKE SURE THAT THE
HOOKED END SUPPORT IS FIXED
LEVEL TO, OR ABOVE THE ‘PLUMBING
INDICATOR LINE’*
(*see Getting to Know your Appliance)
This is part of the packaging and
should have come away with the
polystyrene base.
IF IT HAS NOT... REMOVE IT!
NOTE: YOU MAY NEED A SECOND
PERSON TO HELP YOU RAISE AND
LOWER THE APPLIANCE.
PLEASE USE THE NEW HOSES SUPPLIED, FITTED
TO THE MACHINE.
If you have no hot water supply...
Old hoses may
cause leaks due to
worn out washers.
YOUR MACHINE WILL BE NOISY IF THE TWO FRONT FEET ARE NOT
ADJUSTED SO THE MACHINE STANDS FIRM AND LEVEL.
Check both hot
and cold water
supplies are
running freely...
A cold fill adaptor is available from
your local authorised Service
Centre or by calling the Genuine
Parts & Accessories Hotline (see
Key Contacts).
Connect fill hoses to
water supply taps:
Red or Grey Hose end
to Hot and Blue Hose
end to Cold.
TURN BOTH TAPS ON...
Turn one or both front feet
clockwise until the machine
stands firm and level.
The spring on each foot will
stop them coming loose.
2
REMOVE TWO TRANSIT FIXINGS... Follow these instructions to remove the TWO transit fixings.
IMPORTANT:
Situated, one either
side of the rear panel,
both transit bolts
(complete with
spacers) MUST be
removed before use...
Failure to do so may
cause damage to
your machine!
DO NOT REMOVE!
STANDPIPE METHOD
UNDER SINK METHOD
OR
Attach the GREY
drainage hose to the
under sink drainage
unit securely, using a
hose clip.
Fix the hooked
end support at
a minimum
800mm from
the floor.
cut off the blocked
end of the under sink
drainage unit.
7
READY...
TO CHECK ALL PARTS OF THE INSTALLATION AND TO THOROUGHLY
CLEAN THE INSIDE OF YOUR MACHINE:
RUN PROGRAMME ‘B’ (refer to ‘Programme Selector Dial’, STEP 4).
6
CONNECT TO THE POWER SUPPLY...
PLUG YOUR MACHINE INTO AN ELECTRICAL SOCKET WHICH IS
EASILY ACCESSIBLE. SWITCH ON
NOTE: We recommend extension
leads are not used.
Move your machine into position,
take care not to trap or kink the
hoses.
WITHOUT ANY LAUNDRY
WITHOUT ANY DETERGENT
and
THIS WILL TAKE APPROXIMATELY 2hours TO COMPLETE
.............................
Standpipe height:
minimum 500mm
from the floor.
Insert drainage hose
approximately 100mm
into the standpipe.
✗
✗
It is important the transit
bolt and spacer come out
intact (see pic).
For safety, replace both
plastic covers over the
holes left by removing
the two bolts.
Use a crosshead
screwdriver to
remove the
plastic cover.
Unscrew the
bolt using a
13mm spanner.
ST
OP when 3
threads can be
seen.
Hold, slide
across and pull
to remove.
800mm
from floor
Hooked End Support
STEP 1 STEP 2
WARNING:
● Do not put any items into
the drawer, other than
detergents designed to be
released from the drawer, as
they may cause damage or
blockage.
We recommend the use of a detergent dosing ball,as provided by your detergent
manufacturer.


Praat mee over dit product
Laat hier weten wat jij vindt van de Creda W220VW Wasmachine. Als je een vraag hebt, lees dan eerst zorgvuldig de handleiding door. Een handleiding aanvragen kan via ons contactformulier.
beantwoord | Ik vind dit nuttig (0) (Vertaald door Google)